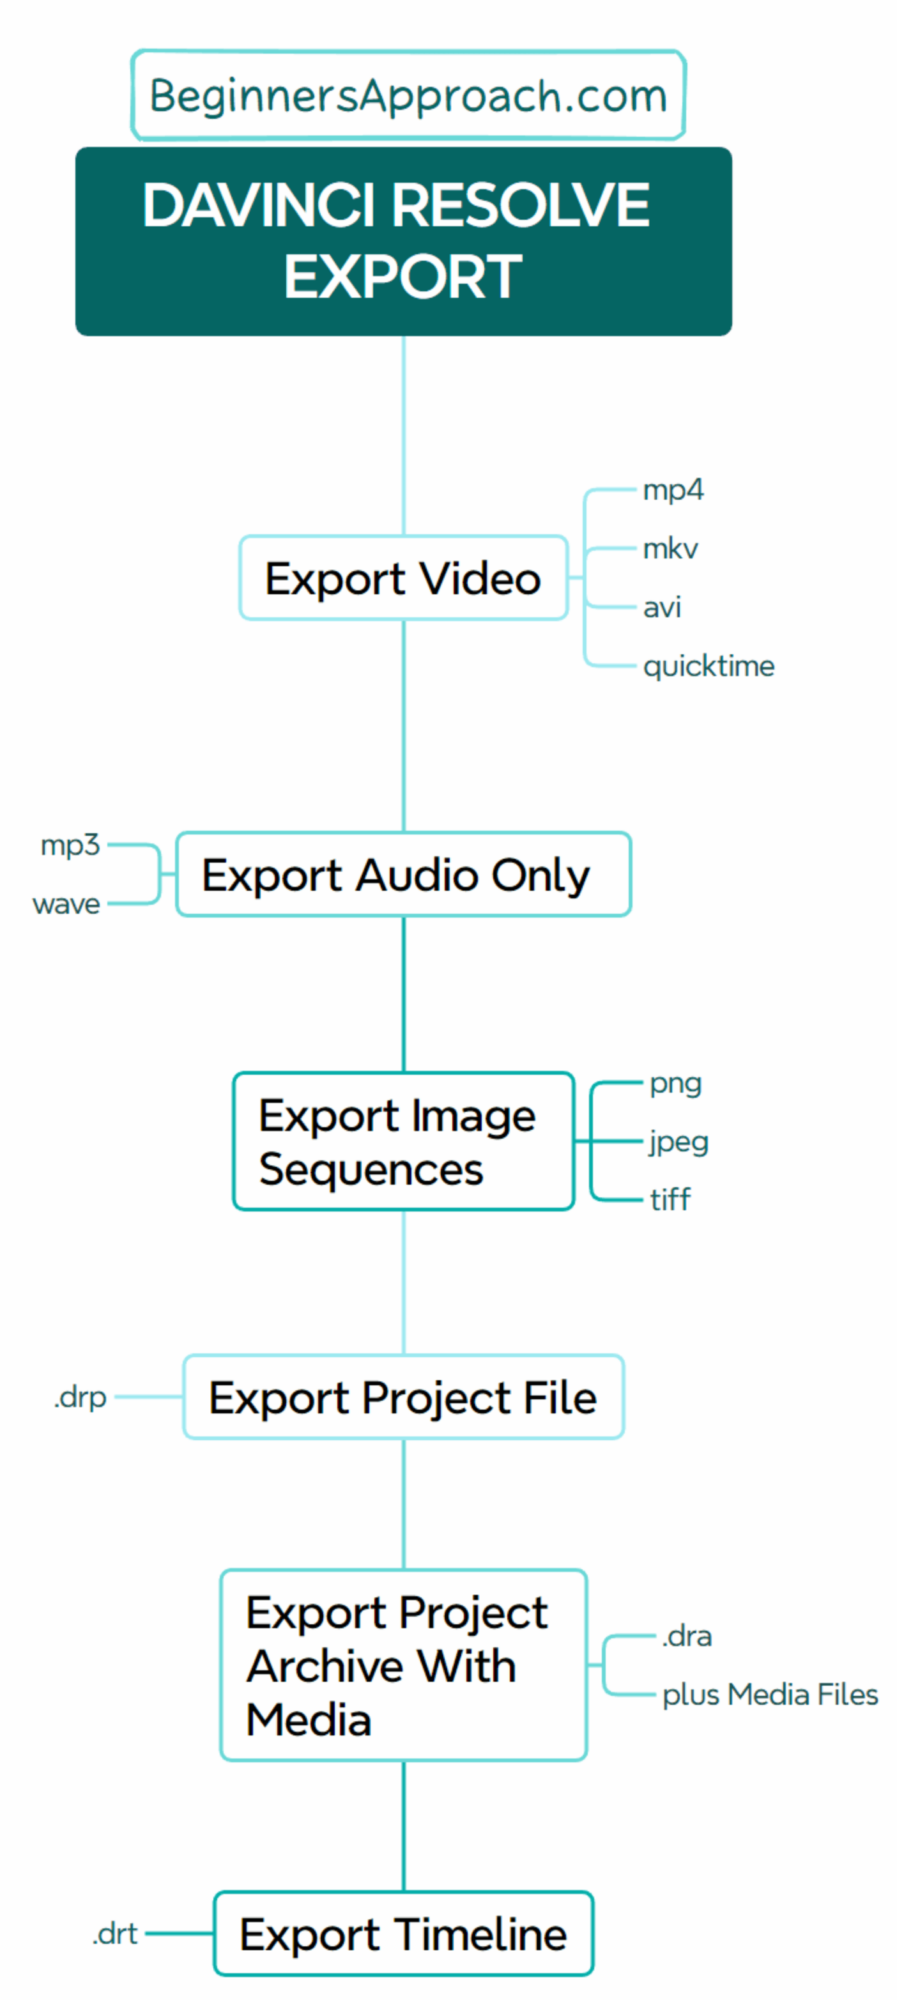
DaVinci Resolve export is the process of delivering your finished project in the form of these formats – video (mp4, mkv), audio only (mp3), image sequences (png, jpg), project file (.drp), project archive (.dra) and timeline (.drt) – based on your requirements.
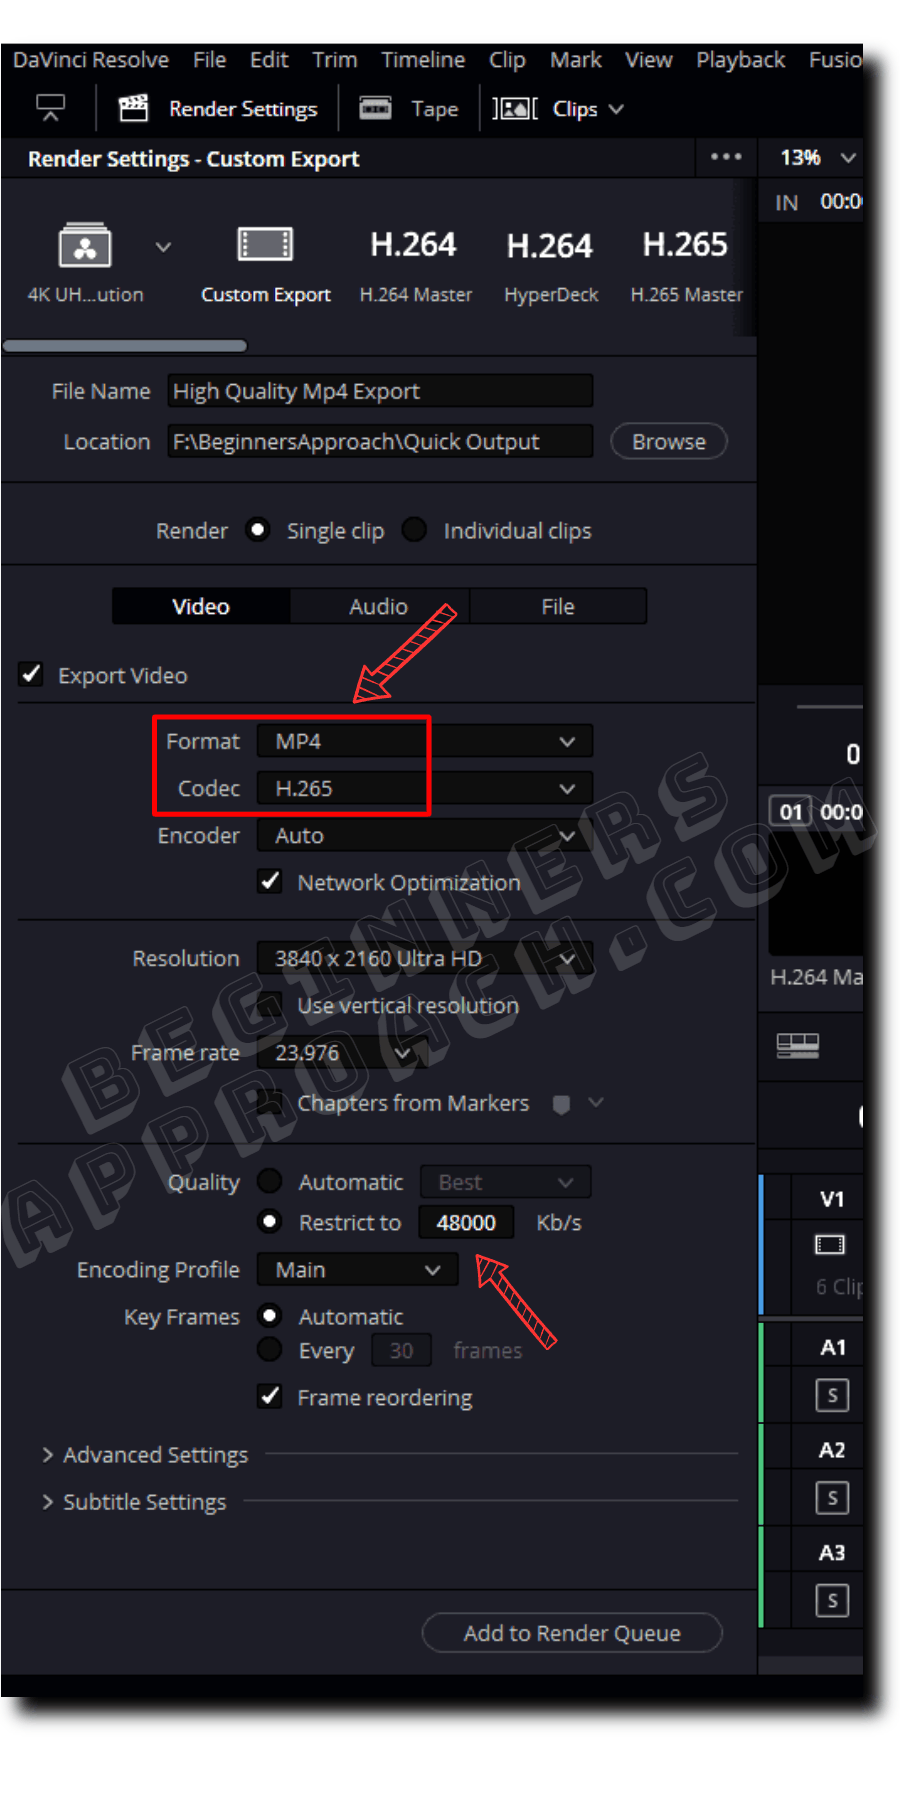
To export a video in DaVinci Resolve, go to the “Deliver” page > “Video” tab. Select your format (mp4 or mkv). Select “H.265” from the “Codec” dropdown. Choose your required “Resolution” (“3840 x 2160 UHD”). Choose your “Frame Rate” (“23.976”). Set “Quality” to > “Restrict to” > 48000 Kb/s. Hit render.
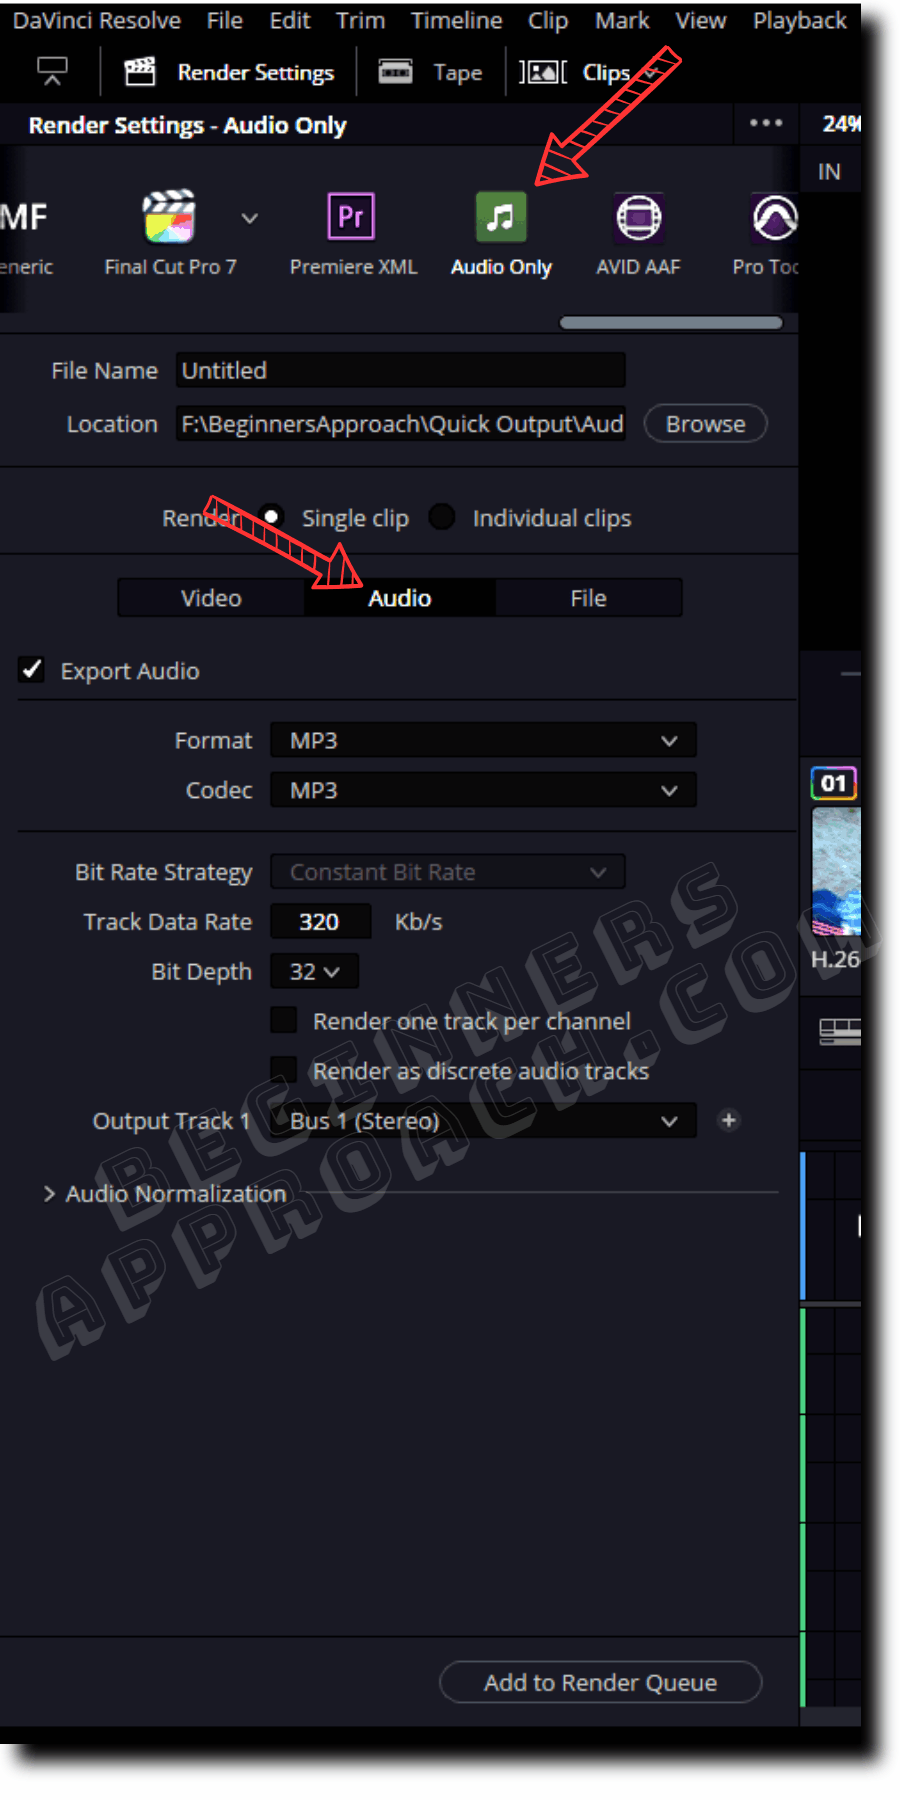
To export audio only in DaVinci Resolve, go to the “Deliver” page. Click on the “Audio Only” option under the “Render Settings”. Choose “mp3” from the “Format” dropdown. Set the codec to “Mp3”. Set the “Bit Depth” to “32” for high-quality output. Hit render.
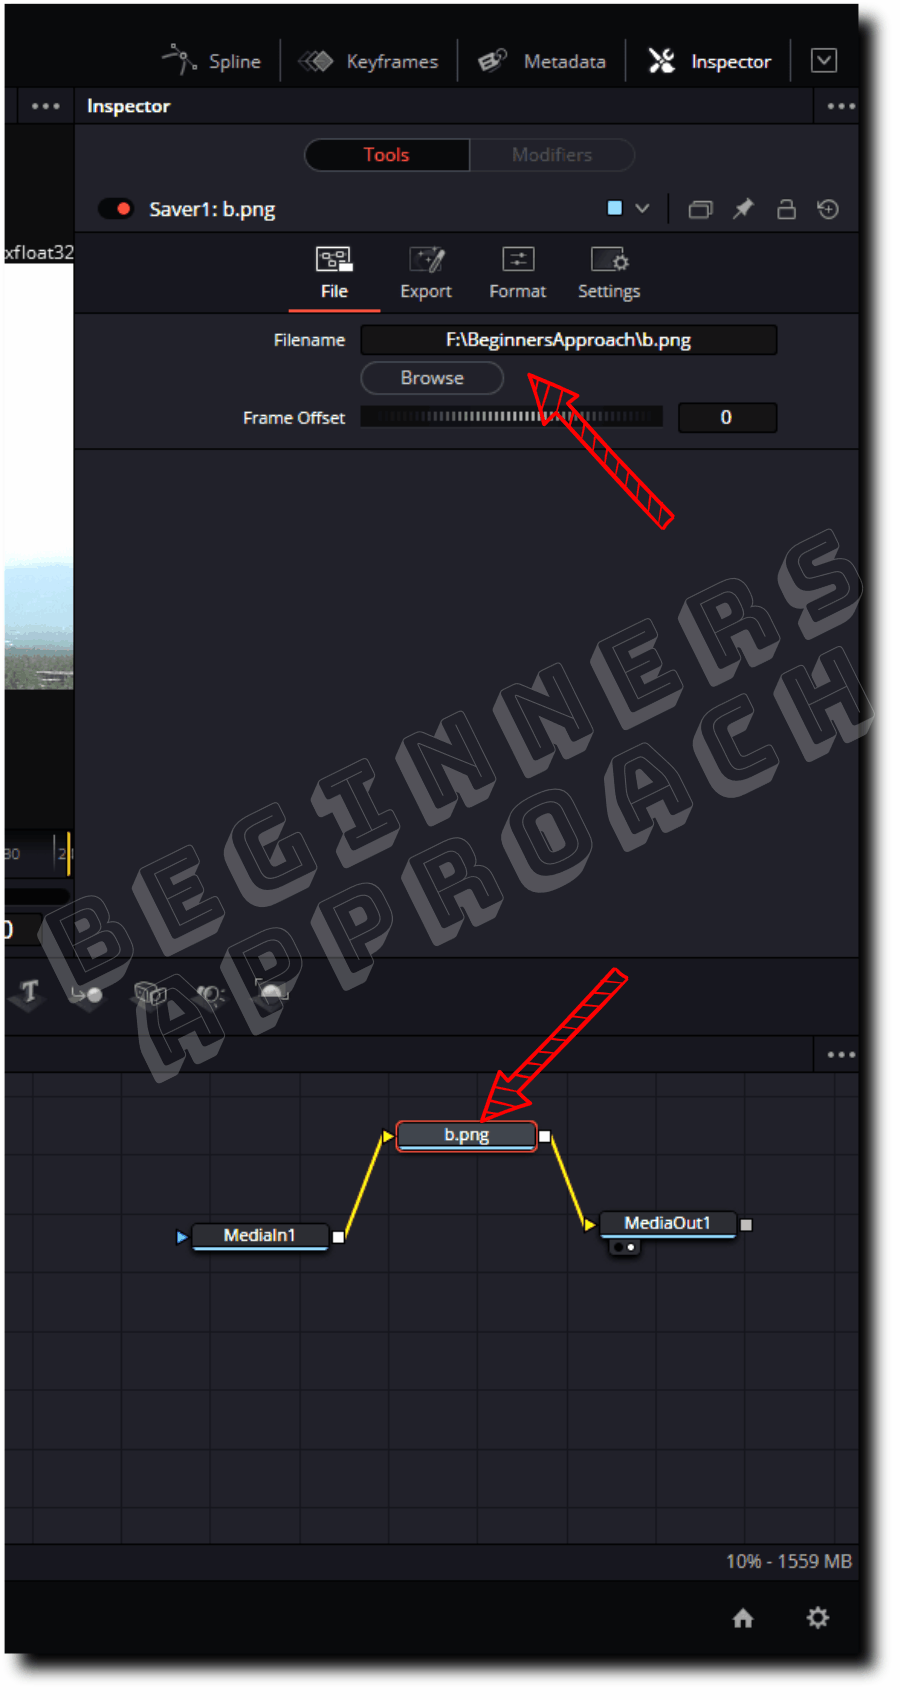
To export the image sequence in DaVinci Resolve, go to the “Fusion” page. Right-click the “MediaIn1” node, and select “I/O” > “Saver”. Click on the “Inspector” > “File” tab > “Browse”. Enter a file name with a “png” extension. “Save as type” = “All Files”. Click on “Save”. The PNG image sequence is exported.
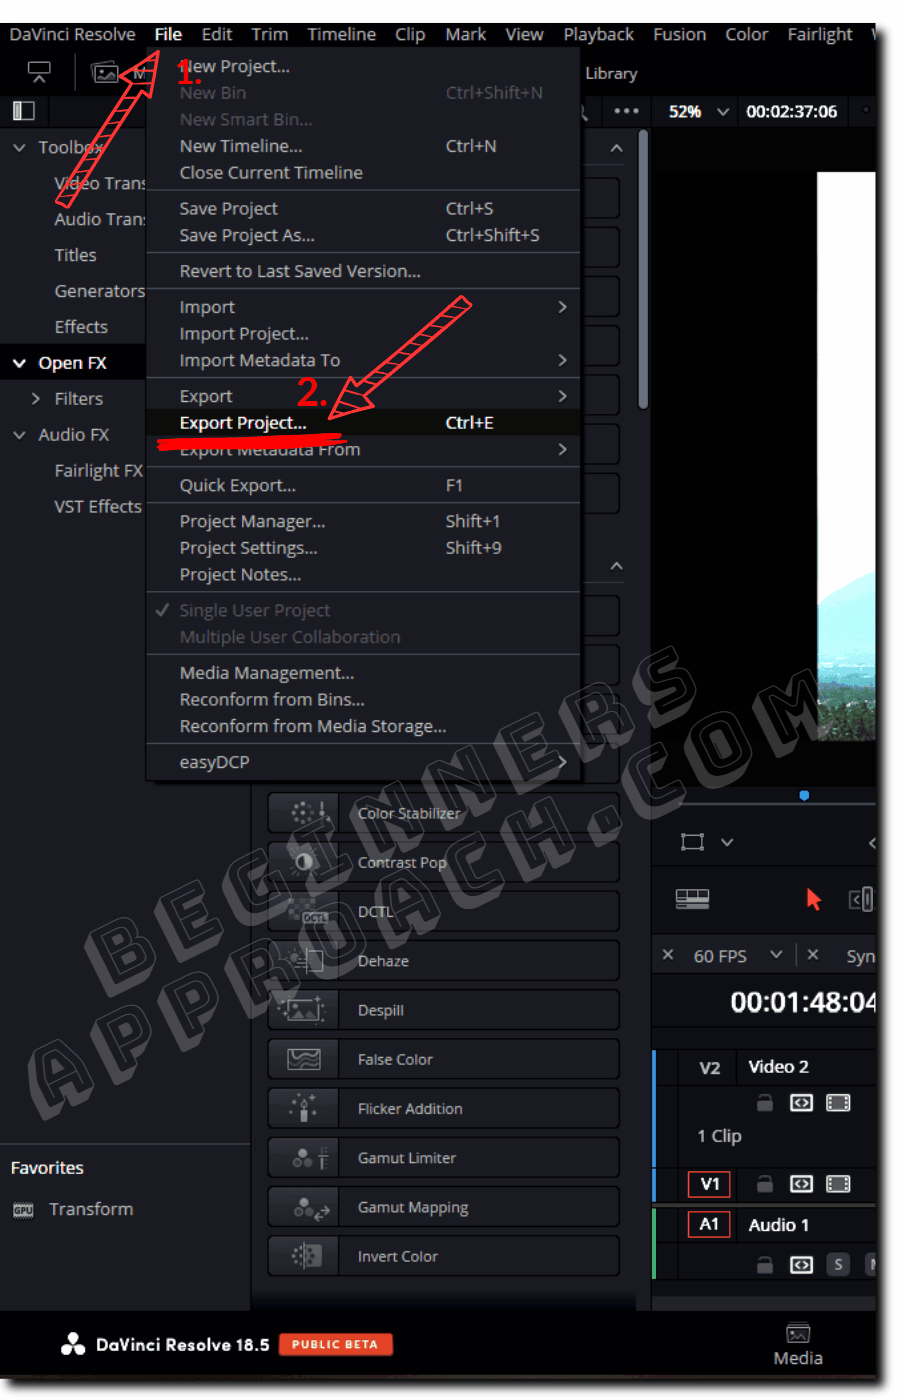
To export a project in DaVinci Resolve, go to “File” > “Export Project”. Choose your desired location. Click on “Save”. The project file is exported as a “.drp” file.
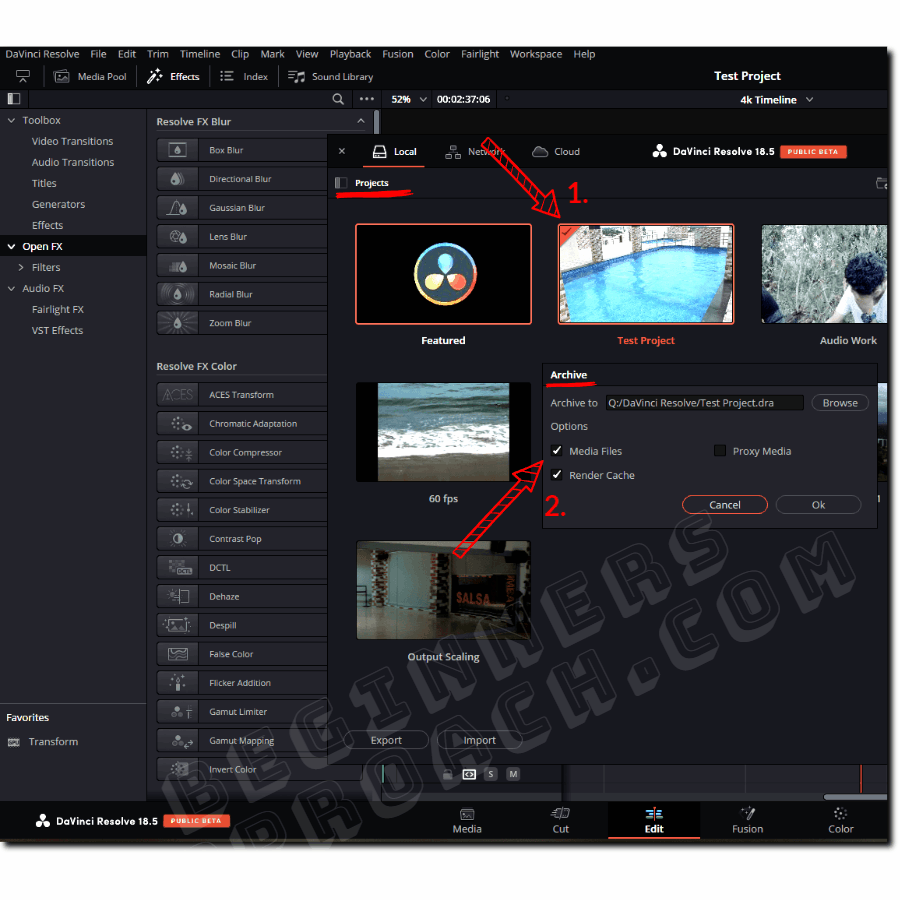
To export a project archive with media files in DaVinci Resolve, go to “File” > “Project Manager”. Right-click on your project. Select “Export Project Archive”. Choose your location. Enable “Media Files”, “Render Cache”, and “Proxy Media” checkboxes. Hit save. The entire project is exported as “.dra” extension.
To export a timeline in DaVinci Resolve, go to “File” > “Export” > Select “Timeline”. Choose your folder location. Hit “Save”. The timeline is exported as a “.drt” file.
Apart from the above way of export, there is also an option called “Quick Export“. Go to “File” > “Quick Export”. Choose your required preset (“H.265 Master”). Hit export.
Today’s quick step-by-step guide will help you export videos and projects in DaVinci Resolve quickly (very useful for beginners and newcomers to DaVinci Resolve versions 18.6, 18.5, 18, 17, etc.)
How to Export Video in DaVinci Resolve?
- Click on the “Deliver” page (rocket icon located at the bottom).
- Click on the “Custom Export” under “Render Settings”.
- Under the “Video” tab, make sure “Export Video” is checked.
- Select your format, say, “MP4” from the “Format” dropdown.
- Select “H.265” from the “Codec” dropdown (H.264 is also fine. For more info, scroll down.)
- Choose your required “Resolution“, say, “3840 x 2160 UHD”. (This is the maximum resolution in the DaVinci Resolve free version.)
- Choose your “Frame Rate“, say, “23.976”.
- Set “Quality” to > “Restrict to” > 48000 Kb/s (2000 times the frame rate for a 4K UHD H.265 export.)
- Let the “Encoding Profile” be “Main”.
- Click on “Add to render queue”.
- Click on “Render All” to start the exporting process (found on the right-hand side under “Render Queue”) – as shown in the image below.
According to DaVinci Resolve’s company The Blackmagicdesign on Export feature – “The deliver page gives you total control over all encoding options and formats, along with a render queue for exporting multiple jobs!“.
If you have an option for selecting “Constant Bit Rate”, select it. Otherwise, you might not get the expected bit rate.
For the Studio (paid) users, you can speed up your render (or export) time with the help of the “Encoder” option set to “Nvidia” or “AMD” based on your GPU. Unfortunately, the free version doesn’t have hardware acceleration for encoding.
I highly recommend the below detailed guide on the best export settings for your video in DaVinci Resolve for Mp4:
How to Export Audio Only In DaVinci Resolve?
- Go to the “Deliver” page.
- Click on the “Audio Only” option under the “Render Settings” by scrolling to the right.
- Enter your desired “File Name” and “Location”.
- Click on the “Audio” tab and make sure the “Export Audio” checkbox is checked.
- Choose “Mp3” under the “Format” dropdown.
- Let the codec be “Mp3“.
- Let the “Bit Depth” be “32”.
- Let the “Output Track 1” be the default “Bus 1 (Stereo)” for single audio file export.
- Click on the “Add to Render Queue” button at the bottom.
- Then click on the “Render All” button on the right-hand side under the “Render Queue” section.
- The render starts, and the audio-only wave file is exported successfully – as shown in the image below.
Click here for a more detailed guide on DaVinci Resolve Export Audio Only (Get THIS Setting Right!) – which also contains issues and proven fixes.
How to Export Image Sequences In DaVinci Resolve?
- Select your video clip on the “Edit” page.
- Go to the “Fusion” page.
- Right-click the “MediaIn1” node under the “Nodes” work area.
- Click on “I/O” > then select “Saver”. See the two images below for exporting image sequences.

- Click on the “Saver1” node and then click on the “Inspector” tab from the upper right corner.
- Under the “File” tab, click on the “Browse” button.
- Enter any file name with a “png” extension, say, “a.png”.
- “Save as type” = “All Files”.
- Click on “Save“.
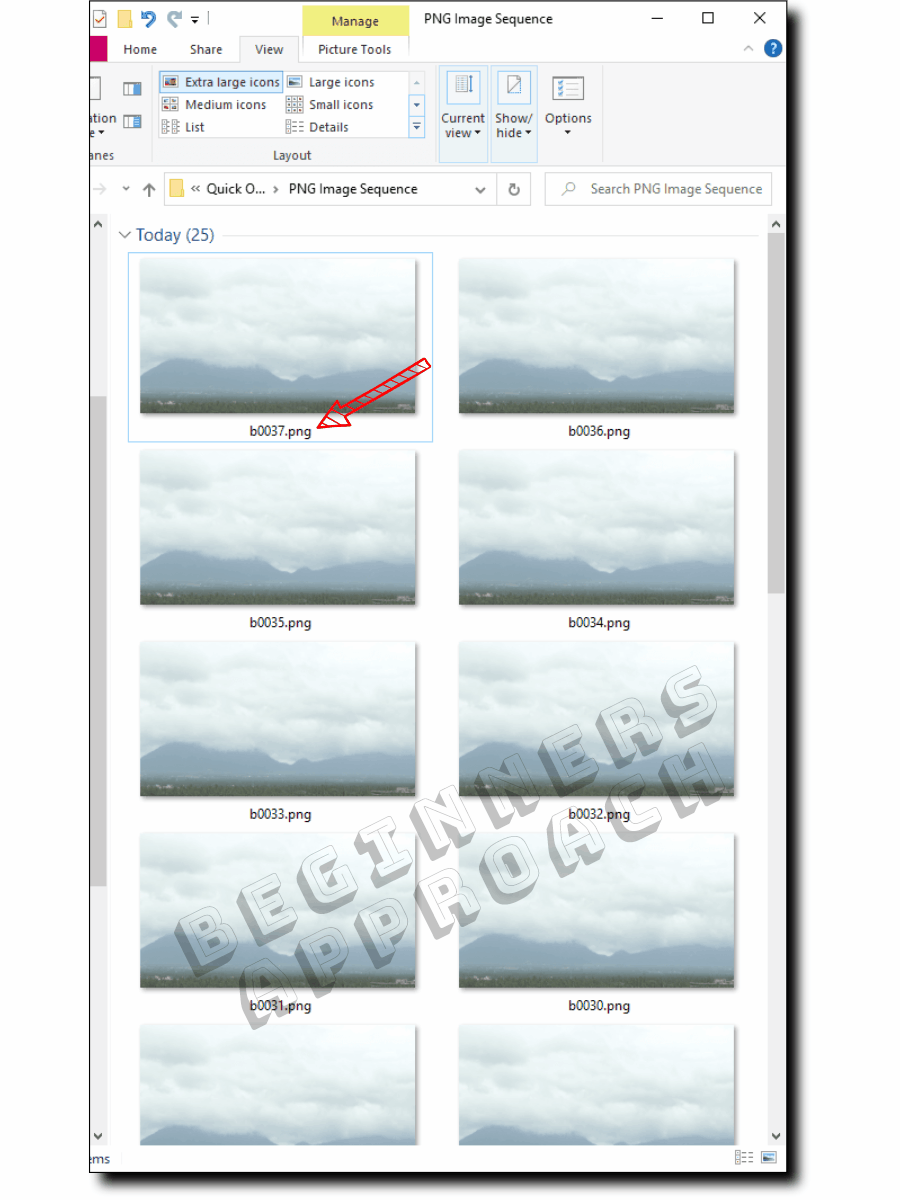
- Now, go to the menu, click on “Fusion” > then click on the “Render All Savers“.
- Resolve converts the video clip into a series of .png image sequences.
Click here for a more detailed guide (including issues and proven fixes) on DaVinci Resolve Export Image Sequence (PNG, Jpg, Tiff!)
How to Export a DaVinci Resolve Project?
- Go to “File” > “Export Project” (the shortcut for export project is “Ctrl + E” or “Cmd + E”).
- Choose your desired location.
- Click on “Save“.
- It saves the project file as a “.drp” extension – which means “DaVinci Resolve Project” file.
- If you’re in the “Project Manager” window, then right-click on your desired project.
- Then click on “Export“. (And follow the same steps as above). The below image shows the exporting of the project file in Resolve.
The “.drp” file doesn’t include your source media files. The size of a .drp file is comparatively less compared to your huge media files, say around a few MB for a large project and less than 1 MB for a small project.
If you are sure you just need to share the drp file with a colorist, and he/she has media files, then it’s a matter of importing the project file (.drp) and relinking the media clips in the timeline.
If you know you need to export only one project along with all the media files, then you should use the “Export Project Archive” option.
Export DaVinci Resolve Project Archive With Media Files
- Go to the “Project Manager” (click on the house icon from the bottom right-hand corner).
- Right-click on your project.
- Select “Export Project Archive“.
- Choose your location.
- Click on “Save”.
- In the next window, enable “Media Files”, “Render Cache”, “Proxy Media”, etc.
- Click on “Ok”.
- A folder with the extension “.dra” is saved. The below image shows the exporting of archive files with media.
Click here for a more detailed guide with issues and fixes on exporting project archive with media.
There will be situations when you might need to export a single timeline and take it to other computers. If you want a particular timeline and its related assets that you want to be copied, then:
How to Export DaVinci Resolve Timeline?
- Go to “File” > “Export” > Select “Timeline“.
- (Make sure you are already in the desired timeline before exporting).
- Choose your folder location.
- Click on “Save”.
- It saves the file with the “.drt” (DaVinci Resolve Timeline) extension.
If you want to export multiple timelines, then:
Export Multiple Timelines in DaVinci Resolve
- Go to “File” > “Media Management“.
- Click on the “Timeline” tab.
- Select your desired timelines.
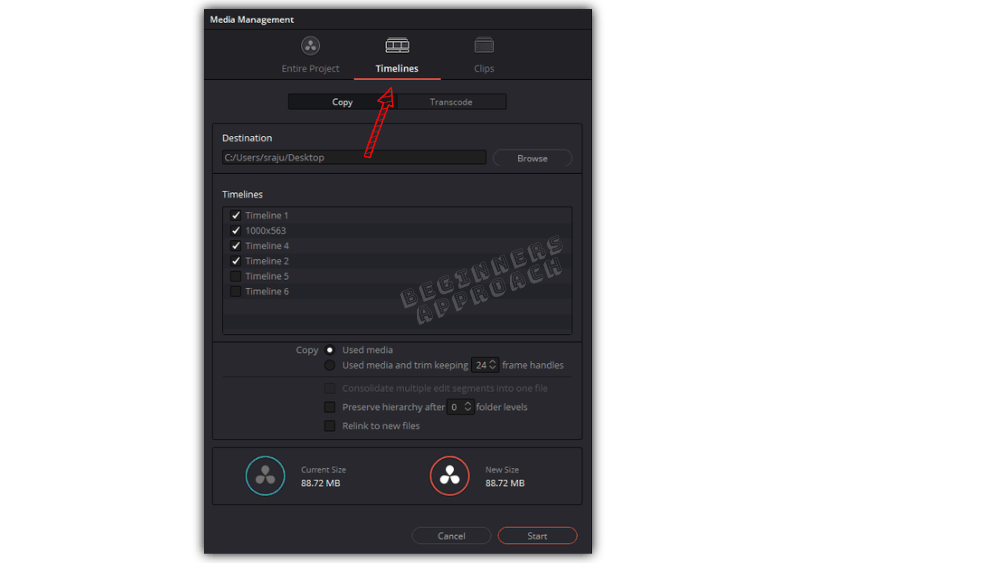
- Choose your destination folder.
- Make sure you are under the “Copy” tab (instead of Transcode)
- Then click on “Start“.
- All the selected timelines are copied as “.drt” files along with the media files.
Quick Export In DaVinci Resolve
Apart from the regular export features in Davinci Resolve (as covered above), there is a “Quick Export” feature as well – a time saver!
According to DaVinci Resolve’s company The Blackmagicdesign on Quick Export feature – “You can output and upload files to YouTube, Vimeo and Twitter from anywhere page using the quick export tool.“
I highly recommend the below detailed guide which saves you valuable time.