The timeline in DaVinci Resolve contains edits of your video and audio clips, and multiple tracks, inside a project.
Backing up the timeline in DaVinci Resolve is the process of automatically saving a particular timeline inside a project that contains information about the edits you do, at a pre-defined interval of time.
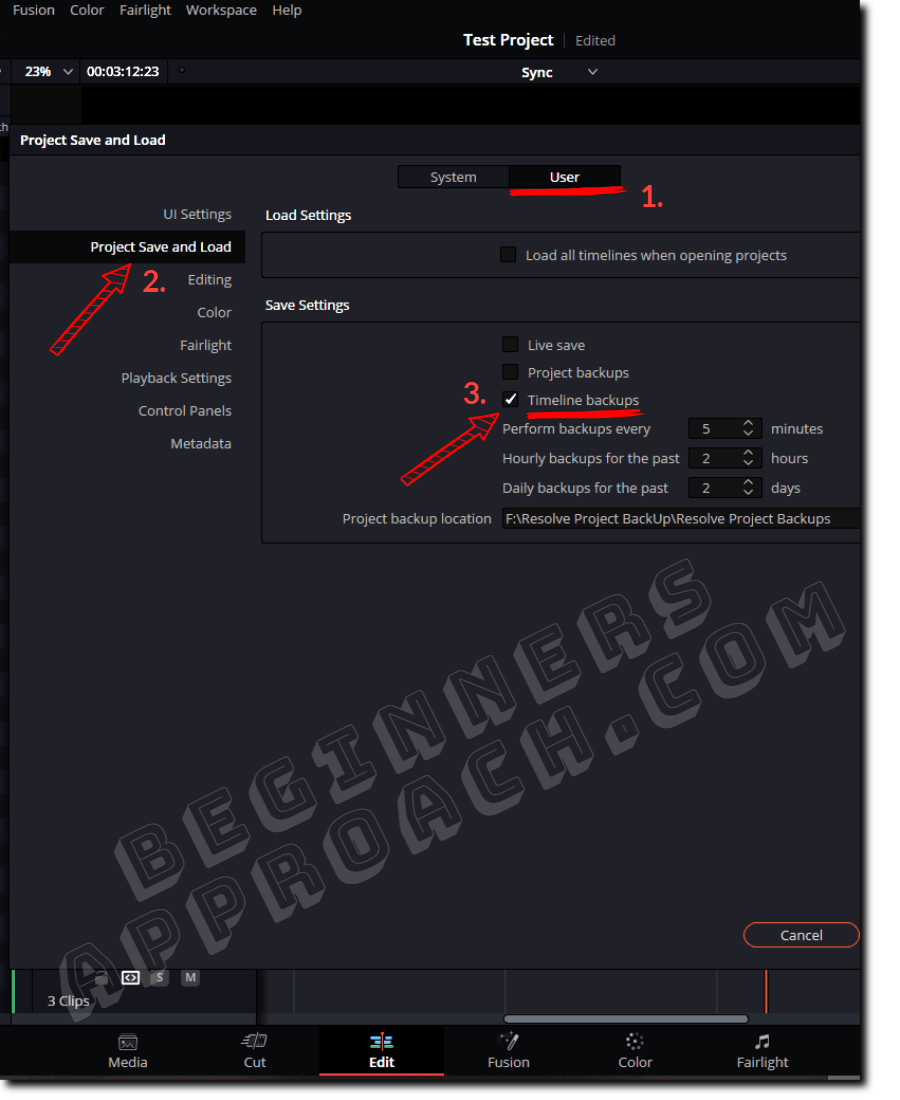
To backup the timeline in DaVinci Resolve, go to the menu “DaVinci Resolve” > “Preferences”, and click on the “User” tab. Then click on “Project Save and Load”. Finally, under the “Save Settings”, enable “Timeline Backups”. Resolve now automatically backs up your timeline according to the time defined in the settings.
The timeline backup feature was introduced in the Resolve version 18.5. The timeline backup feature is not available in DaVinci Resolve versions 18 and 17. The work-around is to create project backups in DaVinci Resolve which also includes your timeline.
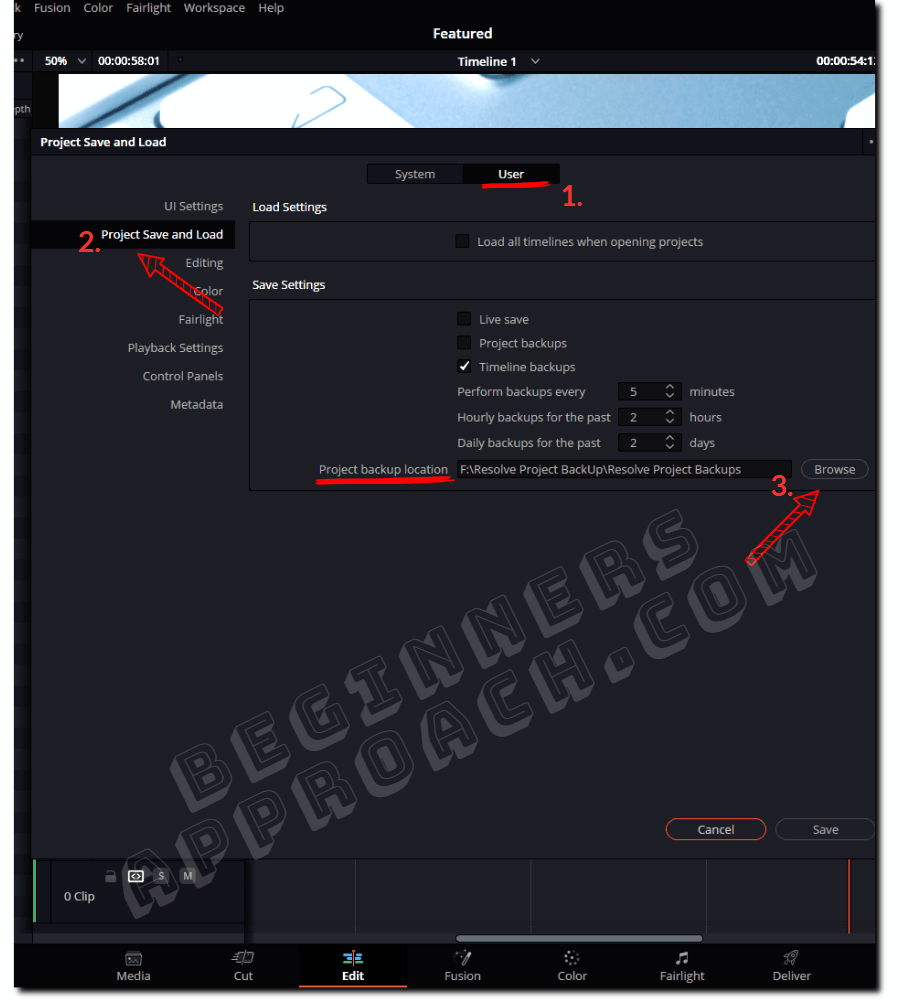
The timeline backup location in DaVinci Resolve can be accessed by going to the menu “DaVinci Resolve” > “Preferences”, and clicking on the “User” tab. Then click on “Project Save and Load”. Under the “Save Settings” section, you can find the “Project Backup location”.
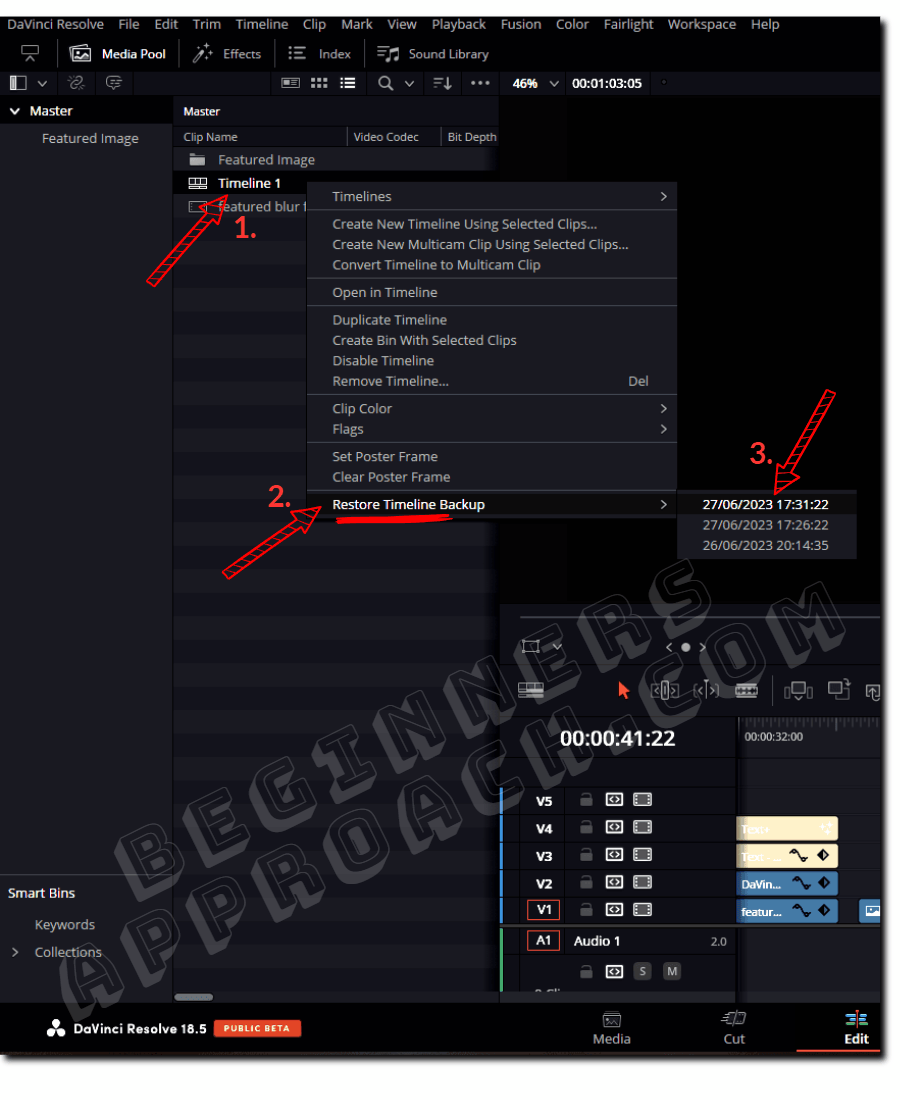
To restore timeline backup in DaVinci Resolve, go to the “Edit” page. Locate your timeline in the “Media Pool”. Right-click the timeline. Select “Restore Timeline Backup” > and choose the required backup displayed in the contextual menu. Your timeline is restored!
To recover the deleted timeline in DaVinci Resolve, create a new timeline in “Edit” > “Media Pool”. Right-click the timeline and click “Restore Timeline Backup” > choose the required backup displayed in the contextual menu.
The timeline backup files are saved in this format – “Timeline.<yyyymmdd><time>“.
3 important settings in “Timeline Backups” feature:
- Perform backups every x minutes
- Hourly backups for the past y hours
- Daily backups for the past z days
Delete your timeline backups if you need to save space, once all of your projects’ timeline work are completed and archived.
The timeline backup is different from autosave (live save) in DaVinci Resolve. The timeline backup automatically saves only during the pre-defined interval of time, whereas the autosave automatically saves every time you make a change.
Let’s explore the timeline backup mechanism in DaVinci Resolve in detail – step-by-step, with pictures and cool infographics! (Very useful for beginners and newcomers to DaVinci Resolve 18.5.)
- How to Automatically Backup Timelines in DaVinci Resolve 18.5?
- Timeline Backup Location in DaVinci Resolve
- How to Restore Timeline Backup in DaVinci Resolve?
- How To Recover Deleted Timeline in DaVinci Resolve?
- The Timeline Backup Files
- 3 Important Settings – How Does Automatic Timeline Back Up Work in DaVinci Resolve?
- Can I Delete Timeline Backups to Save Space in Resolve?
- Timeline Backup Vs Auto Save in DaVinci Resolve
- Timeline and Project Backups in DaVinci Resolve
How to Automatically Backup Timelines in DaVinci Resolve 18.5?
- Navigate to the menu “DaVinci Resolve” > “Preferences” (short cut for “Preferences” is ” Ctrl + , ” or ” Cmd + , “).
- Click on the “User” tab.
- Click on “Project Save and Load” from the left-hand side.
- Under the “Save Settings“, turn on the “Timeline Backups” checkbox.
- DaVinci Resolve now automatically backs up your timeline as per the time defined in the “Save Settings”.
- Enter desired minutes for “Perform backups every 5 minutes”.
- “Hourly backups for the past 2 hours”.
- “Daily backups for the past 2 days”. See the below image for timeline backup procedure in Resolve.
Timeline Backup Location in DaVinci Resolve
- Go to the menu “DaVinci Resolve” > “Preferences”.
- Click on the “User” tab.
- Click on “Project Save and Load”.
- Under the “Save Settings” section, you can find the “Project Backup location”.
- The timeline backups are found under the project backup location.
Click on the “Browse” button to change the folder of the timeline backup according to your needs, as shown in the image below.
Before restoring the timeline backup, you should have enabled it from the user preferences settings. (If not enabled, the backups won’t be created.)
How to Restore Timeline Backup in DaVinci Resolve?
- Go to the “Edit” page.
- Locate your timeline in the “Media Pool”.
- Right-click the timeline.
- Select “Restore Timeline Backup” > and choose the required backup displayed in the contextual menu.
- Your timeline is restored! See the below image for restoring timeline backup in Resolve.
How To Recover Deleted Timeline in DaVinci Resolve?
- Launch DaVinci Resolve.
- Go to the “Edit” page > “Media Pool”.
- Create a new timeline.
- Right-click the timeline.
- Select “Restore Timeline Backup” > and choose the required backup displayed in the contextual menu.
- Your timeline is recovered!
It only works if you have previously enabled timeline backup. If you haven’t enabled this setting, but have enabled the project backup, then it’s still possible to recover the deleted timeline.
To recover a timeline from a project backup, first restore the project. Go to “File” > “Project Manager”. Select your required project and right-click. Click on “Project Backups“. Choose your relevant backup. Click on “Load“. Double-click on the project back up, and it will open like any normal project.
You should find your timeline inside the project!
The Timeline Backup Files
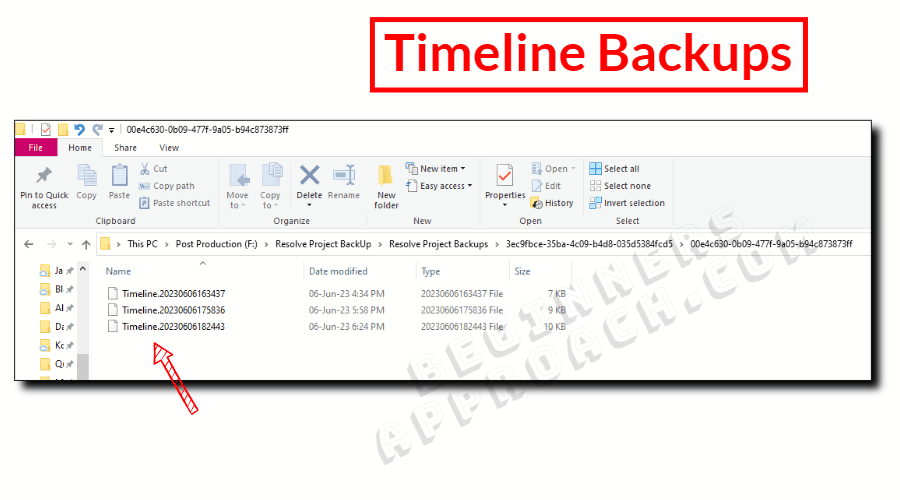
When you navigate to the project backup location which contains your timeline, you can see the timeline backup files saved in this format – “Timeline.<yyyymmdd><time>“, as shown in the above image.
(You need to click on the random numbered folders to locate your timeline backups.)
From the screenshot above, there are 3 timeline backups – as defined in the settings found under the “User Preferences”. (Please refer to the above section for more details).
What is the Use of Timeline Backups in Resolve?
Enabling auto backups for the timeline (similar to a project backup) lets you access the older versions of the same timeline (that were backed up) in case you decide to discard the recent changes.
It lets you jump back in time and start from any version of the timeline backup as per your need.
Timeline backups become very helpful when somehow, your current project timeline gets corrupted and becomes unusable.
No worries, revert to the previous usable version of the timeline backup!
3 Important Settings – How Does Automatic Timeline Back Up Work in DaVinci Resolve?
When you enable “Timeline Backups“, there are 3 settings you must define according to your needs:
- Perform backups every x minutes
- Hourly backups for the past y hours
- Daily backups for the past z days
These 3 important settings are best explained through the below infographics.
Infographics Explaining Timeline Backup in DaVinci Resolve (similar to Project Backup)
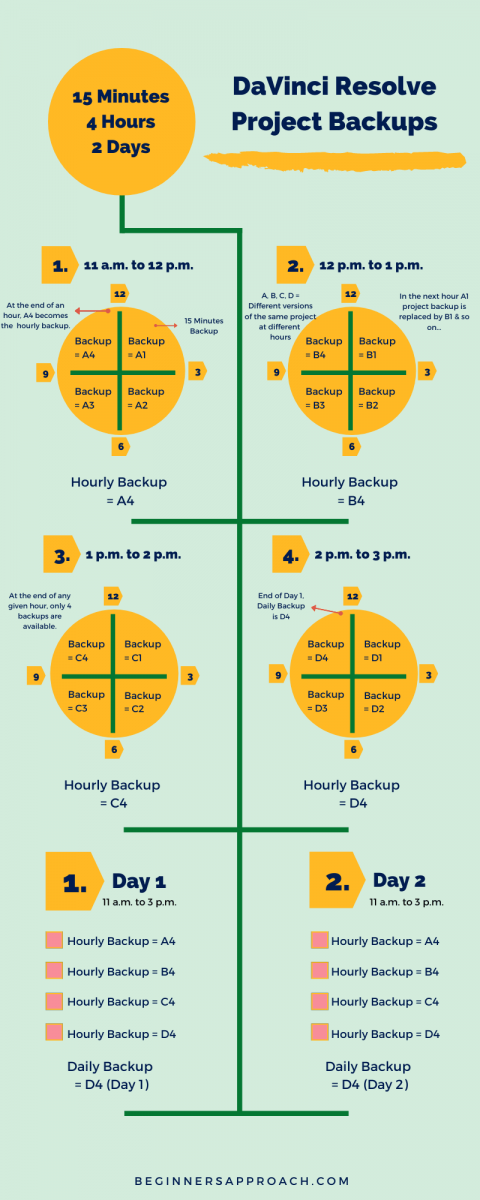
Perform Backups Every x Minutes
Resolve will create timeline backups for every, say, 15 minutes (if you set it to 15 minutes). For an hour, there will be 4 backups.
During the second hour, the 15-minute backup created will replace the first 15-minute backup, which was created at the first hour. (First in, first out concept).
At any given time (after the first hour), only 4 fifteen minutes backups will be available.
Hourly Backups for the Past y Hours
If you set 4, then Resolve will create 4 hourly backups – all of them being the last fifteen minutes backups for that particular hour.
The last backup (at the end of an hour) will be promoted to “Father” from the “Son” relationship. (This backup mechanism is based on the GFS = Grandfather, Father, Son concept. Son = minutes, Father = hourly, Grandfather = Daily)
After the 4th hour, the next hour’s backup will replace the first-hour backup file.
So that on any given day, only 4 hourly backups are available.
Daily Backups for the Past z Days
If you set it to 2, then Resolve will create 2 daily backups – both of them being the last hourly backup.
(The backup at the end of the day (the last hourly backup) is now promoted to “Grandfather” from the “Father” relationship.)
When you proceed to Day 3, the Day 3 daily backup will replace the Day 1 daily backup, such that only 2 daily backups are maintained.
Can I Delete Timeline Backups to Save Space in Resolve?
You can delete timeline backups once all of your projects’ timeline work is completed and archived to save space.
Be very cautious and think twice before deleting. Make sure all of your project-related works are delivered successfully or archived to a different external hard disk before deleting.
How to Delete Timeline Backups in DaVinci Resolve?
To delete the timeline backups in Resolve, go to the folder as defined in the “Project Backup Location” found under the “User Preferences”. Double-click on the random numbered folders to locate your timeline backup files. Delete them.
(Refer to the above section for more details on locating the timeline backup files.)
Timeline Backup Vs Auto Save in DaVinci Resolve
The Autosave (also known as Live save) process saves every change you make. It is an automatic process.
Whereas the timeline backup (similar to a project backup) mechanism – is also an automatic process – that takes regular timeline backups at defined intervals like 15 minutes, 4 hours, and 2 days.
In live save, you can’t go back to the older versions of your timeline or project; it is more of an incremental savings of the changes you make to your timelines in the project.
But the timeline backup option will have separate versions of your timeline backups in time that you can fall back to.
Learn more about Autosave in DaVinci Resolve.
Timeline and Project Backups in DaVinci Resolve
Taking regular timeline and project-level backups is a good practice. For a robust workflow, you must learn to take backups of your project libraries (formerly known as databases). I highly recommend the detailed guides below: