Beginners and newcomers to DaVinci Resolve (versions 18.5, 18, 17, etc.), without knowing the project backup feature, put a ton of effort into their favorite project for days and weeks, and suddenly out of nowhere, the system crashes!
It’s heartbreaking! I’ve been there, and it hurts so much. I had to learn the lesson the hard way until I knew this backup feature in Resolve.
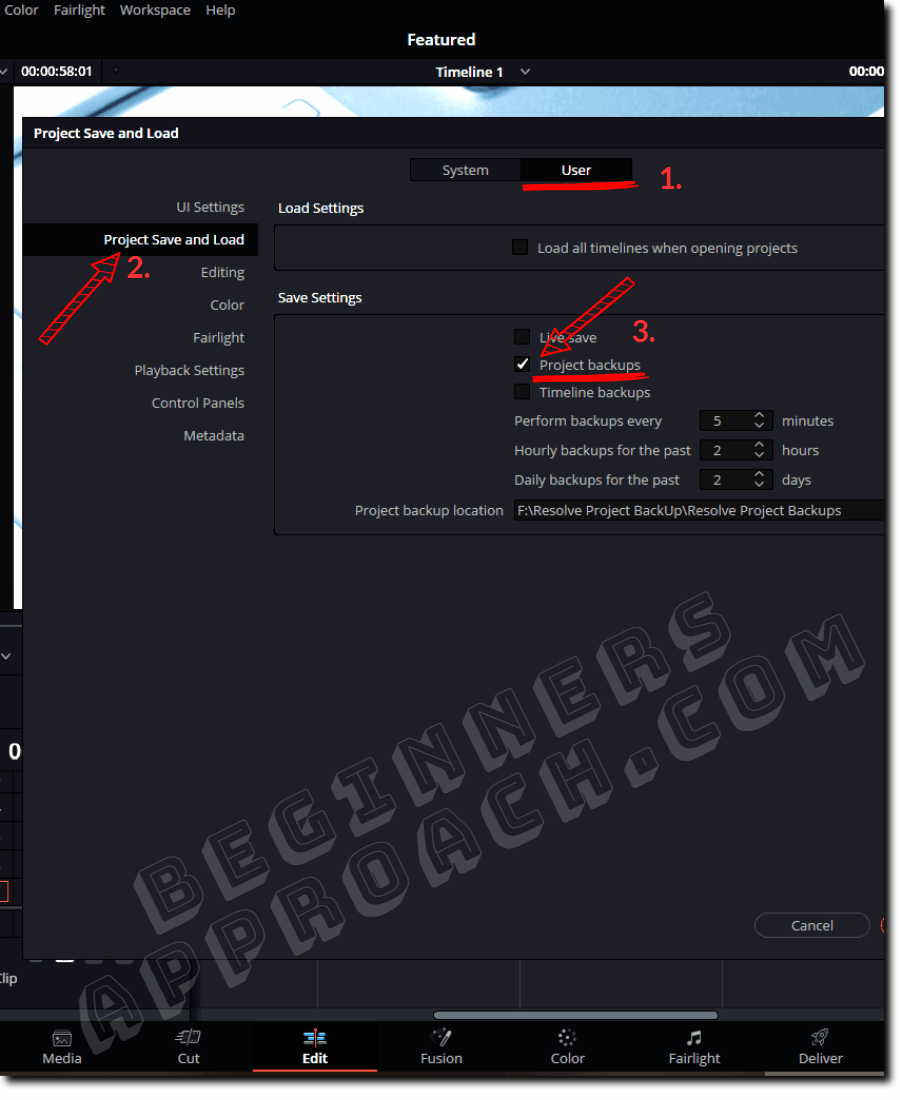
To backup the project in DaVinci Resolve, go to the menu “DaVinci Resolve” > “Preferences”, and click on the “User” tab. Then click on “Project Save and Load”. Finally, under the “Save Settings”, enable “Project Backups”. Resolve now automatically backs up your project according to the time defined in the settings.
Let’s explore the project backup mechanism in detail – step-by-step, with pictures and cool infographics!
- How to Automatically Backup Project in DaVinci Resolve?
- Project Backup Location in DaVinci Resolve?
- What is the Use of Project Backups in Resolve?
- How Does Automatic Project Back Up Work in DaVinci Resolve?
- Can I Delete Project Backups to Save Space in Resolve?
- Project Backups Vs Auto Save in DaVinci Resolve
- Is Live Save and Project Backup Dependent?
- How to Restore Project Backup in DaVinci Resolve?
- Before You Go:
How to Automatically Backup Project in DaVinci Resolve?
- Navigate to the menu “DaVinci Resolve” > “Preferences” (short cut for “Preferences” is ” Ctrl + , ” or ” Cmd + , “).
- Click on the “User” tab.
- Click on “Project Save and Load” from the left-hand side.
- Under the “Save Settings“, turn on the “Project Backups” checkbox.
- DaVinci Resolve now automatically backs up your project as per the time defined in the “Save Settings”.
- Enter desired minutes for “Perform backups every 30 minutes”.
- “Hourly backups for the past 3 hours”.
- “Daily backups for the past 2 days”.
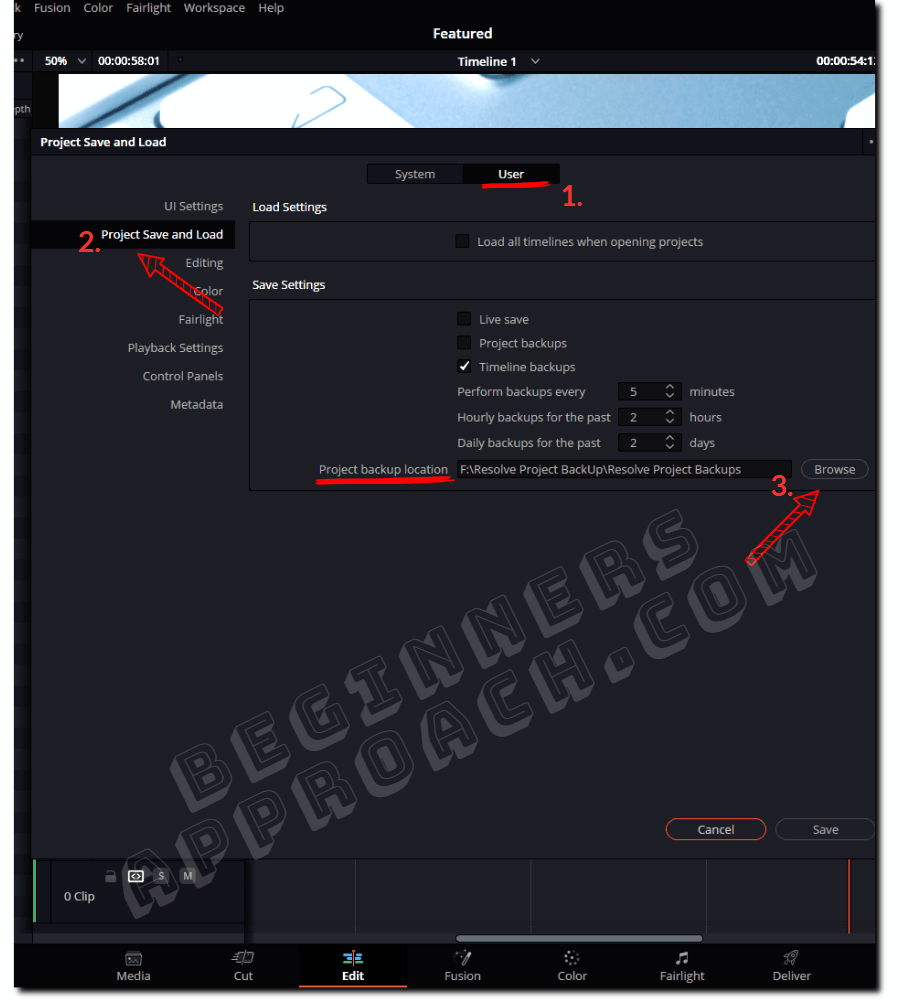
Project Backup Location in DaVinci Resolve?
The project backup location in DaVinci Resolve can be accessed by going to the menu “DaVinci Resolve” > “Preferences”, and clicking on the “User” tab. Then click on “Project Save and Load”. Under the “Save Settings” section, you can find the “Project Backup location”.
Click on the “Browse” button to change the folder of the project backup according to your needs.
Related Article:
What is the Use of Project Backups in Resolve?
Enabling auto backups for the project lets you access the older versions of the same project (that were backed up) in case you decide to discard the recent changes.
It lets you jump back in time and start from any version of the project backup as per your need.
Project backups become very helpful when somehow, your current project file gets corrupted and becomes unusable.
No worries, revert to the previous usable version of the backup!
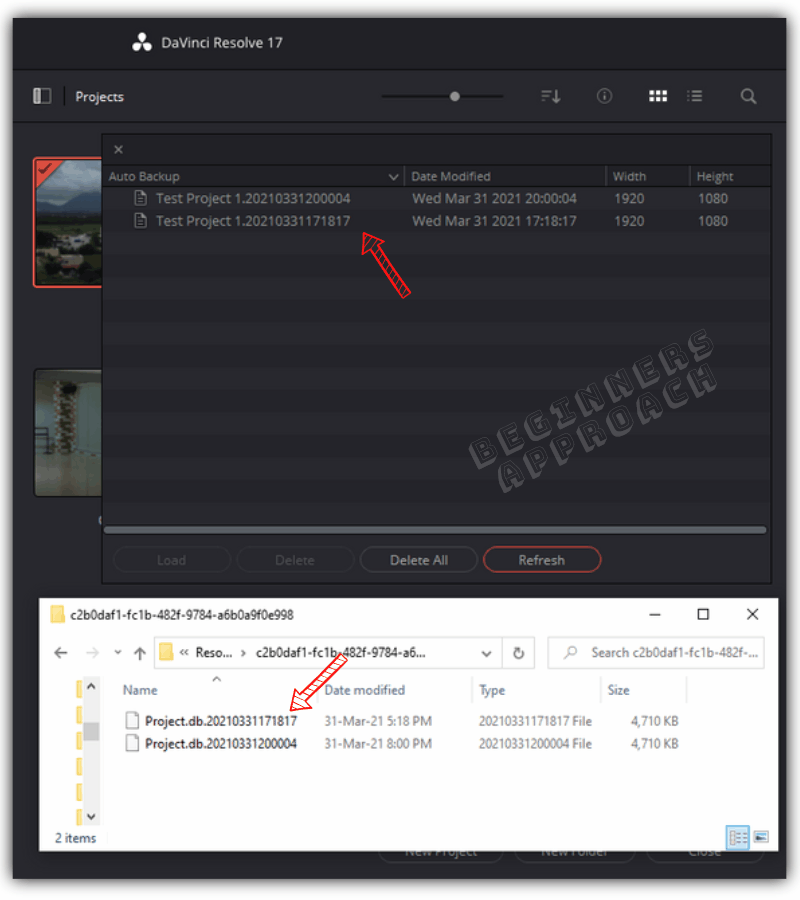
The project backup file is named “Project.db.<year, month, day, hours, minutes, seconds>“.
You can access it by navigating to the project backup location (more on this later).
After navigating to the location, you’ll see folders that are randomly numbered. Sort the folders by date.
Double-click on the folder which has the date of your project backup. You’ll find the project.db backups inside this folder.
How Does Automatic Project Back Up Work in DaVinci Resolve?
When you enable “Project Backups“, there are 3 settings you must define according to your needs:
- Perform backups every x minutes
- Hourly backups for the past y hours
- Daily backups for the past z days
Infographics Explaining Project Backup in DaVinci Resolve
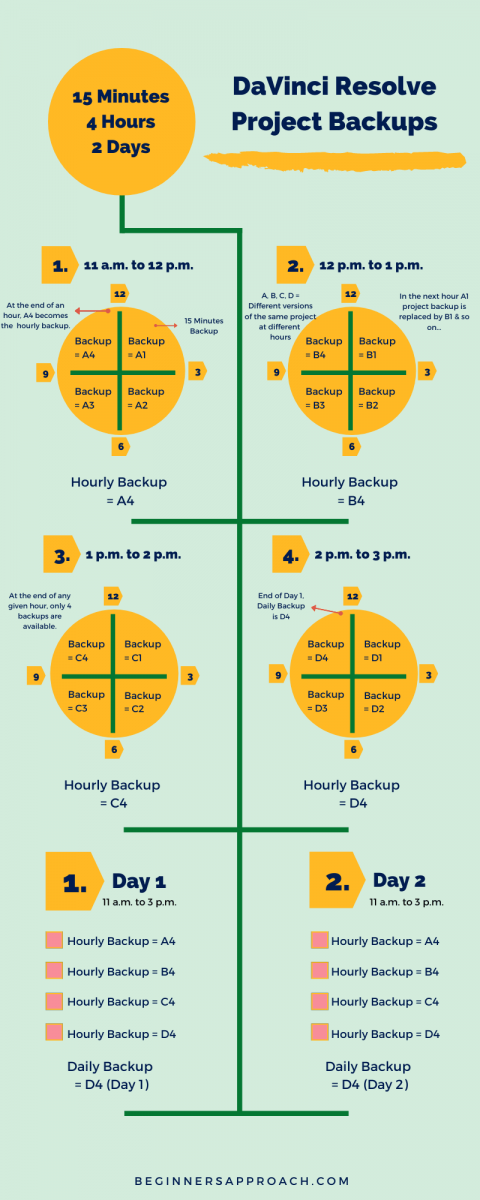
Perform Backups Every x Minutes
Resolve will create project backups for every, say, 15 minutes (if you set it to 15 minutes). For an hour, there will be 4 backups.
During the second hour, the 15-minute backup created will replace the first 15-minute backup, which was created at the first hour. (First in, first out concept).
At any given time (after the first hour), only 4 fifteen minutes backups will be available.
Hourly Backups for the Past y Hours
If you set 4, then Resolve will create 4 hourly backups – all of them being the last fifteen minutes’ backup for that particular hour.
The last backup (at the end of an hour) will be promoted to “Father” from the “Son” relationship. (This backup mechanism is based on GFS = Grandfather, Father, Son concept. Son = minutes, Father = hourly, Grandfather = Daily)
After the 4th hour, the next hour’s backup will replace the first-hour backup file.
So that on any given day, only 4 hourly backups are available.
Daily Backups for the Past z Days
If you set it to 2, then Resolve will create 2 daily backups – both of them being the last hourly backup.
(The backup at the end of the day (the last hourly backup) is now promoted to “Grandfather” from the “Father” relationship.)
When you proceed to Day 3, the Day 3 daily backup will replace the Day 1 daily backup, such that only 2 daily backups are maintained.
Can I Delete Project Backups to Save Space in Resolve?
You can delete project backups once all of your projects are completed and archived to save space.
Be very cautious and think twice before deleting. Make sure all of your project-related works are delivered successfully or archived to a different external hard disk before deleting.
How to Delete Project Backups in DaVinci Resolve?
To delete the project backups in Resolve, go to the menu “File” > “Project Manager”. Right-click your project and then click on “Project Backups”. In the “Auto Backups” window, click on the “Delete All” button. There will be a pop-up saying that “this action will delete the projects(s) permanently. The action cannot be undone.“
Give ok, and Resolve will delete all the project-related backups.
Project Backups Vs Auto Save in DaVinci Resolve
Autosave (also known as Live save) mechanism will save every change you make. It is an automatic process and you don’t have control.
Whereas the project backup mechanism (which is also an automatic process) takes regular project backups at defined intervals like 15 minutes, 4 hours, and 2 days.
In live save, you can’t go back to the older versions of your project; it is more of an incremental savings of the changes you make to your project.
But the project backup option will have separate versions of your project backups in time that you can fall back to.
For example, if you had only live save turned on and you want to work again from yesterday’s changes (because today’s changes to the project were not satisfactory), you would not be able to do so instantly.
Either you have to undo all the changes till you get to that point which is a total waste of time.
But with project backup turned on, you can instantly access the older version of the project!
Learn more about Autosave in DaVinci Resolve.
Is Live Save and Project Backup Dependent?
Live save, and project backup are not dependent. You could have either live save turned on and project backup turned off or vice versa.
It really depends on your requirement.
Before restoring the project backup, you should have enabled it from the user preferences settings. (If not enabled, the backups won’t be created.)
How to Restore Project Backup in DaVinci Resolve?
- Go to “File” > “Project Manager” (short cut for the project manager is “Shift + 1”).
- Select your required project and right-click.
- Click on “Project Backups“.
- You’ll see auto backups that are named after your project, followed by the time & date of the backup.
- Choose your relevant backup.
- Click on “Load“.
- Enter a proper project name (if needed) in the prompt. Click ok.
- Close the auto backup window.
- Your new backup project will be displayed along with other projects in the “Project Manager”.
- Double-click on the project back up, and it will open like any normal project.

Before You Go:
Taking regular project-level backups is a good practice. For a robust workflow, you must learn to take backups of your project libraries (formerly known as databases). I highly recommend the below detailed guide:
Superb thanks so much
You’re welcome!
Congra , its So amazing Tanks a lot
You are welcome!
Does Backup differ from Live Save in that Backup includes media files and Live Save does not?
As per my understanding, enabling project backup creates multiple independent backup project files which don’t include your media files.
While live save is an incremental “save as you go” feature in the same project file (without having to manually save the project.)
If you want media files along with the project file (which contains your edits), then you might have to go to the “Project Manager”, then right click on your project and click on “Export Project Archive”. Read “https://beginnersapproach.com/move-davinci-resolve-projects-databases/” for more information.