
DaVinci Resolve autosave is a feature wherein all the changes like editing, color grading, etc., are automatically saved without the need to manually save (pressing “Ctrl + s” or “Cmd + s”). This is available in the “Cut”, “Edit” and “Fairlight” pages.
“Autosave” is called “Live Save” in DaVinci Resolve. You can enable this option and forget it. Resolve automatically and incrementally saves your changes.
As per Blackmagic “Live Save even works for previously unsaved projects that you’ve forgotten to save if anything goes wrong”.
DaVinci Resolve does have autosave options in the form of “Live Save”, “Project Backups” and “Timeline Backups”. These settings are found in the “User Preferences” which on enabling, automatically saves your work.
To enable autosave in DaVinci Resolve, go to the menu “DaVinci Resolve” > “Preferences”, and click on the “User” tab. Then click on “Project Save and Load”. Finally, under the “Save Settings”, enable “Live Save”. Resolve now automatically saves your changes.
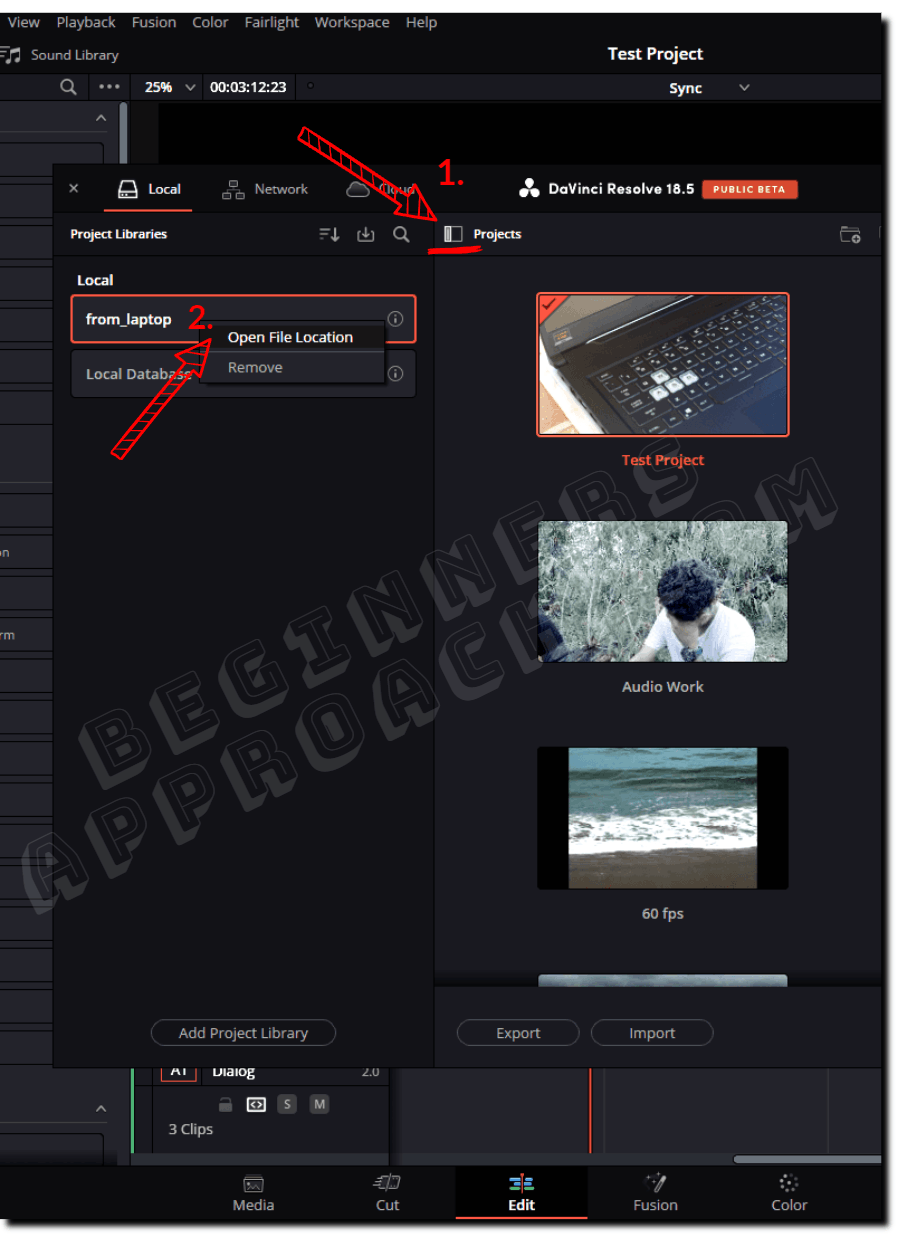
The autosave location in DaVinci Resolve is accessed by going to the “File” > “Project Manager”, and clicking on the “Project Libraries” icon. Then right-click on the desired project library > select “Open File Location”.
The main difference between autosave and project backups is that the autosave (live save) automatically saves every time you make changes, whereas the project backup mechanism takes regular project backups at defined intervals like 20 minutes, 5 hours, and 3 days.
To revert to the previous autosave in DaVinci Resolve, use the undo shortcut “Ctrl + z” or “Cmd + z” shortcuts.
To turn off autosave, disable the “Live Save” checkbox under “DaVinci Resolve” > “Preferences” settings.
Experts always recommend doing a manual save, that is, pressing “Ctrl + s”. Taking regular project backups is also recommended and considered one of the best practices that must be followed.
Let’s explore the autosave mechanism, and also the manual save, in DaVinci Resolve in detail – step-by-step with pictures. (Very useful for beginners and newcomers to DaVinci Resolve versions 18.6, 18.5, 18, 17, etc.)
- How to Turn On AutoSave in DaVinci Resolve?
- Auto Save Location in DaVinci Resolve
- Difference Between Live Save and Project Backups in DaVinci Resolve
- DaVinci Resolve Revert to Previous Save
- How to Turn Off AutoSave in Resolve?
- How to Manually Save a Project in DaVinci Resolve?
- Taking Regular Project Backups
How to Turn On AutoSave in DaVinci Resolve?
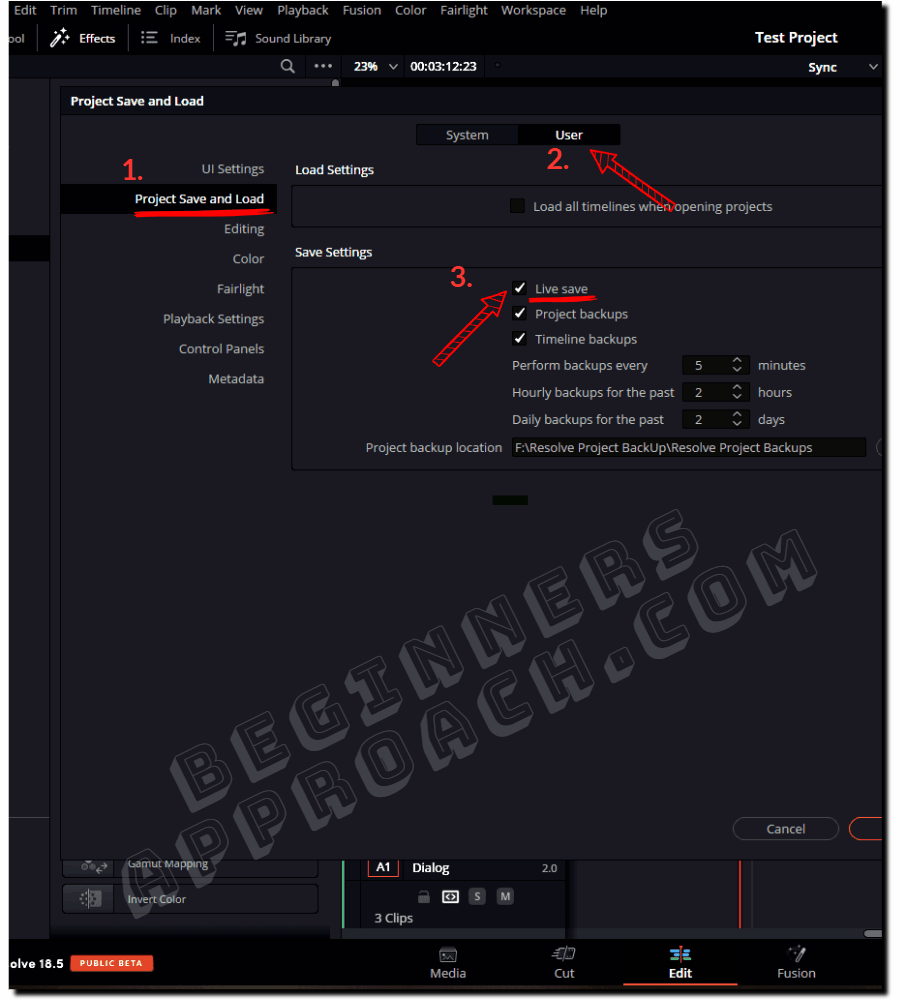
- Navigate to the menu “DaVinci Resolve” > “Preferences” (short cut for “Preferences” is ” Ctrl + , ” or ” Cmd + , “).
- Click on the “User” tab.
- Click on “Project Save and Load” from the left-hand side.
- Under the “Save Settings” (previously “Auto Save”), turn on the “Live Save” checkbox.
- DaVinci Resolve will now automatically save your progress made in the “Edit”, “Cut”, and “Fairlight” pages as shown in the image below.
Auto Save Location in DaVinci Resolve
The autosave location in DaVinci Resolve is the same as the original project location. Go to the “Project Manager”, and click on the “Project Libraries” icon. Then right-click on the project library > click “Open File Location”. The below screenshot shows the location of the auto save.
I highly recommend the below detailed guide regarding the project location and related tips:
3 Quick Steps to Find DaVinci Resolve Project Files in Your System
Difference Between Live Save and Project Backups in DaVinci Resolve
The live save mechanism saves every change you make. It is an automatic process, and you don’t have control. Whereas the project backup mechanism (which is also an automatic process) takes regular project backups at defined intervals like 15 minutes, 4 hours, and 2 days.
In live save, you can’t go back to the older versions of your project; it is more of an incremental savings of the changes you make to your project. Please see the below image for more details on the workings of project back up in Resolve.
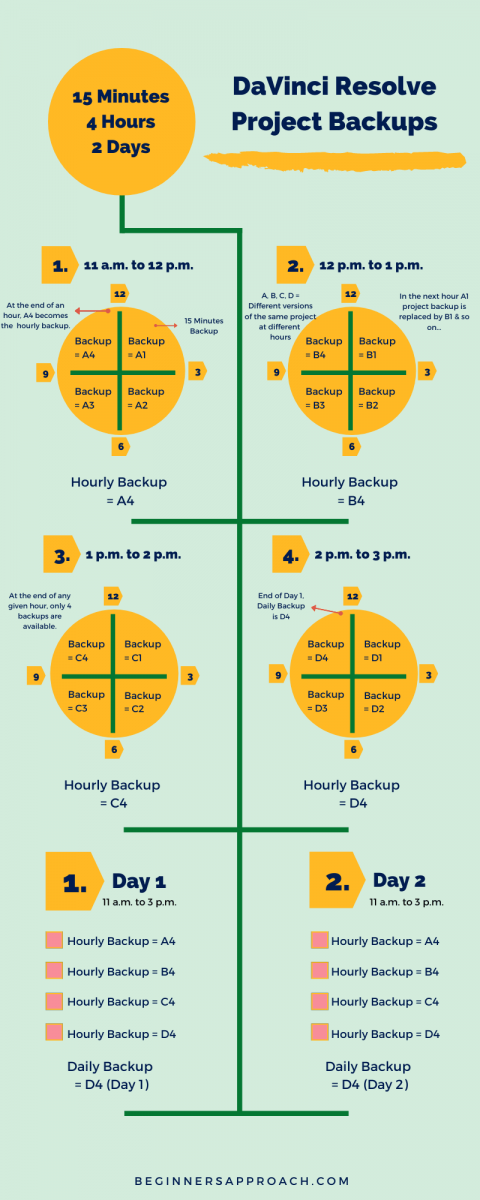
But the project backup option has separate versions of your project backups in time that you can fall back to.
For example, if you had only live save turned on and you want to work again from yesterday’s changes (because today’s changes to the project were not satisfactory), you would not be able to do so instantly.
Either you have to undo all the changes till you get to that point which is a total waste of time.
But with project backup turned on, you can instantly access the older version of the project!
DaVinci Resolve Revert to Previous Save
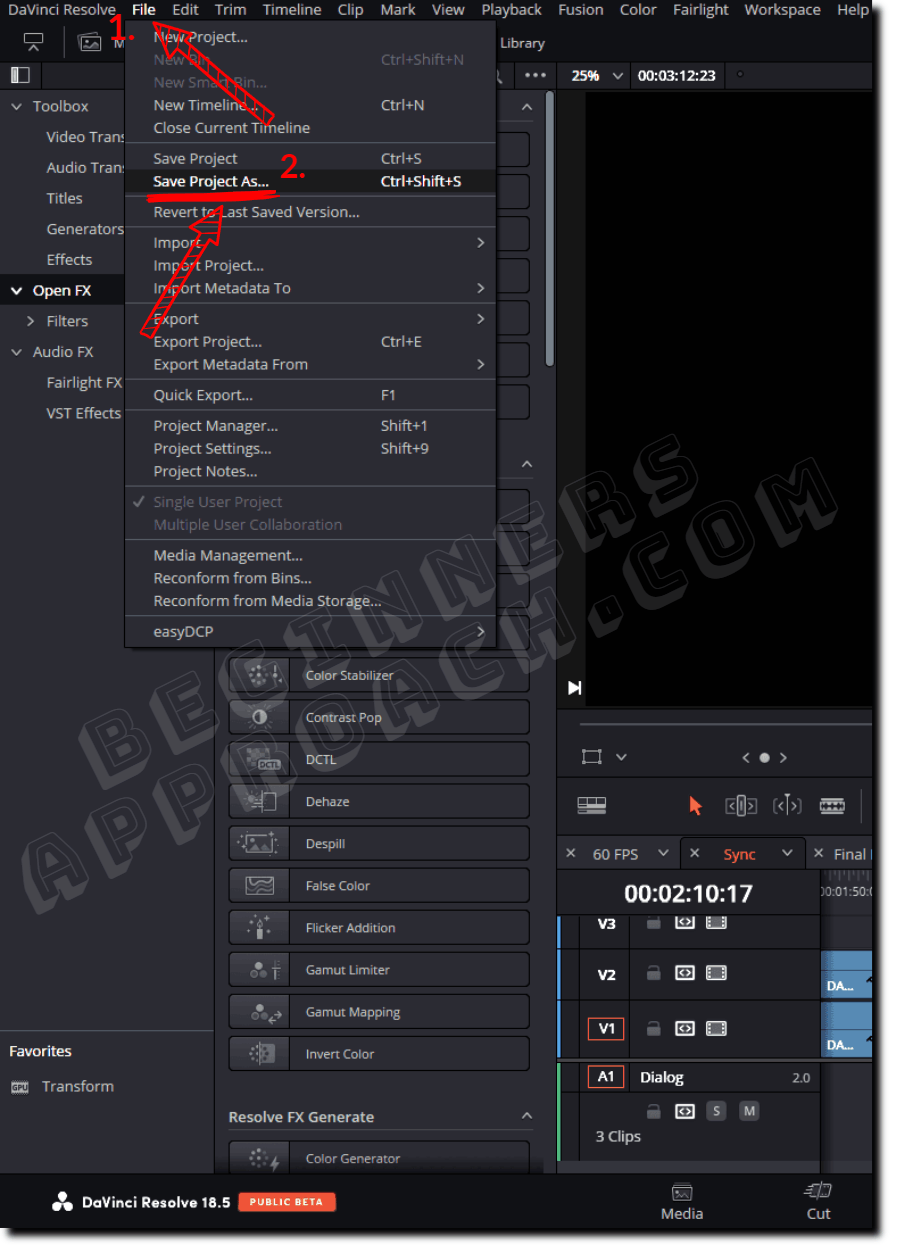
To revert to the previous save in DaVinci Resolve, go to the menu “File” > click on the “Revert to Last Saved Version” option. You can also undo the changes using the “Ctrl + z” or “Cmd + z” shortcuts. The below image shows the “revert to the last saved version” option.

If you want to go back in time to a particular version of the project, it is not possible to use the live save feature. You have to enable the project backups.
How to Turn Off AutoSave in Resolve?
To turn off autosave in DaVinci Resolve, uncheck the “Live Save” checkbox under “DaVinci Resolve” > “Preferences” > “User” tab > “Project Save and Load” > “Save Settings”.
So whenever you close the project, you’ll be prompted to save manually.
How to Manually Save a Project in DaVinci Resolve?
To save a project in DaVinci Resolve, press “Ctrl + s” or “Cmd + s” (manual save), or enable the autosave feature called “Live save” found in the “User Preferences” – for automatic background save. You can also perform automatic project backups.
One of the best practices endorsed by almost all experts is to press “Ctrl + s” / “Cmd + s” regularly.
This should become a habit so that whenever you forget to turn on auto-save options and DaVinci crashes, you can access your manually saved project (prior to crashing)!
How to “Save Project As” in DaVinci Resolve
Go to “File” > “Save Project As…” to create a duplicate copy of your project (the shortcut for “save project as” is “Ctrl + shift + s”). Enter an appropriate name and hit “Save”.
You have created a duplicate copy of your project – as shown in the image above.
Taking Regular Project Backups
If your system or hard drive or Resolve crashes, and you forget to take backups, then Live Save will be your savior!
Now that you know how to work with the autosave feature (live save) in DaVinci Resolve, it’s time you take regular project backups – which is a more robust way to keep all your project files saved and accessible.
I highly recommend the below detailed guides – covering essential aspects of project and timeline backups in Resolve:
How to Backup and Restore DaVinci Resolve Projects