
Many beginners and newcomers to DaVinci Resolve (versions 18.5, 18, 17, etc.) usually have this question:
Can you export audio-only files from DaVinci Resolve? You can export audio-only files like mp3, wav, etc., from DaVinci Resolve on the “Deliver” page.
To export audio only in DaVinci Resolve, go to the “Deliver” page. Click on the “Audio Only” option under the “Render Settings”. Choose “Wave” (or mp3) under the “Format” dropdown. Set the codec to “Linear PCM” for “Wave”. Set the “Bit Depth” to “24” for high quality output. Hit render!
The most important setting for any audio format (especially wav) is the “Bit Depth” in DaVinci Resolve. (More on that later.)
We’ll also see the best export settings for audio in DaVinci Resolve.
Plus…
My research/testing on various audio formats – their bit depths, data rates (bit rates), and the file sizes occupied – which will help you make an informed decision.
Let’s explore the audio-only export in detail – step-by-step with pictures.
How to Export Audio Only in DaVinci Resolve Quickly?
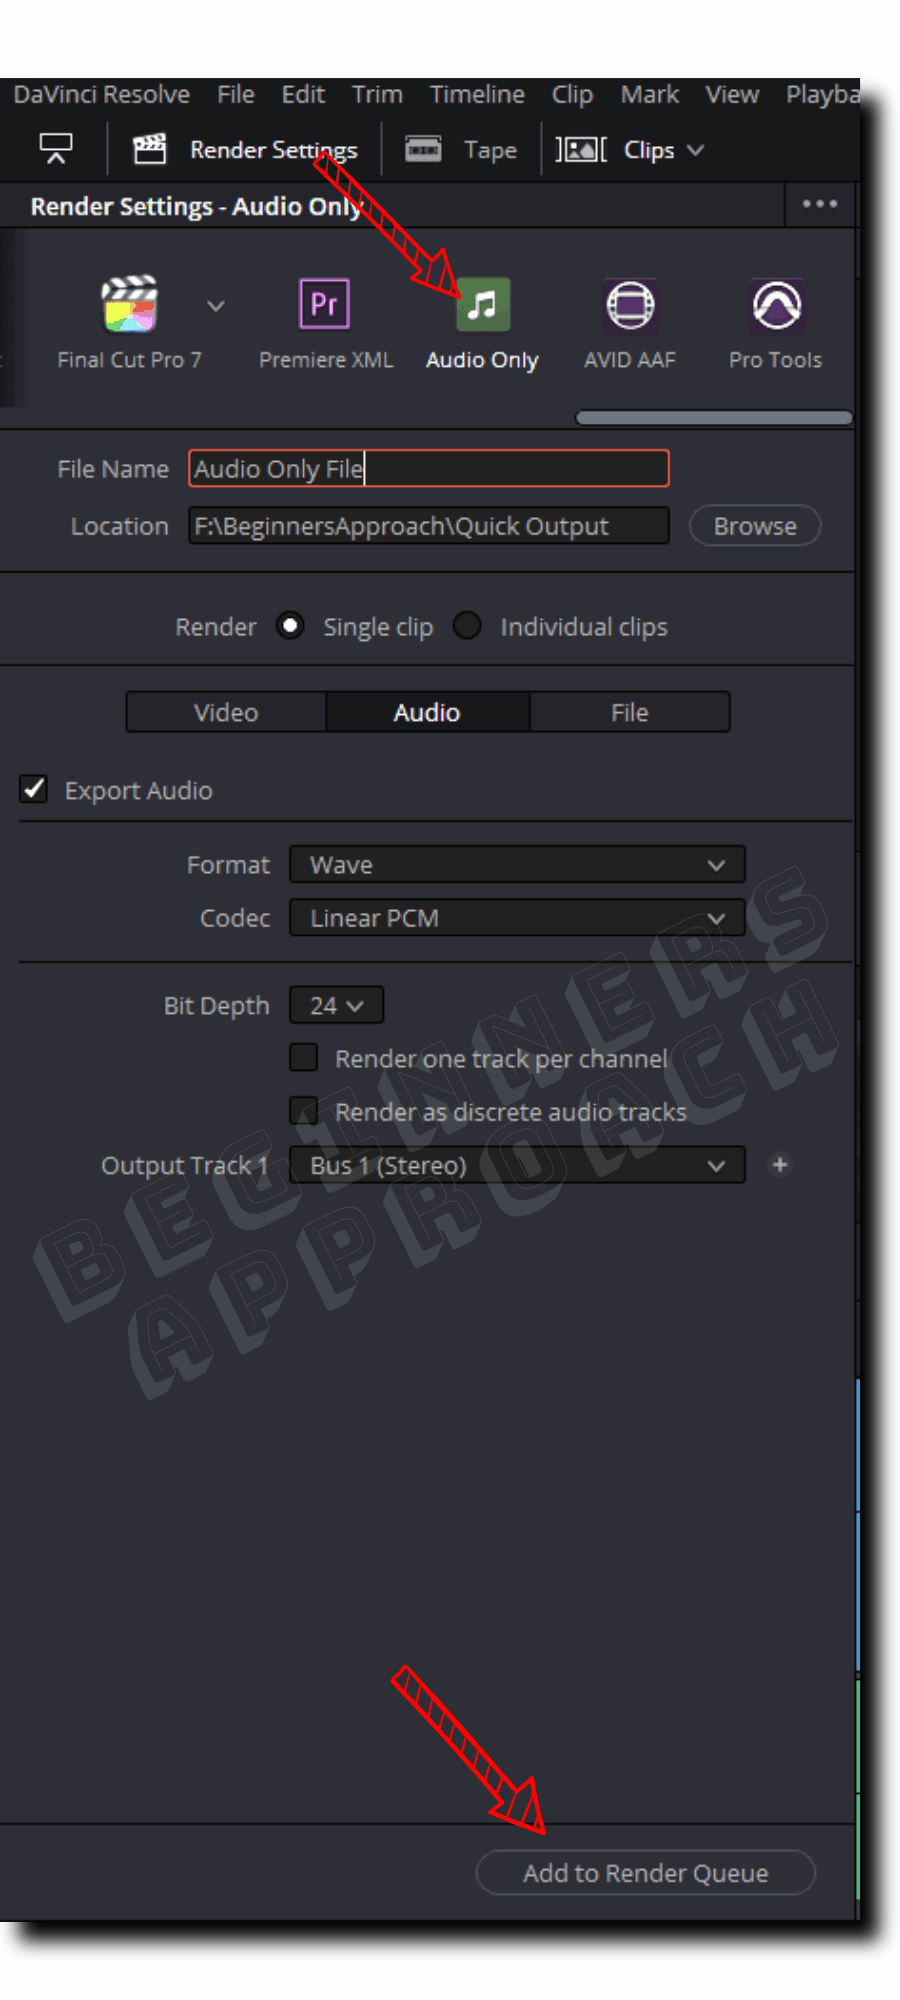
- Go to the “Deliver” page after completing your audio work.
- Click on the “Audio Only” option under the “Render Settings” by scrolling to the right.
- Enter your desired “File Name” and “Location”.
- Click on the “Audio” tab and make sure the “Export Audio” checkbox is checked. (Click on the “Video” tab to make sure the “Export Video” checkbox is unchecked.)
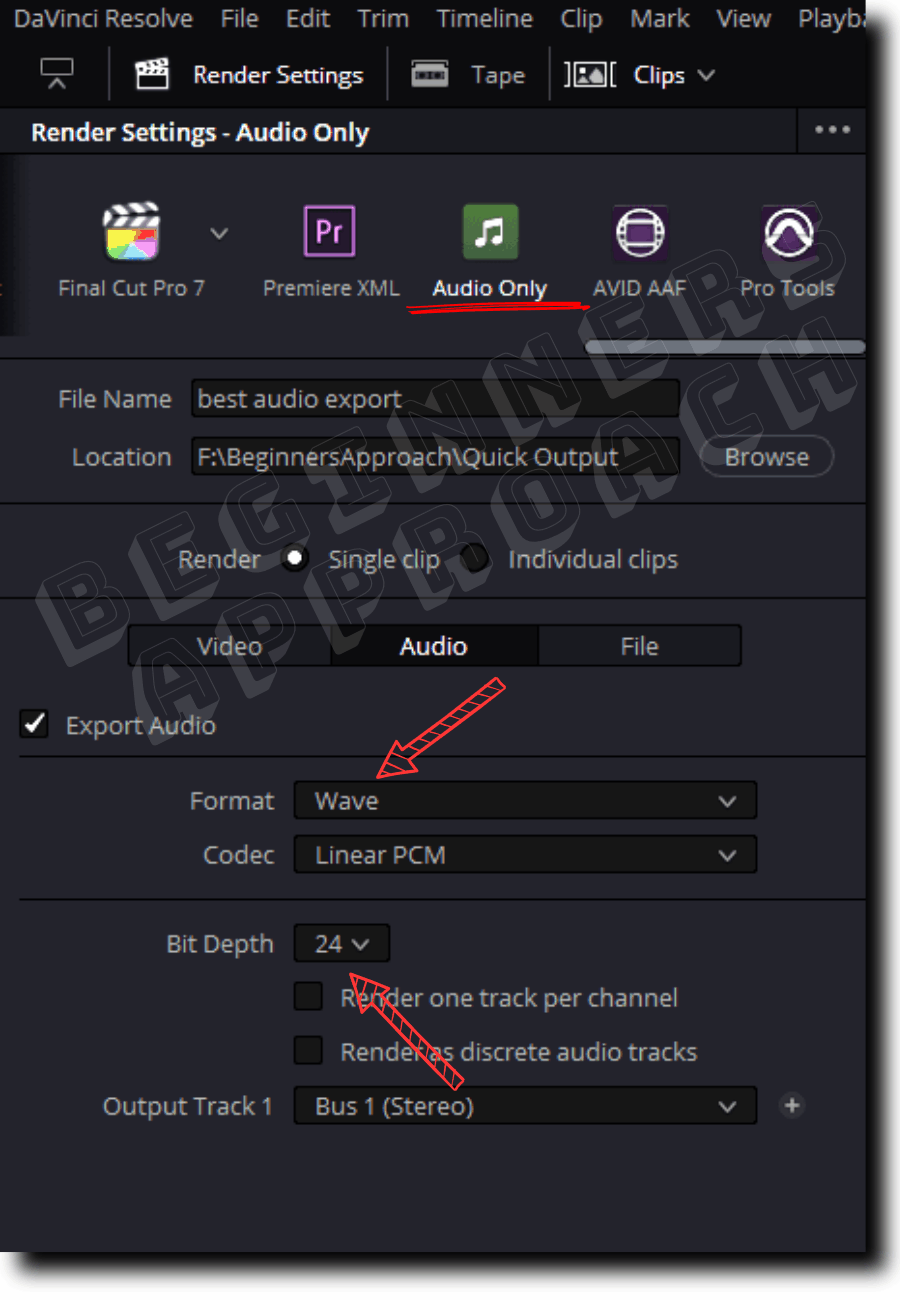
- Choose “Wave” under the “Format” dropdown. (Mp3 format is also fine.)
- Let the codec be “Linear PCM” for “Wave“.
- Let the “Bit Depth” be “24” (even “16” is fine).
- Let the “Output Track 1” be the default “Bus 1 (Stereo)” for single audio file export.
- Click on the “Add to Render Queue” button at the bottom.
- Then click on the “Render All” button on the right-hand side under the “Render Queue” section.
- The render will start, and the audio-only wave file will be exported successfully.
An important thing to note:
The audio sample rate (which is not an option we can choose on the “Deliver” page) is derived from the “Timeline Sample Rate” from the “Project Settings” – which usually defaults to “48 kHz”.
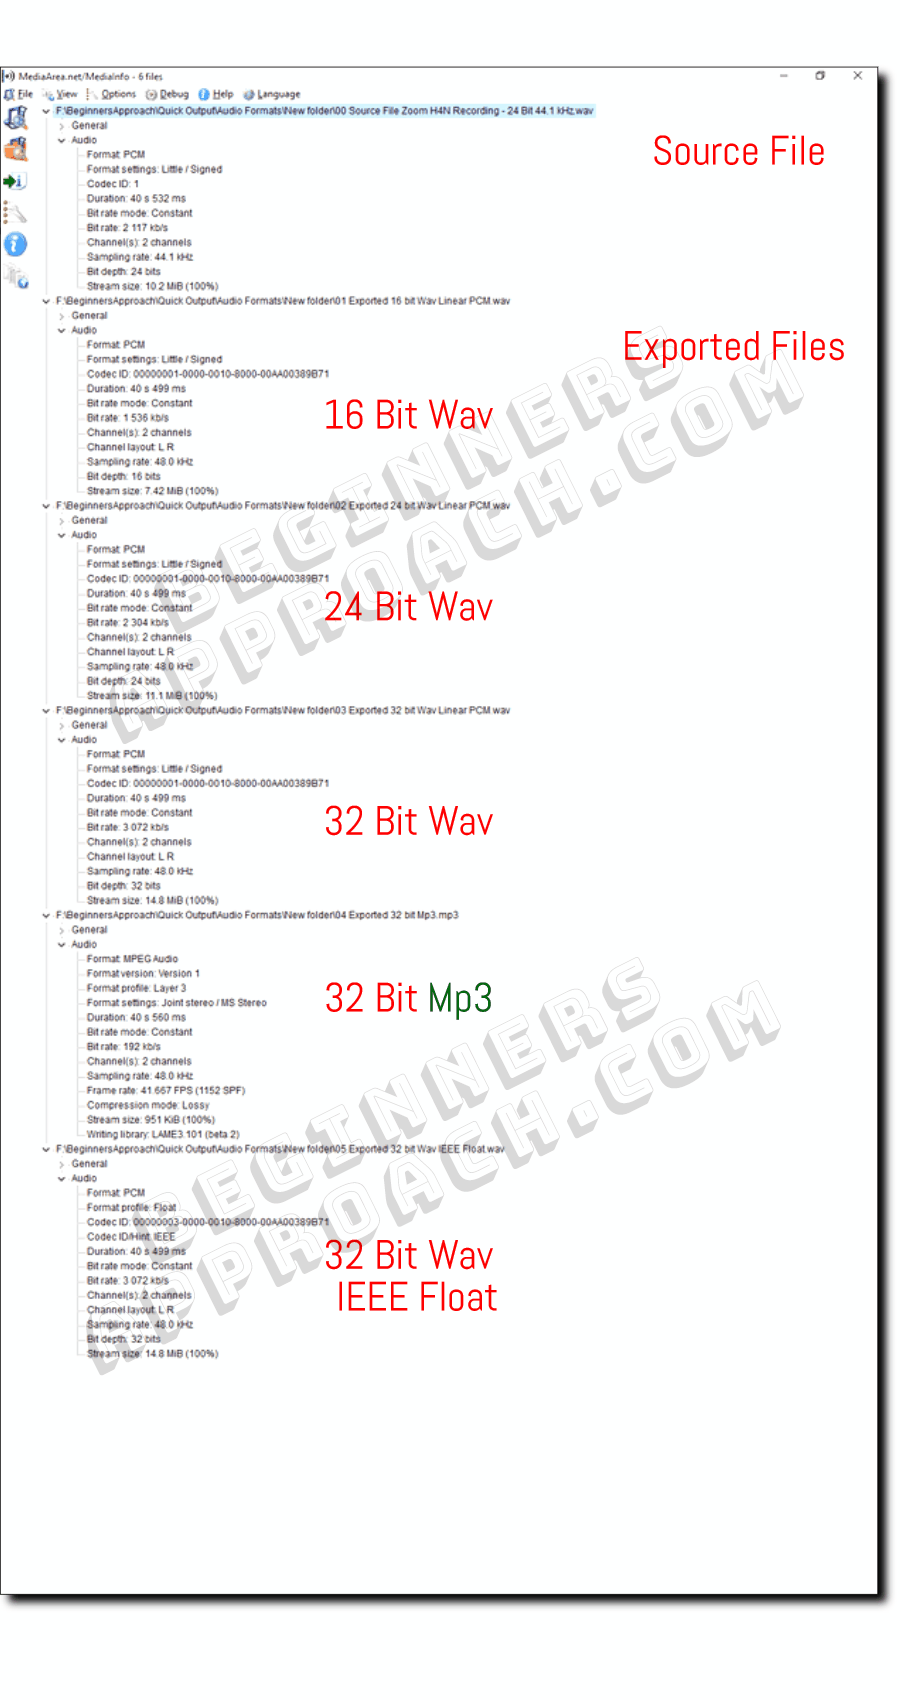
So, your exported audio file will always have a 48 kHz sample rate (you can verify using the “MediaInfo” app – a free tool). (More on that later…)
If you want to change the export audio sample rate, you can do so from the “Fairlight” page. Click on the below post for a detailed step-by-step guide:
Now you can go ahead and use your wave or mp3 audio file.
You’ll notice that only one audio only file will be exported (or rendered) even if you have multiple audio tracks in your timeline – this is because of the option “Bus 1 (Stereo)” set for “Output Track 1”.
However, you can export single, multiple, or any number of tracks you desire – you have total control in Resolve! Read the below article for a step-by-step guide with pictures:
DaVinci Resolve Export Multiple Audio Tracks (Use THIS Setting)
Best Audio Export Settings for DaVinci Resolve
#1) Format = Wav – It is an uncompressed high-quality audio format. Takes up a lot of storage space compared to Mp3/AAC (lossy compressed ones).
#2) Codec = Linear PCM
#3) Bit Depth = 16 or 24 (Can also go for 32, but 24 is sufficient for most cases).
Bit depth defines the audio resolution and dynamic range – low to high frequencies.
The higher the bit depth, the greater the dynamic range, and the more information can be packed. However, the file size can also increase along with the higher bit depth numbers.
If you know the bit depth of your source file, then it’s a good practice to set the same bit depth for render (or increase it a bit).
But never decrease the bit depth of your export setting compared to your source bit depth – you’ll lose data from the exported file. (But it might not make a big difference for a normal human ear.)
(I have researched/tested the bit rates and file sizes occupied by various bit-depth audio files – scroll down to learn more).
DaVinci Resolve – Best Export Audio Format
If you need to manipulate audio without losing data, then Wav (uncompressed audio) is the best audio format (it takes a lot of space). However, if you want to export audio for casual listening or transfer over the internet, then Mp3 or AAC (lossy or compressed audio) is the best audio format.
Mp3 and AAC formats are considered “lossy” because they are compressed during encoding to save space. Which means they don’t decompress back to the original file size.
Therefore, because of their small size, they are preferred for uploading to online platforms. (They still sound good, though).
Whereas Wav format is an uncompressed audio format with no compression applied during export. The original file size and quality are retained without any loss in the process.
Sound engineers and people having high-end audio systems prefer wav – to hear the highest quality sounds.
You get to decide on the audio format based on your requirement.
I mostly export Mp3 – because I don’t require further processing, which strikes a balance between size and quality. And experts prefer Wav for the highest quality output.
If your work requires you to hand over your audio files for further processing to an audio engineer, then wav format makes a lot of sense.
Audio Formats and File Sizes – Wav and Mp3
I did a little research to find out how different audio formats (wav and mp3) with varying bit depths compare against each other.
Here we go…
#1) Using Royalty Free Audio in Wav Format
I took Adobe royalty-free sound effect wav format of 40 seconds duration (as shown in the below image) and imported it into Resolve. (You can also download them for free from the Adobe website.)
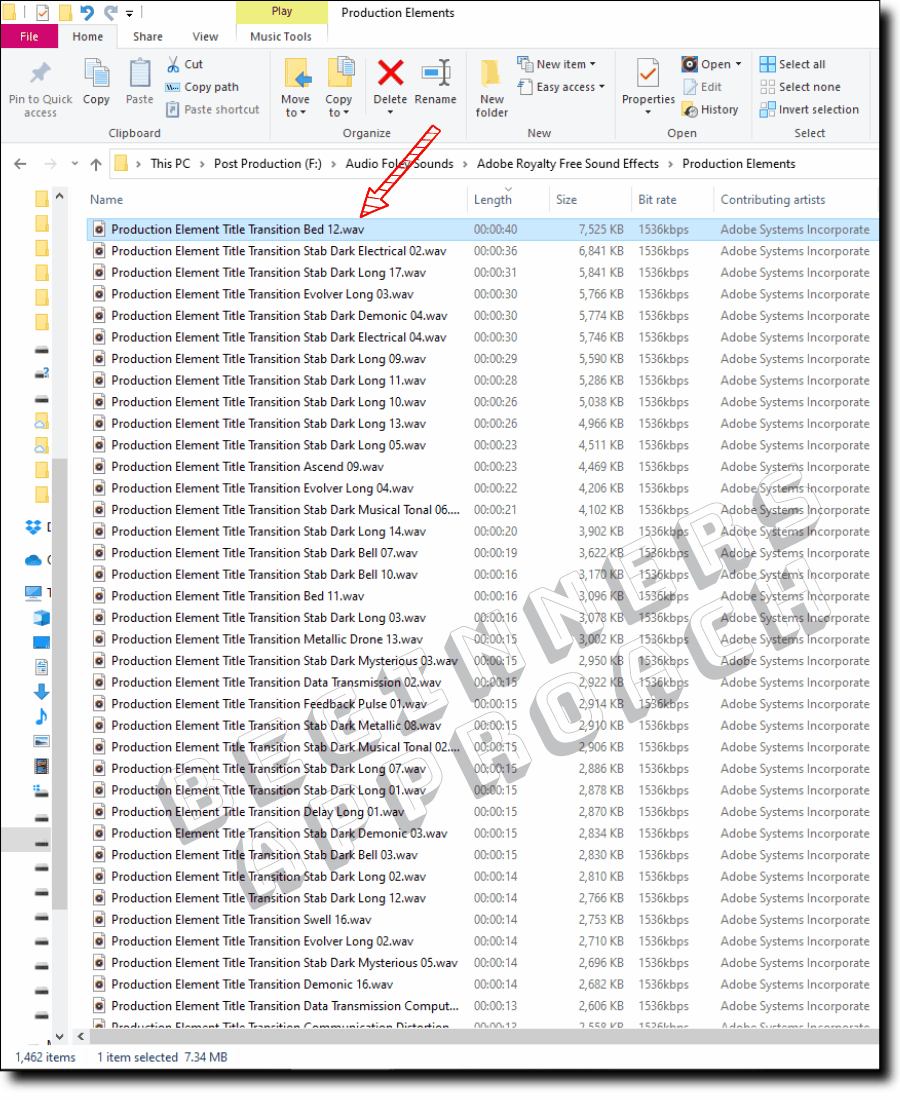
Then did some minor editing and then exported it to different settings for comparison.
Here are the results with different audio formats, bit depths, and codecs:
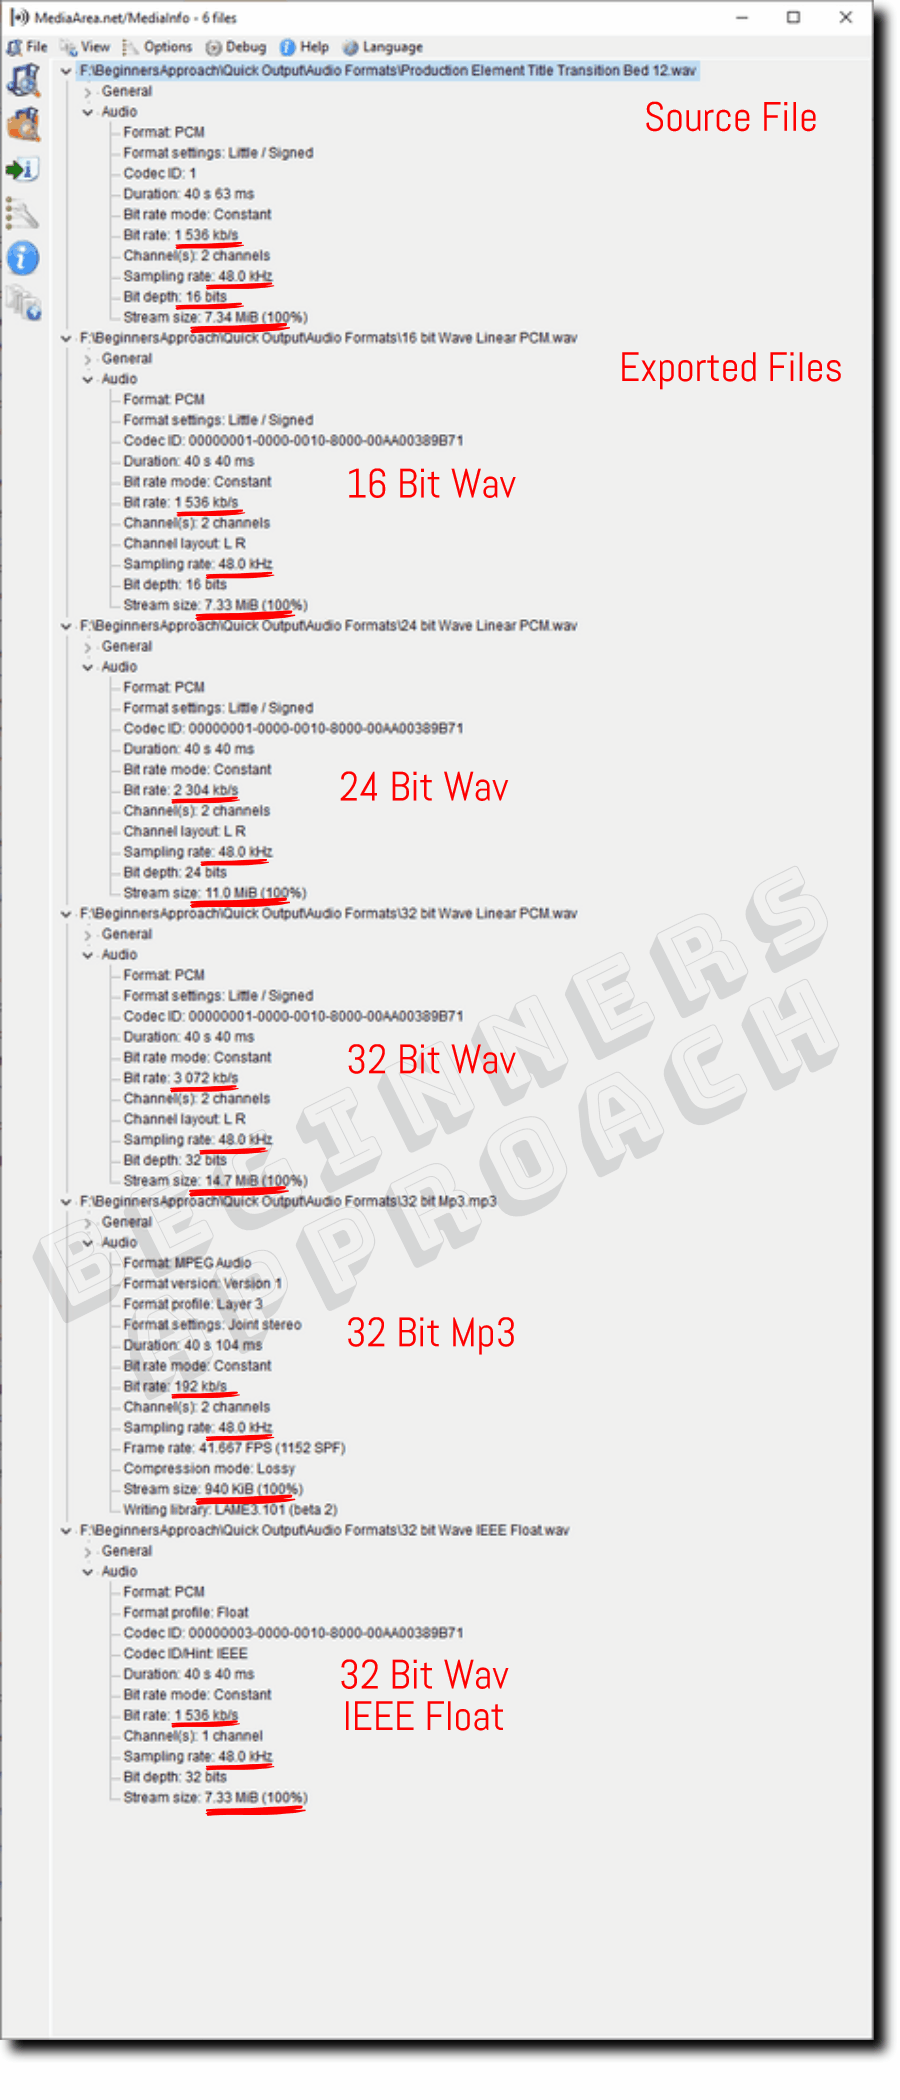
| 48 kHz 40 Sec Files | Codec | Bit Rate (kb/s) | File Size |
|---|---|---|---|
| Input 16 Bit Wav Source File | Linear PCM | 1536 | 7.525 MB |
| Exported 16 Bit Wav File | Linear PCM | 1536 | 7.509 MB |
| Exported 24 Bit Wav File | Linear PCM | 2304 | 11.263 MB |
| Exported 32 Bit Wav File | Linear PCM | 3072 | 15.017 MB |
| Exported 32 Bit Wav File | IEEE Float | 1536 | 7.509 MB |
| Exported 32 Bit Mp3 File | Mp3 | 192 | 940 KB |
Some interesting findings:
If you note, the original 16-bit source file’s bit rate is 1536 kb/s with a sampling rate of 48 kHz, occupying a space of 7.525 MB.
When you export the source wav with the same source settings, that is, 16 bit Linear PCM codec, you get almost the same output – 1536 kb/s occupying nearly the same space – 7.509 MB.
(Note that the default output audio sample rate is 48 kHz).
Since wav is an uncompressed audio file format, the details are sustained and not lost, unlike lossy audio files like Mp3 or AAC.
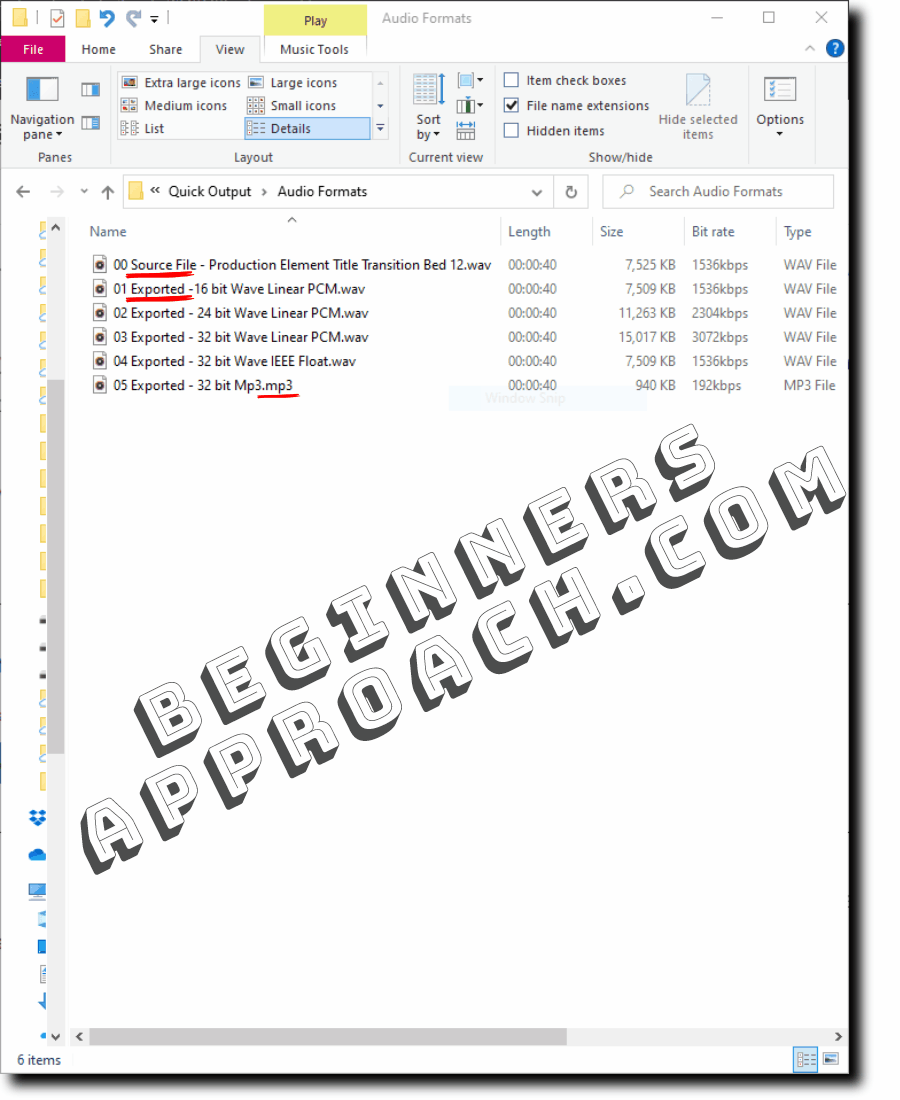
You can also see the maximum bit rate (or data rate) for Mp3 is 192 kb/s in Resolve, whereas a wav can go as high as 3072 kb/s (but this is not an option we can control from the “Deliver” page) – as seen in the above image.
#2) Using Recorded Wav Audio
I recorded a 40-second wav audio from my Zoom H4N audio recorder with the below settings:
- Bit Depth – 24 Bit
- Sampling Rate – 44.1 kHz
- Bit Rate – 2117 kb/s
- File size – 10.2 MB
Then I imported it into Resolve, did some editing (applied equalizer, normalization), and then exported.
Here are the results with different audio formats (wav & mp3), bit depths, and codecs:
| 40 Sec Files | Codec | Bit Rate (kb/s) | File Size |
|---|---|---|---|
| Input 24 Bit 44.1 kHz Wav File | Linear PCM | 2116 | 10.475 MB |
| Exported 16 Bit Wav File | Linear PCM | 1536 | 7.595 MB |
| Exported 24 Bit Wav File | Linear PCM | 2304 | 11.392 MB |
| Exported 32 Bit Wav File | Linear PCM | 3072 | 15.189 MB |
| Exported 32 Bit Wav File | IEEE Float | 3072 | 15.189 MB |
| Exported 32 Bit Mp3 File | Mp3 | 192 | 951 KB |
As I already mentioned in the above section, decreasing the render bit depth (16 bits) compared to the source file (24 bits) will result in data loss.
Keep the rendering bit depth setting the same as the source bit depth (in this case, 24 bits); you almost get the same output bit rate (data rate) and file size.
DaVinci Resolve Supported Audio Formats for Export
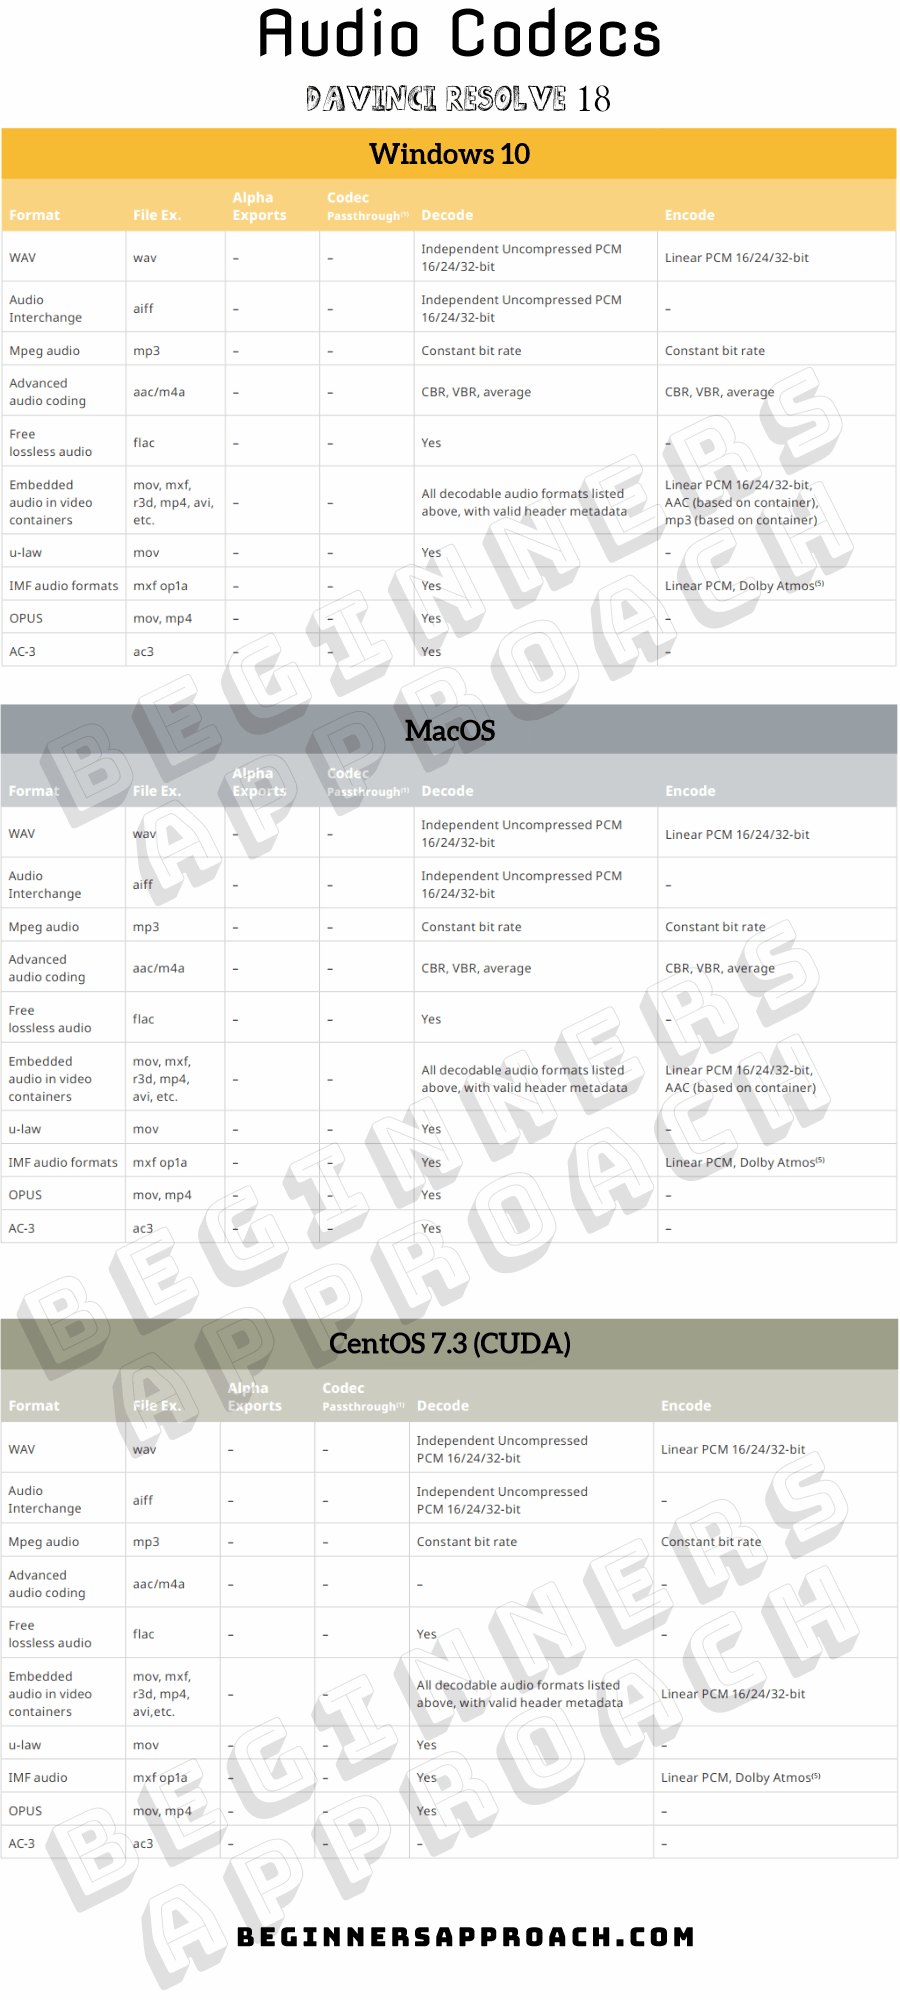
Look at the “Encode” column – those are the formats Resolve can export.
| Windows 10 – Export Audio Formats | MacOS – Export Audio Formats |
|---|---|
| wav – Linear PCM 16/24/32‑bit | wav – Linear PCM 16/24/32‑bit |
| mp3 – constant bit rate | mp3 – constant bit rate |
| aac/m4a – CBR, VBR, average | aac/m4a – CBR, VBR, average |
| Embedded audio in video containers: mov, mp4, avi, r3d, mxf, etc. | Embedded audio in video containers: mov, mp4, avi, r3d, mxf, etc. |
| mxf op1a – Linear PCM, Dolby Atmos | mxf op1a – Linear PCM, Dolby Atmos |
Export Audio from Fairlight in DaVinci Resolve
You can also export audio from Fairlight without going to the “Deliver” page.
Read the below post for a quick step-by-step tutorial.
Both Youtube and an independent mastering engineer have shown the audio quality of music videos (after Youtube’s conversion) is better when the uploaded video source file has the audio as uncompressed 24bit 44.1 SR (.mov format can contain uncompressed PCM audio while many other formats can only contain lossy compressed AAC or MP3). This is why I always render to .mov format with PCM 24 44.1 stereo audio
Also, I, and many engineers recommend that the True Peak of the PCM uncompressed audio should be -0.3 to -1 so that Youtube ( or any other later) lossy compression conversions don’t produce any digital overs. I use -1 to be on the safe side.