
After you import mp3 files inside DaVinci Resolve, you might be surprised to see none of them were actually imported!
If you’re a beginner or newcomer to DaVinci Resolve (versions 18.5, 18, 17, etc.), today’s guide will quickly show you how to fix the mp3 not importing issue in Resolve.
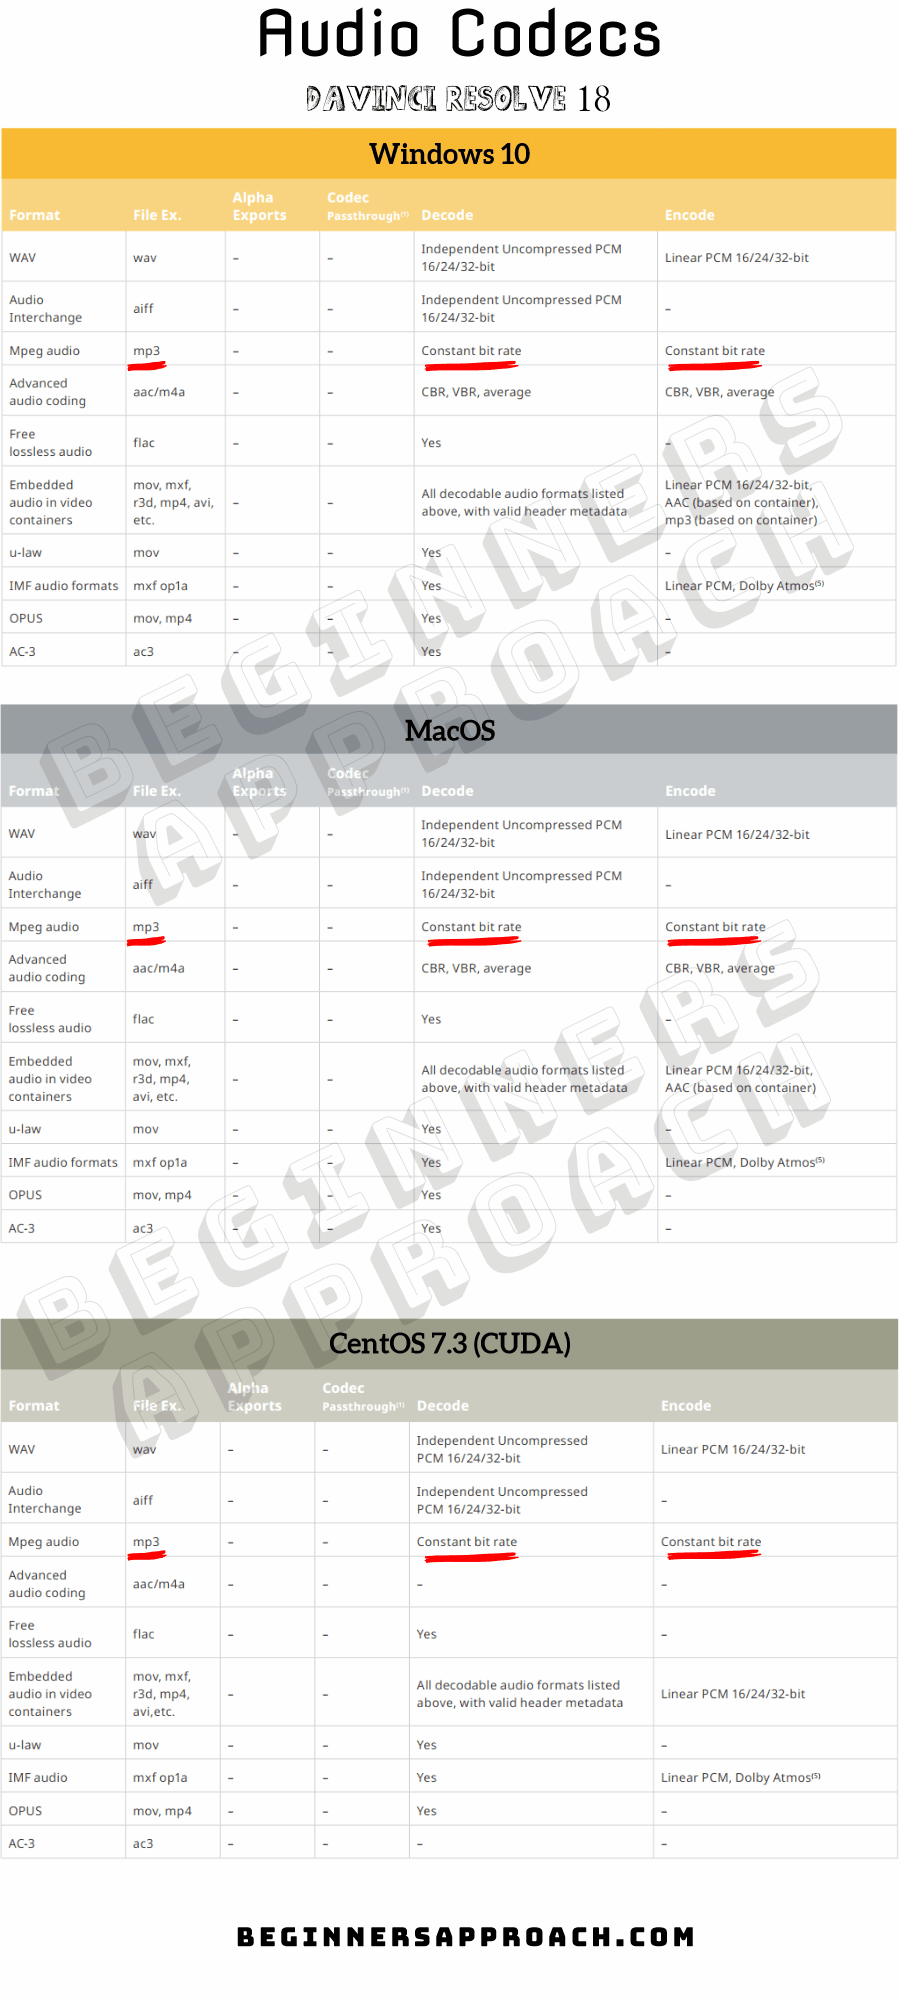
DaVinci Resolve won’t import mp3 because it requires a constant bit rate mp3 file. Therefore, if you have a variable bit rate mp3 file, usually generated by smartphones or online recording tools (like OBS), then you might either fail to import them or have playback issues in Resolve.
To fix the mp3 not importing issue in DaVinci Resolve, convert your variable bit rate mp3 file to a constant bit rate one using Audacity or FFMPEG – free tools. Make sure to place the mp3 file under the audio track instead of the video track.
Let’s explore the fixes for importing mp3 inside Resolve without any issues in detail – step-by-step with pictures!
Fix for Mp3 Importing Issue in DaVinci Resolve
- First, convert your variable bit rate mp3 file to a constant bit rate one.
- To do that, check if your mp3 file has a constant or a variable bit rate mode – using the Mediainfo app (a free tool).
- If your mp3 has a variable bit rate mode, then convert it to a constant bit rate using either Audacity or FFMPEG (free tools).
- Then verify the constant bit rate mp3 using the Mediainfo app.
- Then finally, import your audio mp3 into Resolve.
- If the import is unsuccessful, you can convert or transcode your mp3 file to other formats, say, Wav, aac, mp4. etc., and then import it successfully.
- Let’s get into the detailed step-by-step fix to solve the mp3 not importing issue and then successfully place it on a timeline inside DaVinci Resolve.
To check if your mp3 has a constant or variable bit rate, you have to download and install the MediaInfo app. This is how you do it – step by step.
#1. Navigate to Mediainfo.
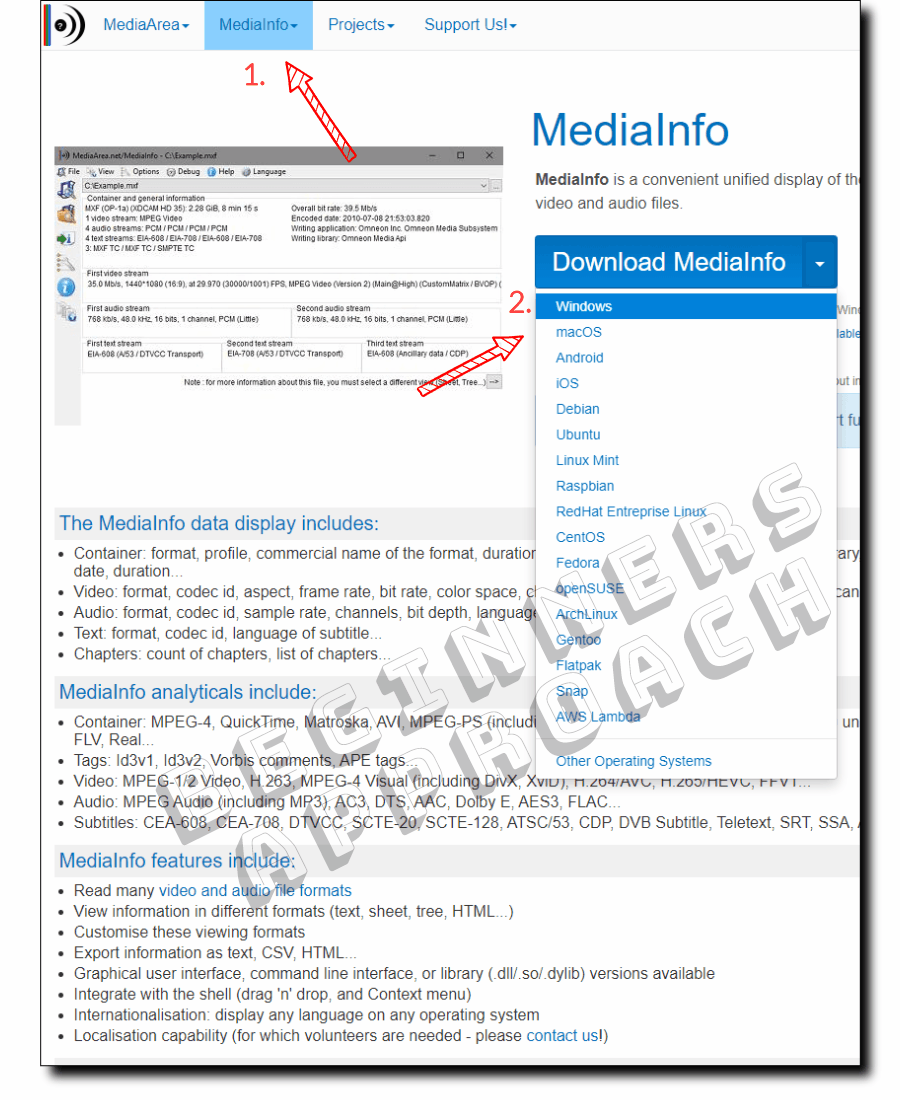
#2. Click on the dropdown to select your OS.
#3. Download the “Universal Installer” and install it.
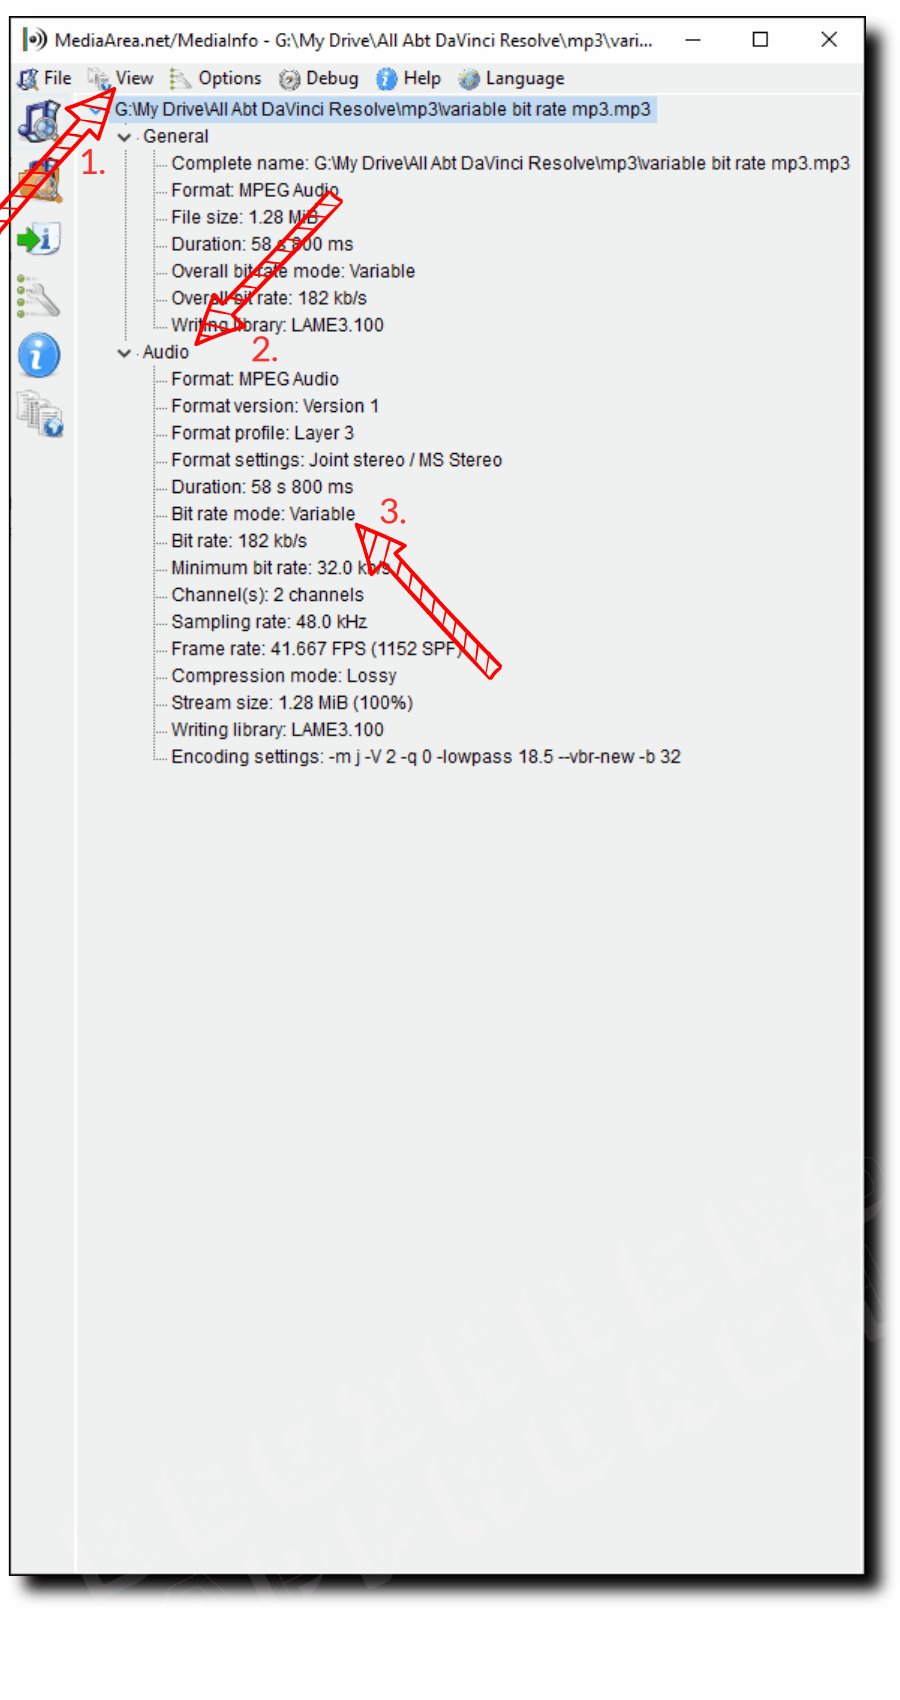
#4. Launch the application.
#5. Go to “File” > “Open” > “File” > Select your mp3 audio file from your system folder.
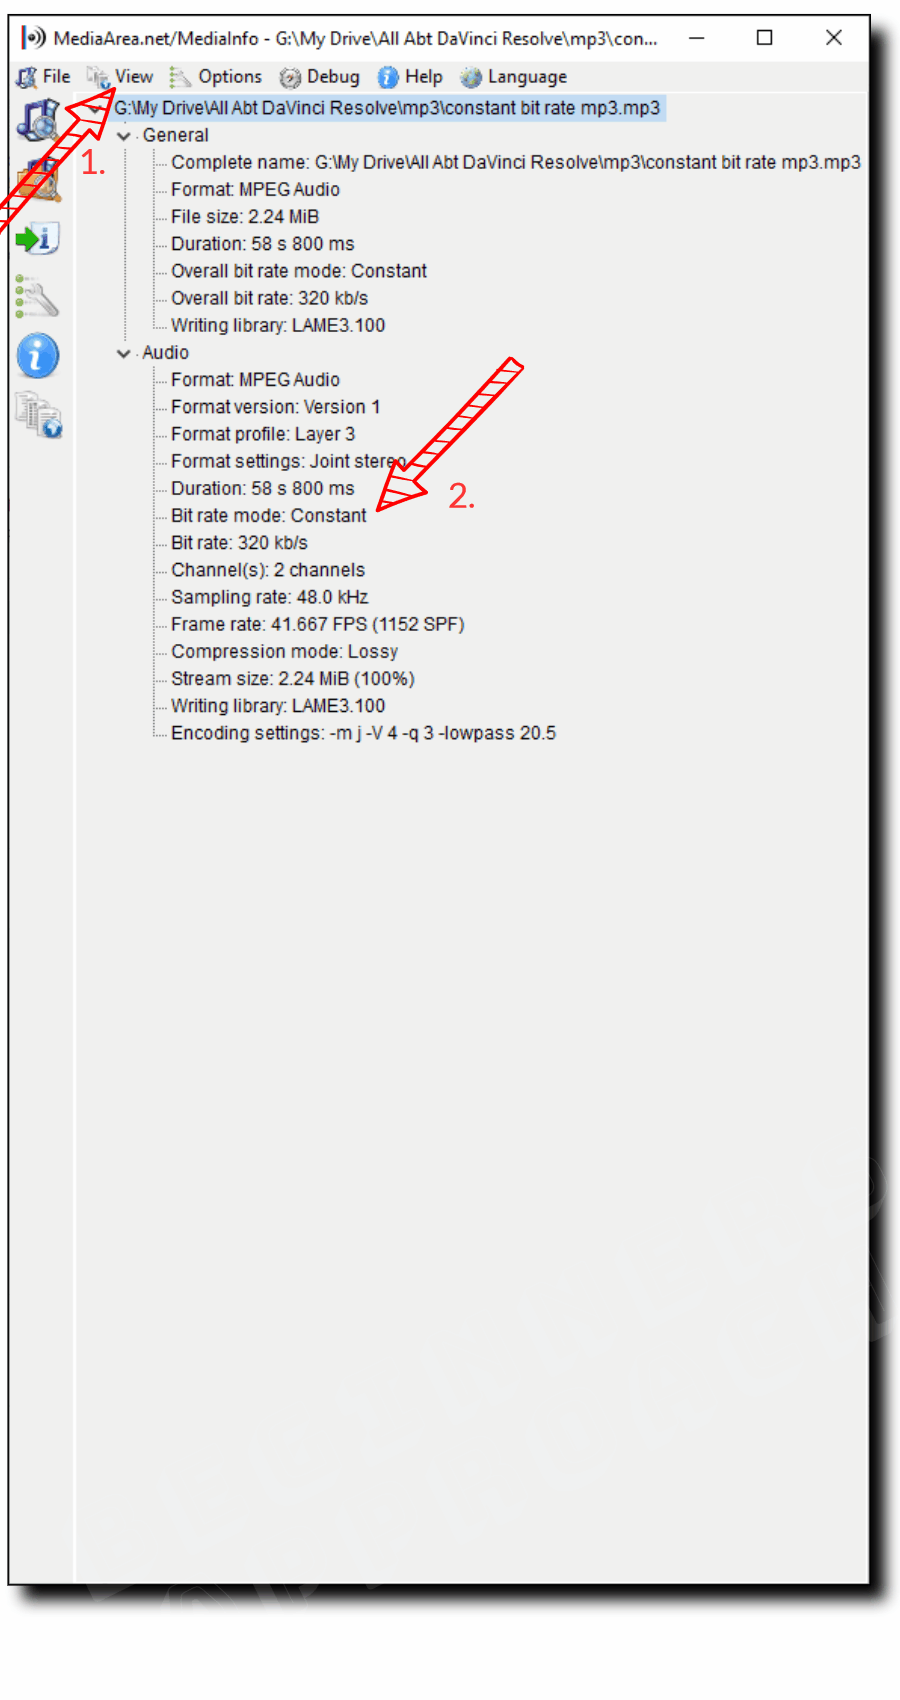
#6. Click on “View” > “Tree”. Check under the “Audio” section.
#7. The “Bit Rate Mode” should display either “Variable” or “Constant“.
How to Convert Variable Bit Rate Mp3 into a Constant One for Resolve?
To convert a variable bit rate mp3 file into a constant one, you can use Audacity or FFMPEG. You’ll have to download and install them. (Both are free).
Using Audacity – convert a variable bit rate mp3 file into a constant bit rate one – the easiest method!
- Head over to Audacity official website.
- Download the installer based on your OS.
- Then install it – a straightforward installation.
- Launch the application and drag and drop your mp3 file (or “File” > “Open” and locate your mp3 file).
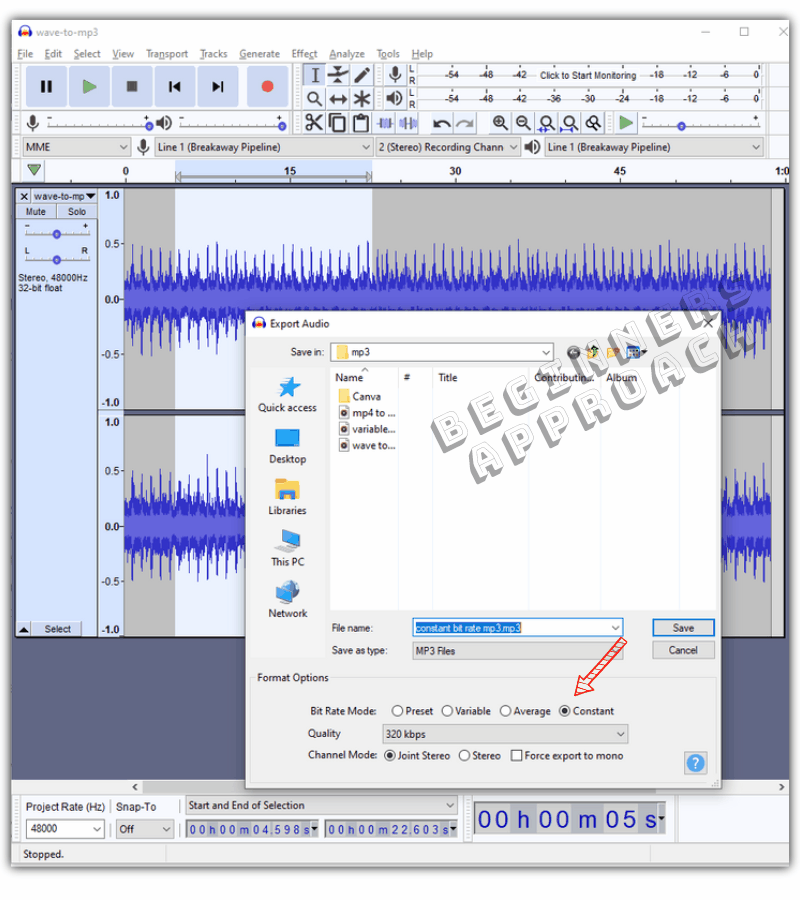
- Then, go to the menu and “Export” > “Export as Mp3”.
- In the “Export Audio” pop-up, under “Format Options“, select “Constant” against “Bit Rate Mode”.
- Under “Quality“, choose high-quality ones like 320 kbps (if required).
- Choose your location and click on “Save“.
- If you get another window titled “Edit Metadata Tags”, click “Ok”, and the file will be exported.
- Your mp3 now contains a constant bit rate, which DaVinci Resolve should recognize and import successfully.
You can double-check the mode of bit rate – constant or variable, using the MediaInfo app discussed above.
After importing, you can edit it with no playback issues in DaVinci Resolve.
But…
If the import is not successful, then proceed to the next step…
This step essentially converts your mp3 to another format, say, wav – which is the recommended one for Resolve.
Using Audacity to Transcode (Convert) VBR Mp3 to Wav for Resolve
- Launch Audacity.
- Drag and drop your mp3 file into Audacity.
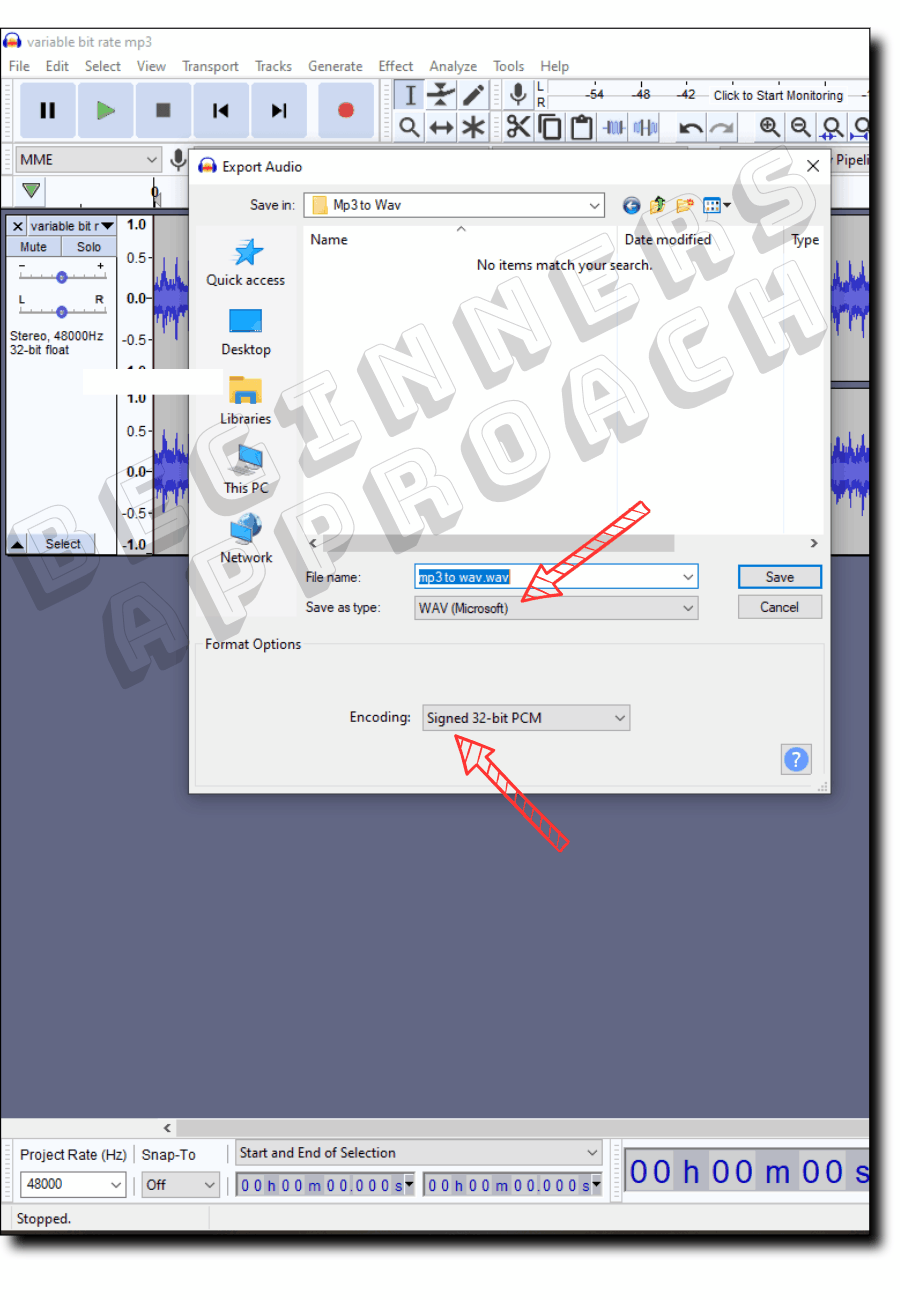
- Go to the “File” > “Export” > “Export As Wav”.
- Enter your required filename.
- Make sure “WAV(Microsoft)” is selected for “Save As Type”.
- Under “Format” options > “Encoding” > Choose a required option, let’s say, “Signed 32 bit PCM”.
- Click on “Save“.
- In the next window, click on “Ok”.
- Your mp3 is now converted to wav format.
Now go ahead and import the wav file into Resolve. It should work!
If this doesn’t import or playback the audio files inside Resolve as expected, you can try the following one.
The Foolproof Method to Convert Your Audio Files – FFMPEG
One of the most robust ways to convert files to any format is using FFMPEG.
FFMPEG is an utility that you need to download and install.
But it doesn’t have a UI (User Interface) like usual desktop-based applications.
You will have to enter commands to execute your instruction. (Don’t worry, I will show you how to do it step by step).
First, read how to download and install FFMPEG the right way. (This tutorial from Wikihow is a helpful step-by-step guide with pictures.)
After following the instructions…
Do the below to convert a variable bit rate mp3 file to a constant bit rate mode using FFMPEG
- Navigate to the folder where you have your audio file.
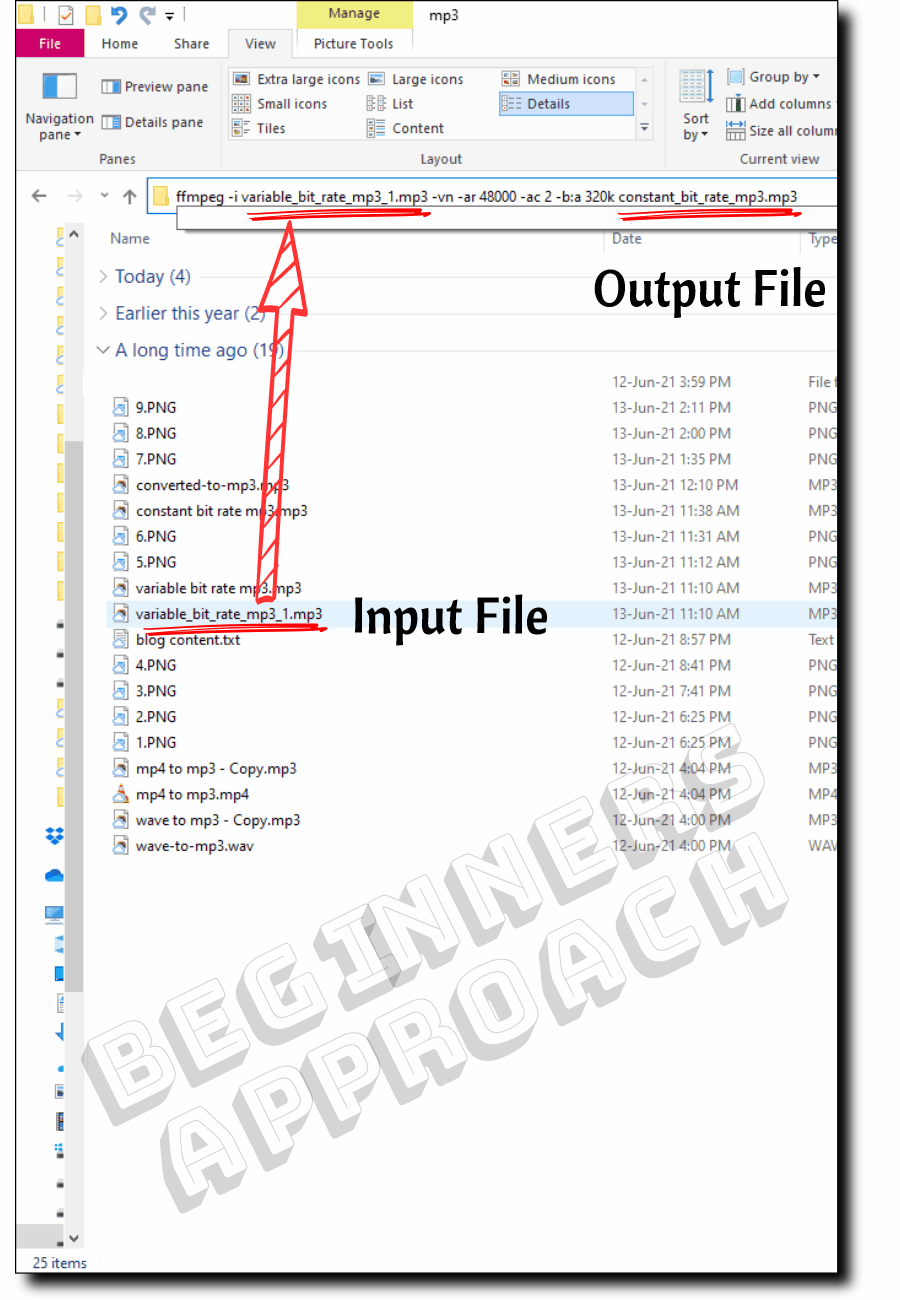
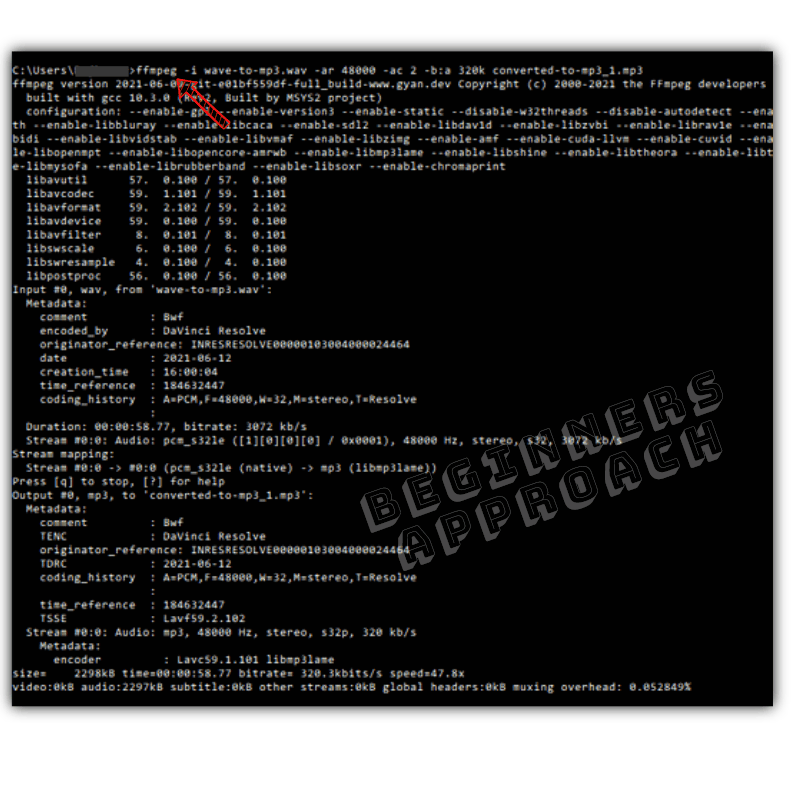
- In the address bar type ffmpeg -i <your variable bit rate mp3 filename>.mp3 -vn -ar 48000 -ac 2 -b:a 320k <any name>.mp3
- For example, I type this in my address bar “ffmpeg -i variable_bit_rate_mp3_1.mp3 -vn -ar 48000 -ac 2 -b:a 320k constant_bit_rate_mp3.mp3“
- Press Enter.
- A command prompt window will open, and your wav file will be converted to mp3 and saved in the same folder.
- The command prompt window will close automatically.
Things to note in the command line:
- -ar 48000 – indicates 48KHz audio frequency
- -ac 2 – indicates 2 audio channels
- -b:a 320k – indicates audio constant bit rate of 320kbps – highest quality
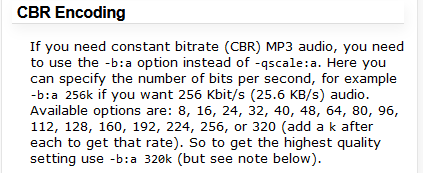
The ffmpeg instruction will include “-b:a” for constant bit rate mode, whereas “-q:a” or “-qscale:a” will be applicable for variable bit rate mode, as per the FFMPEG documentation:
You can take the converted CBR mp3 file and drop it onto MediaInfo to double-check the encoding information (the ones entered in the command line).
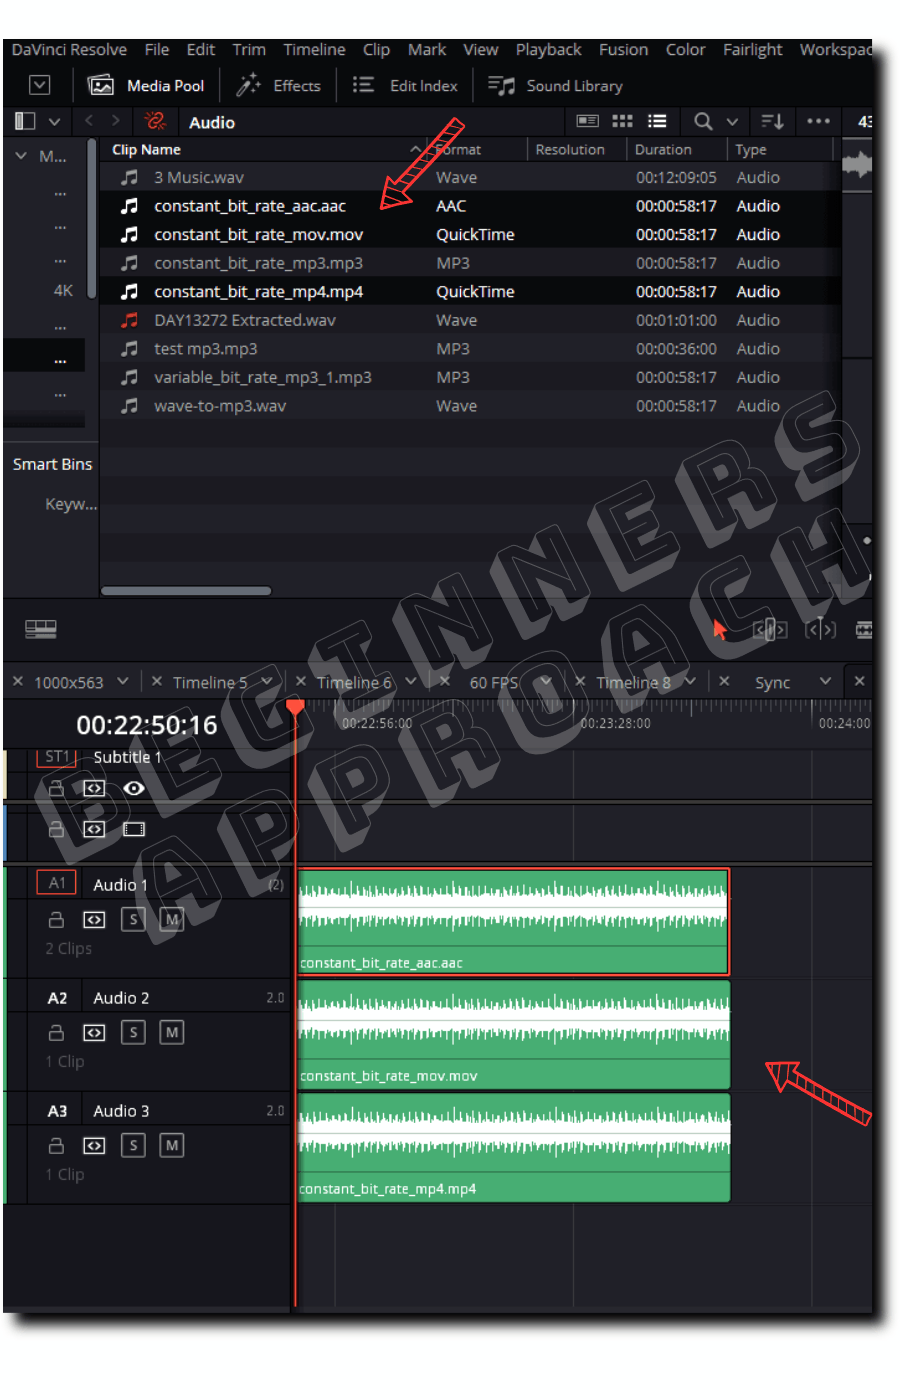
If you are unsuccessful in playing back the mp3 file inside Resolve, then you can try transcoding (or converting) your mp3 file to multiple formats in one go – like aac, mp4, mov, etc., using FFMPEG.
Then you can try importing the files and go ahead with the one format that plays back as expected in Resolve.
Using FFMPEG to Transcode Mp3 to Multiple File Formats – AAC, Mp4, MOV
- Navigate to the folder where you have your audio file.
- In the address bar type ffmpeg -i <your variable bit rate mp3 filename>.mp3 -vn -ar 48000 -ac 2 -b:a 320k <output 1 in mp4>.mp4 <output 2 in aac>.aac <output 3 in mov>.mov
- For example, I type this in my address bar “ffmpeg -i variable_bit_rate_mp3_1.mp3 -vn -ar 48000 -ac 2 -b:a 320k constant_bit_rate_mp4.mp4 constant_bit_rate_aac.aac constant_bit_rate_mov.mov“
- Press Enter. The files will be generated in a few seconds.
You can now import and work with them inside the timeline.
If you are facing problems while executing FFMPEG from the address bar, you can do the same in the command prompt.
Here’s how you do it:
- Press the Windows key and r simultaneously, and you’ll get the “Run” pop-up.
- Enter “cmd” (without double quotes) and press Ok.
- Take note of your path displayed in the command prompt. This is where FFMPEG will look for your wav file.
- Copy the wav file to this path shown on your command prompt.
- Copy your ffmpeg instruction, let’s say, “ffmpeg -i <your filename with extension> -ar 48000 -ac 2 -b:a 320k <any name>”
- Then in the command prompt, right-click and paste the above line of code.
- Press the “Enter” key.
- Your file will now be converted!
Remember that your required file should be copied to the path displayed in the command prompt. Otherwise, you might get a “No such directory exists” error.
There you go!
Closing Thoughts
If you can’t add mp3 in Resolve, make sure you have a constant bit rate audio file.
If not, convert them using Audacity or FFMPEG.
If you are overwhelmed by FFMPEG for transcoding, you can search for online converters to do the job for you.
But spending a little time and learning a a few basic commands with FFMPEG should save you a lot of headaches down the road and give you a robust workflow.
Afte successfully importing your mp3 file, make sure you drag and drop your audio file into the audio track and NOT on the video track.