If you’re a beginner or a newcomer to DaVinci Resolve (versions 18.5, 18, 17, etc.), then today’s guide will help you export mp4 file from Resolve quickly.
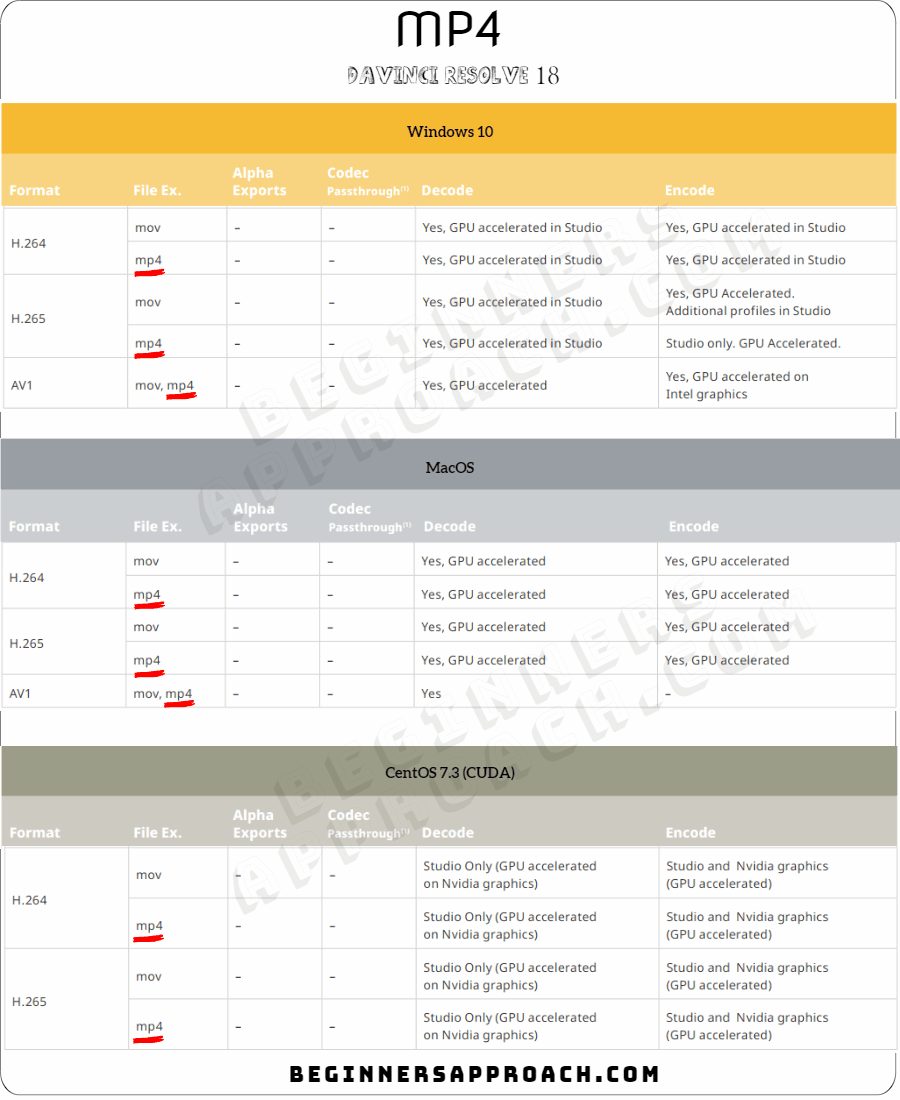
DaVinci Resolve can export mp4 videos by encoding them in H.265(HEVC), and H.264(AVC) codecs (Windows, MacOS and CentOS). Exporting Mp4 files through AV1 encoding is available only in Windows.
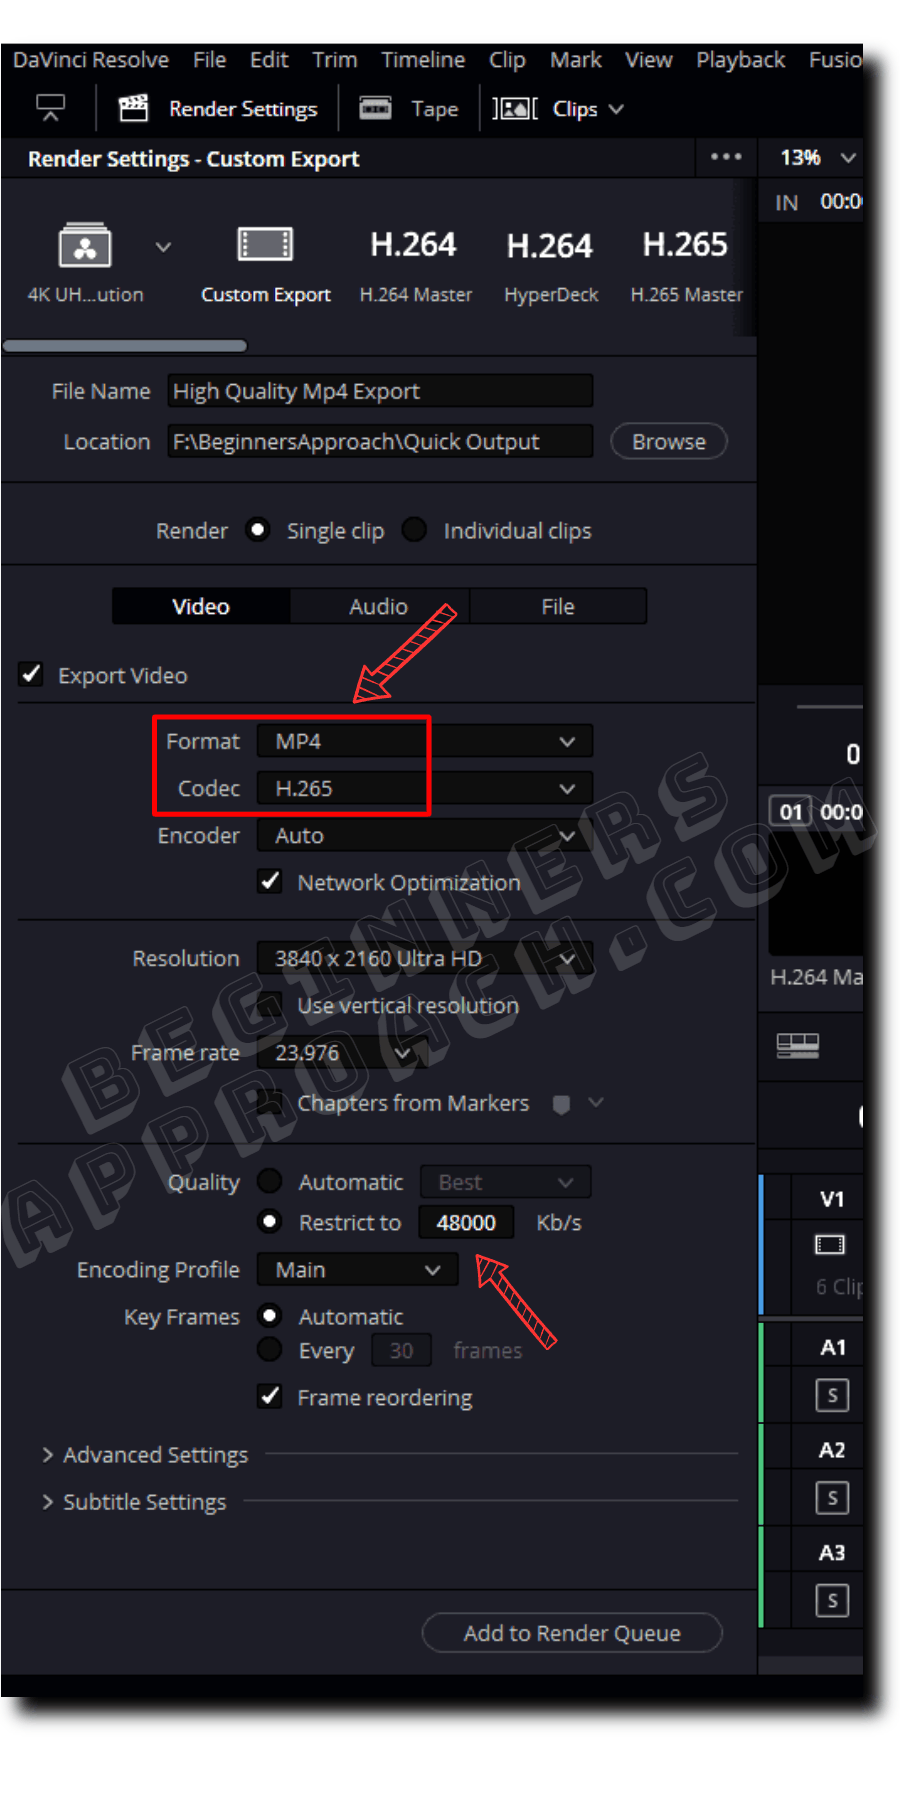
To export Mp4 from DaVinci Resolve, go to the “Deliver” page, then click on the “Custom Export”, select “Mp4” from the “Format” dropdown, set your resolution to, say, “3840 x 2160” for 4K UHD, and finally click on “Add Render Queue”. Hit render. This should export your mp4.
We’ll also look at the best render settings for Mp4 (for social media platforms like YouTube).
Let’s go through the above in detail – step by step – with pictures.
How to Export DaVinci Resolve as Mp4?
- Click on the “Deliver” page (located at the bottom).
- Click on “Custom Export” under “Render Settings”.
- Under the “Video” tab, make sure “Export Video” is checked.
- Select “MP4” from the “Format” dropdown.
- Select “H.265” from the “Codec” dropdown (H.264 is also fine. For more info, scroll down.)
- Choose your required “Resolution“, say, “3840 x 2160 UHD”. (This is the max resolution for free version.)
- Choose your “Frame Rate“, say, “23.976”.
- Set “Quality” to > “Restrict to” > 48000 Kb/s (2000 times the frame rate for a 4K UHD H.265 export.)
- Let the “Encoding Profile” be “Main”.
- Click on “Add to render queue”.
- Click on “Render All” to start the exporting process (found on the right hand side under “Render Queue”).
- Your DaVinci Resolve Mp4 file is saved.

If you have an option for selecting “Constant Bit Rate”, select it. Otherwise, you might not get the expected bit rate.
For the Studio (paid) users, you can speed up your render (or export) time with the help of the “Encoder” option set to “Nvidia” or “AMD” based on your GPU. Unfortunately, the free version doesn’t have hardware acceleration for encoding.
Best DaVinci Resolve Mp4 Export Render Settings
#1) Codec
Codec is one of THE most important settings that determine your final output quality and size.
Remember, Mp4 container can be encoded only in H.264 and H.265 codecs in the free version of Resolve. Windows can encode mp4 in AV1 as well.

The below will give you some ideas on various codecs for delivery:
- High-Quality Master = DNxHR or ProRes – The best possible highest-quality output that acts as a master copy.
- Delivery – H.265 = Highly efficient codec that lowers the file size of your output. But do remember that some of the devices might find it hard to play it back.
- Delivery – H.264 = Most common delivery codec (widely used).
- YouTube = Use H.265 for a higher quality and lower file size upload. If you need the highest quality, you should upload the DNxHR or ProRes output which takes a lot of time to upload. Also, keep in mind that YouTube will further compress your uploaded video to suit the platform’s requirements. Going with a high-quality clean upload is recommended to avoid artifacts.
A small note on H.264 – Most experts recommend not using H.264 codec inside Resolve. Instead, they suggest first rendering the output using DNxHR or ProRes. Then go to Handbrake or Adobe Media Encoder and transcode using H.264 codec for better quality.
#2) Format
Mp4 – This is our expected format.
#3) Bit Rate for 4K Mp4 Video in Resolve
Bit rate is the amount of information packed in 1 second of a video. The bit rate determines the quality of a video.
The higher the bit rate, the more details packed per second – the better the video quality.
Setting the “Quality” to “Automatic” > “Best”, in the “Deliver” page render settings will let Resolve to determine the bit rate for you.
Or you can set it manually – For an H.265 codec, experts suggest a bit rate value equivalent to a minimum of 2000 times the frames per second of your footage.
For example, if your fps is 24, the bit rate should be = 2000 x 24, that is, 48,000 Kb/s.
A 60 fps will result in 2000 x 60 = 120,000 Kb/s.
Now go to the “Deliver” page render settings, and enter the above bit rate value against the “Quality” > “Restrict to” field.
But you can play with different bit rates till you get the desired quality. (The option “Best” should be fine for most scenarios.)
My Little Research on Bit Rate for Mp4
I took a 1-minute 4k video (shot by a Fuji XT series mirrorless camera). I Imported into Resolve, added a fusion title on the Edit page and did some color correction.
Then I rendered the 1 minute video to get a high-quality 4K mp4 output. Here’s a table with all the technical details:
| 1 Minute Source File | Output with “BEST” Quality Bit Rate | Output with Bit Rate set to 2000 times of FPS (48,000 Kb/s) |
|---|---|---|
| 4K video (3820 x 2160) | 4K video (3820 x 2160) | 4K video (3820 x 2160) |
| 23.976 frames per second | 23.976 frames per second | 23.976 frames per second |
| H.264 codec | H.265 (HEVC) codec | H.265 (HEVC) codec |
| Bit rate – 102 Mb/s (or 102,000 Kb/s) | Bit rate – 117,000 Kb/s | Bit rate – 49,400 Kb/s |
| File size – 729 MB | File size – 837 MB | File Size – 354 MB |

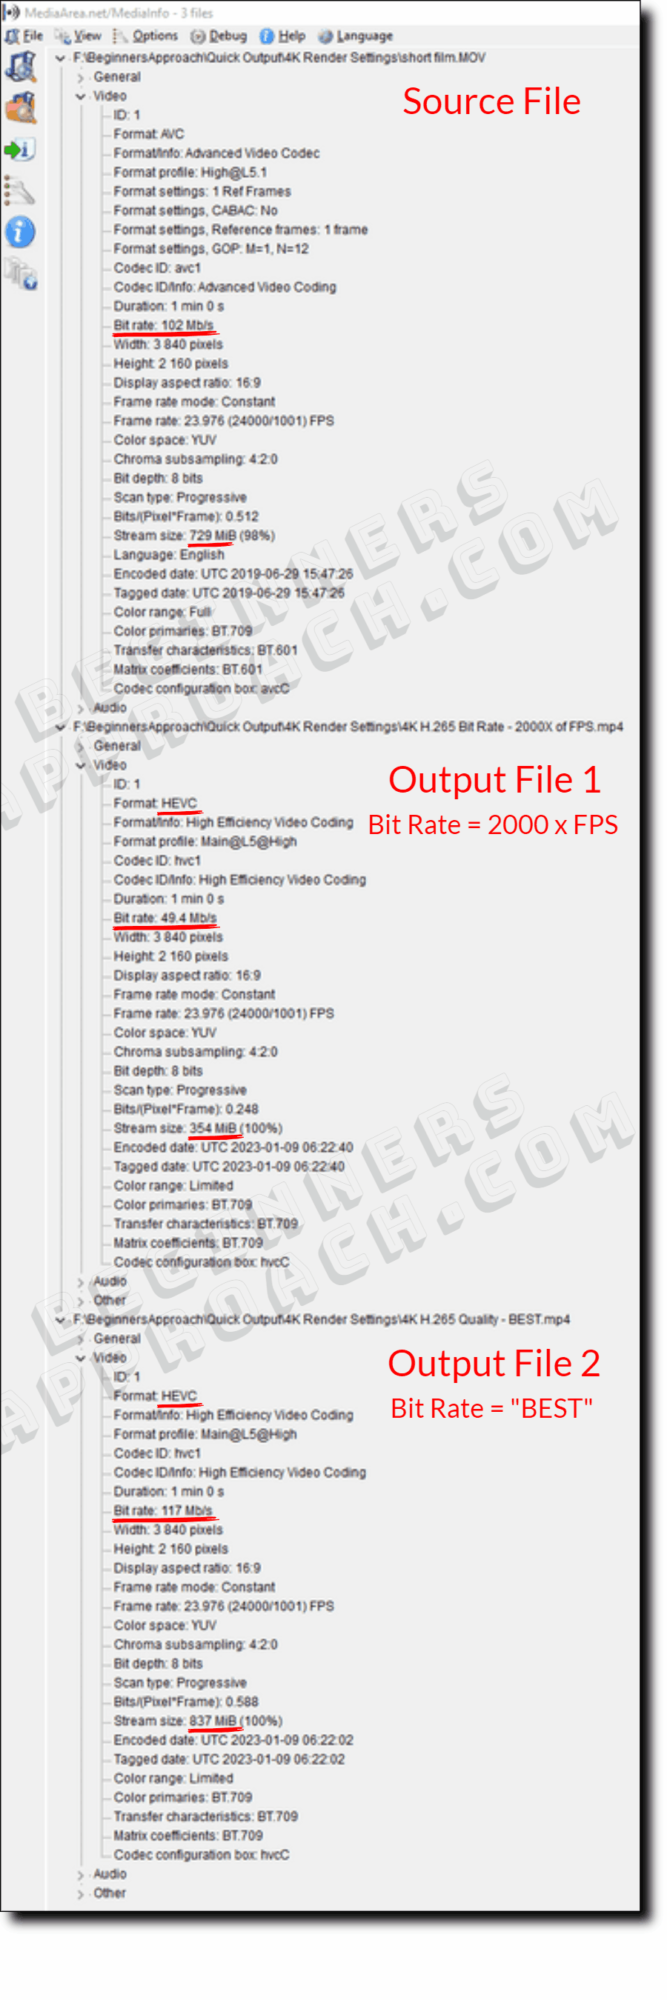
The above table and screenshot quickly let us know the following things (this finding is applicable to the above example only):
The source footage has a bit rate of approximately 102,000 Kb/s with a file size of approx. 729 MB.
If we apply the concept of setting the bitrate to 2000 times the fps, that is, approx. 48,000 Kb/s, we get an output file with a bit rate close to 50,000 Kb/s and a file size of 354 MB which is nearly half of the source file!
This setting saves you a huge space without compromising much on the quality.
If we set the bit rate to the “BEST” quality setting, the output file size is nearly 2 times the source file – because of the higher bit rate (approximately 117,000 kb/s) which Resolve automatically sets on our behalf.
You can then playback the output with different bit rates to check the quality before uploading (or delivery).
If you want to learn to upload to YouTube directly to save time, click on the below for a step-by-step guide:
No Audio After Exporting to Mp4 in DaVinci Resolve?
Make sure the audio track is not muted in the timeline under the “Edit” page. Then go to the “Deliver” page, under “Render Settings”, click on the “Audio” tab. Make sure “Export Audio” is checked.
Make sure “Bus 1 (Stereo)” is selected against “Output Track 1”. (Sometimes “Timeline Track” selected resulted in no audio, as reported by certain users in the online forums).


THIS WAS SUPER HELPFUL CAN’T THANK YOU ENOUGH. send me a donation link to my email and i’ll buy you a coffee. i appreciate the thoroughness of this article, you a real one.
Thank you so much for your valuable comment and support! Glad to know it was super helpful to you!!