Beginners and newcomers to DaVinci Resolve (versions 18.5, 18, 17, etc.) often find it challenging to import and edit Mkv files in Resolve.
Mkv (Matroska) file format is generally exported by screen recorders like OBS Studio.
Does DaVinci Resolve Support Mkv?
DaVinci Resolve does support Mkv natively from versions 17.2, 18, and 18.5. This means older versions like DaVinci Resolve 16 do not support Mkv. There is a workaround to make sure the mkv files are handled by older versions – 16, 17, 17.1, etc.
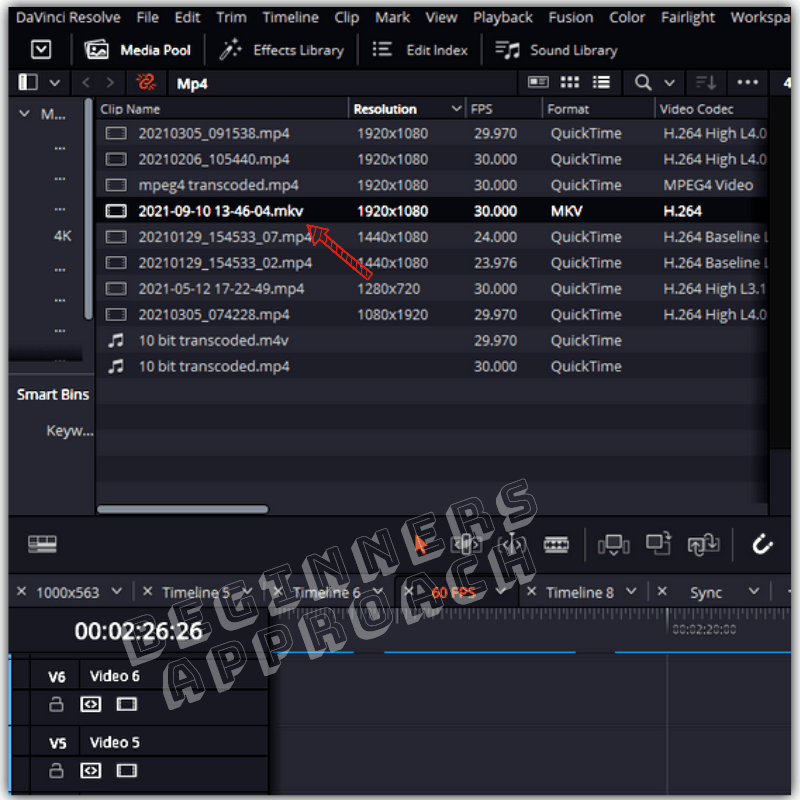
To import mkv in DaVinci Resolve, go to the “Edit” page and then navigate to “File” > “Import” > “Media”. Choose your mkv file. Click on import. Your mkv file is imported in Resolve.
If you face any issues – like mkv no audio or media offline – the fixes for them are also covered below.
Let’s explore the mkv import and fixes for related issues in detail – step-by-step with pictures.
How to Import Mkv To DaVinci Resolve?
- Launch DaVinci Resolve (version 18 or 17.2 onwards) and create a new project (if not already).
- Click on the “Edit” page.
- Click on the “Media Pool” tab from the upper left-hand corner.
- Press the “Ctrl + i” (or “Cmd + i”) shortcut to import mkv media.
- Locate your mkv files, select them, and click on the “Open” button.
- The mkv files are now imported. (If not, then you might have an older version of Resolve).
What to Do If DaVinci Resolve Doesn’t Support Mkv Files?
DaVinci Resolve versions 16, 17, 17.1, etc, don’t support Mkv files natively. The best way is to either upgrade to the latest version or convert the mkv format to the one recognized by Resolve, like, the Mp4 format with H.264 codec.
OBS Studio or other screen recorders record video with H.264 codec, wrapped within Mkv file format. In fact, mkv is the default output recording format in OBS.
Even though you can change the default to mp4 or other formats (which are recognized by Resolve) from the OBS Studio settings, most users don’t do that.
Even if you recorded in mkv format, do not worry, OBS Studio has a built-in feature called “Remux Recordings” to convert your mkv to mp4.
Click on the below to learn more about converting mkv file format to mp4 format within OBS Studio:
You can also convert mkv to other formats using the Handbrake application.
How to Convert Mkv to Mp4 for Editing in DaVinci Resolve Using Handbrake?
- Go to the “Handbrake” website.
- Go to the “Download” section and select the installer file based on your OS.
- Install the setup and launch the application.
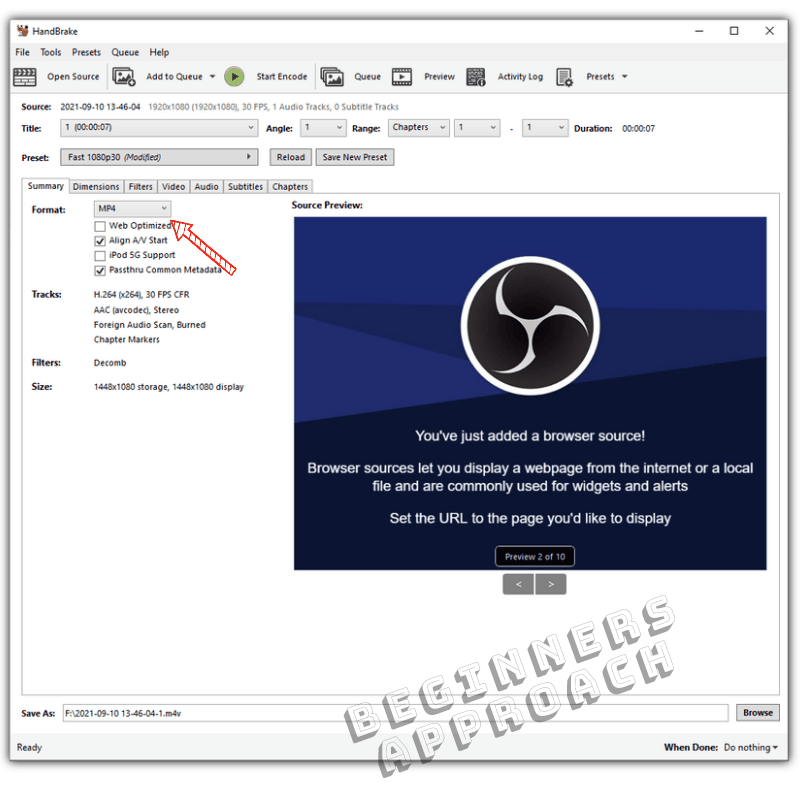
- Go to “File” > “Open Source” > Select your mkv video file.
- Select the required “Preset” (Most probably you will find your required resolution under “Web” or “General” menu).
- Click on the “Summary” and select “Mp4” from the “Format” dropdown.
- Head over to the “Video” tab -> Select “H.264(x264)” from the “Video Codec” dropdown.
- Then select the “Constant Framerate” radio button.
- On the bottom, choose your folder location for the output and rename the file to .mp4.
- Click on “Start Encode” on the top.
- Done!
You can import these transcoded mp4 files to DaVinci Resolve with no issues.
Another effective way is to use FFMPEG – a command-line utility.
With the help of FFMPEG, you can convert any video format to Mp4, and on top of that, you can also convert any video format to editor-friendly codecs like Prores (Mac) and DNxHD (Windows).
(Keep in mind that Mp4 format with H.264/H.265 codec is not editor-friendly and puts tremendous pressure on your computer resources.)
The below article will show you how FFMPEG is used to convert a wav file into mp3.
Mkv or Mp4 Editing Performance Issues in DaVinci Resolve
After making sure DaVinci Resolve can import your mkv file (or transcoded mp4 file), you start editing your footage.
You realize that Resolve is struggling to playback the footage smoothly in real time. This is mainly due to the codecs H.264 or H.265 of your mkv or transcoded mp4 file.
Both of them are highly compressed codecs – especially H.265 is more compressed than H.264. So naturally, your CPU/GPU is under tremendous load to unpack them (decode) and process them in real-time.
The best option is to optimize the footage to a lower resolution by right-clicking your mkv/mp4 files and selecting “Generate Optimized Media“.
Then change the “Timeline Proxy Mode” to half or quarter resolution from the menu “Playback”. This will lower the burden of your GPU so that you get real-time playback.
Apart from that, read the below articles to make sure you utilize your GPU to the fullest:
- How to Make DaVinci Resolve Use GPU (Helpful Tips!)
- Most Common DaVinci Resolve GPU Issues (& How to Fix Them)
- GPU & DaVinci Resolve (9 Things Most Beginners Don’t Know)
DaVinci Resolve Mkv – No Audio After Importing
Sometimes after adding an Mkv file to Resolve’s timeline, you can see the video, but the audio is not present. This is due to Resolve not being able to recognize the audio codec – most probably due to variable bit rate.
The most common issue could be variable bit rate Mp3 audio codecs (since only a constant bit rate is supported by Resolve).
Fix for Mkv No Audio Issue
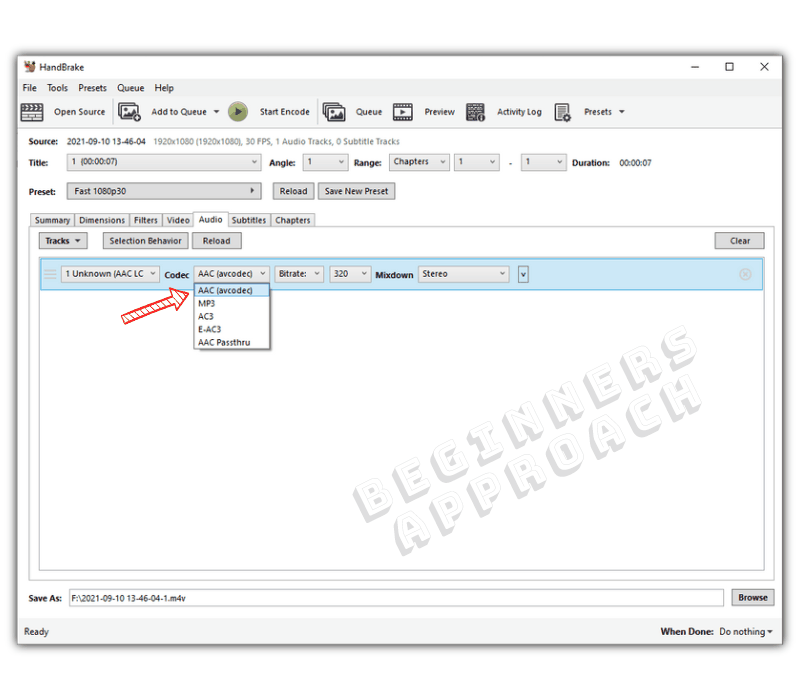
To fix the no audio issue, you should transcode the audio to a constant bit rate mp3 or, still, a better option would be aac – since Resolve can recognize the “aac” format with constant or variable bit rates.
You can open Handbrake, import your mkv file, go to the “Audio” tab, select “AAC” against the “Codec”, and click on the “Start Encode” button.
See if you can hear the audio in Resolve. If not, again, come back to Handbrake and select other listed codecs, encode, and import into Resolve.
DaVinci Resolve Mkv Media Offline Issues
Sometimes when you drag and drop the mkv files into Resolve’s timeline, you might see media offline error. This means that DaVinci Resolve is not able to recognize your mkv (or transcoded mp4) files.
The mkv media offline issue is due to: your video having a heavily compressed H.265 (HEVC) codec, or your mkv (or transcoded mp4) file might contain variable frame rates instead of a constant frame rate.
(Please keep in mind that Resolve only recognizes constant frame rate files.)
To fix the mkv media offline issue, make sure the mkv file resides in high-speed internal storage drives. If you have an external drive, make sure the cable or USB port is fast enough for read and write operations. Make sure to update the GPU driver. Transcode 10 bits 4:2:2 mkv files, since they are not supported in the free version.
I highly recommend the below detailed guide on solving media offline issues: