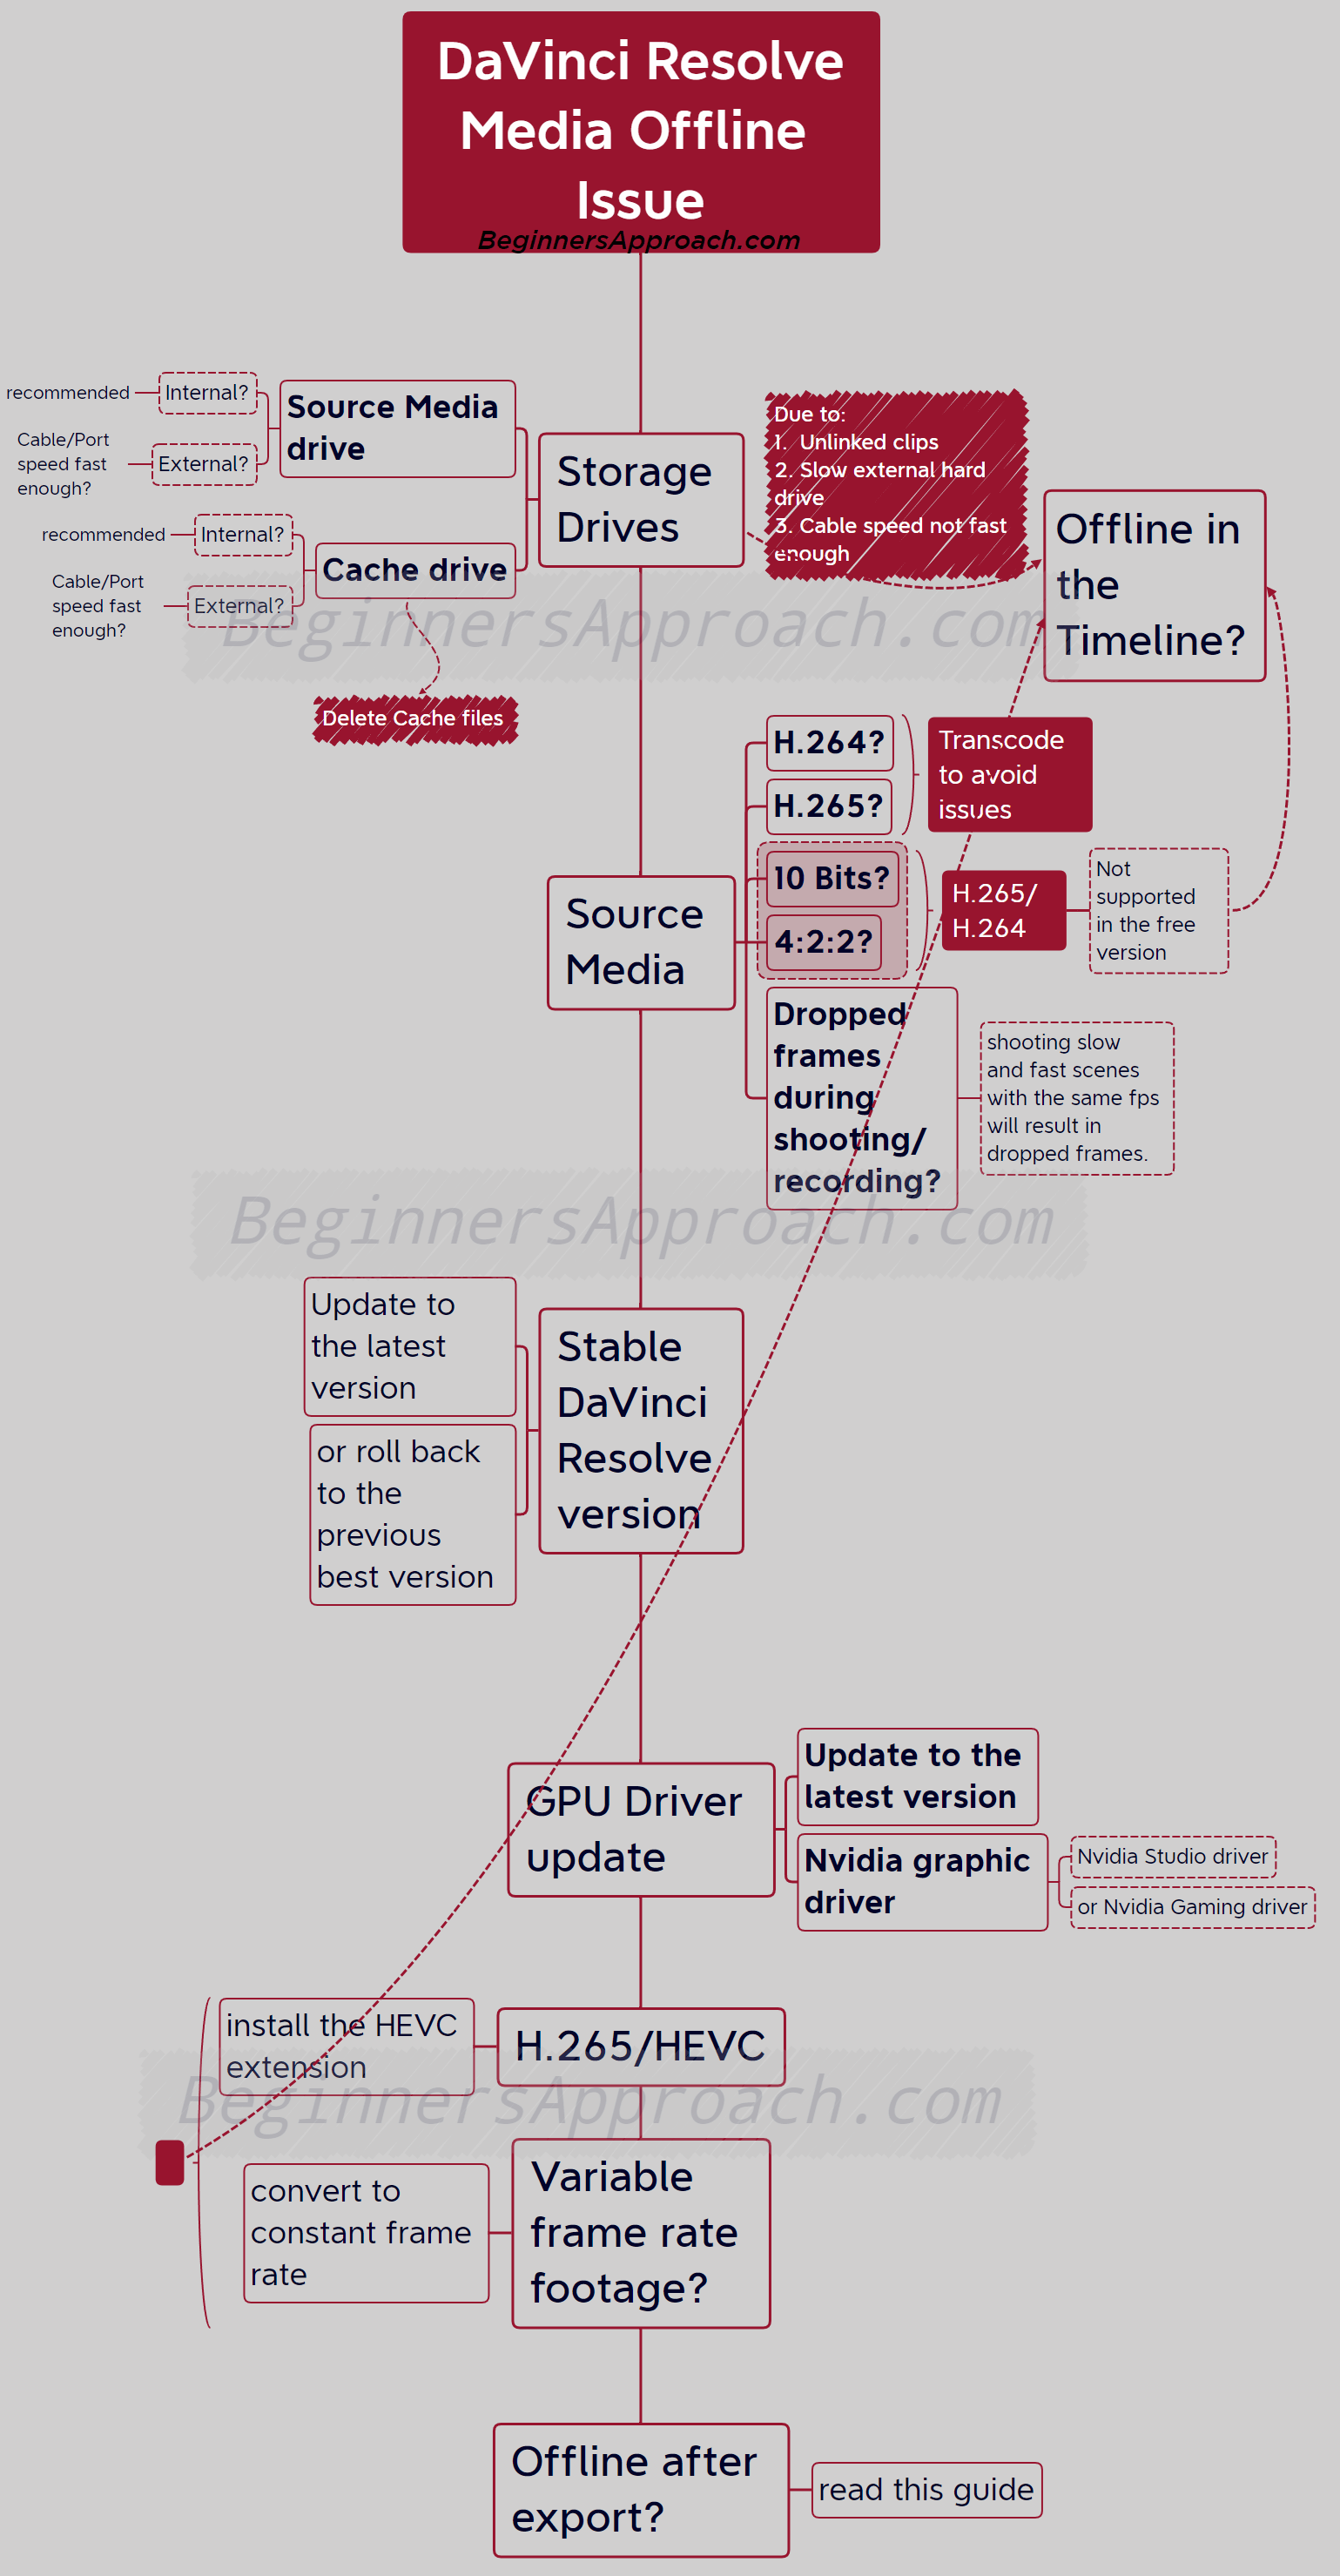
The media offline issue in DaVinci Resolve happens whenever Resolve is unable to read the source footage, due to unlinked clips, external slow storage drives, H.265/HEVC encoded videos, variable frame rate, 10-bit 4:2:2 files, etc.
To fix the media offline issue in DaVinci Resolve, use high-speed internal (or fast cable/USB external) drives for media and cache files. Transcode footage that is shot in 10 bits, 4:2:2, since they aren’t supported in the free version. Update the GPU driver.
This is a step-by-step guide to fixing the media offline issues in DaVinci Resolve (version 18.6, 18.5, 18, 17, etc.) – very useful for beginners and newcomers.
The following media offline issues and fixes are discussed in detail:
- DaVinci Resolve media offline due to unlinked clips.
- Media offline issue on importing of media inside Resolve.
- DaVinci Resolve media offline frames or flickering issues.
- Media offline due to missing clips
- Media offline or Audio sync issues during playback.
- Transcode – The Foolproof method for fixing media offline issue
- #1) DaVinci Resolve Media Offline – Unlinked Clips Issue
- #2 – DaVinci Resolve Media Offline on Import
- #3 – DaVinci Resolve Media Offline Frames / Flickering Issue
- #4 – DaVinci Resolve Media Offline due to Missing Clips
- #5 – Either Audio Sync Issues or Media Offline during Playback
- #6 – Foolproof Method for Media Offline Issue – Transcode Your Media to DaVinci Resolve Recognizable Codec
- Important Points to Keep in Mind
- Before You Go:
The below infographics help you identify the root cause. Once you identify the root cause, the fix is easy – covered in detail below.
#1) DaVinci Resolve Media Offline – Unlinked Clips Issue
Unlinked clips issue results in media offline when your imported clips inside Resolve lose their link with the source footage placed in the hard disk. This happens when you unknowingly move your source footage to a different folder or drive, especially during exporting and importing your projects to another system (laptop or desktop).
Or, whenever you rename your source footage.
Fix for Media Offline Due to Unlinked Clips:
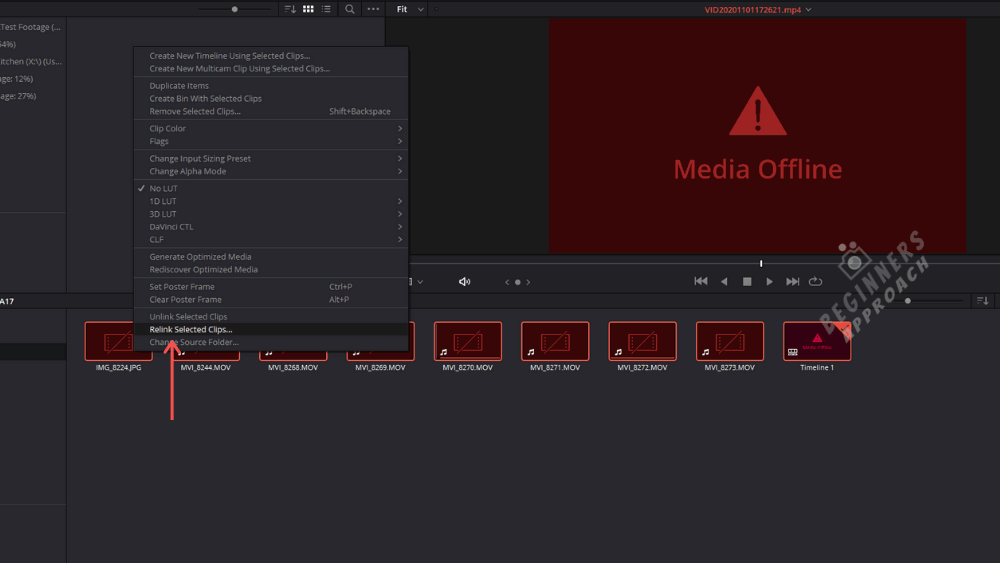
- Go to the Media Pool under the “Edit” or “Media” page.
- Select all of your offline clips
- Then right-click one of the selected clips
- Choose “Relink Selected Clips”
- From the dialog box, locate your folder, which contains the source footage.
- Click Ok.
If for some reason, there are clips that couldn’t be found, then DaVinci Resolve would ask for “Comprehensive Search” in a dialog box.
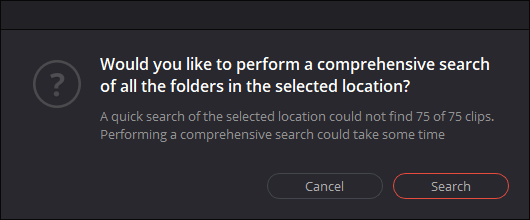
Clicking Search lets Resolve search the source files inside the sub-folders of the selected folder.
If (for some reason) a few clips are offline, then change the parent folder and start the search again.
If unlinked clips are not your issue, then proceed to the next one.
#2 – DaVinci Resolve Media Offline on Import
Importing clips inside DaVinci Resolve turn offline due to the following reasons:
- Unable to successfully play back H.265 or HEVC codec footage.
- DaVinci Resolve free version doesn’t support 10 bits H.264 or H.265 footage.
- DaVinci Resolve free version doesn’t support 4:2:2 chroma sampling.
Now let’s fix the above issues one by one.
DaVinci Resolve Media Offline due to H.265 or HEVC codec
If you import and drag the H.265 clips into the timeline and try to play, either Resolve shows media offline, or you hear the audio with no video.
Media offline issues happen on import in Resolve when high resolution & faster footage (like 4K 60 FPS) and highly compressed H.265. (or HEVC) codecs are encoded by smartphones like iPhone, the GoPros/DJI drones, and mirrorless cameras.
The root cause is the inability to decode HEVC or H.265 by Windows 10. This means Windows needs HEVC extensions to successfully decode H.265 footage (in DaVinci Resolve).
Fix for Media Offline due to H.265 (HEVC) in DaVinci Resolve
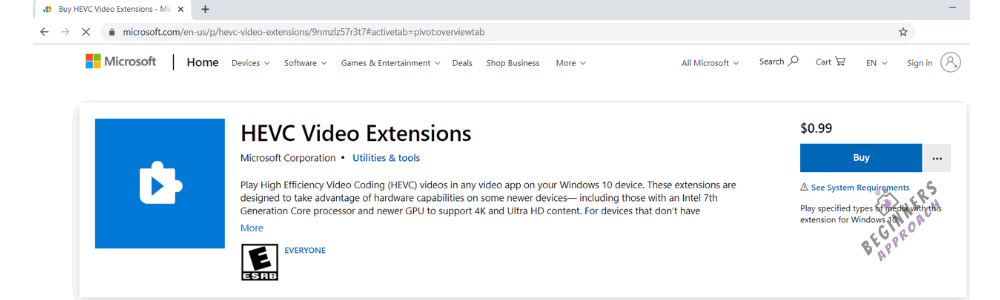
- Go to the Microsoft store or type “Microsoft hevc video extensions” in Google and click on the relevant result.
- Click on the “Buy” button. (You’ll have to purchase it for $0.99.)
- Download and install the extension.
- Restart your PC.
- Resolve should now be able to decode the H. 265 videos.
DaVinci Resolve Studio Supports 10 bits and 4:2:2 Chroma subsampling
Upgrade to the Studio version (or if you can’t, there is a workaround discussed below) to work with the 10-bit footage along with 4:2:2 chroma subsampling, as most modern cameras like mirrorless and drones shoot in high resolution.
Keep in mind that both the DaVinci Resolve free and Studio versions support H.265 decoding, but only the Studio version supports GPU acceleration for Windows. For MacOS users, the free version supports GPU acceleration for both encoding and decoding.
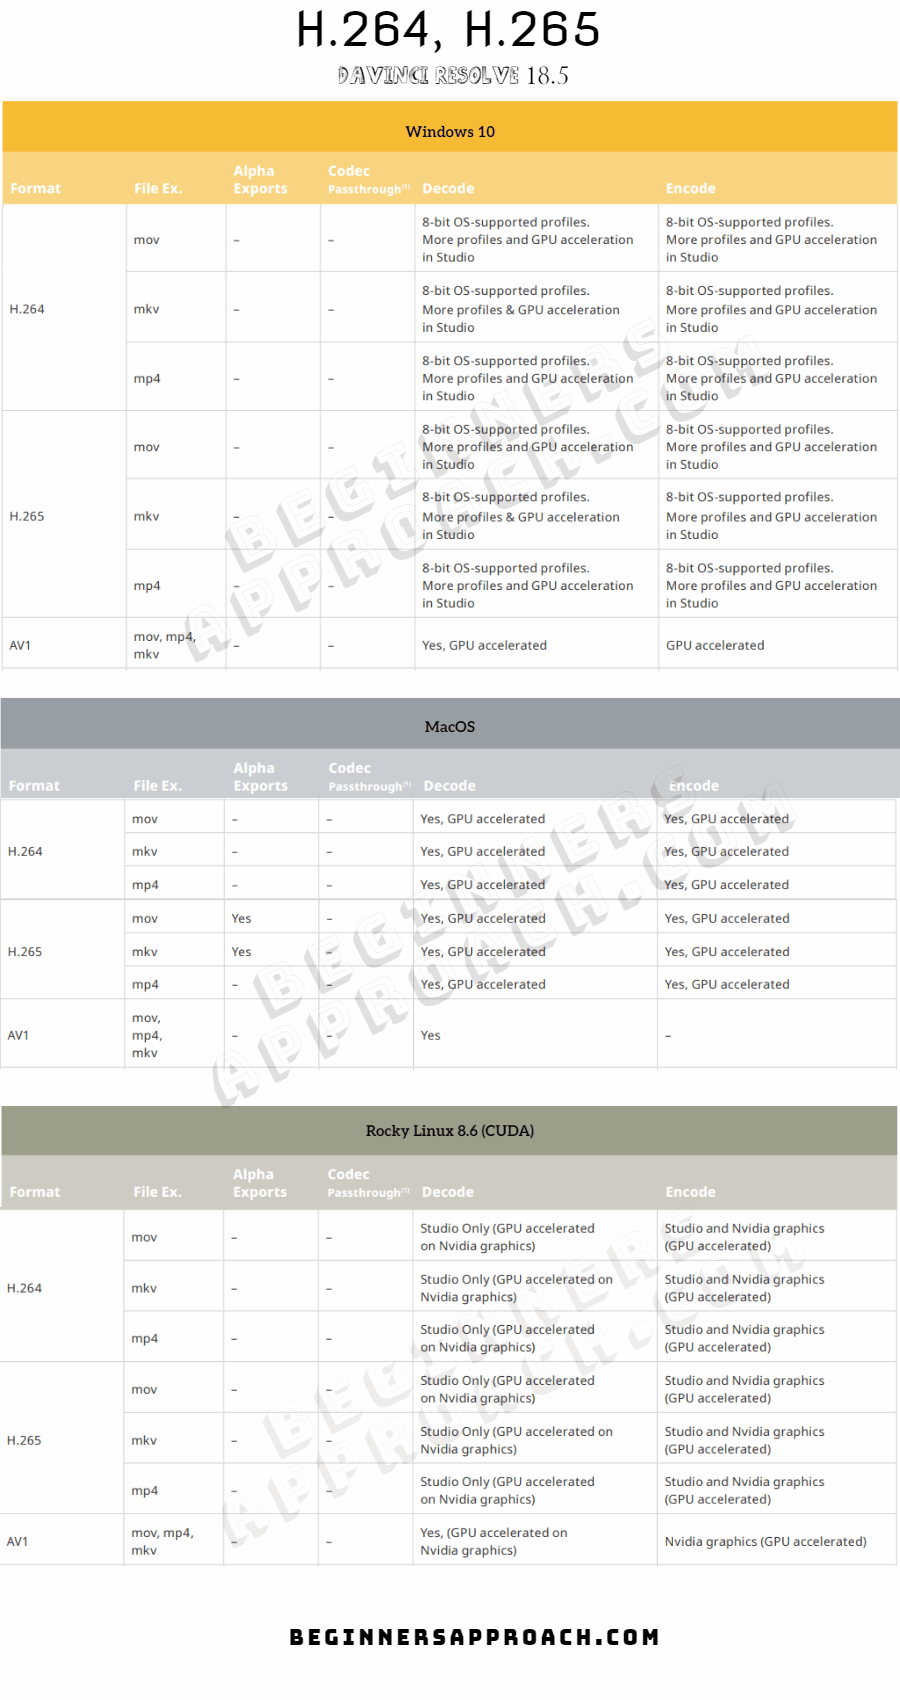
So, if you plan to upgrade to the Studio version being a Windows user, working with H.265 footage should no longer be an issue.
Related Article:
#3 – DaVinci Resolve Media Offline Frames / Flickering Issue
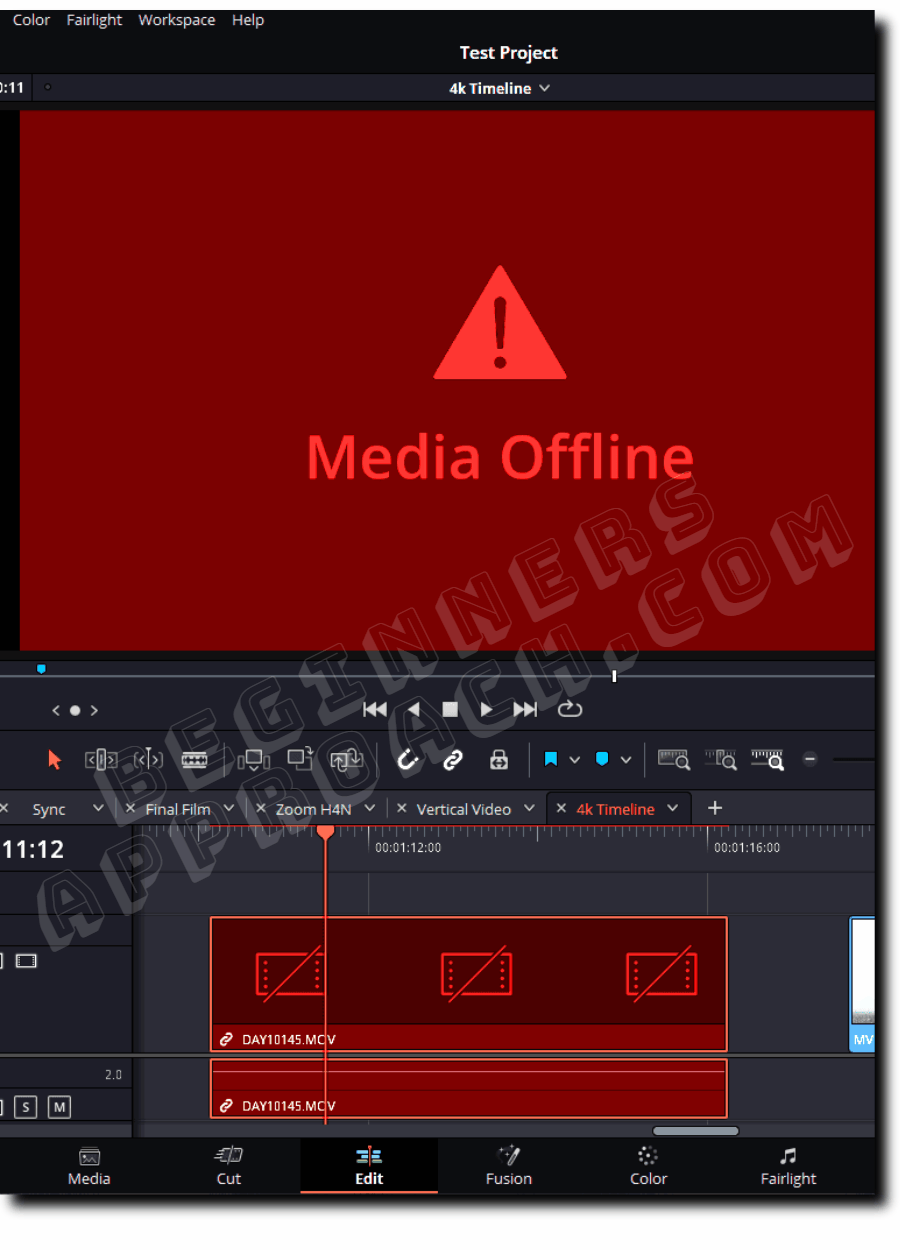
Media offline frames are the most common issue you get while playing back the clip in the timeline. This results in a flickering media offline error.
The media offline frames (flickering) issue is due to the slow external storage drives or the cable (port) speed not being fast enough for the read-write operation. If you have your source footage (especially H.265/H.264) or cache files located in an external drive or USB, make sure the cable is fast enough for Resolve to decode the footage.
Huge file sizes coming from cameras like red cameras – take a lot of bandwidth for read-write operation. Hence, external storage is not suggested.
Another reason – dropped frames during recording. Shooting slow and fast scenes with the same fps will result in dropped frames. Resolve shows the dropped frames as offline.
Fix for Media Offline Frame Issue in Resolve
- Transcode your source files to editor-friendly codecs like DNxHR or ProRes (described below).
- Move your source files to high-speed internal drives.
- Delete cache files (Playback > Delete Render Cache > All or Selected Clips) and regenerate them.
- Make sure the drive with cache isn’t full.
- Regarding your external drive, make sure you assign a drive letter high in the alphabet so that the drive letter won’t change whenever your computer automatically assigns it during loading.
- Make sure the cached folder path has not changed (is the same as the actual path.)
- If none of the above works, then simply copy all of your source media to a new storage device and relink all the files (as mentioned in the above section).
#4 – DaVinci Resolve Media Offline due to Missing Clips
Missing clips are denoted by a question mark in the timeline that is displayed when you accidentally delete a file from the Media Pool.
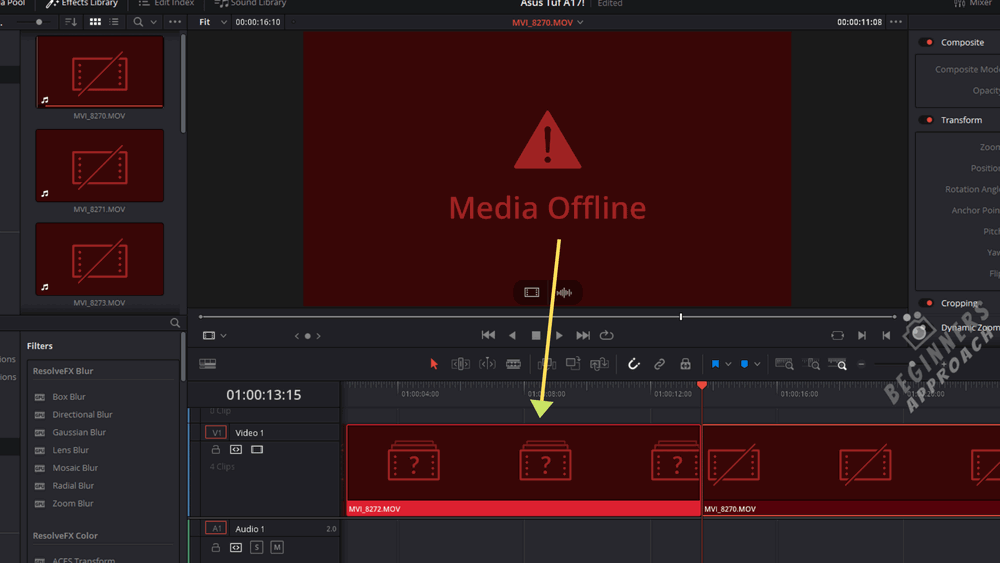
Fix For Media Offline due to Missing Clips:
Re-import the deleted files into the media pool from your source folder.
#5 – Either Audio Sync Issues or Media Offline during Playback
After you import all the clips inside DaVinci Resolve, they turn offline, but the audio seems to be fine. Or, sometimes, the video plays with out-of-sync audio. This is a common issue with Variable Frame Rate (VFR) footage.
The variable frame rate footage is generated by smartphones, OBS(Open Broadcaster Software), and game-play recording software like NVIDIA ShadowPlay, etc. (To the contrary, a DSLR or mirrorless shoots constant frame rate videos.)
Please keep in mind that any editing software (NLE) like DaVinci Resolve or Premiere Pro will expect constant frame-rate videos.
(Learn more about – Frame Rates in DaVinci Resolve (Things You Should Know))
Hence it’s a good practice to convert variable framerate footage into constant framerate ones.
Click on the below article for a step-by-step guide on checking and converting your media to a constant frame rate file.
DaVinci Resolve: Convert Variable to Constant Frame Rate File
#6 – Foolproof Method for Media Offline Issue – Transcode Your Media to DaVinci Resolve Recognizable Codec
Even after following the above steps, if you are still unable to fix the media offline issue, then the best possible solution is to – Transcode your footage.
Transcoding is nothing but re-encoding your footage to other DaVinci Resolve recognizable codecs like:
- #1. H.264, Mpeg-4, VP9, etc. These are highly compressed codecs that can demand a lot of horsepower from your laptop/desktop. (Can use Handbrake)
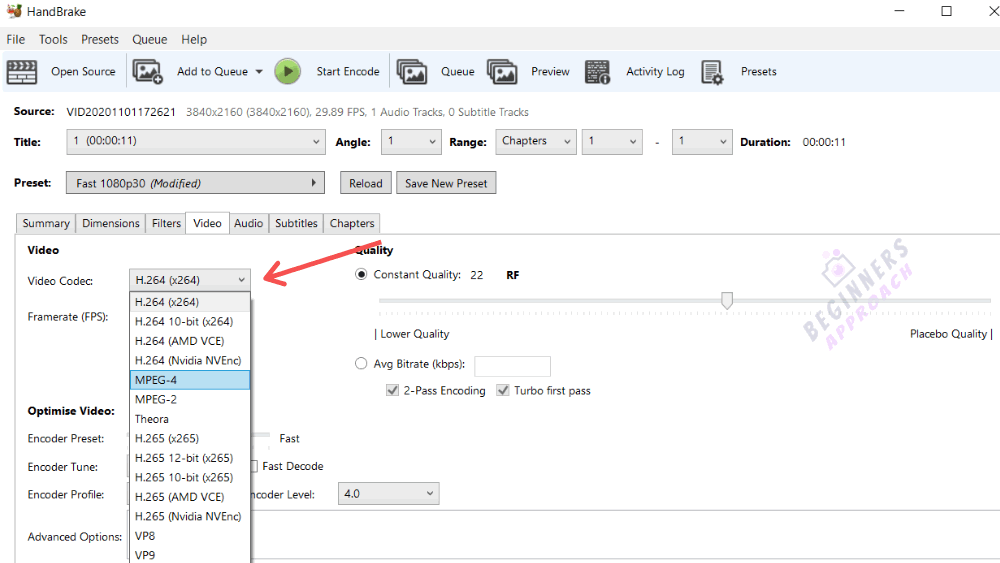
- #2. Post-production friendly codecs like DNxHR (Windows) or ProRes (Mac). These take up huge disk space but are easy to edit and color-correct. (Can use FFMPEG – a command line interface utility).
If you need editing-friendly codecs like DNxHR, PRORES, etc but are facing difficulty working with FFMPEG, then try either of the below steps using Handbrake:
1. Batch transcode your footage into the codec that DaVinci can decode, like H.264.
Then import the footage inside DaVinci Resolve and then go to the delivery tab and export the footage into your required format and post-production-friendly codec.
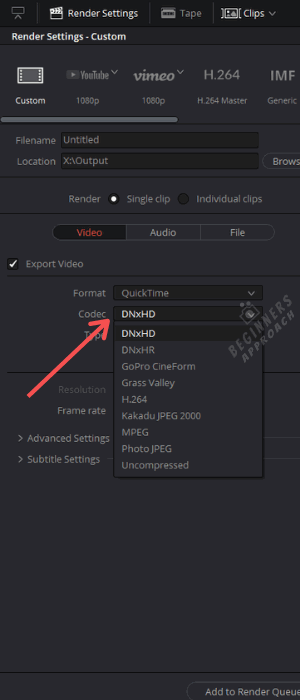
This will export videos that are huge in size but are easy to edit (less stress on your computer’s resources).
Go ahead and import these videos into DaVinci Resolve and start editing.
Or…
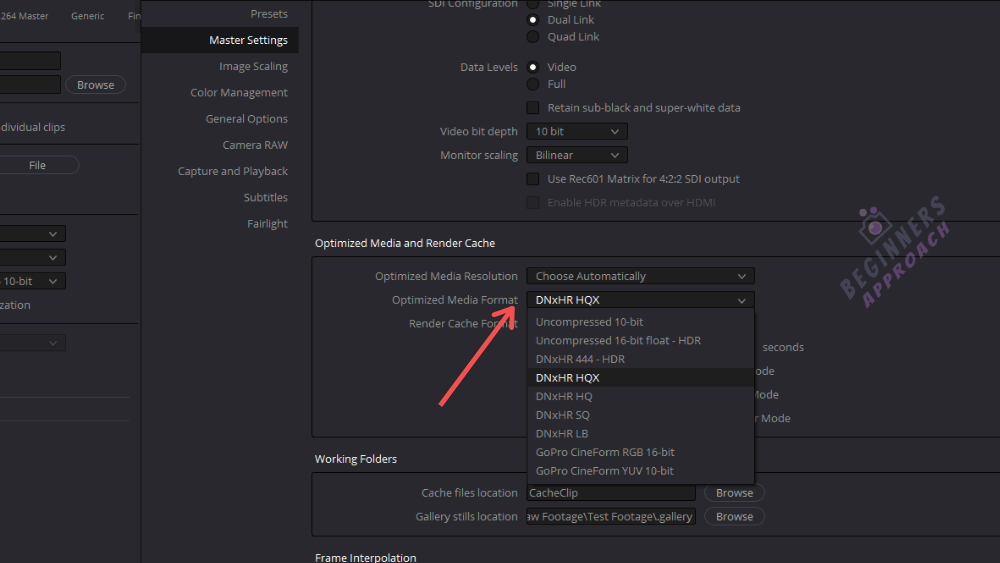
2. After importing the footage that DaVinci can decode:
- Go to “Project Settings” > “Master Settings” > “Optimized Media and Render Cache”
- Select your required editing-friendly codec like DNxHR HQX or Uncompressed 10-bit (can result in huge file sizes)
- Click “Save”.
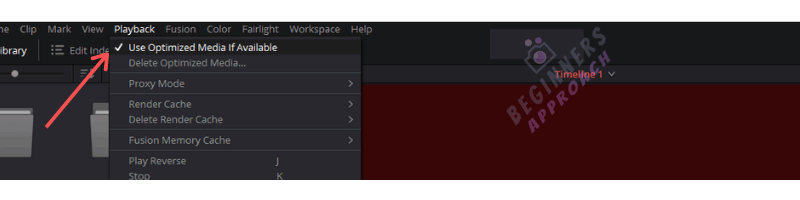
- Go to “Playback” > Check the “Use Optimized Media If Available” option.
- That’s it.
Important Points to Keep in Mind
Whenever you face any problem related to media offline issues, keep a check on the following items:
- DaVinci Resolve updated to the latest version (this can solve some codec support-related issues)
- The latest GPU drivers (preferably Studio versions) are installed and compatible with DaVinci Resolve.
- The codec of your footage like H.265, H.264, etc.
- 8 or 10 bit footage.
- 4:2:0, or 4:2:2 chroma sub-sampling.
- The container or format like .mp4, .mkv, etc.
- Mirrorless/DSLR cameras, GoPros, and Drones like DJI Mavic – can pack the video into highly compressed h.265 codec (in 4K 60fps).
- Videos shot using Smartphone, Screen Capture software – which can result in variable frame rate videos.
- Does the footage play in media players like VLC, etc?
The above knowledge can help you zero in on the root cause…
This can further help you in coming up with a solution using the various methods we discussed in this post.
Before You Go:
If you want to learn more about render cache, optimized media, and proxy media, refer to the below helpful guides:
DaVinci Resolve Render Cache (3 Settings for Smooth Playback)
DaVinci Resolve Optimized Media (3 Important Things to Know)
Thank you, that helped a lot. Variable framerate was the problem.
You’re welcome!
Or. as in my case and solved, the file name is too long!! I renamed my jpg and it works now!
In my case, relinking does not work, and I don’t think the codec or format are a problem. The file in question is a jpeg, 564 pixels wide and 400 pixels high. It was produced in Microsoft Paint, and I’m trying to import it into Davinci Resolve 17 running on a Mac. In the past, with previous versions of DR, I’ve had crashes upon importing jpegs, or the jpeg would import but have no content (entirely black image), but in those cases the jpegs were all extremely long and skinny (for example, 11,000 pixels wide and 400 high), and I could fix the problem either by cutting the length or enlarging the height, as if aspect ratio were somehow a problem.
My jpeg had an Alpha channel (don’t know why). Removing that fixed the problem. Dimensions were not a problem, since the same trick made it possible to import a much larger and skinnier image.
Thanks for your information!
Thanks, i bought the HEVC extension for $0,99 and it worked fine!
But it’s weird because my offline files came from my phone’s camera, and i didn’t have this issue on the past with the files from this exact same phone…
THANKS SO MUCH! I have a gopro hero 11 and windows 11, it was saying media offline i tried other fixes but all i had to do was download that windows store encoder you linked in the second fix. thanks a ton!!!
Glad to know it was super helpful to you!
Merci à vous pour votre aide.
I helped!! Thank you so much!
Glad it helped!
Thank you thank you thank you SO MUCH
FIX #7 helped! Now I don’t have to redo days of my editing progress.
You should really consider putting these tutorials into video format for YouTube. I could not find any solution on there.
Thanks for your comment. I am glad the post was helpful!