As you might be aware, DaVinci Resolve uses GPU for all of its image processing activities like color grading, effects, etc.
Though DaVinci Resolve Studio (paid version) can effectively use GPU for both decoding and encoding (rendering), there are some limitations for DaVinci Resolve Free version when it comes to GPU acceleration.
Today we’ll see how to make sure your DaVinci Resolve uses GPU effectively.
And…
We’ll also see few work-arounds to overcome the limitation of DaVinci Resolve free version with respect to GPU acceleration.
Let’s get started!
What is GPU Acceleration?
GPU acceleration is a process in which highly computational tasks, like complex image processing, are offloaded to GPU (from a CPU) so that the realtime playback is maintained and the CPU is free to do other tasks.
The basic hardware of a GPU has more transistors which take up a lot of data processing when compared to CPU.
According to BlackMagic, as already stated, the image processing is taken care by the graphics card unlike other traditional editing tools.
What is GPU Decoding?
The process of decoding (decompressing a codec for further processing) is generally taken care by CPU (not GPU).
But certain graphics card can actually decode, which means there is hardware acceleration available for decoding, also known as GPU decoding.
DaVinci Resolve has the capability to make use of such graphics cards (like Nvidia GeForce GTX 1650) to leverage decoding of highly compressed codecs like H.264 (AVC) and H.265 (HEVC), which enables the playback of high resolution footage at real time (without drops in frames)!
The CPU is freed up for other tasks and the GPU does the heavy lifting.
The more beefier your GPU (more cores and onboard memory), the smoother the real-time playback of high resolution footages like 4K 60 FPS.
What is GPU Encoding?
Encoding is a process in which the CPU renders all the edits, transitions, effects, color grading into one video file for streaming. Certain GPUs can take up this task and can quickly render the video file because they are specialized to do so.
This means we have hardware acceleration available for encoding (rendering), also known as GPU encoding.
Rendering highly compressed codecs like H.264 and H.265 takes a lot of time by the CPU because of complex computations involved.
But when the GPU acceleration is available, then the rendering time is greatly reduced!
GPU Acceleration Supported Codecs in DaVinci Resolve
DaVinci Resolve has GPU acceleration for the following codecs:
| Codecs | Decoding | Encoding |
|---|---|---|
| H.264 | GPU Acceleration Supported | GPU Acceleration Supported |
| H.265 | GPU Acceleration Supported | GPU Acceleration Supported |
| Red | GPU Acceleration Supported | GPU Acceleration Not Supported |
If you have any GPU related issues in DaVinci Resolve, then read the below article:
Best DaVinci Resolve GPU Settings
The below settings will make sure Resolve is using the GPU at an optimal level:
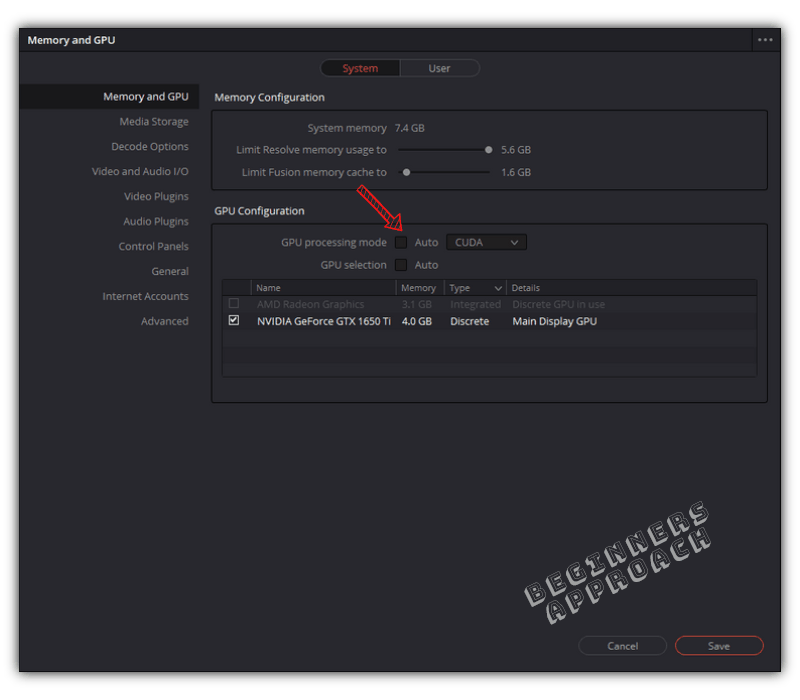
- Go to the menu “DaVinci Resolve” -> “Preferences” -> “System” -> “Memory and GPU” -> “GPU configuration”, for “GPU Processing Mode” and “GPU Selection“, uncheck “Auto” and select either “Cuda” (for NVidia) or “OpenCL” (for AMD Radeon).
- For Studio users, under “Decode Options” -> check “Decode H.264/H.265 using hardware acceleration” -> check either “Nvidia” or “AMD” based on your graphics card.
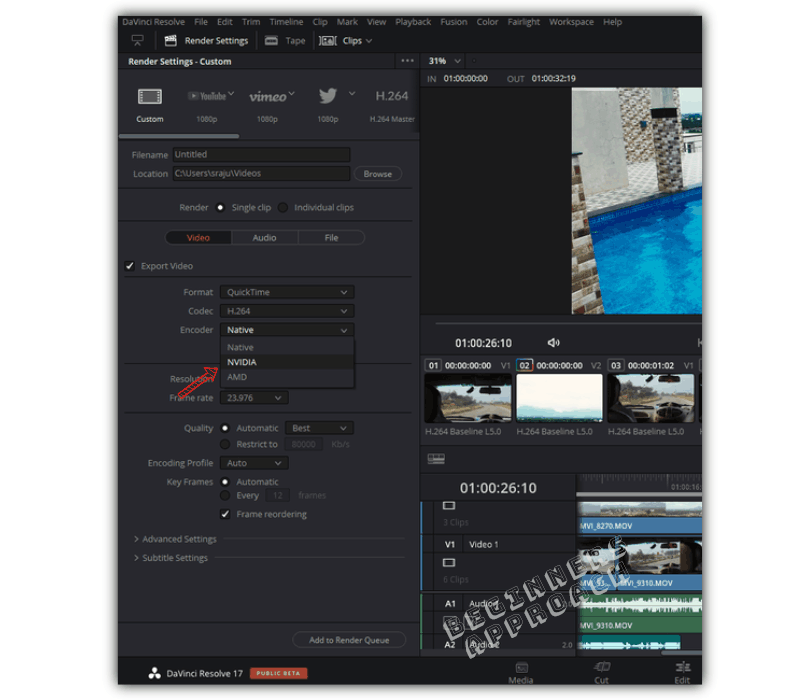
- For Studio users, go to “Deliver” page, under “Video” tab -> under the “Encoder“, select “Nividia” (or Amd as per your GPU), instead of “Native” for “H.264” or “H.265” codecs (which generally come under Quicktime and MP4 formats).
Does DaVinci Resolve Free Version Use GPU for Decoding?
The free version of DaVinci Resolve doesn’t support GPU (or hardware acceleration) for decoding. The decoding is taken care by CPU. But the paid version of DaVinci Resolve (Studio) does support GPU acceleration for decoding.
Mac has GPU acceleration available for decoding in the free version of DaVinci Resolve.
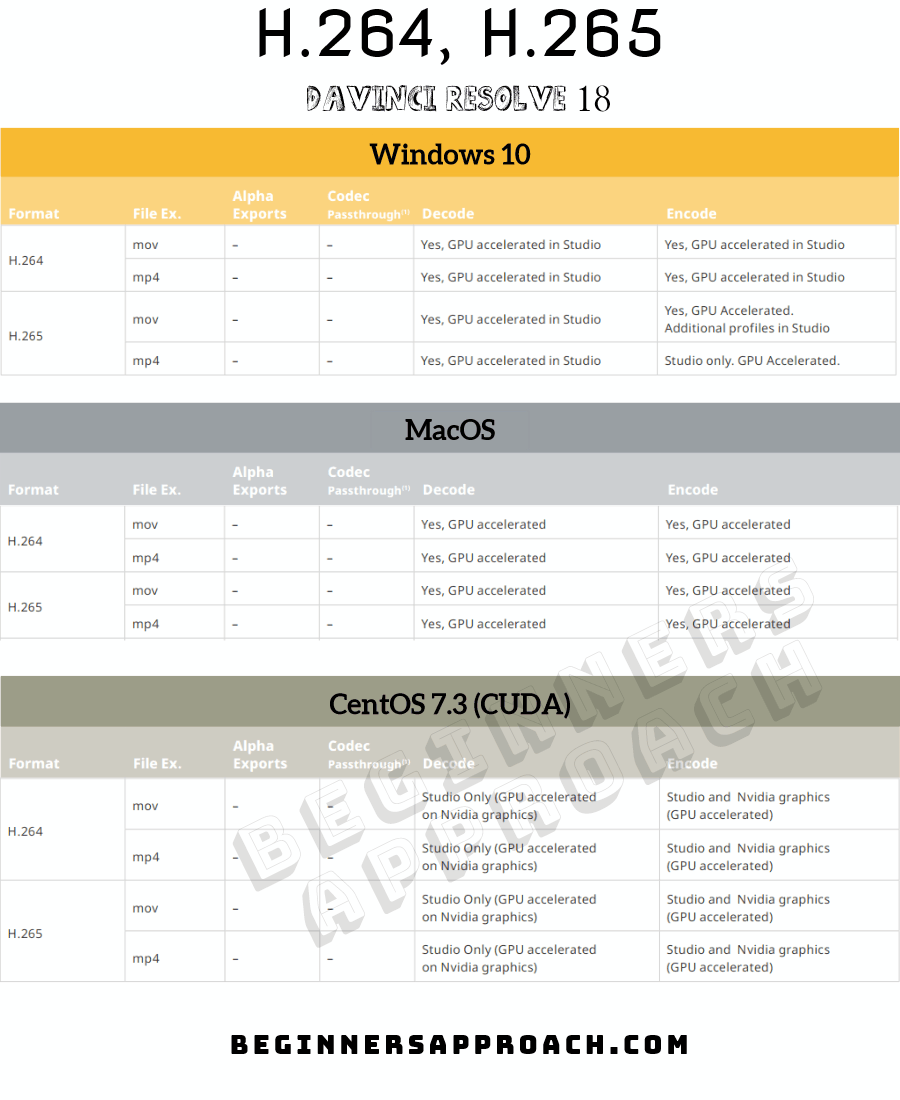
The following list will give you an idea of GPU acceleration support in Mac, Windows, and Linux.
If you have the free version and you are having a hard time playing back the video at realtime, then there are work-arounds to overcome that. (It will involve few additional steps and time).
But if you are a Studio user, all you have to do is check an option for enabling GPU decoding (discussed in the next section) and good to go!
How to Make DaVinci Resolve Studio Use GPU for Decoding?
- Go to the menu “DaVinci Resolve” -> “Preferences“.
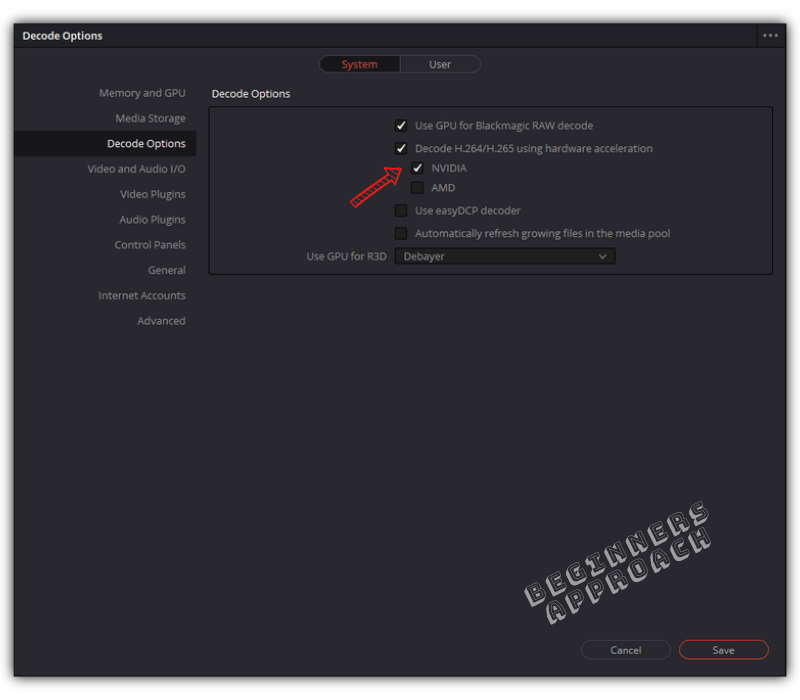
- Click on “System” tab -> click on “Decode Options“.
- Check “Decode H.264/H.265 using hardware acceleration”.
- Check either “Nvidia” or “AMD” based on your graphics card.
- Click on “Save“.
- You might need to restart Resolve to see the changes reflected.
This option should use your GPU card for decoding.
How to Improve Decoding for DaVinci Resolve Free Version?
The Resolve free version will use only CPU for decoding purposes. So if you have a CPU with a lot of cores (say 6, 8, 10, 12), then your computer will be much faster in decoding and encoding your footage.
But higher resolution footages like 4K 60 FPS with H.264/H.265 codecs can stress your CPU and slow your machine.
Having GPU acceleration is a nice feature, but if it’s not, then transcoding your footage into editing friendly codecs like Prores, DNxHD, etc, is the only better option available.
How to Transcode in DaVinci Resolve?
After importing all of your footage (H.264/H.265) into the timeline:
- Go to “Deliver” tab.
- Against “Render“, select “Individual Clips”.
- Under “Video” tab, against “Format”, select “Quicktime”.
- Under “Codec” select “DNxHD” (or Prores for Mac).
- Based on your hard disk space, choose a higher resolution format.
- Click “Add to Render Queue” and render.
Now all the clips will be converted to DNxHD codec, which are easier to edit and color grade!
Which means you have made the decoding process easier for your CPU.
Does DaVinci Resolve Free Version Use GPU for Rendering?
The free version of DaVinci Resolve doesn’t support GPU for rendering. Instead, the CPU does the rendering (encoding). The paid version, also known as DaVinci Resolve Studio, can use GPU for rendering which dramatically speeds up the encoding process.
But Mac has GPU acceleration available for rendering in the free version of DaVinci Resolve.
How to Make DaVinci Resolve Studio Use GPU for Rendering?
- Go to “Deliver” tab.
- Under “Video” tab, select your desired format and codec (H.264 or H.265).
- Under the “Encoder“, select “Nividia” (or Amd as per your GPU), instead of “Native”.
- Click on “Add to Render Queue”
- Then render the footage.
- The render (encode) should happen at a faster rate compared to the “Native” encoding.
Note that the encoder option will be available only for H.264 and H.265 codecs (at the time of this writing).
How to Speed Up Rendering in DaVinci Resolve Free Version?
The best way to speed up rendering is not to encode your footage in H.264 or H.265 codecs, instead encode in post production friendly codecs like DNxHD or Prores.
Since CPU takes the job of encoding, it is always a good practice to avoid highly compressed codecs like H.264 or H.265 if you can do so (the same applies to decoding as well).
After rendering is done in the DNxHD or Prores codecs, transcode your footage to H.264 or H.265 using Handbrake or FFMPEG, which makes use of NVidia NVENC and AMD VCE encoders (basically it uses your GPU for encoding).
Since Handbrake uses hardware acceleration for encoding, the encoding happens much faster!
In the next section we will see how to encode using GPU in Handbrake.
How to Encode H.264/H.265 Using GPU Acceleration in Handbrake?
- Navigate to “Handbrake” website.
- Go to “Download” section and select the installer file based on your OS, then download and install it.
- Launch Handbrake.
- Drag and drop your video file into Handbrake.
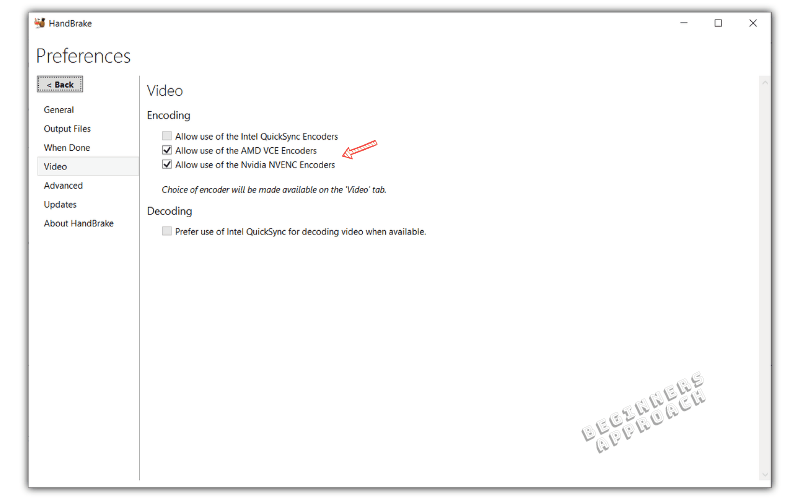
- Click on the menu “Tools” -> “Preferences” -> “Video” -> “Encoding“, make sure “Allow use of the AMD VCE” and “Nvidia NVENC encoders” are checked.
- Go back and click on the “Video” tab.
- Under “Video Codec“, select “H.264 Nvidia NVENC” (or AMD VCE) based on your type of GPU.
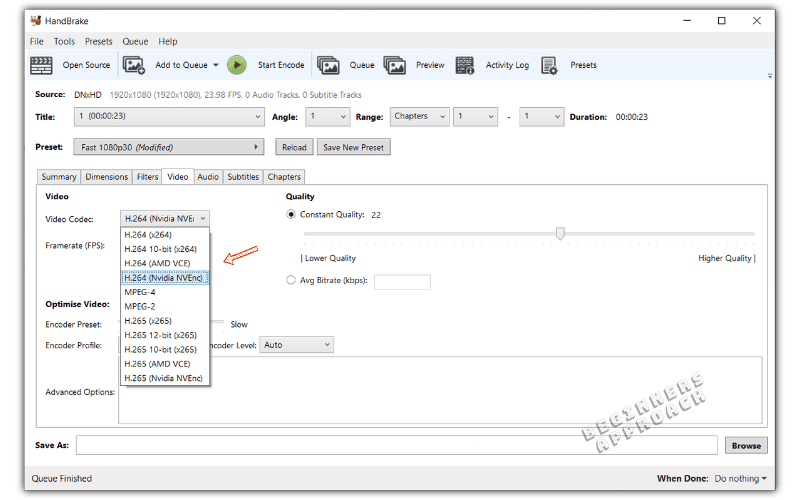
- Now update other options as needed.
- Click on “Start Encode“.
- The encoding will start and will use your GPU!
This should fasten your encoding process and save you a lot of time and effort.
Now if you’re finding any difficulties using your GPU for encoding, read this article from Handbrake for more information.
You may also find the below posts helpful:
DaVinci Resolve Mp4: Import / Export (& Fix Issues Quickly)
DaVinci Resolve MKV: Import / Export (& Fix Issues Quickly)
GPU & DaVinci Resolve (9 Things Most Beginners Don’t Know)
Can My Laptop Run DaVinci Resolve? (Explained for Beginners)
Can DaVinci Resolve Do Animation? (Explained for Beginners)
How to Add Motion Blur in DaVinci Resolve (Read This First!)