To upscale a video to 4K in the DaVinci Resolve free version, create a new timeline with the resolution set to “3840 x 2160 UHD”. Drag and drop the HD clips onto the 4K timeline. If you see black bars, then change the “Image Scaling” setting to “Scale Entire Image to Fit”. Finally, go to the “Deliver” page and do a 4K export.
There are reasons why experts recommend 4K upscaling (from your HD clips) before uploading to YouTube.
You get better image quality when you do a 4K upload on YouTube due to the high-quality compression codec – Vp9. Unfortunately, 1080p videos are compressed using AVC1 – a lower-quality codec – resulting in pixelations and artifacts.
The “Superscale” AI feature is available only in the paid version (Studio) of DaVinci Resolve. (More about it later.)
Today we’ll see the below in the free version of DaVinci Resolve:
- How to upscale 1080p video to 4K
- Fit 1080p footage in a 4K timeline
- Export in 4K Ultra HD
- Common Issues and Fixes
How to Upscale to 4K in DaVinci Resolve?
#1) Create a New 4K UHD Timeline on the “Edit” page
- Go to the menu “File” > “New Timeline” (the shortcut for the new timeline is “Ctrl + n” or “Cmd + n”).
- Uncheck “Use Project Settings”.
- Enter your timeline name.
- Click on the “Format” tab.
- Set the “Timeline Resolution” to “3840 x 2160 Ultra HD”.
- “Mismatched Resolution” > “Scale Entire Image to Fit” (this is the default value).
- Click on the “Output” tab.
- Ensure the checkbox is checked for “Use Timeline Settings for Output Scaling”.
- Let the “Mismatched Resolution” be set to > “Scale Entire Image to Fit” (same as the input scaling).
- Click on “Create”. See the image below for the required settings.
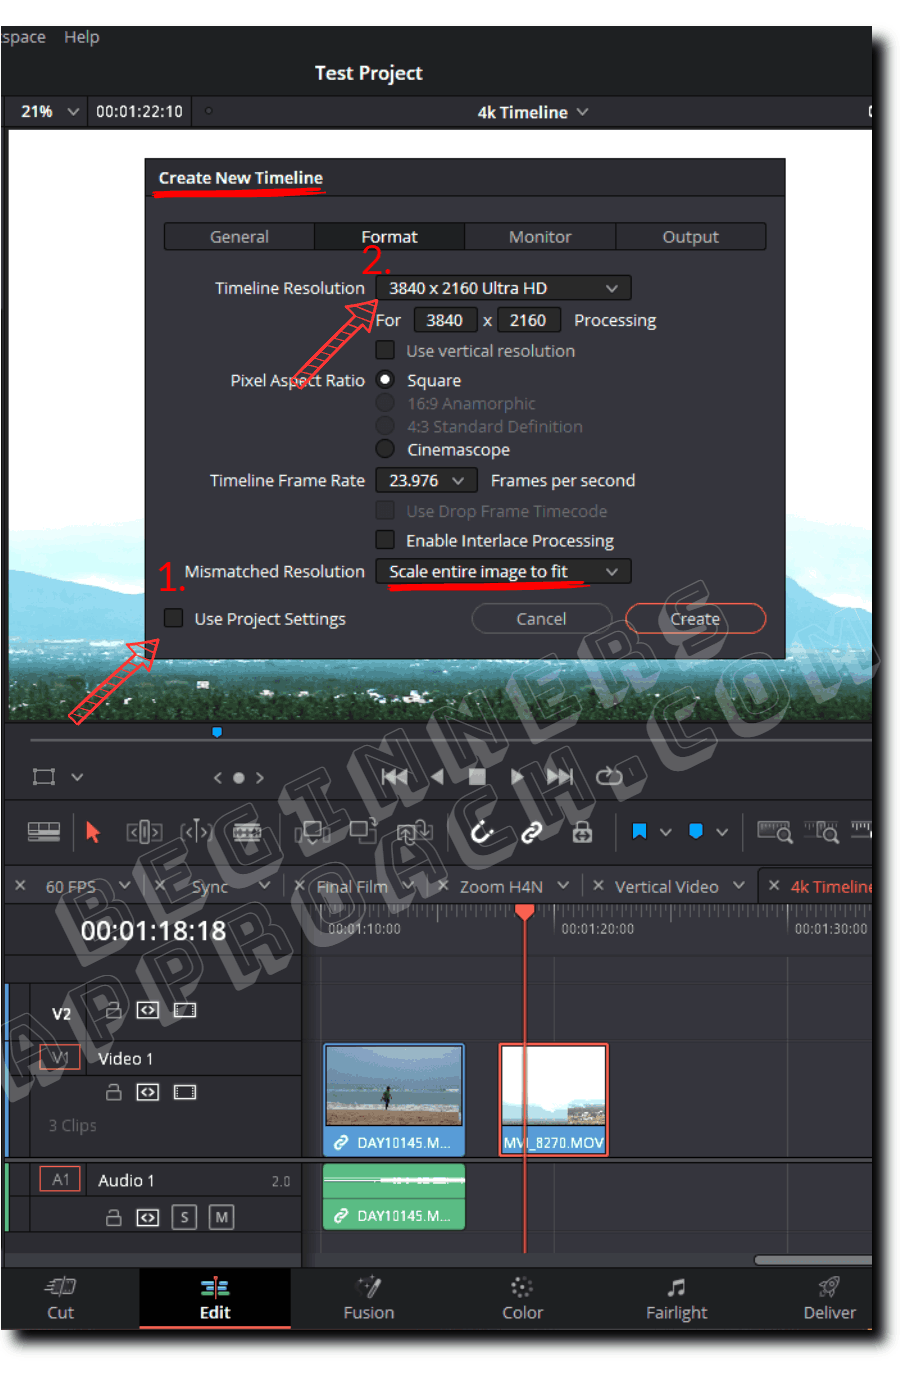
DaVinci Resolve Upscale to 4KA few important things to note:
- You can convert an existing “timeline” resolution within a project to 4K UHD by locating the timeline in the “Media Pool”, right-clicking the timeline > “Timeline” > “Timeline Settings” > unchecking the “Project Settings” checkbox, and then set the resolution to “3840 x 2160 Ultra HD” under the “Format” tab.
- See the below image for a better understanding.
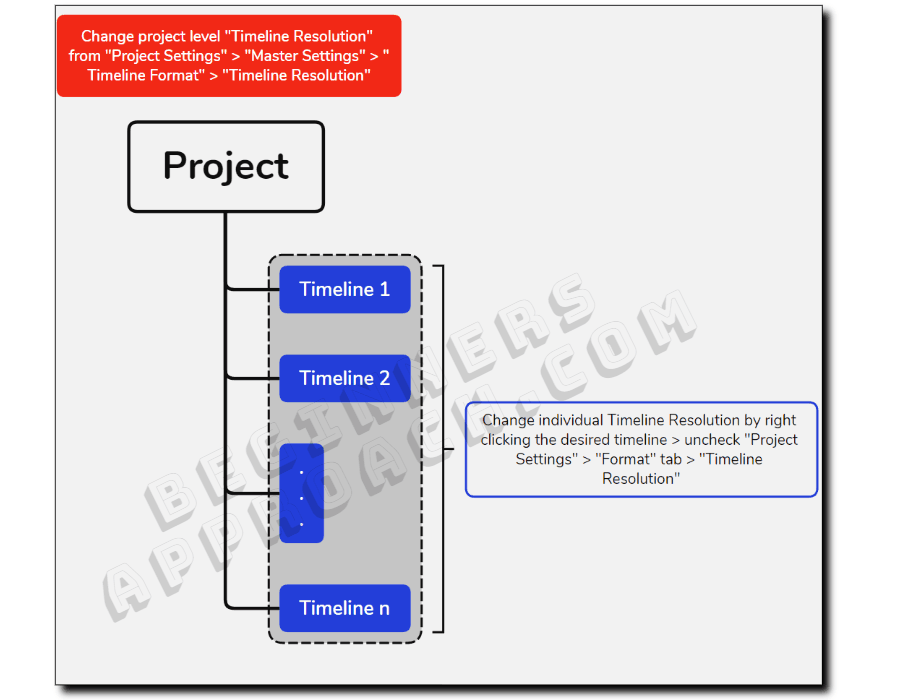
- You can convert an existing “project” (which is a collection of timelines) to 4K UHD by going to “File” > “Project Settings”. Next, click on “Master Settings” > “Timeline Format” > Set “Timeline Resolution” to “3840 x 2160 Ultra HD”.
- If you have already created a 1080p timeline project, then creating a new timeline with the 4K timeline resolution is absolutely important – as discussed above.
But this should not be an issue if you already have a 4K UHD timeline project.
You are just ensuring you’re working in a 4K UHD timeline, irrespective of the project timeline resolution.
#2) Drop 1080p Footage in a 4K Timeline and Adjust the “Image Scaling”
Drag and drop the 1080p HD clips on the 4k UHD timeline.
If you drop an HD (1920 x 1080) clip on a 4K UHD (3840 x 2160) timeline with the “Image Scaling” set to “Scale Entire Image to Fit”, then there won’t be any black bars. The HD clips will smoothly fit into the UHD timeline because of the same aspect ratio (1.78).
(Aspect Ratio = Height/Width.)
If you get any black bars due to a mismatch in the aspect ratio, then locate your timeline from the “Media Pool”, right click and then select “Timeline” > “Timeline Settings”. Next, click on the “Format” tab > “Mismatched Resolution” > select “Scale Full Frame with Crop”. This will crop the footage automatically and fill the frame with no black bars.
(However, you can manually zoom out/in the clip until the black bars are gone from the “Inspector” settings on the right-hand side upper section.)
After the editing and color grading are done, it’s time to export in 4K Ultra HD.
#3) Export 1080p as 4K in Resolve
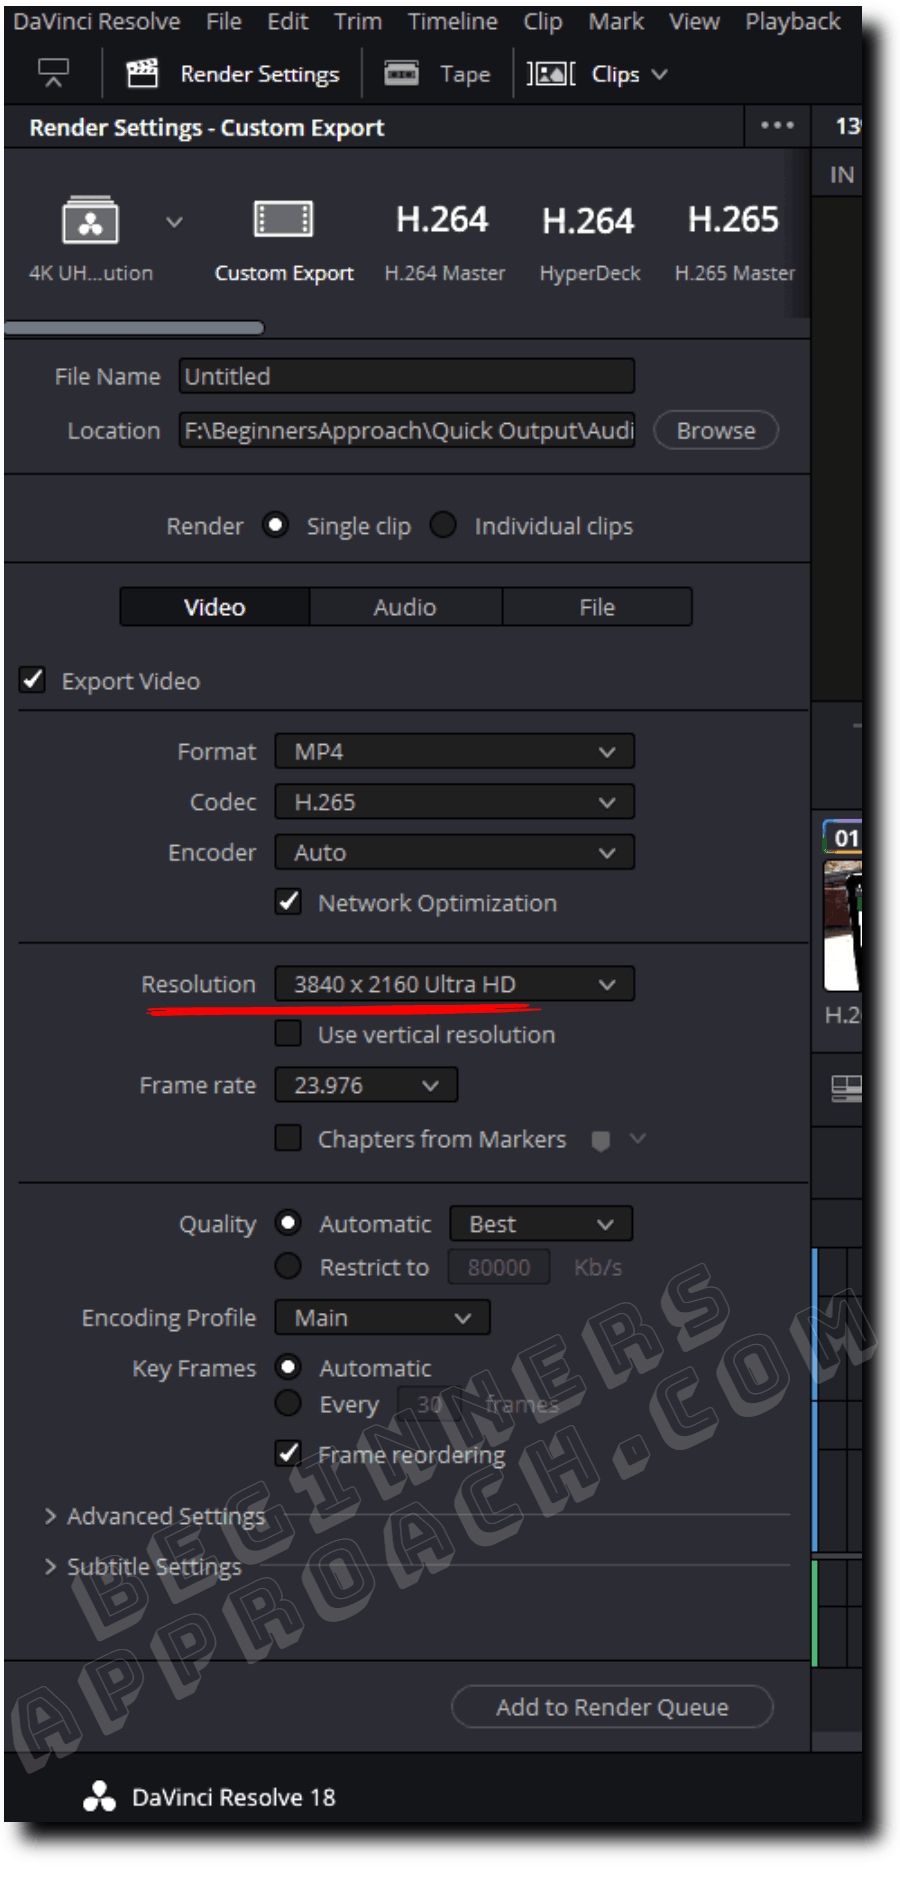
- Go to the “Deliver” page
- Set the “Resolution” to “3840 x 2160 Ultra HD”.
- Choose your “Format“, say, “Mp4“.
- “Codec” > “H.265” (or “H.264”)
- “Quality” > “Best“
- “Encoding Profile” > “Main”
- Click on “Add to Render Queue”
- Click on “Render All”.
- Your 1080p video is upscaled to 4K! See the below image for the exact settings in Resolve.
When you upload the 4K video to YouTube, it will be processed with a better compression codec called VP9, providing better image quality!
Related Article:
Super Scale AI Feature in DaVinci Resolve Studio Version
Enabling the “Super Scale” feature will create new pixels for the resized image (say, from 1080p to 4K). It is a very processor-intensive and high-quality upscaling algorithm, available only in the Studio version ($295).
Unfortunately, the “Super Scale” feature is not available in the free version. Furthermore, even though the feature is displayed in the free version, you get a huge watermark when you enable it.
To locate the “Super Scale” feature in Resolve, right-click on the clip in the “Media Pool” under the “Edit” page, and click “Clip Attributes” > “Super Scale“. When you select an option, say, 2x, two other dropdowns are enabled – Sharpness and Noise Reduction.
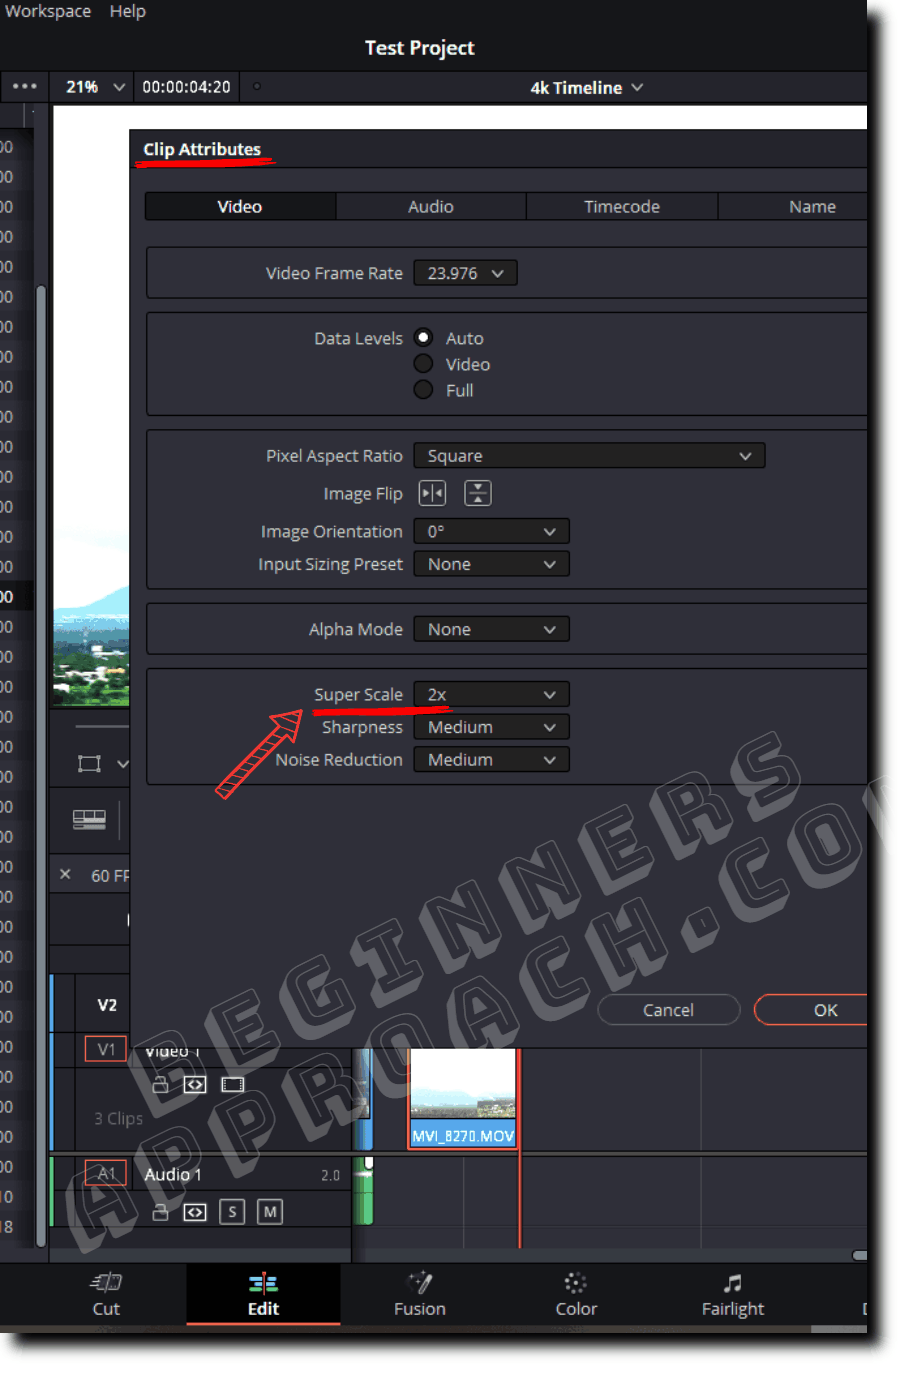
The above image shows the super scale feature inside DaVinci Resolve.
If you can afford the Studio version, then this is a great feature to exploit. (One of the third-party alternatives is Topaz AI – which is also a paid one.)
Issues and Fixes
While Exporting from 1080p to 4K, the Video is Cropped
If there is no cropping when you edit in the timeline, but then when you upscale to 4k and export, the video is cropped. This issue is due to the different values set in the “Mismatched Resolution” dropdown in the “Input Scaling” and “Output Scaling” settings.
Always ensure the setting in the “Mismatched” resolution dropdown in the “Output Scaling” is the same as the “Input Scaling”.
Locate your timeline from the “Media Pool”, right-click, and then select “Timeline” > “Timeline Settings”. Next, click on the “Output” tab > “Mismatched Resolution”. Finally, ensure the value is the same as found under the “Format” tab.
Resolve will always consider the setting specified in the “Output Scaling” > “Mismatched Resolution” for rendering your upscaled 4K export!
You can do the same for the project-level settings.
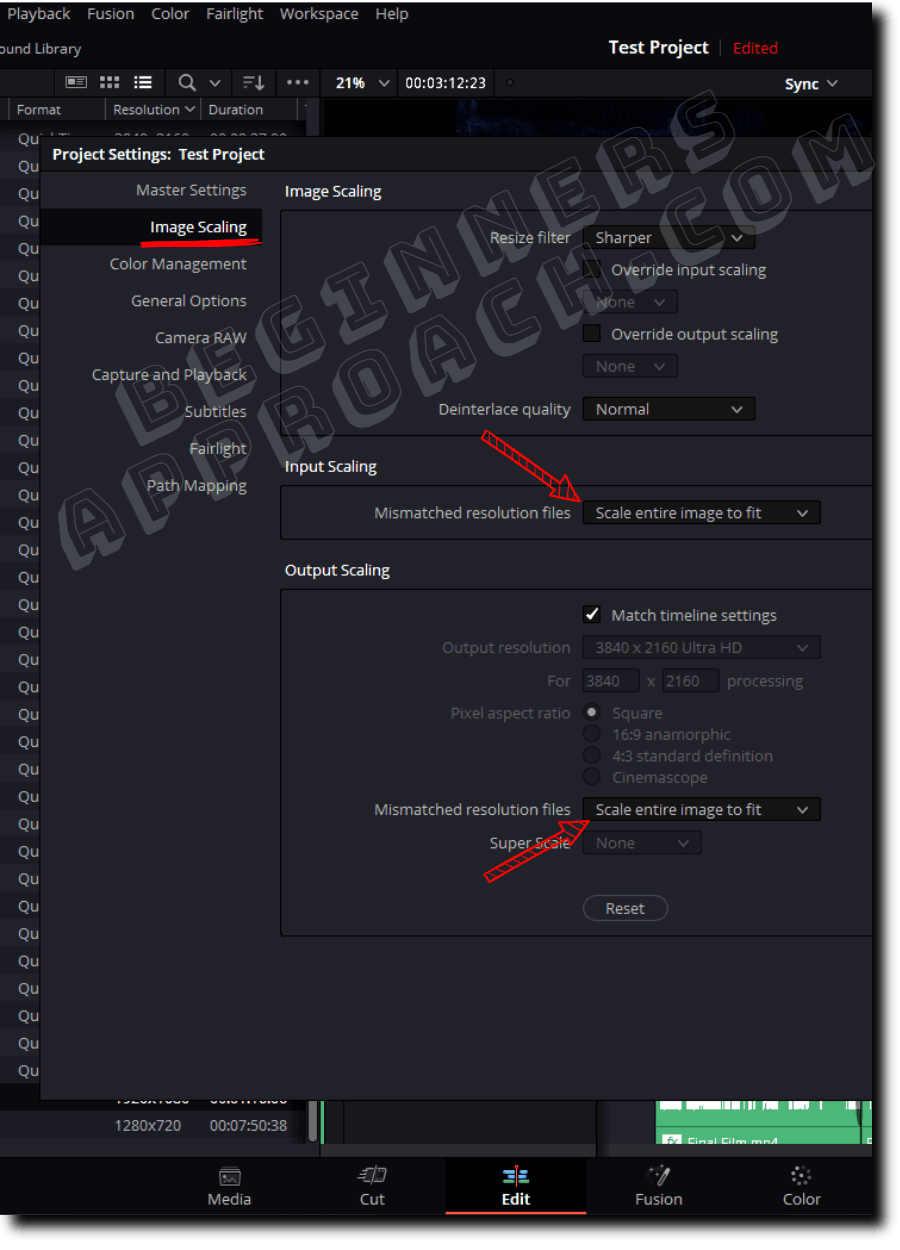
Go to “File” > “Project Settings” > “Image Scaling”. Make sure the “Input Scaling” and “Output Scaling” values are the same for “Mismatched Resolution Files” as shown in the image below:
You may also be interested in the below post: