
DaVinci Resolve offers a few important shortcuts for full-screen viewing, enhanced viewing, cinema viewing, etc.
We will also see how to assign your own shortcuts to make the process even faster!
Let’s dive right in!
- How to Preview Full Screen in DaVinci Resolve?
- How to Get Out of Full Screen in DaVinci Resolve
- How to Full Screen DaVinci Resolve Window?
- Full Screen Options in the Color Page of DaVinci Resolve
- How to Full Screen Preview in Second Monitor in DaVinci Resolve?
- How to Make Timeline Full Screen in the Second Monitor in Resolve?
- How to Make Resolve Full Screen in the "Cut" Page?
- How to Assign Your Favorite Key for Full Screen Viewer in Resolve?
How to Preview Full Screen in DaVinci Resolve?
The shortcut for full screen preview in DaVinci Resolve is “Control + F” (or “Command + F”) on all the pages (“Media”, “Cut”, “Edit”, “Color”, “Fairlight”, “Deliver”) except “Fusion”. This expands the viewer into the full screen. Resolve calls it the “Cinema Viewer” mode.
Alternatively, you can also access cinema viewer mode by clicking on the menu option “Workspace” > “Viewer Mode” > “Cinema Viewer”, from any of the pages.
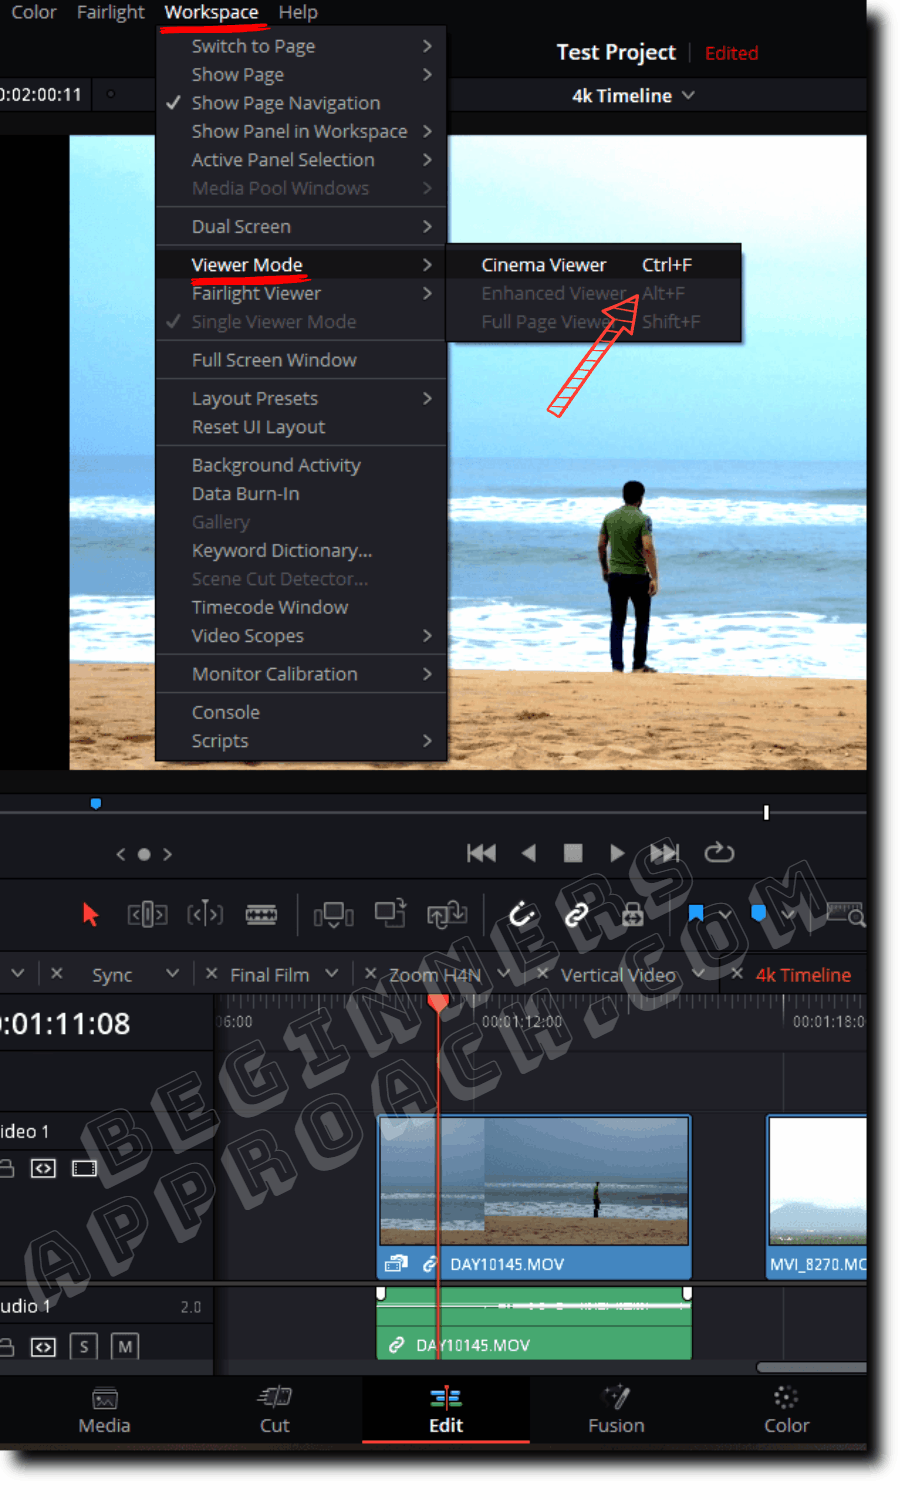
You will notice that the cinema viewer mode will be disabled (greyed out) when you access it from the “Fusion” page.
You will also notice that the “Color” page will have 2 more options enabled – “Enhanced Viewer” and “Full Page Viewer” (More on this later).
How to Get Out of Full Screen in DaVinci Resolve
To get out of the full screen in DaVinci Resolve, press either the escape key or the “Control + F” (or “Command + F”) keys again. This will return to your original workspace.
How to Full Screen DaVinci Resolve Window?
To make DaVinci Resolve window full screen, go to the menu > “Workspace” > select “Full Screen Window”. This will make your monitor display only the DaVinci Resolve application.
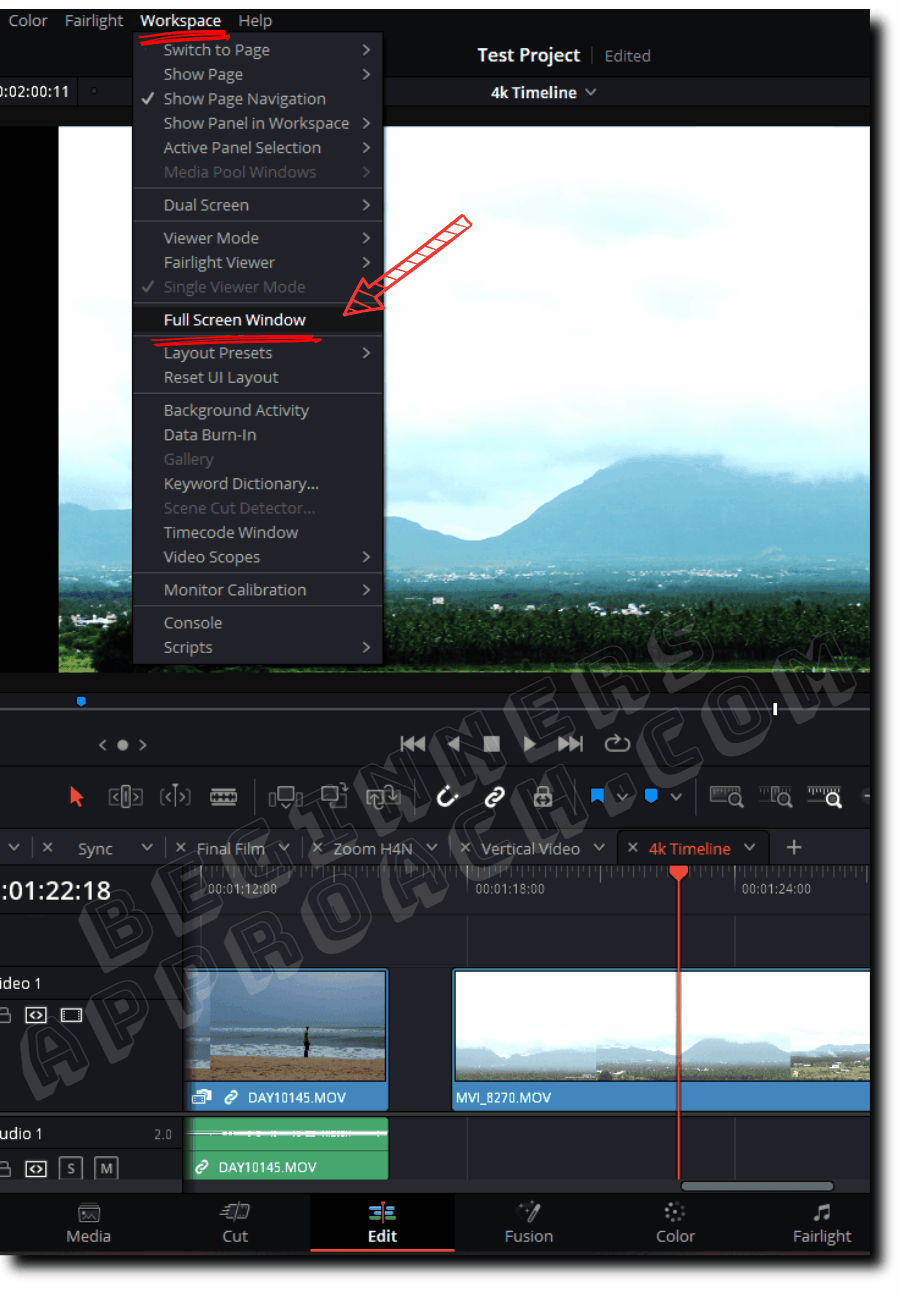
Professionals generally prefer this option before starting their day-to-day work in Resolve. It is distraction-free and makes you efficient.
By default, when you launch DaVinci Resolve, it is displayed as a floating window.
By the floating window I mean, it has a title bar with which you can resize/minimize the application to your taste.
But if you prefer not to resize Resolve, then converting it to a full-screen window (not to be confused with the full-screen cinema viewer mode) will make the whole application full-screen. You won’t see the windows taskbar or the title bar.
All you see is only the DaVinci Resolve application (as discussed above)
Full Screen Options in the Color Page of DaVinci Resolve
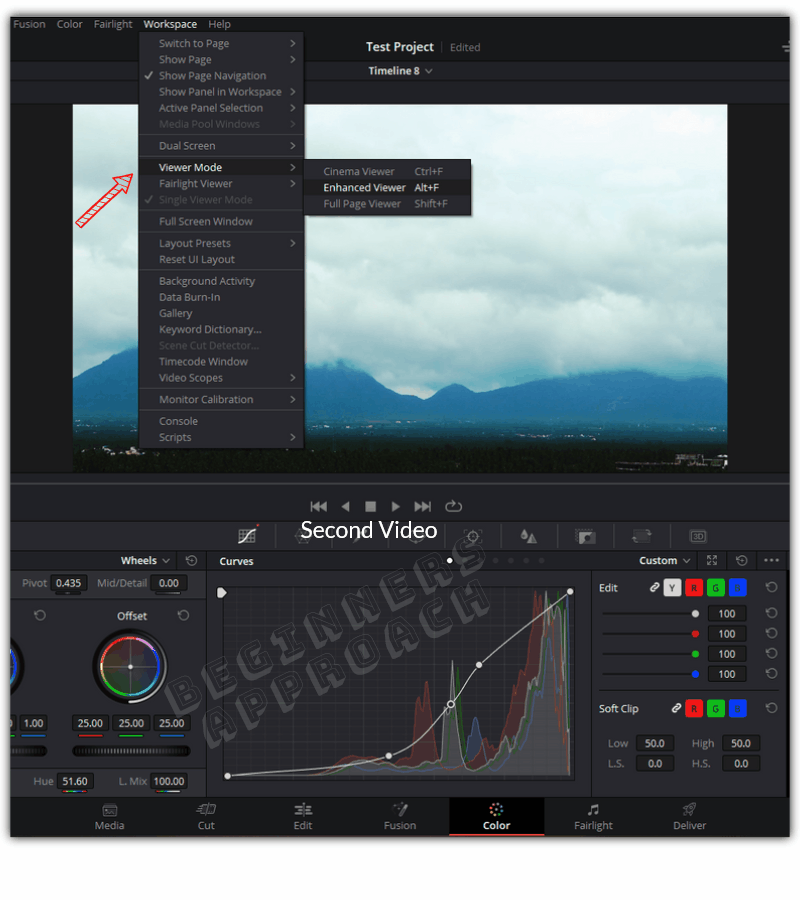
The “Color” page has 3 different options for viewer mode:
| “Color” Page Modes | Windows Shortcut | Mac Shortcut |
|---|---|---|
| Cinema Viewer mode | “Control +F” | “Command + F” |
| Enhanced Viewer mode | “Alt +F” | “Option + F” |
| Full Page Viewer mode | “Shift +F” | “Shift +F” |
Difference Between Cinema, Enhanced, and Full Page Viewer Modes in the “Color” Page of DaVinci Resolve
Cinema viewer mode expands your viewer to the full screen of your monitor. All you see is the video or image in the viewer. No menu options are displayed at the top, and no pages are displayed at the bottom.
This is really useful so that you get a feel for the final output during the editing or color grading stages. (Keep in mind that the cinema viewer mode is available across different pages like Media, Cut, Edit, Color, Fairlight, Deliver, etc.).
Enhanced viewer mode hides panels like “Gallery” and “Nodes”, left and right to the timeline viewer. Basically, it creates space for the viewer so that there is no distraction.
I tend to use enhanced viewer mode a lot by pressing “Shift + F”. This view helps me get my hands dirty with curves, color wheels, keyframing, etc., which is found directly below the viewer.
Full page viewer mode makes your viewer big such that it takes the maximum space. However, you can still see menu options, pages, transport controls, etc.
As per Blackmagic, this mode will be helpful while working with the positioning of windows, rotoscoping, etc.
How to Full Screen Preview in Second Monitor in DaVinci Resolve?
First, turn on the dual-screen mode by going to the menu option “Workspace” > “Dual Screen” > “On”. Then again, navigate to the menu “Workspace” > “Video Clean Feed” > select your required monitor from the options.
This will make your viewer full screen on the second monitor.
How to Make Timeline Full Screen in the Second Monitor in Resolve?
First, turn on the dual-screen mode by going to the menu option “Workspace” > “Dual Screen” > “On”. Then again, navigate to the menu “Workspace” > “Dual Screen” > “Full Screen Timeline”.
This will make your primary monitor display only the timeline, and the second monitor display all the other “Edit” page controls.
How to Make Resolve Full Screen in the “Cut” Page?
Go to the “Cut” page and click on the “Full Screen” button from the top right corner. The shortcut is “Control +F” for Windows and “Command + F” for Mac.
How to Assign Your Favorite Key for Full Screen Viewer in Resolve?
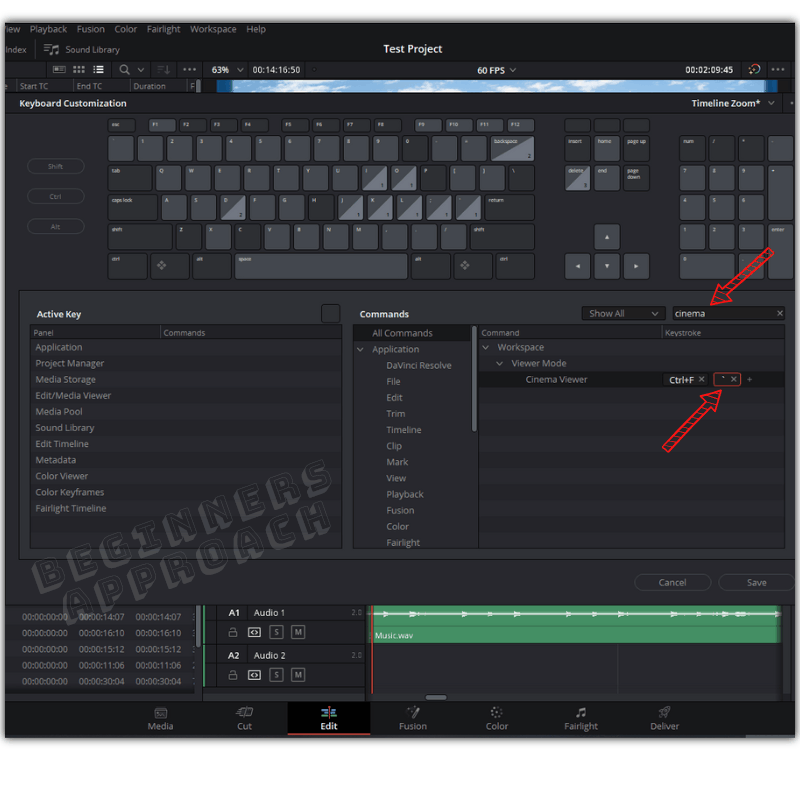
- Go to the menu “DaVinci Resolve” > “Keyboard Customization”.
- In the search box, type “cinema” (if you want to set a shortcut key for “Cinema Viewer” mode)
- Expand the “Viewer Mode” to reveal “Cinema Viewer“.
- Click on plus button next to the “Ctrl+F” keystroke.
- Enter your favorite shortcut key, like, tilde “~”.
- Click on the “Save” button.
- Now you can press “~” to make your viewer expand into full screen in your monitor.
- You can follow the same method for setting shortcuts for “Enhanced Viewer” and “Full Page Viewer” in the “Color” page.
How to Set Full Screen Timeline Shortcut
If you’re on a dual monitor setup and work extensively in the “Edit” timeline, then you can set your own full-screen timeline shortcut by going to “DaVinci Resolve” > “Keyboard Customization”, type “Full Timeline Viewer” in the search box, and assign your favorite keystroke to it! Click on the “Save” button!
You may be also interested in the below post:
I use the free version in windows and I can absolutely import and export mp4 files. No idea where you got the very wrong impression this was only available in the paid version.
Thanks for your comment. I meant – to encode Mp4 with H.265 (HEVC) codec, one might need Studio version, the free version doesn’t support as per Blackmagic. But the free version can encode and decode (import/export) Mp4 with H.264 codec – as you said. Anyways thanks again, I have rephrased to make it clear in the post.