When you record separate audio using audio recorders like Zoom and microphones like Rode, on top of the built-in audio recording of your camera, it naturally becomes a challenge to sync them – especially for beginners and newcomers to DaVinci Resolve (versions 18.5, 18, 17, etc).
To sync audio and video in DaVinci Resolve, go to the “Media Pool”. Select both the video and the separate audio file, right-click > choose “Auto Sync Audio” > “Based on waveform and append tracks”. Drag and drop the clip in the timeline and then delete the built-in audio. Your audio is synced.
Let’s explore the audio and video sync – both automatically and manually – in Resolve in detail – step-by-step with pictures.
- How to Auto Sync Audio and Video Clips in DaVinci Resolve?
- How to Automatically Synchronize Multiple Audio and Video Clips in DaVinci Resolve?
- How to Check Video Clips that are Synced with the Audio in Resolve?
- DaVinci Resolve Sync Audio Clips in Timeline
- Manually Sync Audio and Video
- How to Get Back the Original Audio After Syncing in Resolve?
- Syncing Audio and Video Using Timecode in DaVinci Resolve
- Audio Drift Issues
How to Auto Sync Audio and Video Clips in DaVinci Resolve?
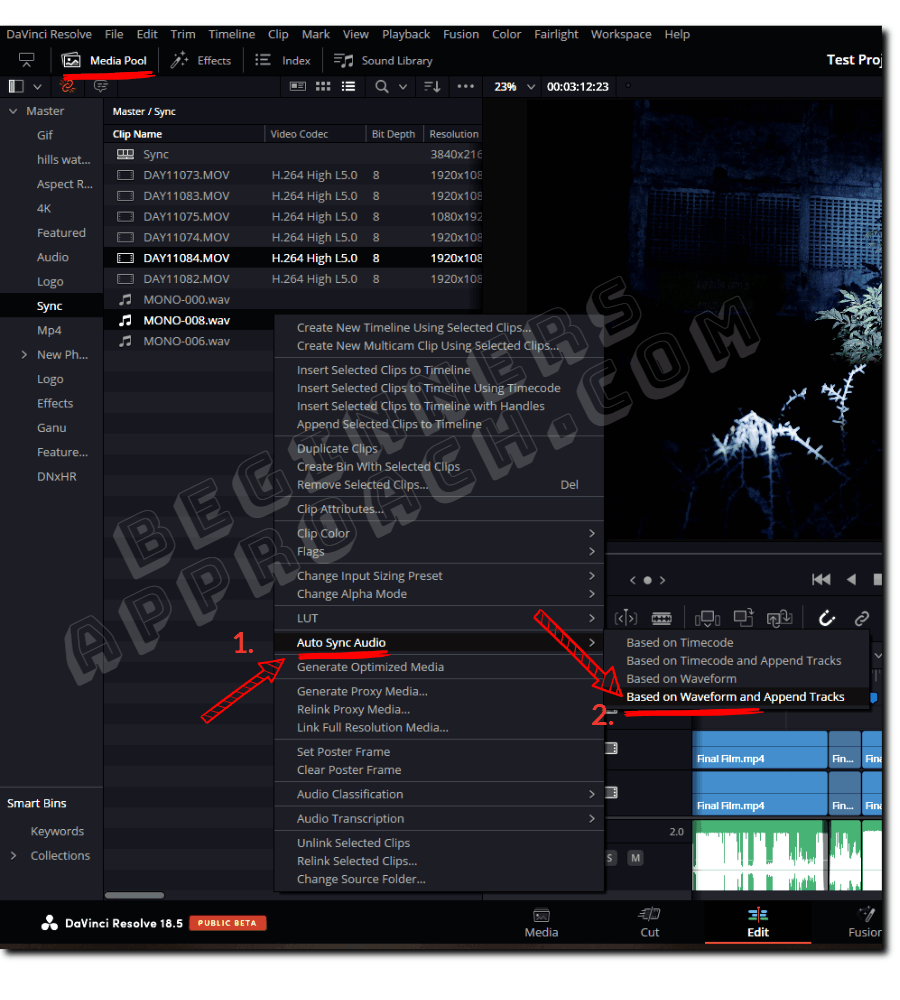
- Go to the “Media Pool” under the “Edit” page.
- Import your audio and video clips that need to be synced.
- Click on the video clip whose built-in audio needs to be replaced with the new audio.
- Press control (or command) and click on the audio clip that needs to be synced to the required video.
- Right click on any one of the clips.
- Select “Auto Sync Audio” > “Based on waveform and append tracks”.
- This will not replace the original audio but will append the new audio track to the original one.
- Drag and drop the video clip on to the timeline and you’ll see that the audio will have 2 tracks.
- The first one is the built-in camera audio and the second one is the newly synced audio.
After you’re satisfied with the newly synced audio (captured separately), you can delete the first clip (camera audio) – the unusable one. To do this:
Right-click on the video clip, uncheck “Link”. Now click on the audio clip and press backspace.
Now select the video and the newly synced audio clip, right-click and check “Link”. Now the video clip will have only the newly synced audio.
(For more information on audio and video clips’ link, click on “All About Audio & Video Clips’ Link in DaVinci Resolve“).
Once you are comfortable with the process, you can save a lot of time (if you have many audio/video clips that need to be synced) by doing the following.
How to Automatically Synchronize Multiple Audio and Video Clips in DaVinci Resolve?
- Go to “Media Pool” under the “Edit” page.
- Create a new bin and import all of your audio and video clips into it.
- Select all the clips with the help of “Control + a” (or “Command + a”).
- Right click on any one of the clips.
- Select “Auto Sync Audio” > “Based on waveform”.
- DaVinci Resolve will take some time to sync all of your clips.
- The “Based on waveform” option will replace the original audio with the new one.
- When you drop the video clip on to the timeline, the audio will occupy only one track.
Sometimes, during bulk syncing, Resolve might throw errors – which could be due to some video clips not having corresponding audio clips. (We will deal with syncing these clips in a few minutes).
That is fine, go ahead and give “Ok”. The important thing is saving time in syncing multiple clips automatically!
How to Check Video Clips that are Synced with the Audio in Resolve?
Before syncing, right-click on the video clip inside “Media Pool” and select “Clip Attributes“. Click on the “Audio” tab. You will see that the “Source Channel” has “Embedded Channel 1″ and “Embedded Channel 2”, which means it is in-built camera audio captured during shooting video.
After you sync your new audio with the video using “Based on waveform and append tracks“, the “Source Channel” will now include “Linked Channel 1” and “Linked Channel 2” on top of the Embedded channel 1 & 2.
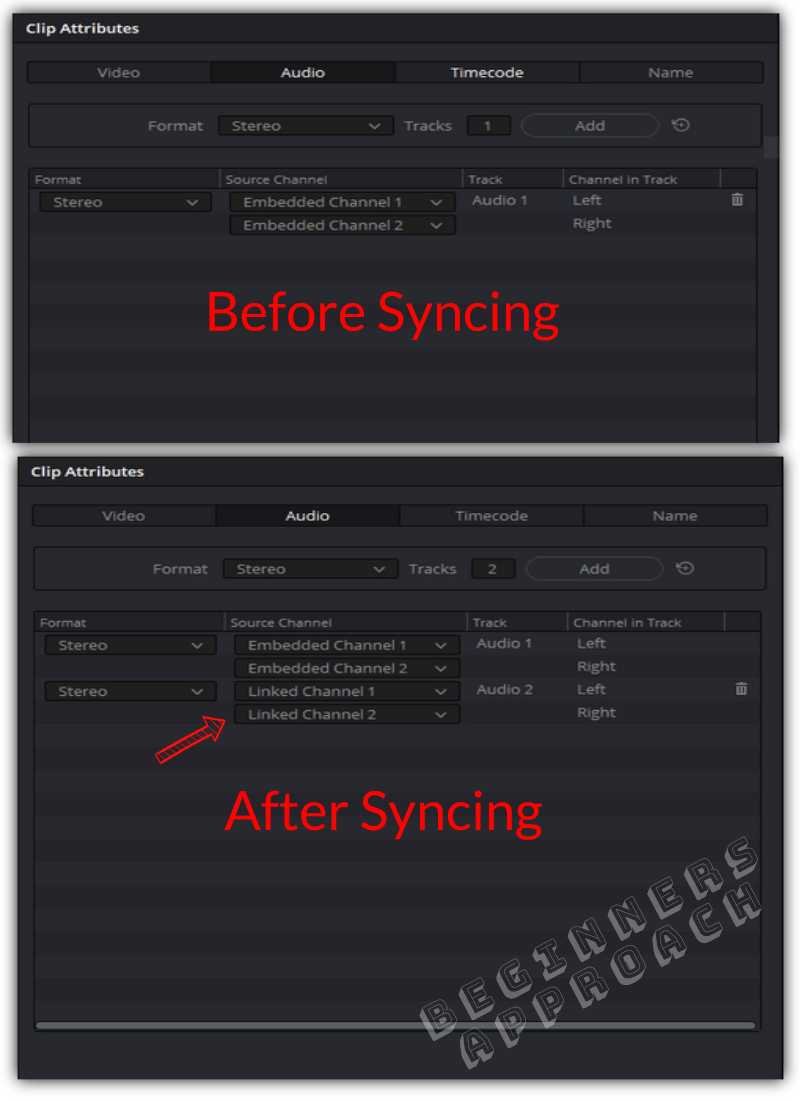
If you synced using “Based on waveform” only, then the “Source channel” will only show “Linked Channel 1” and “Linked Channel 2”.
Keep in mind that I captured stereo audio using a Zoom audio recorder with the Rode NTG2 microphone using a boom pole. That is the reason it shows 2 channels, “Left and Right”.
If you captured mono audio (having only one channel), you would see only “Linked Channel 1”.
If you want to know more about audio channels, then click on the below:
How to Split Audio Channels / Tracks in DaVinci Resolve (Explained!)
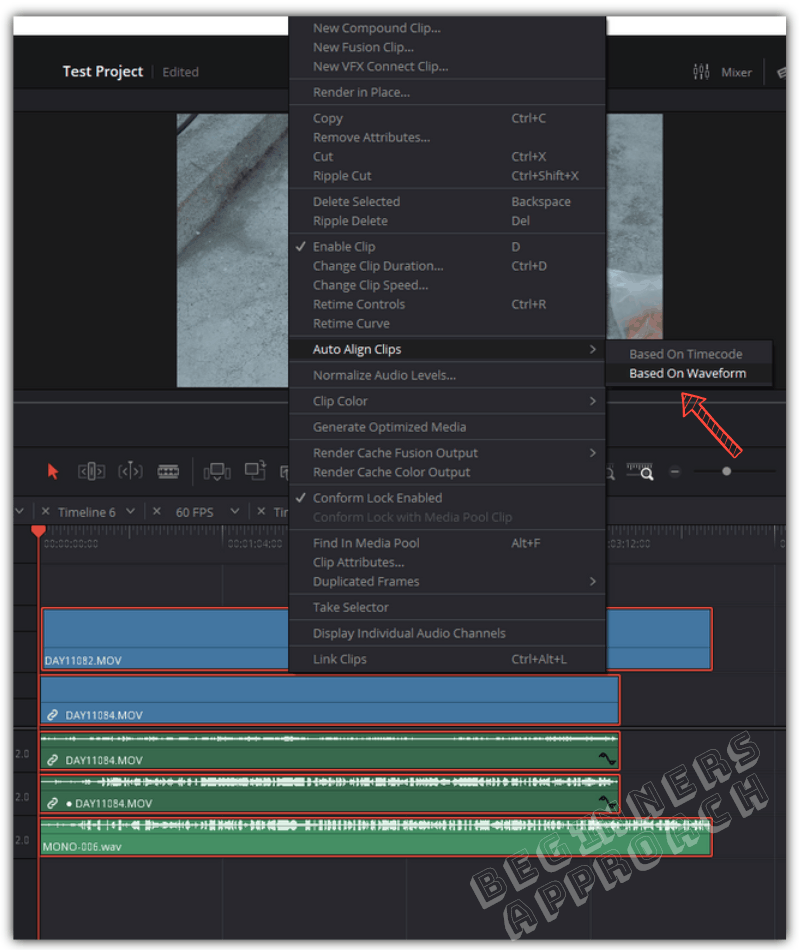
You can also sync audio inside the timeline. This situation might arise when you have multiple videos shot through multiple cameras or a single camera and a screen recorder like OBS studio.
So when you have multiple video clips that need to be synced to the audio, then “Auto Align Clips” will help you achieve the result.
DaVinci Resolve Sync Audio Clips in Timeline
To sync audio in the timeline in Resolve, select all the clips by drawing a box around them in the timeline. Right-click and select “Auto Align Clips” > “Based On Waveform”. All the clips should now be aligned and synced automatically.
Manually Sync Audio and Video
Sometimes Resolve might not properly sync your audio and video clips as you expected. Or…
There might be times when you don’t have camera audio but have separate audio recorded using audio recorders.
In those cases, you can manually sync audio and video.
If you decide to embed the required audio to the video before bringing it into the timeline, then do the following:
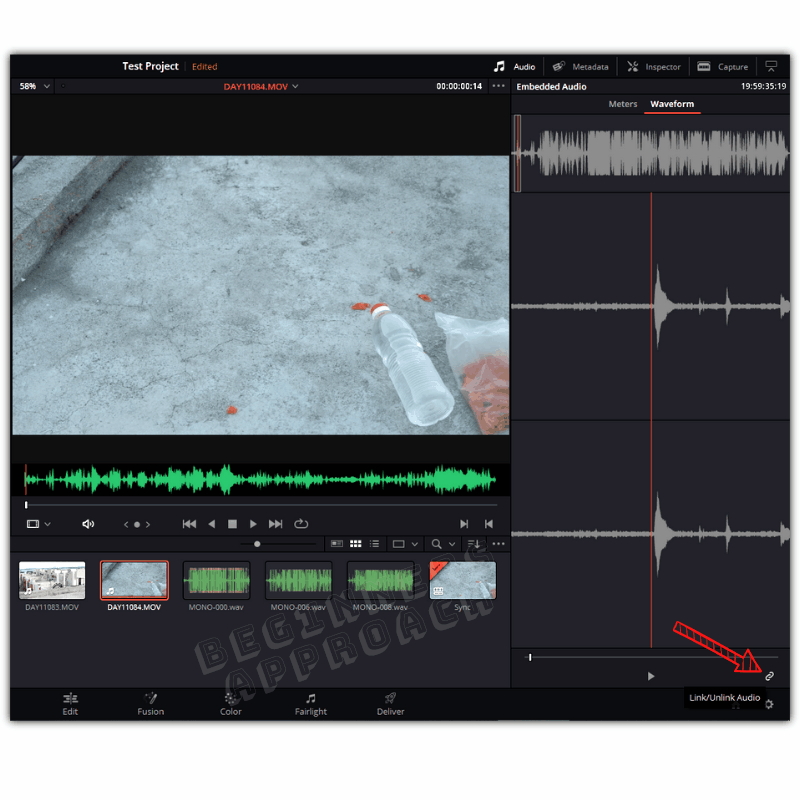
How to Manually Sync Audio and Video in DaVinci Resolve?
- Go to the “Media” page and make sure the required clips are already imported.
- Double click on the video clip so that it is displayed in the viewer.
- If you have any sharp sound like a clap or snap in the video, place the playhead over there. If you don’t have, then place your playhead to where you want to sync your audio. This will be your sync point.
- Now click on the “Audio” tab (upper right hand corner) and then click on the “Waveform” tab.
- Double click on your required audio clip. Your audio waveform will now show up in the “Waveform” tab.
- Now, you have your video clip in the viewer and audio clip in the “Waveform” tab. Good!
- For your audio clip sync point, move your playhead to the point where you have the sharp sound like a clap or snap.
- Once you have determined the point (which is your sync point), click on the “Link/Unlink Audio” icon (bottom right corner) to link the sync point of the audio with the video.
This new audio will now be embedded into your video. You can double-check by right-clicking the video clip > “Clip Attributes” > “Audio” tab > “Source Channel” shows “Linked Channel”.
(“Linked Channel” denotes newly synced audio. “Embedded Channel” denotes in-built camera audio.)
The other way is to drop both the video and audio clips in the timeline. Manually align the audio beneath your video either by looking at the camera audio waveform or by looking at the video to determine the sync point.
You can use “comma” and “period” keys to move your audio clip one frame to the left or right, for a finer adjustment. This is a time-consuming process.
How to Get Back the Original Audio After Syncing in Resolve?
If you’ve synced and replaced your original audio, but need it back, then right-click on the video clip, select “Clip Attributes”, click on the “Audio” tab. From the “Source Channel” dropdown, which contains your “Linked Channel”, select “Embedded Channel”.
If you want to do it for all the clips, then try undoing (press “Control + z”) till you see “Embedded Channel”. If this doesn’t work, then go and manually change the clip attributes as discussed above.
During production, if you separately recorded your video using a camera and audio using an audio recorder by setting the same timecode in both of them, then those clips can be easily synced using the timecode.
Syncing Audio and Video Using Timecode in DaVinci Resolve
To sync audio using timecode in Resolve, select all the clips by drawing a box around them in the timeline. Right-click and select “Auto Align Clips” > “Based On Timecode”. All the clips should now be aligned and synced automatically.
But to do this successfully, you should have already recorded using synchronized timecode for audio and video.
Audio Drift Issues
Sometimes, for large audio and video clips that are synced together, the sync might be perfect in the starting and middle, but towards the end, they might be out of sync.
This issue can be solved by “Elastic Wave” feature in Resolve.