Exporting image sequences from video in DaVinci Resolve is the process of converting a video into a sequence of images in the form of Png, Jpg, or Tiff formats.
To export a png image sequence from a video in DaVinci Resolve, go to the “Fusion” page. Right-click “MediaIn1” node, select “I/O” > “Saver”. Click on the “Inspector” > “File” tab > “Browse”. Enter a file name with a “png” extension. “Save as type” = “All Files”. Click on “Save”. The Png image sequence is exported.
To export a Jpg image sequence from a video in DaVinci Resolve, go to the “Fusion” page. Right-click on the “MediaIn1” > “Insert” > “I/O” > select “Saver”. From the “Inspector” > “File” tab > “Browse”. Enter a file name with a “jpg” extension. “Save as type” = “All Files”. Click on “Save”. The Jpg image sequence is exported.
To export a TIFF image sequence from a video in Resolve, go to the “Deliver” page, and click the “Custom Export” tab. Select “Single Clip” for “Render”. Select “TIFF” (or “DPX”) from the “Format” dropdown under the “Video” tab. Hit render to export the image sequence.
To export an image sequence to a video in DaVinci Resolve, go to the “Deliver” page > “Custom Export”. Choose “mp4” format, “H.264” codec, your required “Resolution” and “Frame Rate” (60). Set the “Quality” to “Automatic” and “Add to render Queue”. Hit render!
Let’s explore the above video to image sequence export in detail – step-by-step with pictures. (Very useful for beginners and newcomers to DaVinci Resolve versions 18.6, 18.5, 18, 17, etc.).
Resolve doesn’t have a direct export option for Png and Jpg image sequences. But there is a workaround!
How to Export PNG Image Sequences in DaVinci Resolve?
- On the “Edit” page, select your video clip or mark in (short cut i) and out (o) in the timeline.
- Go to the “Fusion” page.
- Right-click the “MediaIn1” node under the “Nodes” work area.
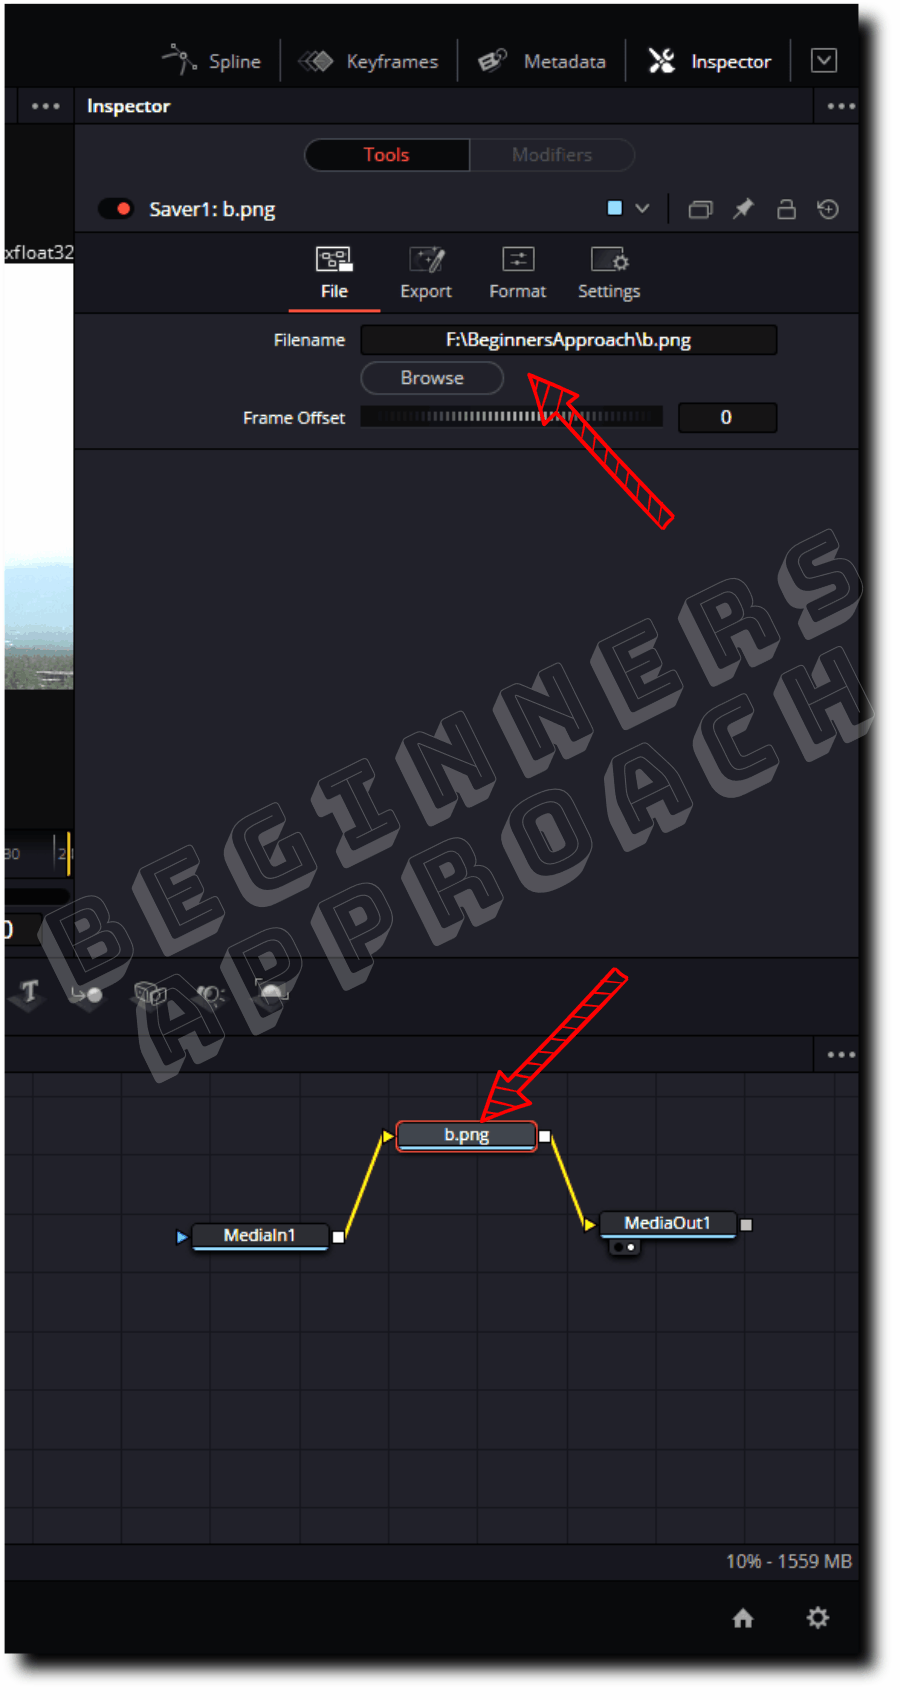
- Click on “I/O” > then select “Saver”, as shown in the image below.

- Click on the “Saver1” node and then click on the “Inspector” tab from the upper right corner.
- Under the “File” tab, click on the “Browse” button.
- Enter any file name with a “png” extension, say, “a.png”.
- “Save as type” = “All Files”.
- Click on “Save“.
- Now, go to the menu, click on “Fusion” > then click on the “Render All Savers“, as shown in the above image.
- Rendering will start and take a few minutes based on the length of the clip.
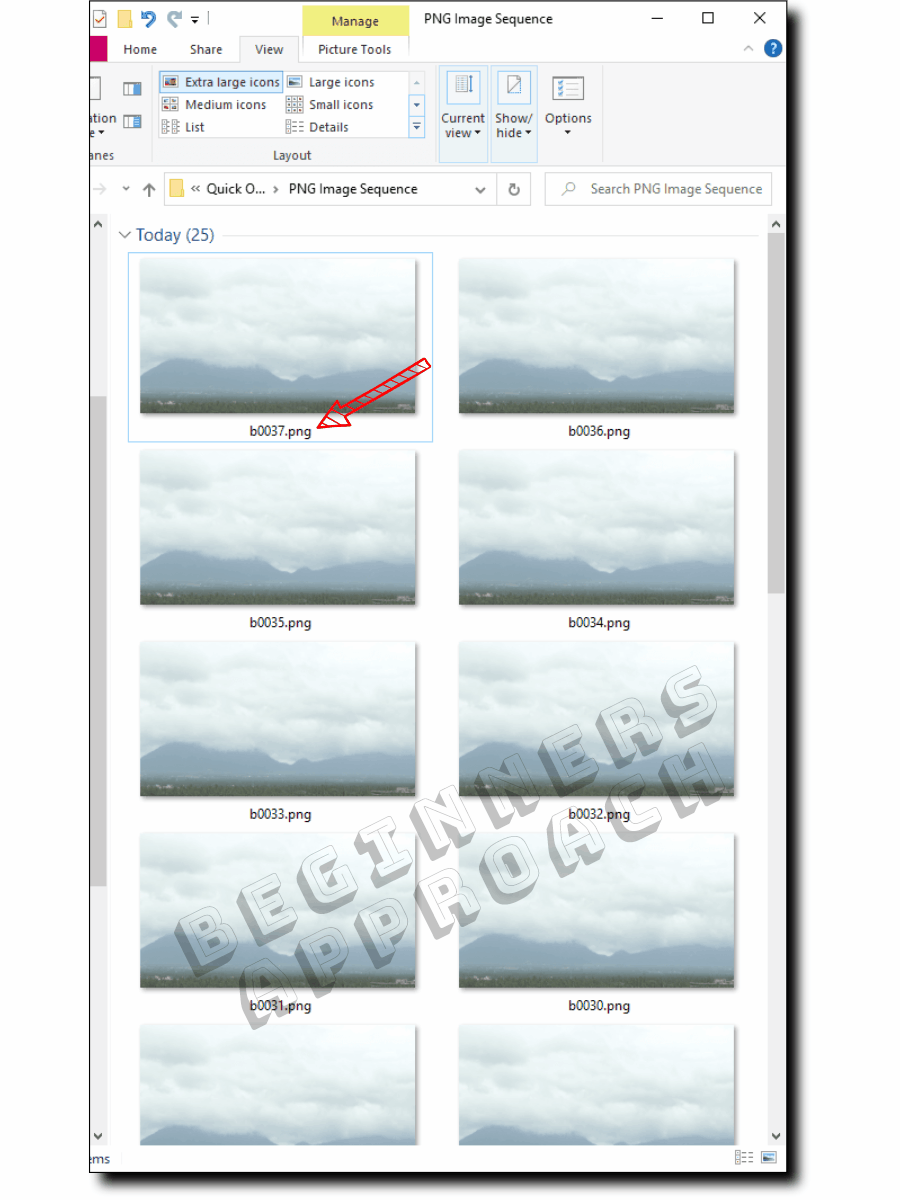
- Done! Resolve converts the video clip into a series of .png image sequences, as shown in the image below.
DaVinci Resolve Export Jpg Image Sequence
To export the Jpg image sequence, select your clip in the timeline on the “Edit” page, then go to the “Fusion” page. Right-click on the “MediaIn1” > “Insert” > “I/O” > select “Saver”.
Then from the “Inspector” tab, under the “File” tab, click on the “Browse” button. Enter any name with a “jpg” extension, say, “1.jpg”. Select “All Files” for “Save as type”.
Then from the menu, click on “Fusion” > “Render All Savers”. Resolve will render the video clip into a series of Jpg image sequences.
How to Export as TIFF or DPX Image Sequences in DaVinci Resolve?
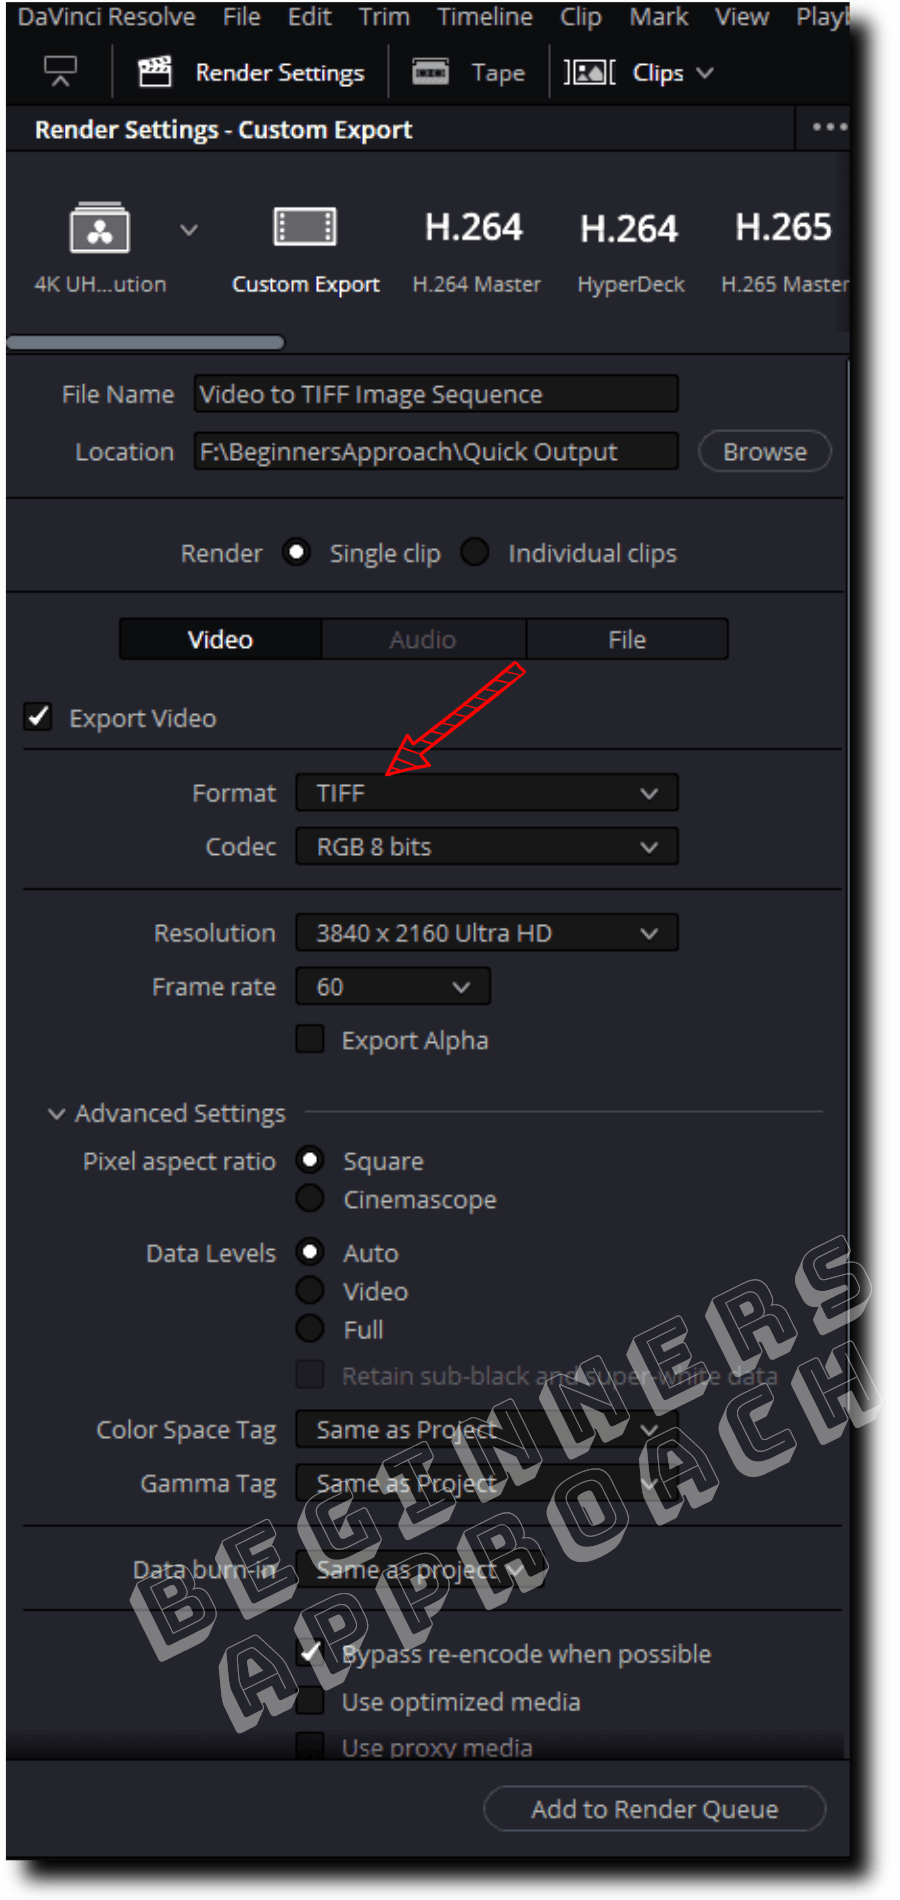
- Go to the “Deliver” page.
- Click on the “Custom Export” tab.
- Select “Single Clip” for “Render” (which is the default value).
- Under the “Video” tab, select “TIFF” (or “DPX“) from the “Format” dropdown.
- Codec = “RGB 8 Bits” (or any value based on your requirement).
- Resolution – your desired one, let’s say, “3840 x 2160 Ultra HD”.
- Frame Rate = your desired one, let’s say, “23.976”.
- Enter a File name and location at the top of the Render Settings.
- Click on “Add to Render Queue”.
- Then click on “Render All”.
- Done! Resolve converts the clip into a series of .TIFF images formats, as shown in the below image.
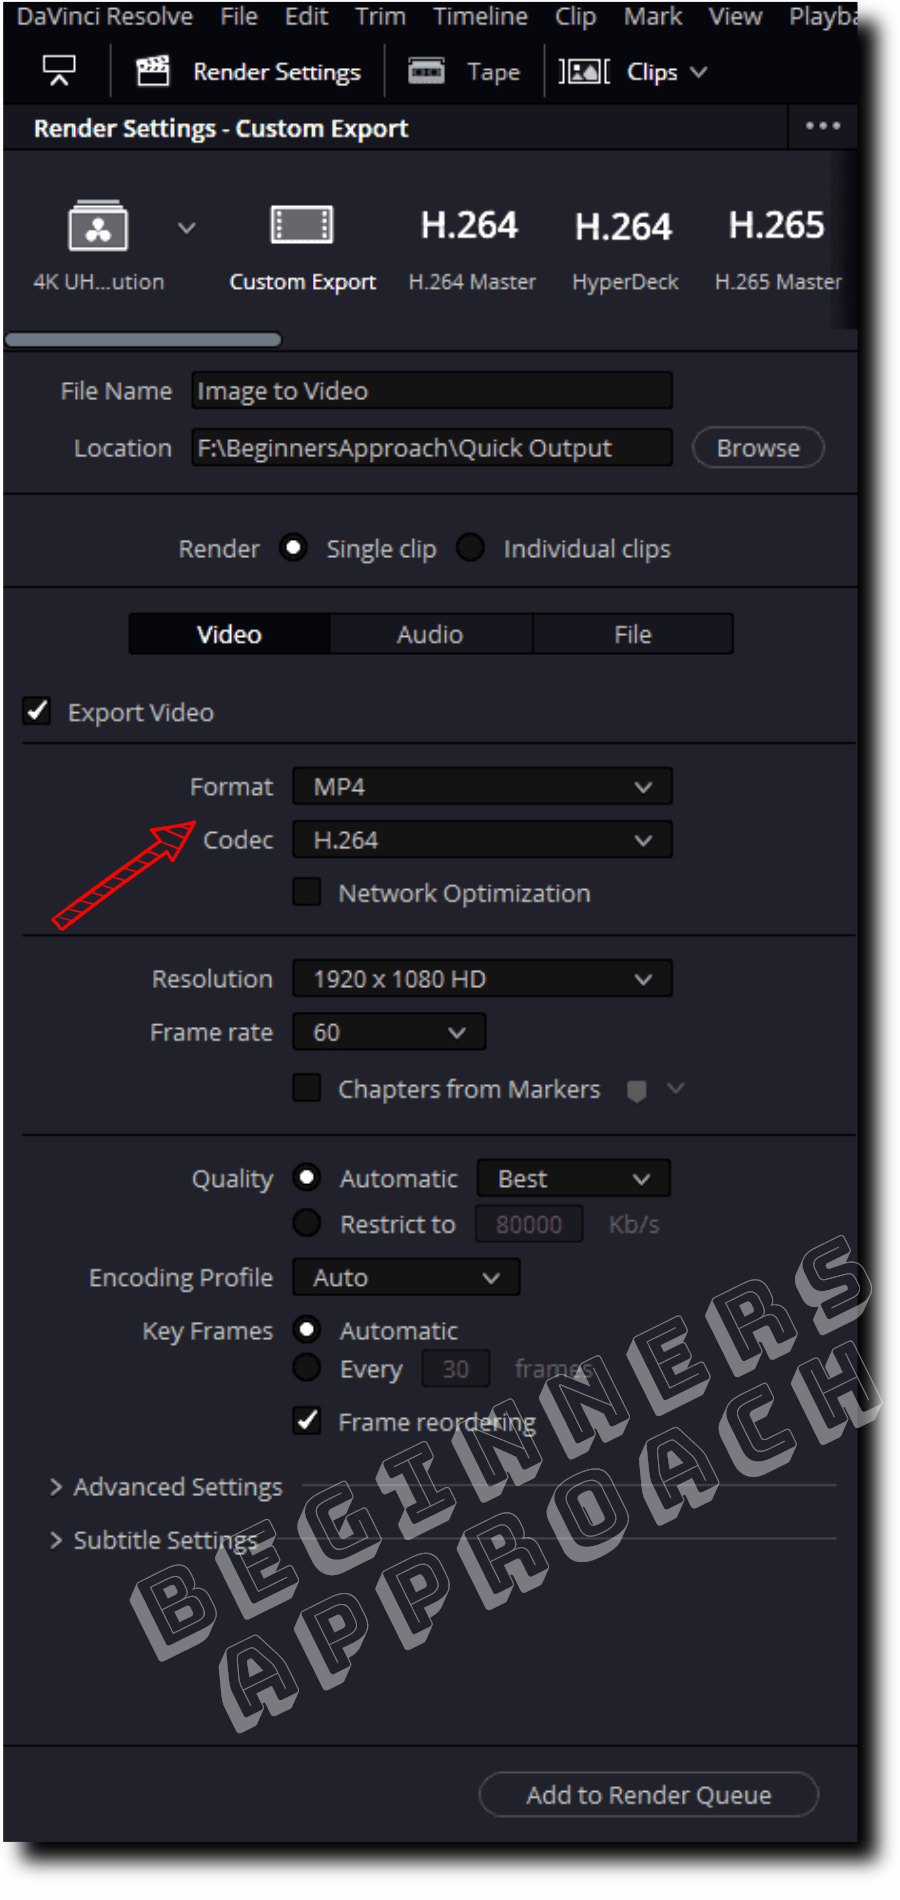
How to Export Image Sequence to a Video in DaVinci Resolve?
- Go to the “Deliver” page after importing, editing, and color-correcting the image sequences in Resolve.
- Click on the “Custom Export” tab.
- Select “Single Clip” for “Render” (which is the default value).
- Under the “Video” tab, select “Mp4” from the “Format” dropdown.
- Codec = “H.264”.
- Resolution – your desired one, let’s say, “1920 x 1080 HD”.
- Frame Rate = your desired one, say, “60”.
- Enter a File name and location – found at the top of “Render Settings”.
- Click on “Add to Render Queue“.
- Then click on “Render All“.
- Done! The image sequences are converted into a video clip in .mp4 format, as shown in the below image.
If you want to know more about different export image formats, then read the below: