A timeline frame rate in DaVinci Resolve denotes the number of frames per second of a single timeline inside a project. Whereas a project frame rate denotes the number of frames per second for all the timelines inside a project.
Changing the timeline frame rate is different from changing the project frame rate. Changing the timeline frame rate affects only a particular timeline whereas changing frame rate of a project affects all the timelines under the project (setting is found under the “Project Settings” > “Master Settings”).
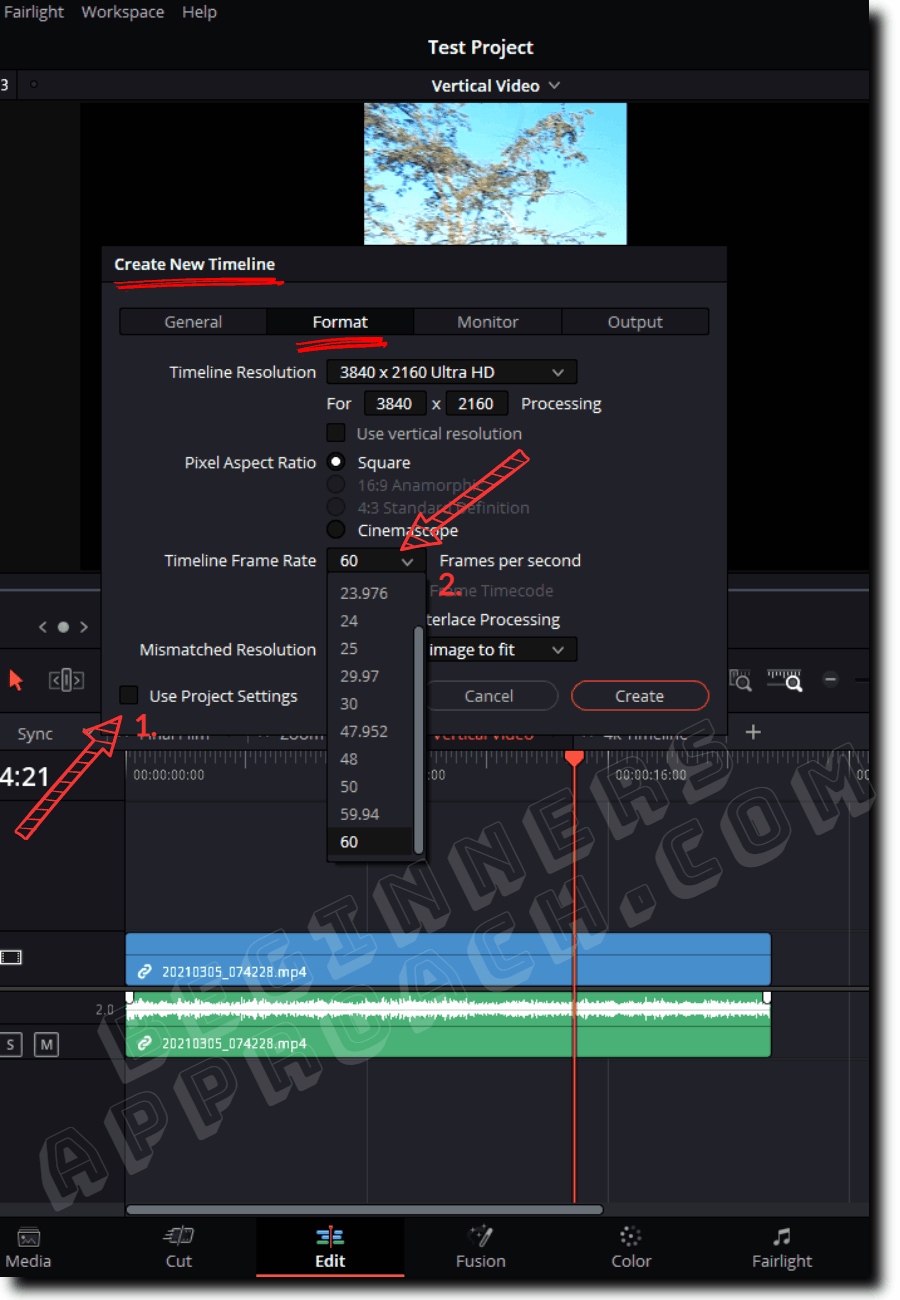
To change the timeline frame rate in DaVinci Resolve, go to the menu “File” > “New Timeline”. Uncheck “Use Project Settings”. Click on the “Format” tab. Select your desired fps from the “Timeline Frame Rate” dropdown. Click on “Create”. The timeline fps is changed.
If you can’t change the timeline frame rate, then create a new timeline, set the required fps, and then copy the clips from the previous timeline to this new timeline.
To set a 60 fps timeline frame rate in DaVinci Resolve, go to “File” > “Project Settings” > “Master Settings ” > choose “60” from the “Timeline Frame Rate” dropdown. Before changing the project frame rate, you should first create a new project, change the fps, and then import the clips.
Let’s go through the above process of fixing the timeline frame rate in detail – step-by-step with pictures. (Very useful for beginners and newcomers to DaVinci Resolve versions 18.6, 18.5, 18, 17, etc.)
How to Change the Timeline Frame Rate in DaVinci Resolve?
- Under the “Edit” page, click on the “Media Pool” tab.
- Go to the menu “File” > “New Timeline” (the shortcut for the new timeline is “Ctrl + n” or “Cmd + n”).
- Uncheck “Use Project Settings“. This will reveal different tabs like “General”, “Format”, “Monitor”, “Output” etc.
- Click on “Format“.
- Select your desired fps from the “Timeline Frame Rate” dropdown.
- Click on “Create“.
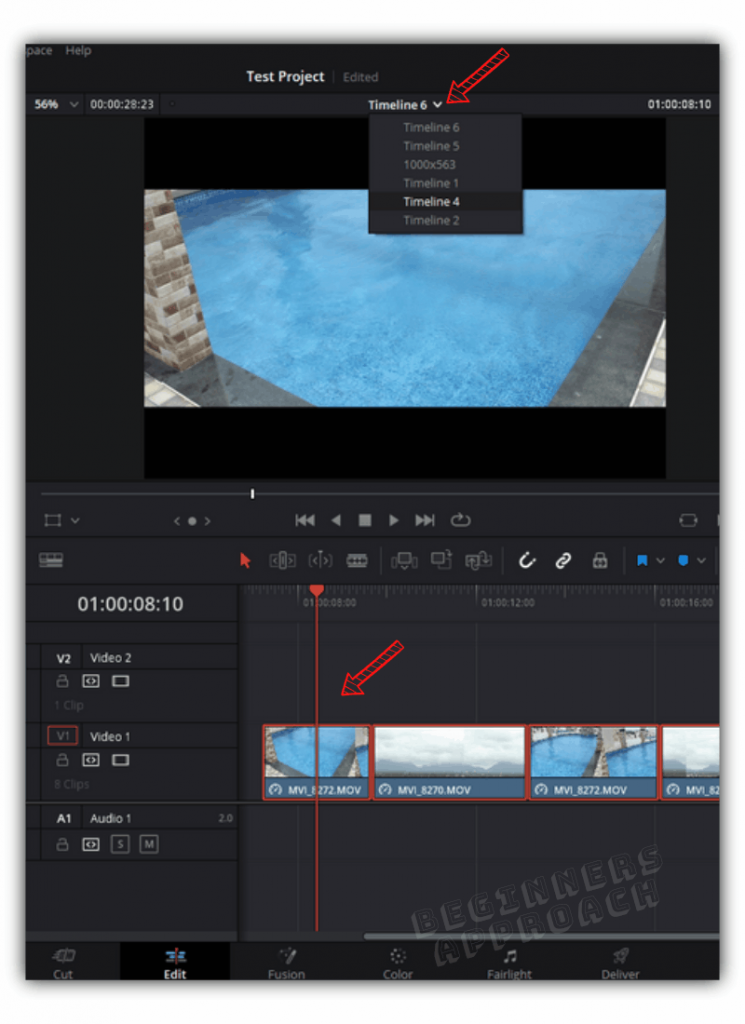
A new timeline with the desired frame rate is created, as shown in the above image.
Can’t Change Timeline Frame Rate (Greyed Out)
The timeline framerate greys out once you import clips into the media pool within a project. DaVinci Resolve doesn’t let you change the frame rate directly once the clips are imported. However, there is a workaround.

It’s very important that you know your target frame rate beforehand and set it accordingly.
You can still change the frame rate at this stage. All you have to do is:
Delete all the imported clips from the “Media Pool”. Then go to “Project Settings” > “Master Settings”. The “Timeline Frame Rate” dropdown is enabled for you to choose the correct frame rate.
Fix for Timeline Frame Rate Greyed Out Issue
If you’re in the middle of editing and can’t change the timeline frame rate, create a new timeline, set your required frame rate, and copy all the clips from your existing timeline to the new one.
- After creating a new timeline with the desired timeline frame rate (as discussed above), go back to your timeline with all the edits using the dropdown from the top of the timeline viewer.
- Copy all the clips by pressing “Ctrl + a” or “Cmd + a”.
- Go to the new timeline by selecting it from the timeline viewer dropdown.
- Press “Ctrl + v” or “Cmd + v”.
- All the clips are copied with your new frame rate to the new timeline!
Keep in mind that the new frame rate is only applicable to this particular timeline.
The project timeline frame rate is still the same that is greyed out (and not the new one that you just set while creating a new timeline).
Any new timeline created will still follow the project timeline frame rate unless you uncheck the project settings manually, as discussed above.
How to Set 60FPS Timeline Frame Rate in DaVinci Resolve?
- Go to “File” > “Project Settings”
- Under the “Master Settings ” > choose “60” from the “Timeline Frame Rate” dropdown.
- The 60 fps timeline frame rate creates a slow-motion effect.
Before changing the project frame rate, you should first create a new project, change the fps, and then import the clips.
If you are facing many issues related to changing frame rates in DaVinci Resolve, then I highly recommend the below-detailed guide with pictures:
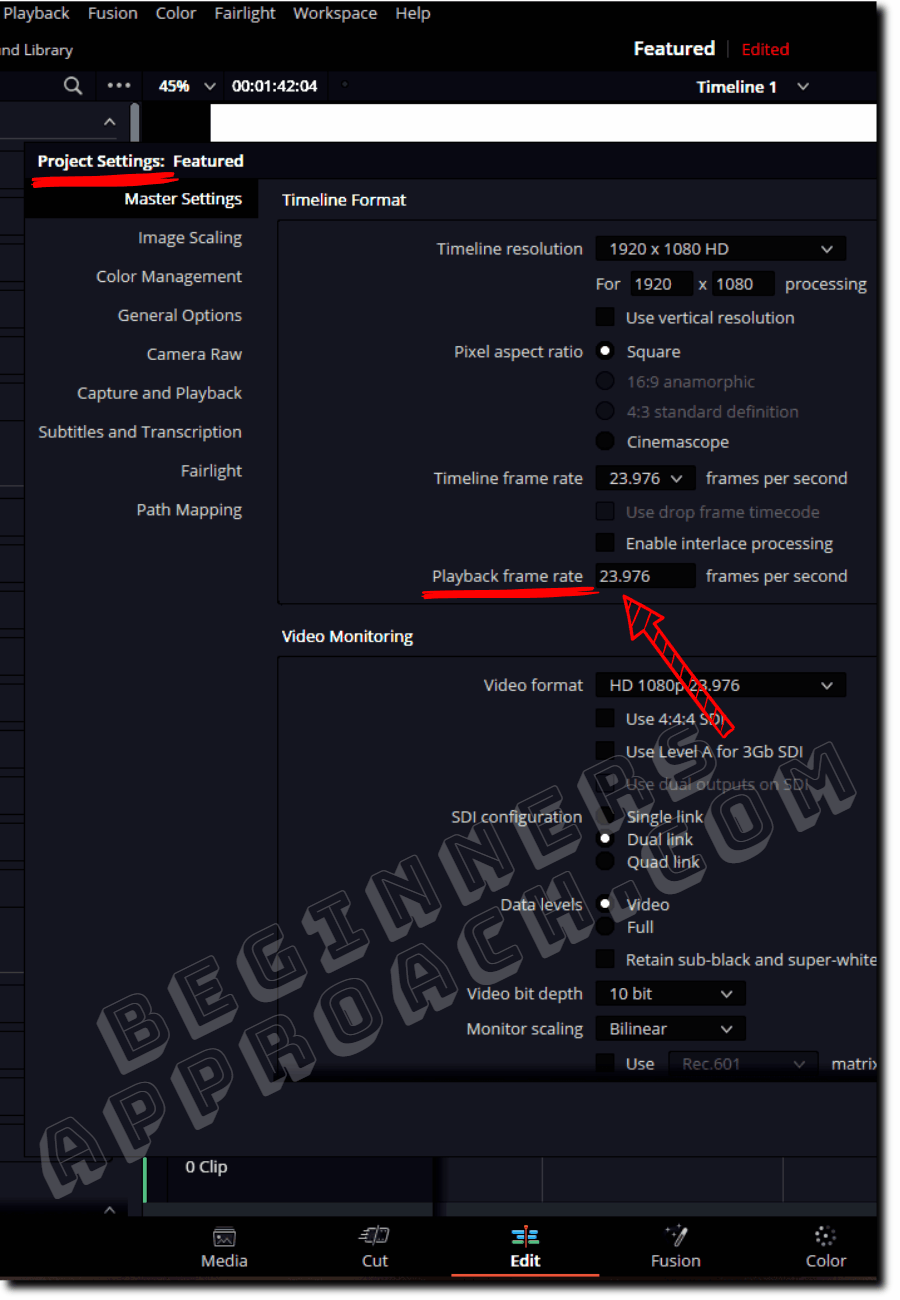
What is the Playback Frame Rate in Resolve?
Playback frame rate is the frames per second value you set to be output to your monitor (or other external displays). This doesn’t affect the timeline frame rate or the frame rate of your footage. It is merely for external displays (like your desktop monitor).
Then what is the difference between Timeline Frame Rate and Playback Frame Rate?
Timeline Frame Rate Vs Playback Frame Rate in DaVinci Resolve
The timeline frame rate represents the number of frames per second of your clips in the timeline as required for your final delivery. The playback frame rate is the number of frames per second your clips will play on your monitor (external display), which is based on the refresh rate (hertz).
For example, let’s say you have a 4K timeline with 23.976 FPS. If you have a 1080p monitor with a 60 Hz refresh rate, it can smoothly display 23.976 fps without any issues (in fact, frame rates up to 60 fps will have no problem in your display).
Anything beyond that will result in, what is called “screen tearing” (but the monitor will still display what it is capable of).
The timeline frame rate can not be changed after importing your files into the timeline.
But the playback frame rate can be changed at any time based on your external display needs.
(If you don’t understand the above technical concept, let’s keep it simple – keep your playback frame rate the same as the timeline frame rate. That’s it! Once you get the hang of working in Resolve or any video editor, you’ll figure out the difference through your experience).
Before You Go:
The best way to have a smooth workflow is to determine the delivery frame rate before you start production.
For example, you can shoot the majority of the footage at 23.976 fps and slow-motion stylistic footage at 60, 120, or 240 FPS.
You can set the timeline frame rate to 23.976 and convert the 60, 120, and 240 fps footage into 23.976 for a slow-motion effect through “Clip Attributes”.
Apart from setting the correct timeline frame rate, you should also know how to change the export frame rate and set different frame rates for a project.
I highly recommend the detailed guides below: