
DaVinci Resolve’s latest version 18.5 supports mkv export by encoding them in H.265(HEVC), and H.264(AVC) codecs. The earlier versions like 18 and 17 – do not support mkv export (encoding).
To export Mkv from DaVinci Resolve, go to the “Deliver” page. Then click on the “Custom Export”. Select “MKV” from the “Format” dropdown, set your resolution to, say, “3840 x 2160” for 4K UHD, and finally click on “Add Render Queue”. Hit render. This exports your MKV.
To export mkv in earlier versions of Resolve 18 or 17, first Export your footage in Mp4 in Resolve. Then transcode your mp4 file to mkv in Handbrake.
The 3 important render settings for MKV in DaVinci Resolve are:
- Codec
- Format
- Bit Rate
After exporting mkv, if there is no audio then unmute the audio track in the timeline. Select “Bus 1 (Stereo)” against the “Output Track 1” on the Delivery page.
Let’s go through the mkv export in detail – step by step – with pictures. (Very useful for beginners and newcomers to DaVinci Resolve versions 18.6, 18.5, 18, 17, etc.).
How to Export Mkv in DaVinci Resolve?
- Click on the “Deliver” page (located at the bottom).
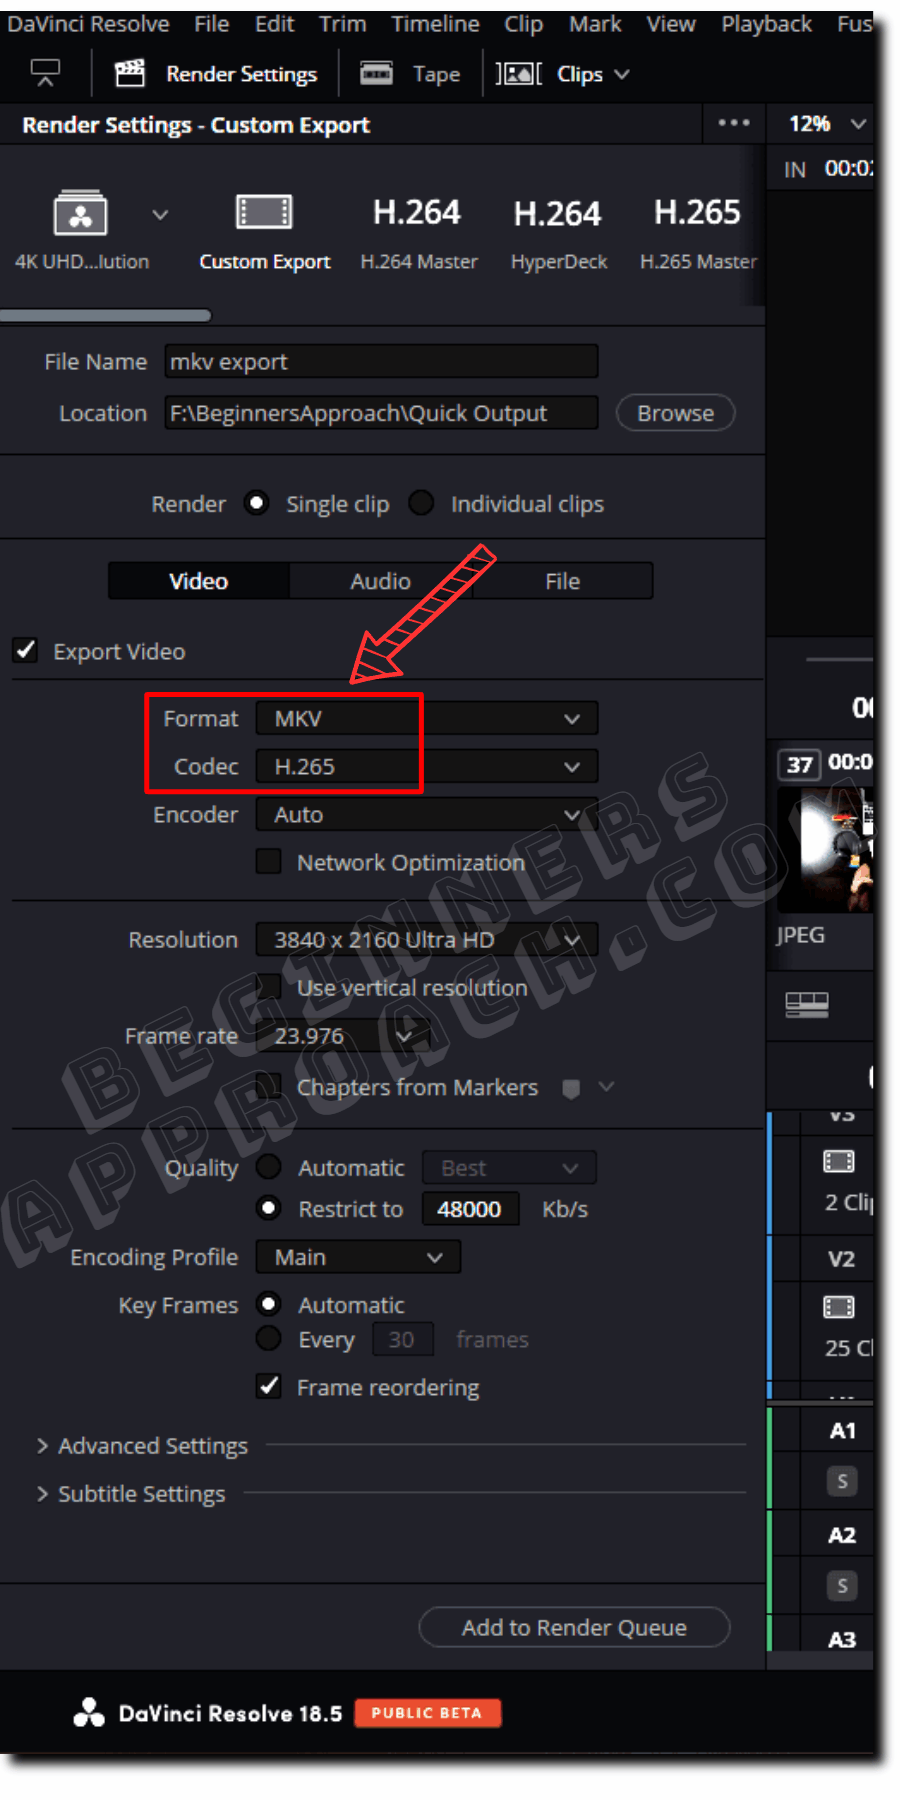
- Click on “Custom Export” under “Render Settings”.
- Under the “Video” tab, make sure “Export Video” is checked.
- Select “MKV” from the “Format” dropdown.
- Select “H.265” from the “Codec” dropdown (H.264 is also fine. For more info, scroll down.)
- Choose your required “Resolution“, say, “3840 x 2160 UHD”. (This is the max resolution for free version.)
- Choose your “Frame Rate“, say, “23.976”.
- Set “Quality” to > “Restrict to” > 48000 Kb/s (2000 times the frame rate for a 4K UHD H.265 export.)
- Let the “Encoding Profile” be “Main”.
- Click on “Add to render queue”.
- Click on “Render All” to start the exporting process (found on the right hand side under “Render Queue”).
- Your DaVinci Resolve MKV file is successfully saved, as shown in the below image.
If you have an option for selecting “Constant Bit Rate”, select it. Otherwise, you might not get the expected bit rate.
For the Studio (paid) users, you can speed up your render (or export) time with the help of the “Encoder” option set to “Nvidia” or “AMD” based on your GPU. Unfortunately, the free version doesn’t have hardware acceleration for encoding.
Best DaVinci Resolve MKV Export Render Settings
The 3 important and best Mkv export settings are:
- Codec
- Format
- Bit Rate for 4K Mkv Vides
#1) Codec
Codec is one of THE most important settings that determine your final output quality and size.
Remember, the Mkv container can be encoded only in FFV1, H.264, and H.265 codecs in the free version of Resolve 18.5.
The below will give you some ideas on various codecs for delivery:
- High-Quality Master = DNxHR or ProRes – The best possible highest-quality output that acts as a master copy.
- Delivery – H.265 = Highly efficient codec that lowers the file size of your output. But do remember that some of the devices might find it hard to play it back.
- Delivery – H.264 = Most common delivery codec (widely used).
- YouTube = Use H.265 for a higher quality and lower file size upload. If you need the highest quality, you should upload the DNxHR or ProRes output which takes a lot of time to upload. Also, keep in mind that YouTube will further compress your uploaded video to suit the platform’s requirements. Going with a high-quality clean upload is recommended to avoid artifacts.
A small note on H.264 – Most experts recommend not using H.264 codec inside Resolve. Instead, they suggest first rendering the output using DNxHR or ProRes. Then go to Handbrake or Adobe Media Encoder and transcode using H.264 codec for better quality.
#2) Format
Mkv – This is our expected format.
#3) Bit Rate for 4K Mkv Video in Resolve
Bit rate is the amount of information packed in 1 second of a video. The bit rate determines the quality of a video.
The higher the bit rate, the more details packed per second – the better the video quality.
Setting the “Quality” to “Automatic” > “Best”, in the “Deliver” page render settings will let Resolve to determine the bit rate for you.
Or you can set it manually – For an H.265 codec, experts suggest a bit rate value equivalent to a minimum of 2000 times the frames per second of your footage.
For example, if your fps is 24, the bit rate should be = 2000 x 24, that is, 48,000 Kb/s.
A 60 fps will result in 2000 x 60 = 120,000 Kb/s.
Now go to the “Deliver” page render settings, and enter the above bit rate value against the “Quality” > “Restrict to” field.
But you can play with different bit rates till you get the desired quality. (The option “Best” should be fine for most scenarios.)
No Audio After Exporting to MKV in DaVinci Resolve?
Make sure the audio track is not muted in the timeline under the “Edit” page. Then go to the “Deliver” page, under “Render Settings”, and click on the “Audio” tab. Make sure “Export Audio” is checked.
Make sure “Bus 1 (Stereo)” is selected against “Output Track 1”. (Sometimes “Timeline Track” selected resulted in no audio, as reported by certain users in the online forums).
Before You Go:
If you want to learn to upload to YouTube directly to save time, click on the below for a step-by-step detailed guide: