
Transition for fading in or out to black in DaVinci Resolve is used to open and end a scene or a video so that the opening and ending are not abrupt.
There are two important fade transitions – Cross Dissolve, and Dip to Color Dissolve – which are essential for a speedier workflow.
To fade transition between two clips in DaVinci Resolve, right-click on the meeting point of the 2 clips on the timeline and select “24 Frame Cross Dissolve”. This places a “Cross Dissolve” transition of 1-second duration, which fades the first video clip to the second one smoothly.
To add a fade to white transition in DaVinci Resolve, click on the “Effects” tab. Search for “Dip to Color Dissolve“. Drag and drop it onto the right end of the required clip in the timeline. Go to the “Inspector” > “Transition” tab, and select “Color” to white. Update the “End Ratio” value to “50”.
If you’re not able to add a transition between 2 clips in DaVinci Resolve, this is due to no overlap between the tail of the first clip and the head of the second clip in the timeline. To fix it, trim the end of the first clip and the start of the second clip.
If you want to add a transition between 2 clips in DaVinci Resolve without trimming, then add 2 transitions. Add the first transition to the end of the first clip. Then, again add the same transition to the start of the second clip.
Let’s explore the DaVinci Resolve fade transitions and issues related to it, in detail – step-by-step, with pictures. (Very useful to beginners and newcomers to DaVinci Resolve versions 18.6, 18.5, 18, 17, etc.)
How to Fade Transition Between Clips in DaVinci Resolve?
- Go to the “Edit” page, which has your timeline.
- Place 2 clips adjacently without any gaps.
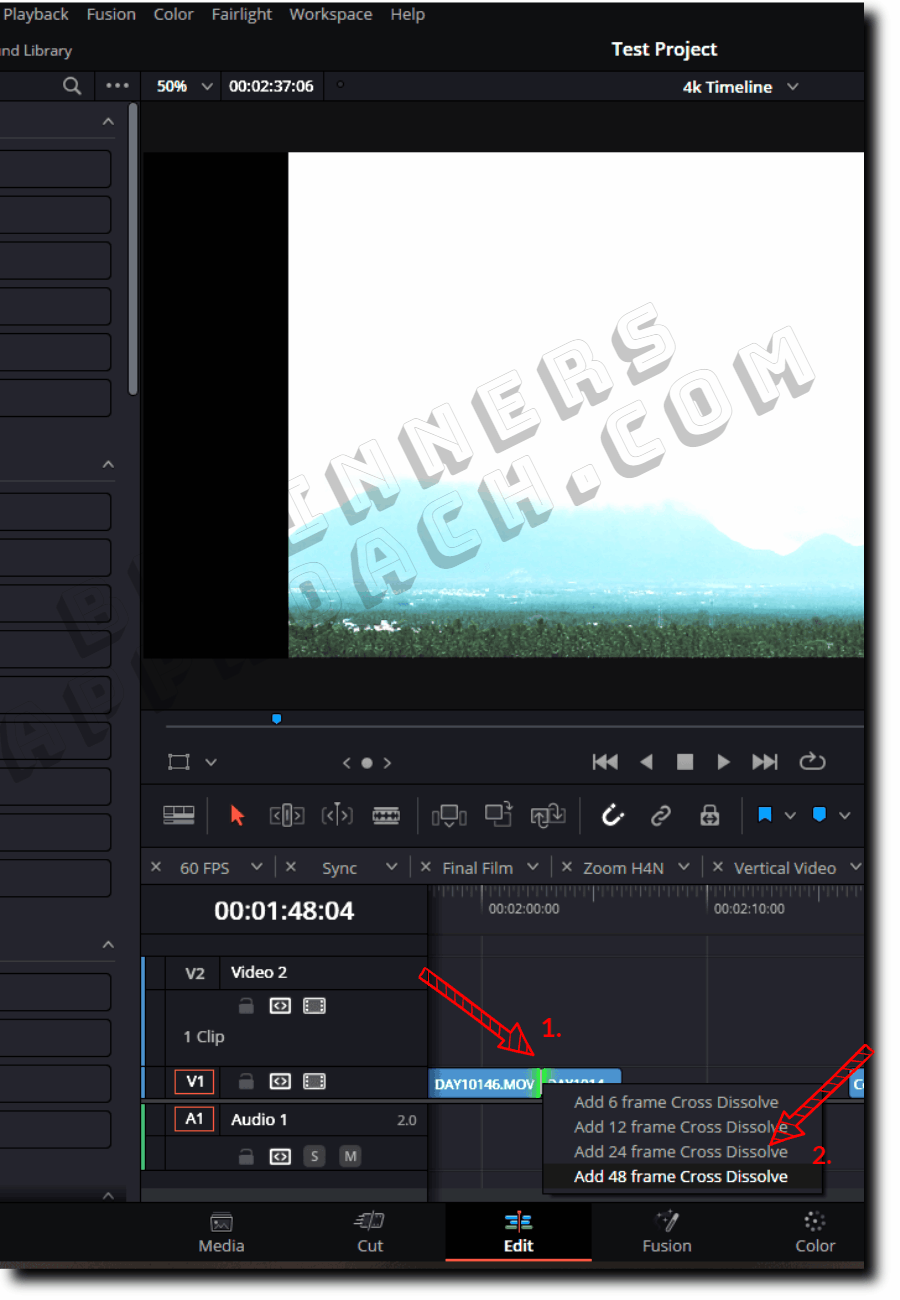
- Right-click on the meeting point of the 2 clips and select the required option, say, “24 Frame Cross Dissolve“.
- This places a “Cross Dissolve” transition of 1-second duration. Of course, you can change the duration to your taste from the “Inspector” tab.
- The “Cross Dissolve” fades the first video clip to the second one smoothly, as shown in the below image.
You can click on the transition and go to the “Inspector” tab to further fine-tune the controls to your taste.
You can change the “Duration“, “Alignment“, “Ease“, etc., parameters to your taste.
DaVinci Resolve Fade Transition to White
- Click on the “Effects” tab on the “Edit” page.
- Search for the “Dip to Color Dissolve” transition.
- Drag and drop it onto the right end of the required clip in the timeline.
- Go to the “Inspector” > “Transition” tab
- Select “Color” to white.
- Update the “End Ratio” value to “50”. The below image shows dip to color dissolve transition in Resolve,

Related Article:
Sometimes DaVinci Resolve doesn’t allow you to place a transition between 2 clips.
Not Able to Add Transition Between Clips in DaVinci Resolve?
DaVinci Resolve doesn’t allow you to add a transition between 2 clips because Resolve needs edit points. According to BlackMagicdesign – “If there is no overlap between the heads and tails of the two clips, you may not be able to add a transition where you want.“
If you place 2 whole clips (without trimming) end to end in the timeline, then there is no overlap between the tail of the first clip and the head of the second clip. So you won’t be able to place a transition between the 2 clips.
When you click on the meeting point of the 2 clips and get a red highlight, that indicates there is no overlap.
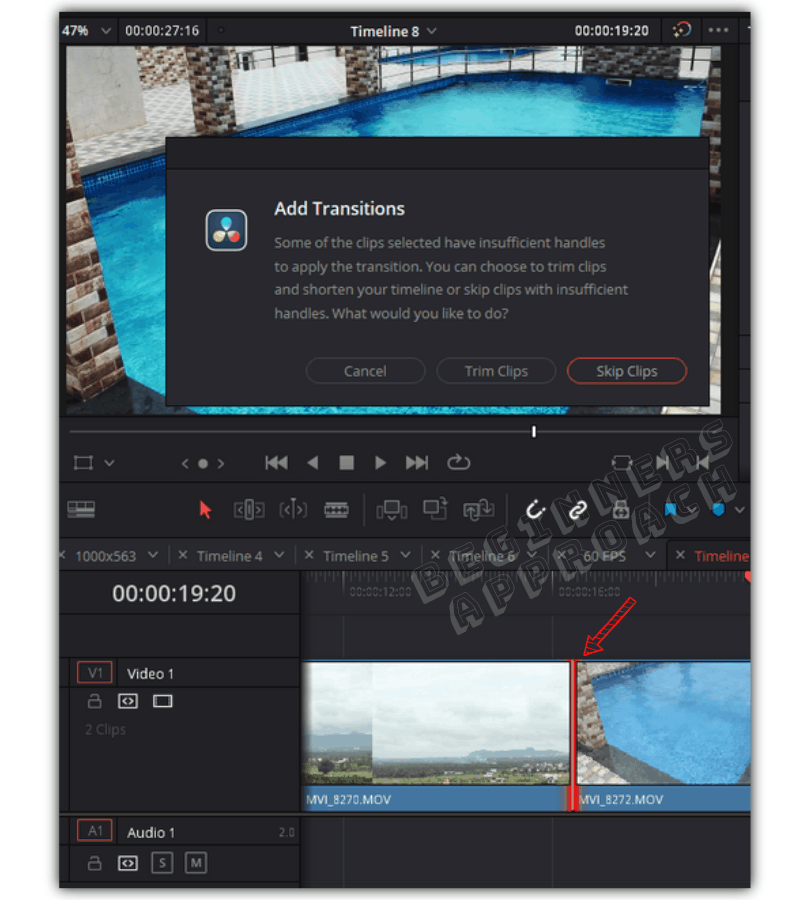
If you right-click on the meeting point of the 2 clips and select “Add 24 Frame Cross Dissolve”, you’ll get the below message from DaVinci Resolve:
“Some of the clips selected have insufficient handles to apply the transition. You can choose to trim clips and shorten your timeline or skip clips with insufficient handles. What would you like to do?”
If you click on “Trim Clips“, Resolve will automatically trim a few frames from the 2 clips so that it can place the transition between the clips.
This leads us to…
Fix For Unable To Add Transition Between Clips
Trim the end of the first clip and the start of the second clip. This results in an overlap of the heads and tails of the clips. This provides handles so that a transition can be successfully applied between the clips.
How to Add Transition Without Trimming in DaVinci Resolve?
If you don’t want to trim the clips and want to apply a transition, there is a workaround. You’ll need to add 2 transitions. Add the first transition to the end of the first clip.
Then, again add the same transition to the start of the second clip. Let me explain through an example for better understanding.
Let’s say you want to fade out to white from the first clip and then fade into the second clip from white.
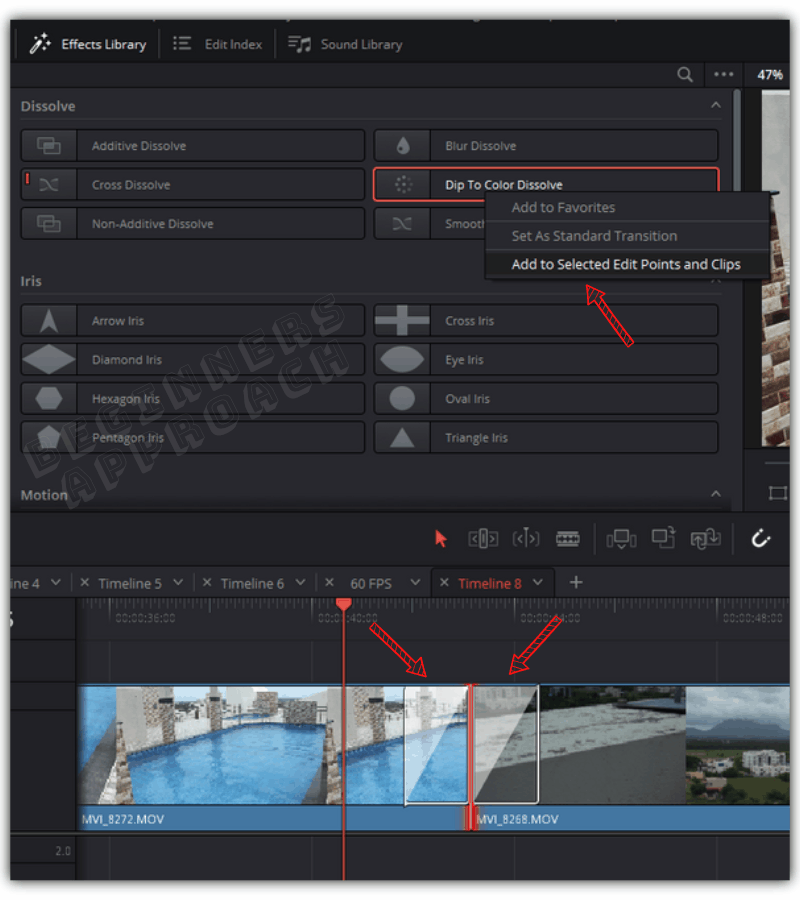
Then click on the first clip in the timeline. Go to “Effects” > “Dissolve” > Right-click on “Dip to Color Dissolve” and select “Add to Selected Edit Point and Clips”.
It will place 2 transitions at the start and end of the clip. Select the transition from the starting position and delete it by pressing the backspace button.
Similarly, click on the second clip and do the same as above. Now delete the transition placed at the end.
Now you should have 2 transitions back to back on the 2 clips, as shown in the image below.
Click on the first transition, go to the “Inspector” tab, and change the “End Ratio” value to 50. Next, change the “Color” to white using the eyedropper.
Click on the second transition, go to the “Inspector” tab, and change the “Start Ratio” value to 50. Next, change the “Color” to white using the eyedropper.
When you play it back, the first clip will fade out to white, and from white, you will slowly fade into the second clip.
If all you want is to fade out to black and then fade in from black without trimming the clips, then simply grab the fade handles, and fade out and fade in respectively. (For step-by-step instructions, please scroll above as this is already covered).
You may also be interested in the below post: