If you’re a beginner or newcomer to DaVinci Resolve (versions 18.5, 18, 17, etc.), then today’s guide will show you how to change the frame rate in Resolve.
To change the frame rate in DaVinci Resolve, go to “File” > “Project Settings” > “Master Settings ” > choose the frame rate from the “Timeline Frame Rate” dropdown. Before changing the project frame rate, you should first create a new project, change the fps and then import the clips.
Changing a project frame rate is different from changing a timeline frame rate.
Let’s go through the above (how to change frame rate in davinci resolve) in detail – step-by-step with pictures.
You can set the frame rate at 3 different places in DaVinci Resolve:
- Project level
- Timeline level
- Clip level
Your project is a collection of your timelines. A project level setting will affect all the timelines. However, Resolve lets you alter the setting of individual timelines. More on that later.
The project frame rate is always changed before importing any clips into the media pool.
How to Change Project Frame Rate in DaVinci Resolve?
- Go to the “Project Manager” (click on the bottom right corner home icon).
- Create a “New Project”.
- Don’t import your clips yet.
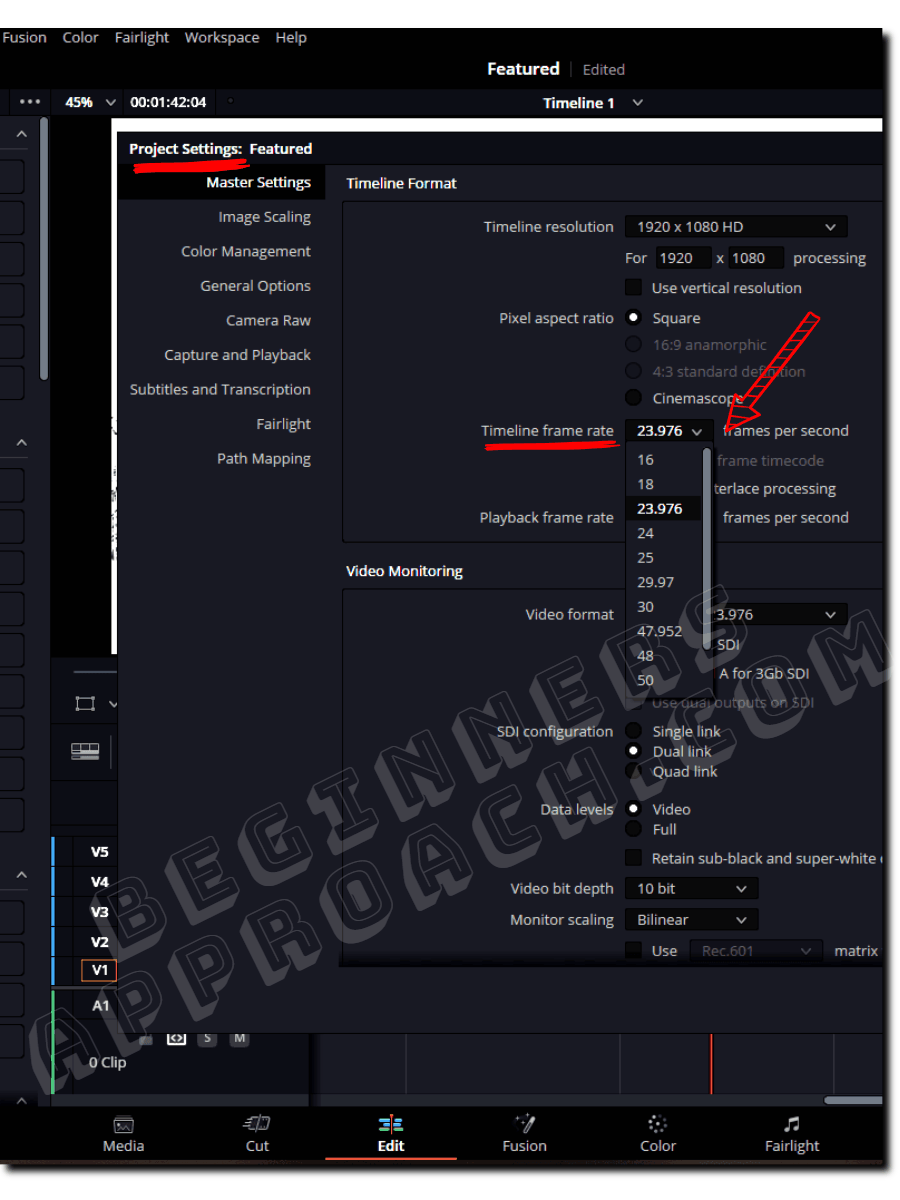
- Click on “File” > “Project Settings” (short cut for project settings is “Shift + 9“).
- Click on “Master Settings“.
- Under “Timeline Format“, there is a “Timeline Frame Rate” dropdown.
- Choose your required frame rate, say, 23.976 FPS from the dropdown.
- Click on “Save“.
Your project timeline frame rate is now set to the required value.
You are good to go ahead and import your required clips. After you import one or more clips, you’ll note that the timeline frame rate is now locked out under “Project Settings”!
Why is Timeline Frame Rate Greyed Out in Resolve?
The timeline framerate will be disabled or greyed out once you import your footage into the media pool within a project. DaVinci Resolve will not let you change the frame rate directly once the clips are imported. But you can change it indirectly (discussed below).
It’s very important that you know your target frame rate beforehand and set it accordingly.

Fix – You can still change the frame rate at this stage. All you have to do is delete all the imported clips from the “Media Pool”. Then go to “Project Settings” > “Master Settings” > “Timeline Frame Rate” will be enabled for you to choose the correct frame rate.
But if you’re in the middle of editing and would like to change the frame rate, then there is a workaround.
You can’t change your existing timeline’s fps (frames per second); however, you can create a new timeline, set your required frame rate, and copy all the clips from your existing timeline to the new one.
I highly recommend the below detailed guide on changing timeline frame rate:
If you are facing many issues related to changing frame rates in DaVinci Resolve, then I’d highly recommend the below-detailed guide with pictures:
Now let’s see how to change the frame rate (fps – frames per second) of a specific clip.
How to Change the Frame Rate of a Clip in DaVinci Resolve?
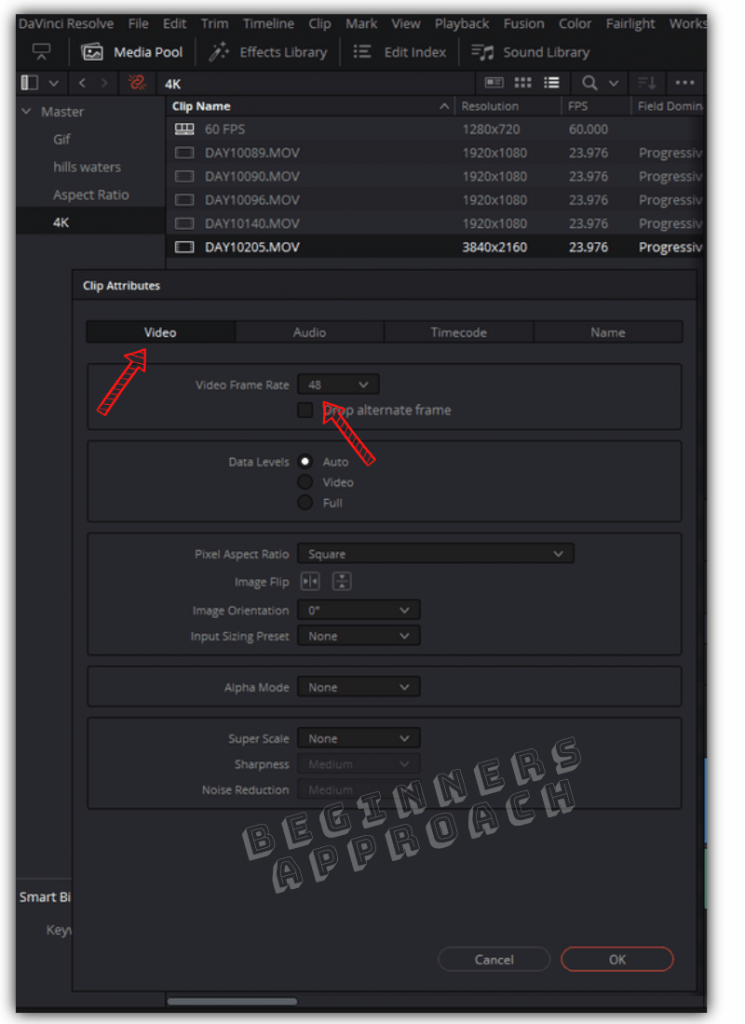
- Under the “Edit” page, click on the “Media Pool”.
- Select your desired clip (or select a group of clips with the help of “Ctrl”/ “Cmd”).
- Right-click and click on “Clip Attributes…“
- Click on the “Video” tab.
- Under “Video Frame Rate“, select your desired frame rate and click on “Ok”.
- Done!
The clip(s) is now updated to the new frame rate.
(You can also do the same operation when the clips are placed in the timeline. Just select your required clips and select “Clip Attributes”.)
The “Clip Attributes” reveal the properties of a clip.
Once you update the frame rate, Resolve will re-interpret the clip with the new frame rate.
When you change the frame rate of a clip, keep in mind:
- The duration of the clip might change.
- The audio of the clip will not be affected. Meaning, if you change the frame rate, the duration of the video may change, but the audio duration remains the same (which might cause out-of-sync issues).
How to Change Export Frame Rate in DaVinci Resolve?
You can’t export a 23.976 or 24 or 30 fps project frame rate to 60 fps output in Resolve. Similarly, you can’t export a 60 fps project to a 24 fps. However, you can export a “23.976” fps project to 23.976, 24, and 29.976(3:2) frame rate.
Read the below-detailed guide to know more about changing the export frame rates in Resolve (with pictures):
Before You Go:
The best way to have a smooth workflow is to determine the target frame rate before you start production.
For example, you can shoot the majority of the footage at 23.976 fps and slow-motion stylistic footage at 60, 120, or 240 FPS.
In this way, when you start editing, you can set the project frame rate to 23.976 and convert the 60, 120, and 240 fps footage into 23.976 for a slow-motion effect through “Clip Attributes”.
At the same time, exporting your video at the correct frame rate is also important.
I highly recommend the below detailed guide on exporting your required frame rates:
Thank You!