
Optimized Media workflow is one of many ways to improve real-time playback performance inside DaVinci Resolve.
In DaVinci Resolve optimized media are processor efficient pre-rendered duplicate media created from the original source footage, which is easy to work with in real-time without any lag. You’ll have to generate them before starting the editing (for a faster workflow).
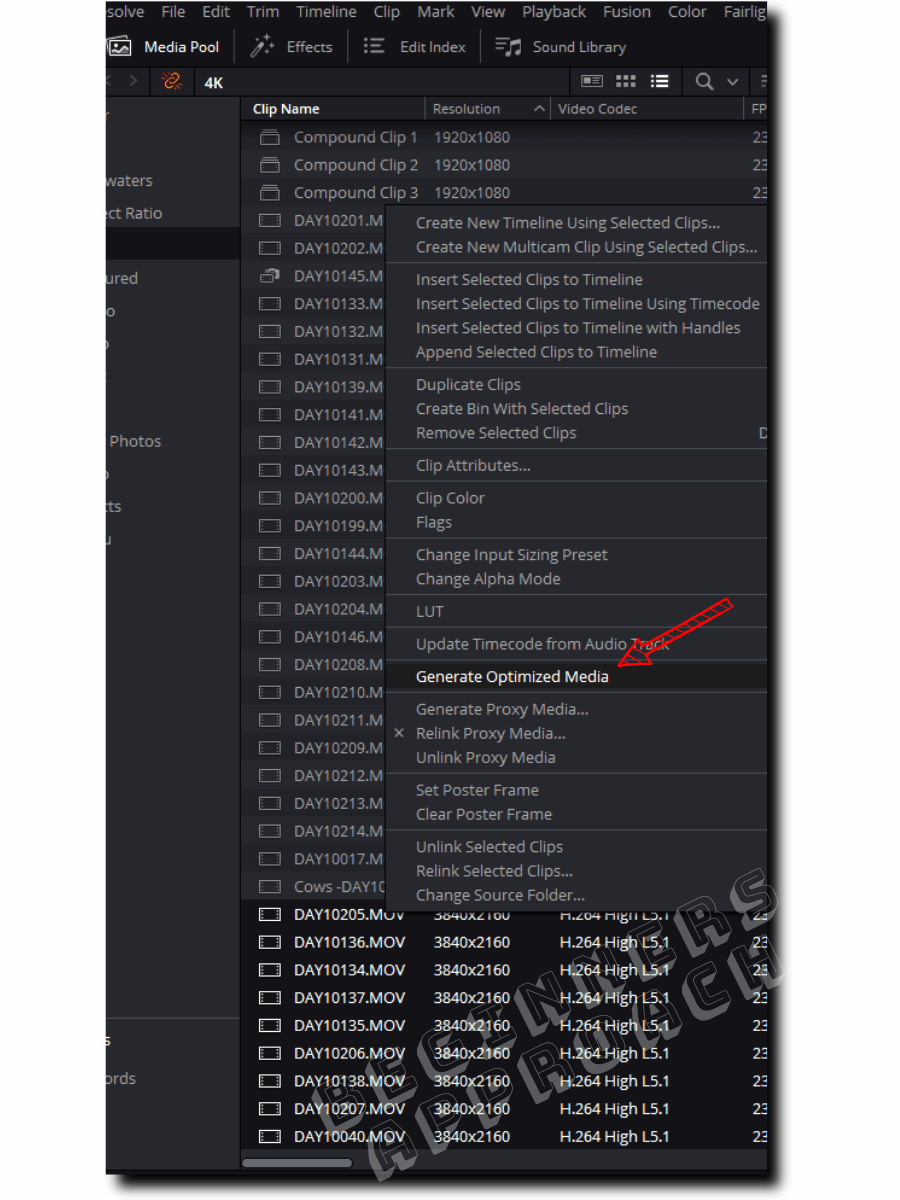
To generate optimized media in DaVinci Resolve, select all of your clips, right-click and then select “Generate Optimized Media” under the “Edit” page > “Media Pool” tab. Before that, you must set 3 important settings (covered below).
If you’re a beginner or newcomer to DaVinci Resolve (versions 18.5, 18, 17, etc.), today’s quick guide will show you how to generate optimized media, and important settings related to it, in detail – step-by-step with pictures!
- How to Generate Optimized Media in DaVinci Resolve?
- Location of Optimized Media in DaVinci Resolve
- Optimized Media – 3 Important Things to Know
- What is the Best Optimized Media Format in DaVinci Resolve?
- How to Enable Optimized Media in Resolve?
- How to Switch Between Optimized Media and the Original Source File?
- What is the Size of Optimized Media in Resolve?
- How to Know If a Media is Optimized in Resolve?
- How to Export Optimized Media in Resolve?
- Optimized Media Not Working
- Before You Go:
How to Generate Optimized Media in DaVinci Resolve?
- Go to the ‘Media Pool” on the “Edit” page.
- Select all of your clips that need optimized media.
- Right-click and then select “Generate Optimized Media“.
- Resolve will take a few minutes based on the number of clips selected.
- You won’t be able to edit till the process is complete.
This is where the Proxy workflow comes in handy – the proxy creation happens in the background; without you having to wait for it to complete – which means you could be editing, color grading, or even doing VFX compositing without wasting time.
On top of that, the proxy files are generally lower in file size and provide a faster editing workflow.
To know more about the proxy workflow and the differences between optimized media and proxy, click on the below:
Location of Optimized Media in DaVinci Resolve
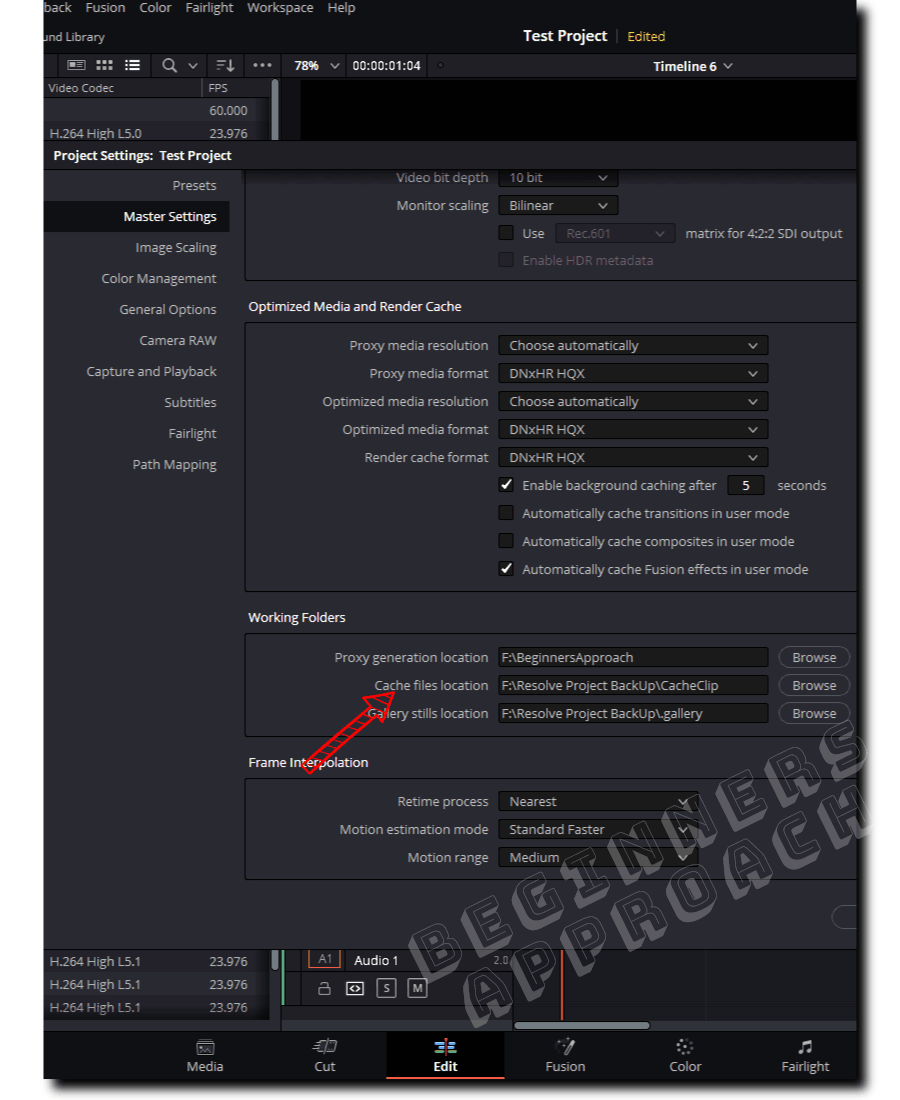
- Click on the bottom right corner cog wheel – the “Project Settings” (short cut is “Shift + 9”).
- Click on the “Master Settings” and scroll down till you see the “Working Folders” section (immediately below the “Optimized Media and Render Cache” section.)
- “Cache Files Location” is your optimized media location.
- By default, this is the first scratch disk (storage disk) displayed in the “Preferences” > “Media Storage”.
- Click on the “Browse” button to change the location as per your storage requirement.
- But make sure this is not an external connected hard disk. Instead, let this be your internal and high-speed storage device.
- Also, beware – if you’re unaware of the size of your hard drives, the optimized media can quickly occupy a lot of space resulting in zero storage space.
Also, remember that these are internally generated files recognized only by Resolve and are not user-friendly like the proxy versions, which can be transferred across computers and sent over the internet.
The optimized media from DaVinci Resolve have .dvcc file extensions.

Optimized Media – 3 Important Things to Know
- Choose processor-friendly formats like DNxHR (Windows) or ProRes (Mac) for faster and real-time editing.
- Generate optimized media for the required clips, which contain highly compressed codecs like H.264 / H.265 or, high resolution and fast 4K/6K/8K 60/120 fps footage or, raw video files.
- During export, make sure you are rendering the correct format – it could be your original resolution footage or the optimized media – based on your choice.
Let’s discuss these in detail with quick steps to save you time!
What is the Best Optimized Media Format in DaVinci Resolve?
In DaVinci Resolve, the best optimized media formats are DNxHR (Windows), ProRes (Mac), and Uncompressed 10/16 bit. They are highly efficient and processor-friendly formats that do not strain your computer resources. But do keep in mind that, these formats take up a lot of space in your storage disks.
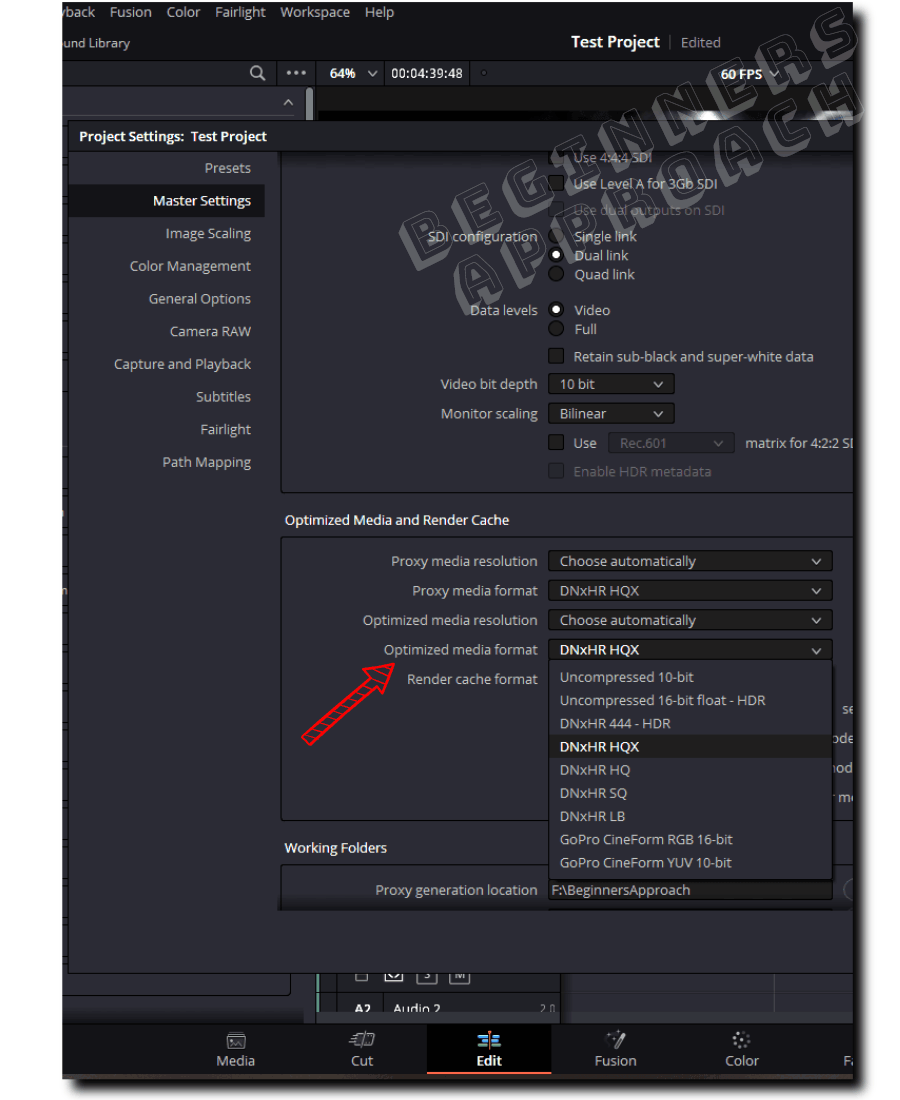
- To choose the desired optimized media format, click on the bottom right corner cog wheel – the “Project Settings” (short cut is “Shift + 9”).
- Click on the “Master Settings” and scroll until you see the “Optimized Media and Render Cache” section.
- Choose DNxHR from the dropdown against “Optimized Media Format”. (You could choose high-quality ones like DNxHR HQX or DNxHR 444 – HDR – based on your storage space availability and color grading preferences.)
- Or, if you want to save space and quickly generate the optimized media, select “DNxHR LB”.
- (The above is for a PC. Choose the corresponding ones displayed in your MAC. The idea is the same.)
- If you want, you could leave the default option for “Optimized Media Resolution” which is “Choose Automatically“, or select the ones based on your requirement – keeping in mind the storage space availability, color grading, VFX, etc.
How to Enable Optimized Media in Resolve?
- Go to the “Edit” page after opening your project in Resolve.
- Go to the menu toolbar, click “Playback,” and click “Use Optimized Media If Available”.
- Before enabling this option, make sure you’ve already generated optimized media with the desired format, as discussed above.

How to Switch Between Optimized Media and the Original Source File?
To switch to the original source file, simply go to the menu “Playback” > and then click to unselect “Use Optimized Media if Unavailable”. This should help you toggle between the original and optimized media.
What is the Size of Optimized Media in Resolve?
I suggest you generate optimized media for a single clip to get a feel for the amount of time Resolve takes to generate optimized media and the file size it occupies on your hard disk.
As soon as you generate optimized media, go to the above location (in this case = <Hard Drive Name> -> <Your Personal Folder> -> “CacheClip” -> “Optimized Media” -> <Folder with Random alphanumerals>.
Right-click the folder, click on “Properties” and note the “Size on disk”.
This should give you an idea of the file size.
With this, you can better plan your precious time (I am talking about the time Resolve takes to generate optimized media).
As mentioned earlier, you won’t be able to work in Resolve unless the optimized version is generated.
I plan my work efficiently – I would start the optimized media generation and work on other high-priority tasks outside of Resolve while it’s in progress.
How to Know If a Media is Optimized in Resolve?
Older versions of Resolve, like version 16, included a column called “Optimized Media” in the “Media Pool” which displays the optimized media status. Unfortunately, it is unavailable from version 17 and version 18 (at least at the time of this writing – till version 18 Beta 5).
But we do have columns for “Proxy”, “Proxy Media Location”, “Online”, etc., which display information about the proxy versions.
If you have generated high-quality, optimized media formats like DNxHR or ProRess, or Uncompressed and would like to export them for delivery instead of the original source file, you can do the same in Resolve with a simple setting.
How to Export Optimized Media in Resolve?
- Click on the “Deliver” tab.
- Click on the “Advanced” settings.
- Scroll down and then click to select the “Use Optimized Media” checkbox.
- Click on “Add to Render Queue”.
- Then, click on “Render All”.
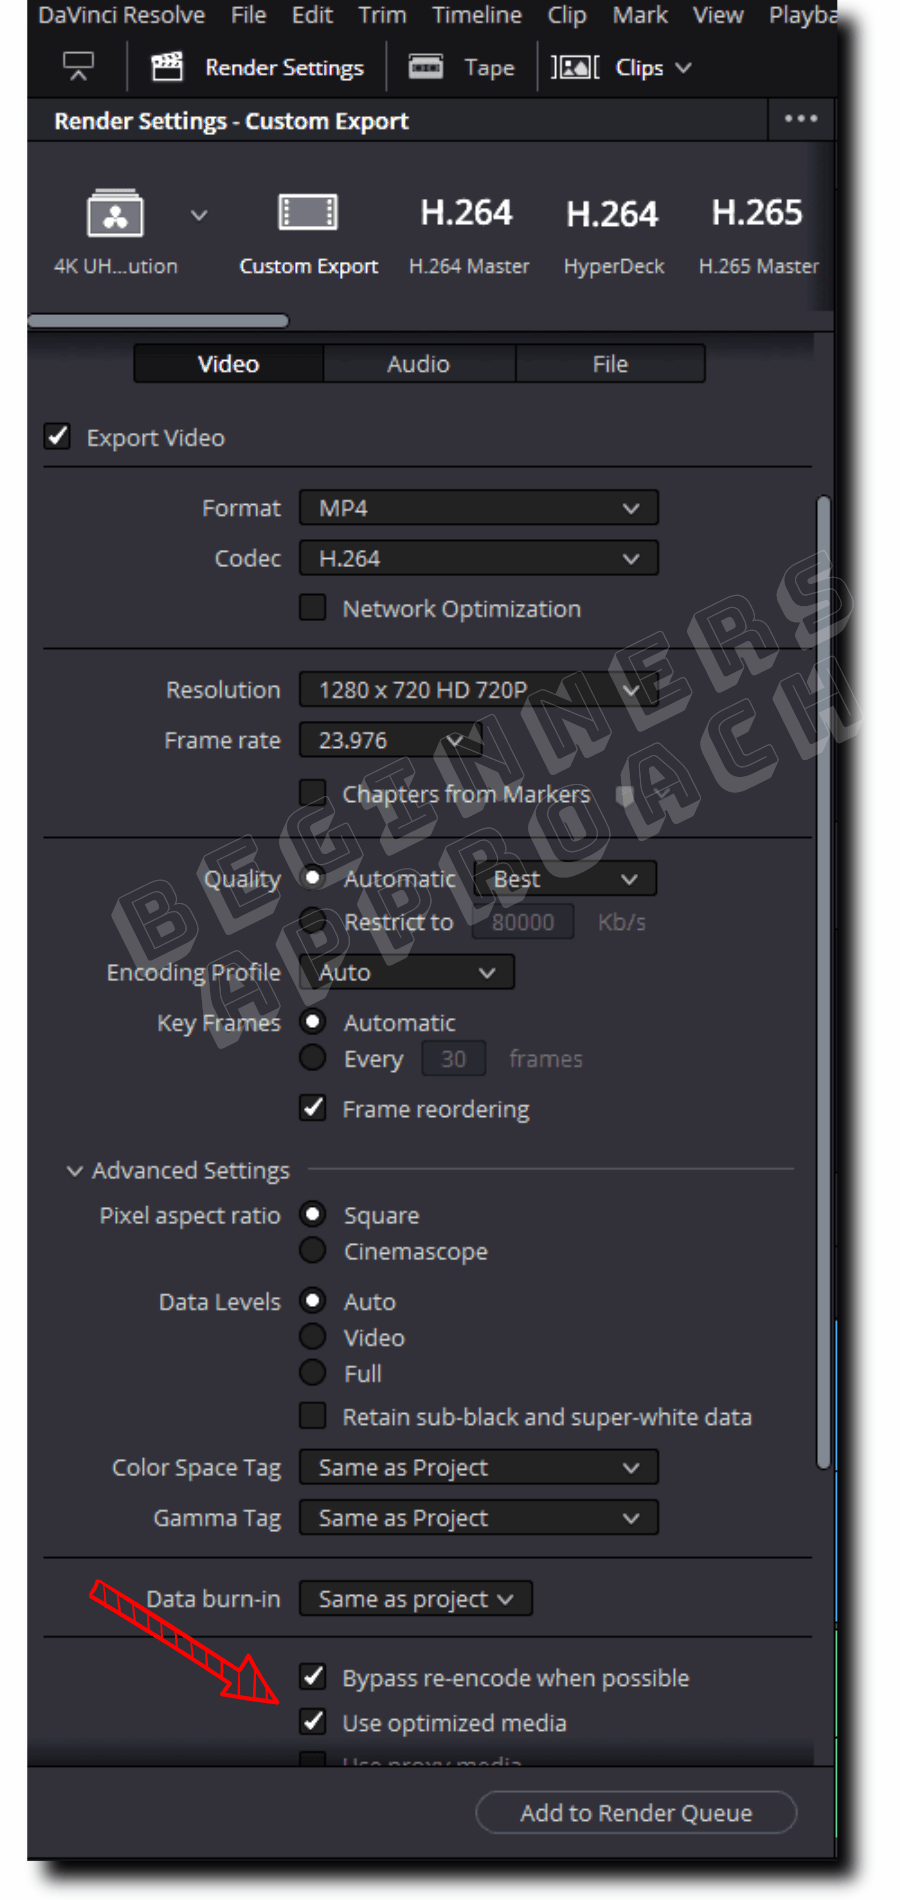
The rendering time during export is reduced when “Use Optimized Media” is selected.
Optimized Media Not Working
If the existing optimized media is not working, delete them from your hard disk and generate optimized media again. This should mostly solve your issue.
Always keep in mind that optimized media is different from rendering cache or rendering a clip in the timeline.
Suppose you threw a computationally intensive effect on top of your optimized clip in the timeline. In that case, your computer might stutter – giving a feeling that the optimized media process is not working.
What you should be really doing is rendering the clip inside the timeline, which should solve the issue.
Before You Go:
Computationally intensive effects (certain OFX effects) can bring your computer to a halt. The next logical step is to know DaVinci Resolve’s Render Cache settings. I highly recommend the below detailed guide:
DaVinci Resolve Render Cache (3 Settings for Smooth Playback)