
If you’re a beginner or newcomer to DaVinci Resolve (versions 18.5, 18, 17, etc.), today’s quick guide will help you get the Render Cache settings right to achieve smooth playback.
DaVinci Resolve’s Render Cache (also known as caching) is one of many ways to improve real-time playback performance without lag inside DaVinci Resolve.
What is DaVinci Resolve Render Cache?
The DaVinci Resolve Render Cache is nothing but the caching or rendering of your clips with all the effects baked in so that the playback is smooth and in real-time without any dropped frames (no red indicators). There are 2 modes – Smart and User cache that you MUST know to reap the full rewards.
Your computer (which could be a fully loaded monster) would come to a halt when computationally intensive effects are thrown on top of the clips in your timeline, like:
- Fusion effects,
- Resolve FX
- OFX
- Transitions,
- Composite modes other than “Normal” like “Add”, “Luminosity”, etc.,
- Speed effects, Retime effects, etc.
Today I’ll show you 3 IMPORTANT things you must remember before render-caching your clips in the timeline.
- What is DaVinci Resolve Render Cache?
- Render Cache – 3 Important Settings to Know
- How to Quickly Cache in DaVinci Resolve for Improved Realtime Playback?
- How to Manually Cache in DaVinci Resolve for an Improved Playback
- Best Render Cache Format in DaVinci Resolve
- How to Change Background Caching Seconds in Resolve?
- Where is the DaVinci Resolve Render Cache Location – Windows and Mac?
- How to Change Cache Location in Resolve?
- DaVinci Resolve – How to Render in Place?
- Can I Return to Original Clips with Effects After Rendering in Place?
- How to Disable Render Caching in Resolve?
- Optimized Media vs. Render Cache
Render Cache – 3 Important Settings to Know
- Render cache formats in the Project Settings – Choose processor-friendly codecs like DNxHR, ProRes, or Uncompressed 10/16 bits.
- From the menu, Playback > Render Cache > Smart or User to set DaVinci Resolve to automatically or manually cache computationally intensive effects like Fusion Effects on the clips in the timeline.
- Right-click the clip in the timeline > Render Cache Fusion Output > Set it to On or Auto. (You should also know about “Render Cache Color Output”)
To save you time, let’s discuss these in detail with quick steps!
How to Quickly Cache in DaVinci Resolve for Improved Realtime Playback?
To quickly render cache in DaVinci Resolve, go to the menu “Playback” > “Render Cache” > and select “Smart” from the options. “Smart” cache will automatically render and cache your clips during playback in the timeline or whenever you are inactive in Resolve for 5 seconds (as defined in the Project Settings).
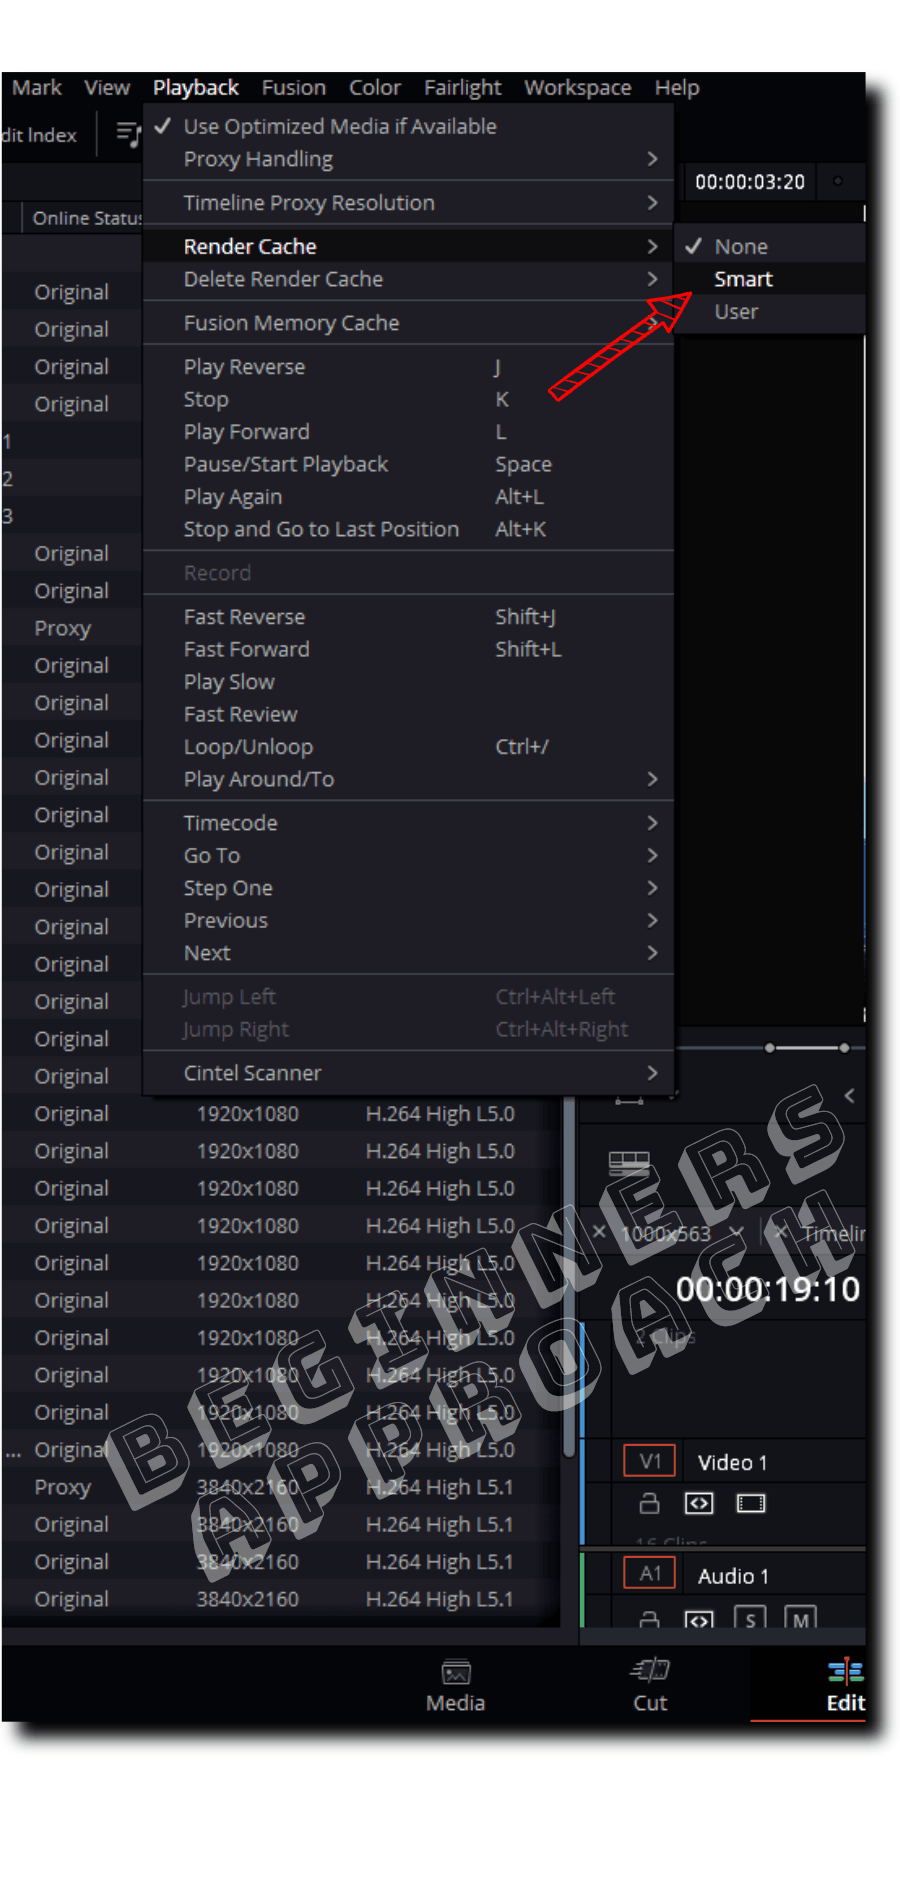
Selecting the “Smart” cache option lets Resolve to decide to cache those clips which it thinks have processor-intensive effects in the Timeline.
(This is a set-and-forget-it approach.)
You can identify the caching mechanism by a red line on top of the processor-intensive clips with effects in the timeline, which gradually become blue over time.
Once it’s blue, the clips playback in real-time smoothly. (The first playback is usually stuttery, and the subsequent playbacks are smooth).
With the smart cache option selected, Resolve first starts with the automatic caching of the composites, transitions, and then ResolveFX effects.
How to Manually Cache in DaVinci Resolve for an Improved Playback
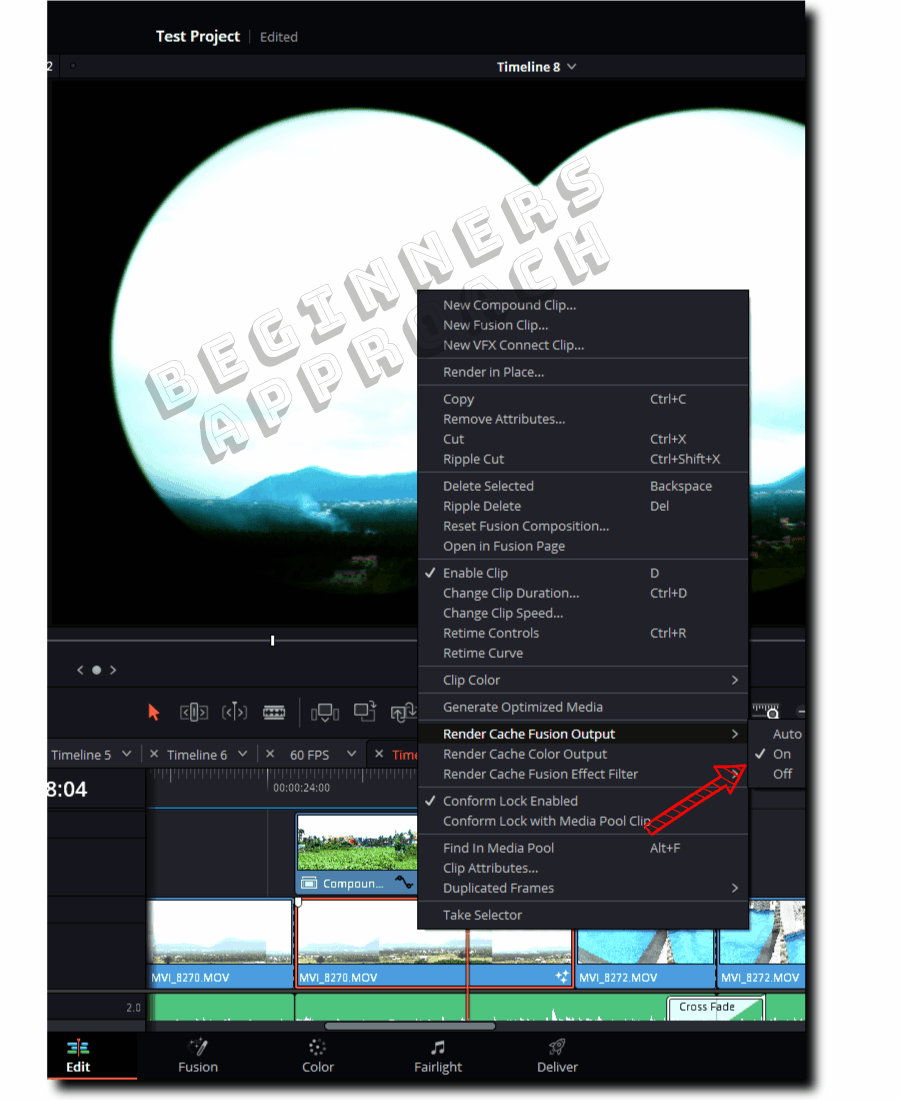
You can manually render cache in DaVinci Resolve by going to the menu “Playback” > “Render Cache” > and selecting “User” from the options. Then go to the timeline and right-click the required clip and click on the “Render Cache Fusion Output”, and then select “On” (instead of the default “Auto”). This will force Resolve to cache your clip.
Manual “User” caching gives you control over render caching of specific clips with processor-intensive effects of your choice in the timeline.
If you want more details on Resolve’s caching and want to improve the performance further, then click on the below to learn more about Render Cache Fusion output, Render Cache color output, and Node caching, with step by step guide and illustrations:
Best Render Cache Format in DaVinci Resolve
The best render cache format in Resolve is DNxHR (for Windows), ProRes (for Mac), and Uncompressed 10/16 bits if you have a lot of storage space.
They are highly efficient and processor-friendly formats that do not strain your computer resources. But do keep in mind that these formats take up a lot of space in your storage disks.
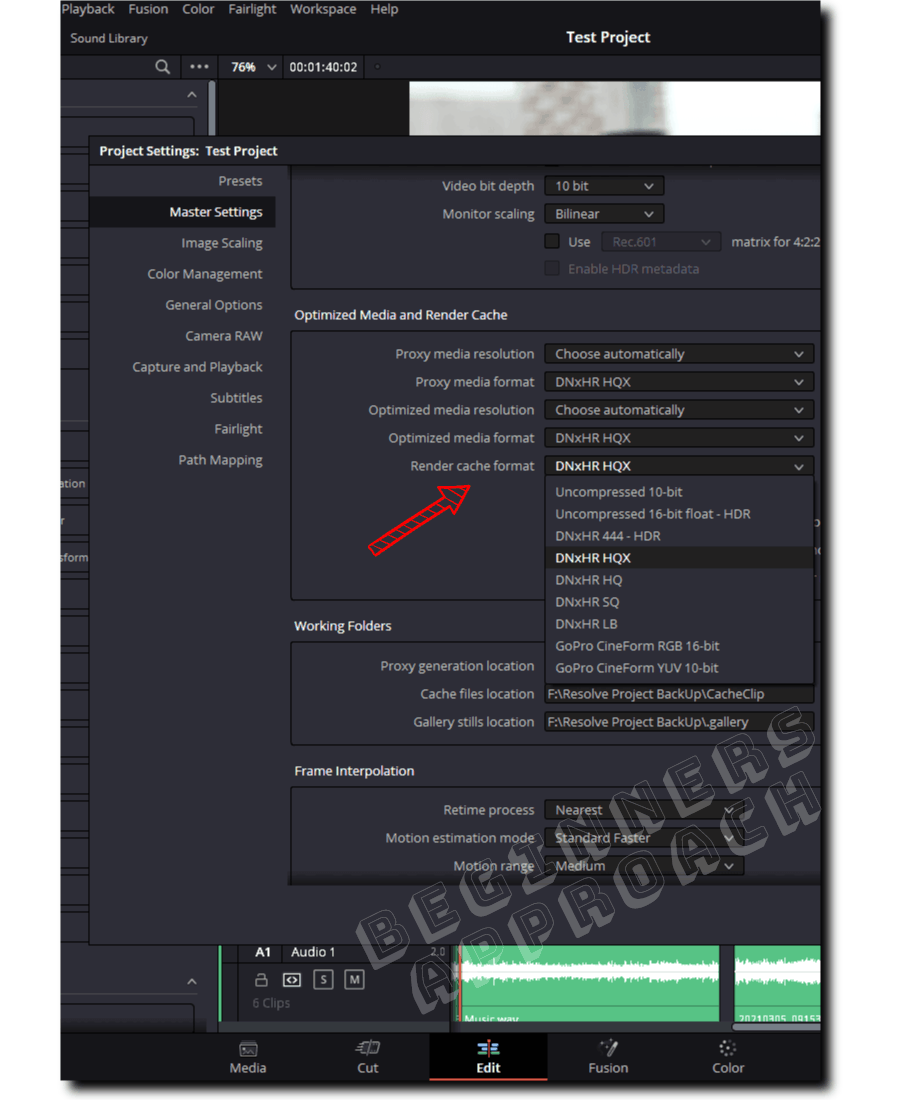
You can change the render cache format by clicking on the bottom right corner cog wheel – the “Project Settings” > “Master Settings” > “Optimized Media and Render Cache” > “Render Cache Format” > and then select DNxHR or ProRes or your desired format.
During the background rendering (or caching), Resolve converts the existing video format to “.dvcc” files – which are internal only to Resolve and can not be exported or moved over to other computers.
How to Change Background Caching Seconds in Resolve?
You can change the background caching seconds to your required value by going to the “Project Settings” > then clicking on the “Master Settings” > “Optimized Media and Render Cache” > “Enable Background Caching After 5 seconds”. You can set it to preferably 3 seconds (based on your requirement).
This means that after 3 seconds of your inactivity, Resolve will automatically start the caching process in the background.
Where is the DaVinci Resolve Render Cache Location – Windows and Mac?
The render cache location can be found by clicking on the bottom right corner cog wheel – the “Project Settings” > “Master Settings” > “Working Folders” > “Cache Files Location”. Resolve creates a “CacheClip” folder and places all of the rendered (cached) files. The files end with the “.dvcc” extension.
Also, note that the Cache files location defaults to the first volume you add to the “Media Storage Locations” found in the System Preferences. (Menu > DaVinci Resolve > Preferences > System > Media Storage).
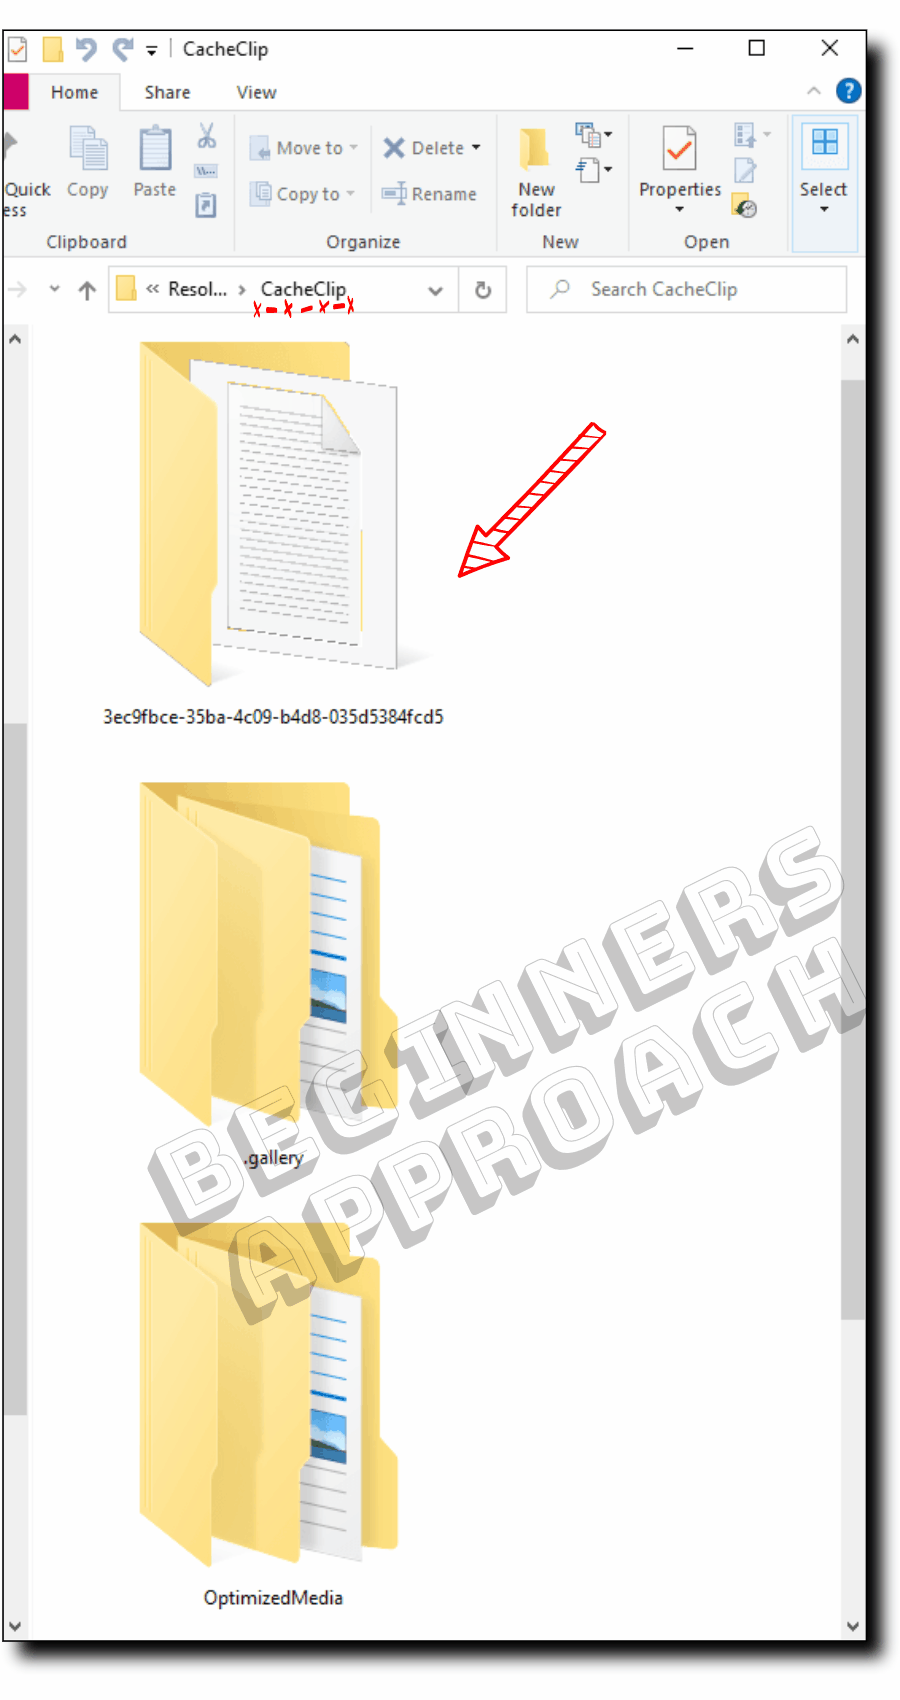
The folders are named randomly with alpha numerals. If you double-click and get inside them, you will see the “.dvcc” files which are nothing but the internally generated cached files.
How to Change Cache Location in Resolve?
Click on the bottom right corner cog wheel – the “Project Settings” > “Master Settings” > “Working Folders” > “Cache Files Location” and then click on the “Browse” button. Next, choose your desired folder and click “Select Folder”. This should change your render cache location.
DaVinci Resolve Cache Location Update Required
When you open a project, Resolve might throw this warning message – “Cache location update required – Please update the capture location in project settings as the current location is offline or inaccessible”.
This could be due to the unavailability of the previously available hard disk or external drive containing the cache files.
To solve this error, go to the “Project Settings” > “Master Settings” > “Working Folders” > “Cache Files Location” and then click on the “Browse” button. Next, choose a folder on your now available storage disk (preferably an internal and high-speed one) and then click on “Select Folder”. This should change your render cache location and solve the error.
Rendering (caching) clips can take massive space in your hard disk. However, once you are done with the project, you can delete them. Click on the below for quick and efficient tips on clearing cache in DaVinci Resolve:
DaVinci Resolve Delete Render Cache in 3 Clicks (Save Space)
One of the best ways to render your clip or multiple clips is by selecting all of the clips and rendering them – the good old render in place, inside the timeline.
DaVinci Resolve – How to Render in Place?
- Go to the “Edit” page (Render in Place works only on the “Edit” page”).
- Select your desired clips by “Ctrl” clicking (or “Cmd” clicking).
- Right-click and click on “Render in Place”.
- A “Render in Place” pop-up is displayed.
- Select your required format (say “Quicktime”)
- Select your codec (say “DNxHR” or “ProRes”)
- Select your type (say “DNxHR HQ”)
- If not, enable “Include Video Effects”, “Include Fusion Composition”, and “Include Color Grading Effects”.
- Click on “Render”.
- Choose your desired folder location.
- Resolve will now render your selected clips.
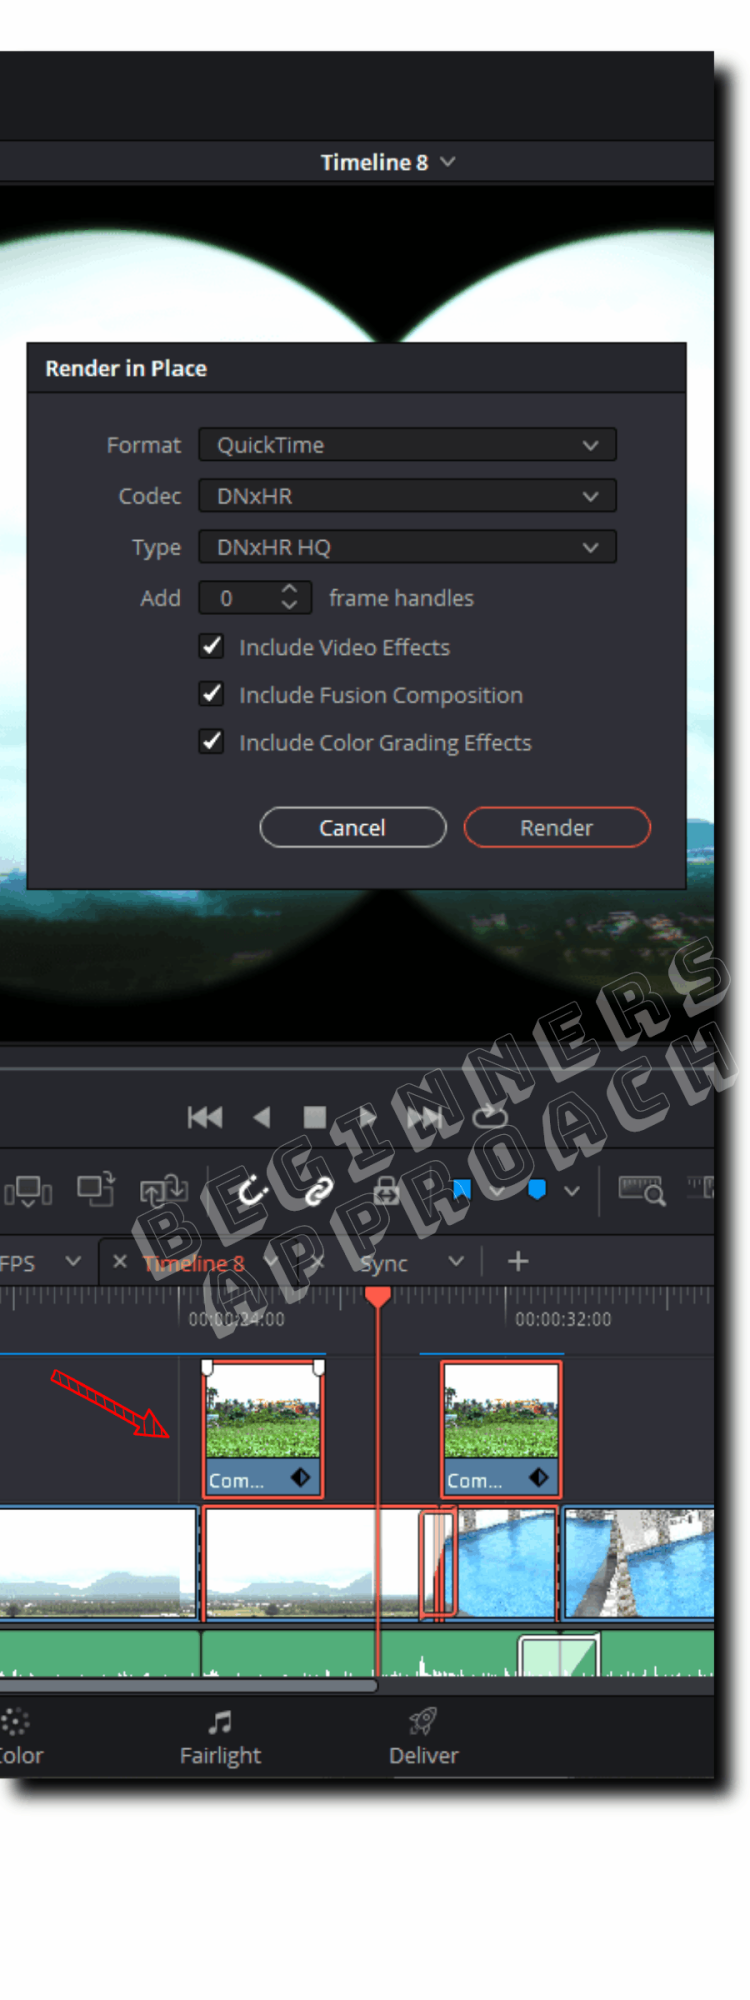
After rendering, Resolve will replace the existing clips with the rendered clips (baked-in with all the effects) in the timeline.
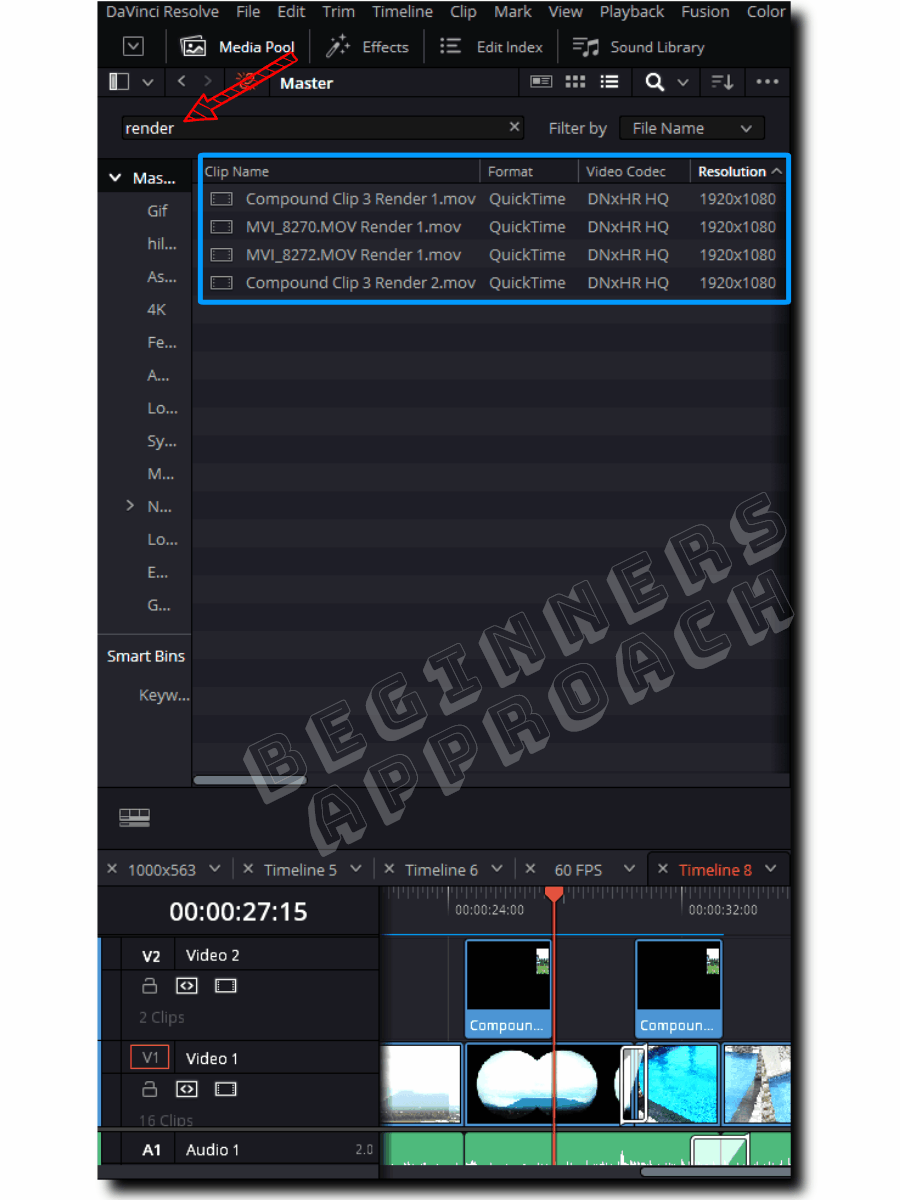
DaVinci Resolve also automatically imports these rendered clips inside the “Media Pool” > “Master” bin. You can verify by clicking on the “Search” button and searching for the “render” keyword.
Can I Return to Original Clips with Effects After Rendering in Place?
You can return to the original clips with editable effects by selecting “Decompose to Orignal”. The rendered clips will not be deleted and will be placed in the same location on your hard disk.
These clips will also be available in the “Media Pool” even after you decompose them.
This is how you do it.
How to Decompose to Original Clips After Render In Place in DaVinci Resolve?
- On the “Edit” page, select all the clips that were rendered in place.
- Right-click the clips and click on “Decompose to Original”.
- The original clips and the effects (which can be edited again) are returned to the timeline.
How to Disable Render Caching in Resolve?
To disable render caching in Resolve, go to the menu, click on “Playback” > click on “Render Cache”, and then select “None”. As soon as you choose “None”, the blue or red lines (cache indicators) will disappear from the timeline.
Optimized Media vs. Render Cache
Generating optimized media happens before starting the editing work. It improves the playback performance of the clips throughout DaVinci Resolve – Edit Page, Media Page, on and outside timelines, etc.
Whereas the render cache improves the real-time performance of the clips only in the timeline where they are rendered (or cached) along with the computationally intensive effects baked in.
An optimized media without heavy effects will be smooth, but when these are added on top of the optimized media, the playback will stutter, and the frames will be dropped. This is where the render caching helps you improve the real-time performance.