
Beginners and newcomers to DaVinci Resolve (versions 18.5, 18, 17, etc) frequently face video lagging issues – getting a smooth and real time playback performance becomes a challenge.
It is true when you import heavily compressed files from DJIs, GoPros, Mavic Airs, Mirrorless cameras, Smartphones, etc. – even with a powerful computer.
Why is DaVinci Resolve so Laggy?
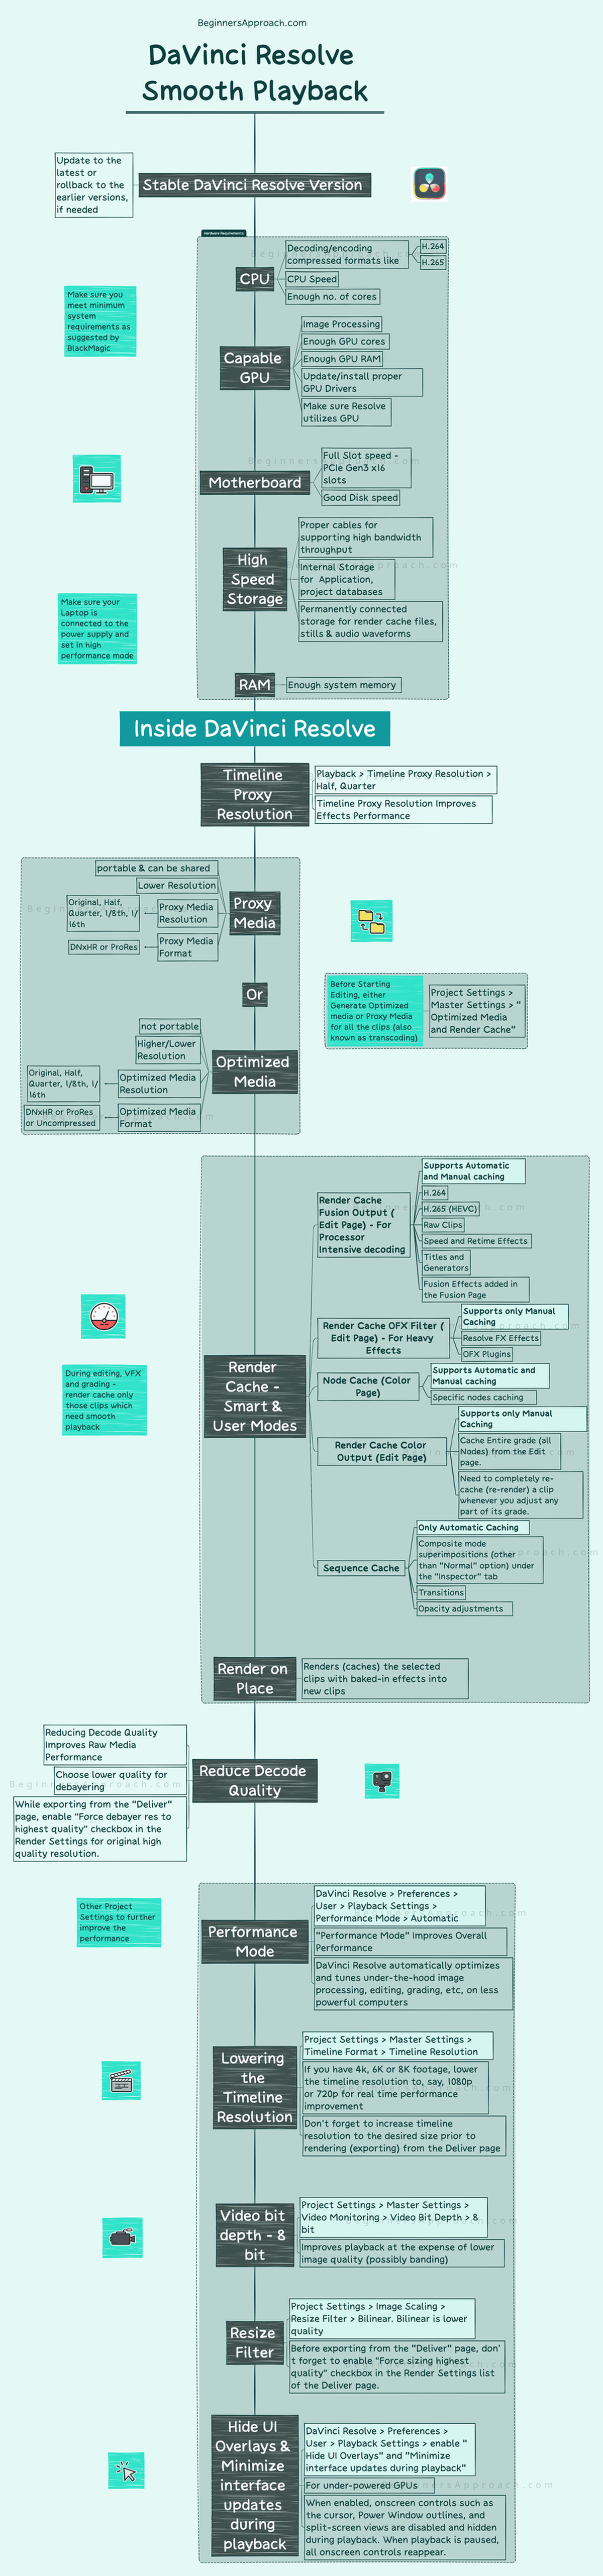
DaVinci Resolve becomes laggy due to – working with heavily compressed codecs like H.265 or H.264, using external storage drives with slow speed cables, under-powered GPU and not meeting the minimum system requirements.
To fix the DaVinci Resolve playback lag issue, reduce the timeline proxy resolution to half or quarter, generate proxy media for compressed codecs like H.265/H.264, use render cache for computationally intensive effects and lower the timeline resolution during editing.
The below infographics clearly explains all the playback choppy issues and fixes in detail.
- Why is DaVinci Resolve so Laggy?
- #1) Generate Proxy Media
- #2) Generate Optimized Media
- Can I Use Both Proxy Media and Optimized Media at the Same Time?
- #3) Timeline Proxy Mode
- #4) Render Cache in DaVinci Resolve
- #5) Render In Place
- #6) Reduce Decode Quality
- #7) Performance Mode
- #8) Lowering the Timeline Resolution
- #9) Set Video Bit Depth to 8 Bit
- #10) Resize Filter (Image Scaling Settings)
- #11) Hide UI Overlays
- #12) Minimize Interface Updates During Playback
- My Closing Thoughts
Your computer should meet minimum system requirements as suggested by Blackmagic company.
This boils down to a minimum of 4 core CPU, 4 GB Memory in GPU, 16 GB System RAM, a good Motherboard with full speed slots, high speed permanently connected storage, etc.
(Getting the GPU part is very important. Search this blog for “GPU” related posts which will help you solve issues related to them. There are posts that will provide tips to utilize the GPU optimally inside Resolve).
But the playback improvement tips (discussed here) are equally applicable to both – a powerful computer exceeding the hardware requirements and a computer with limited resources.
The below fixes help you overcome the DaVinci Resolve playback lagging issues and prevent frames from getting dropped during playback.
#1) Generate Proxy Media
Proxy media files are lower-resolution versions of your original highly compressed source files.
In most cases, your source files could be compressed using H.264 or HEVC (H.265) codecs.
These codecs are heavily compressed to save space, which means they are not processor friendly.
As a result, your computer struggles to play them back in real time. Hence the frames are dropped – resulting in choppy playback.
Experts recommend generating proxy media before you even begin editing.
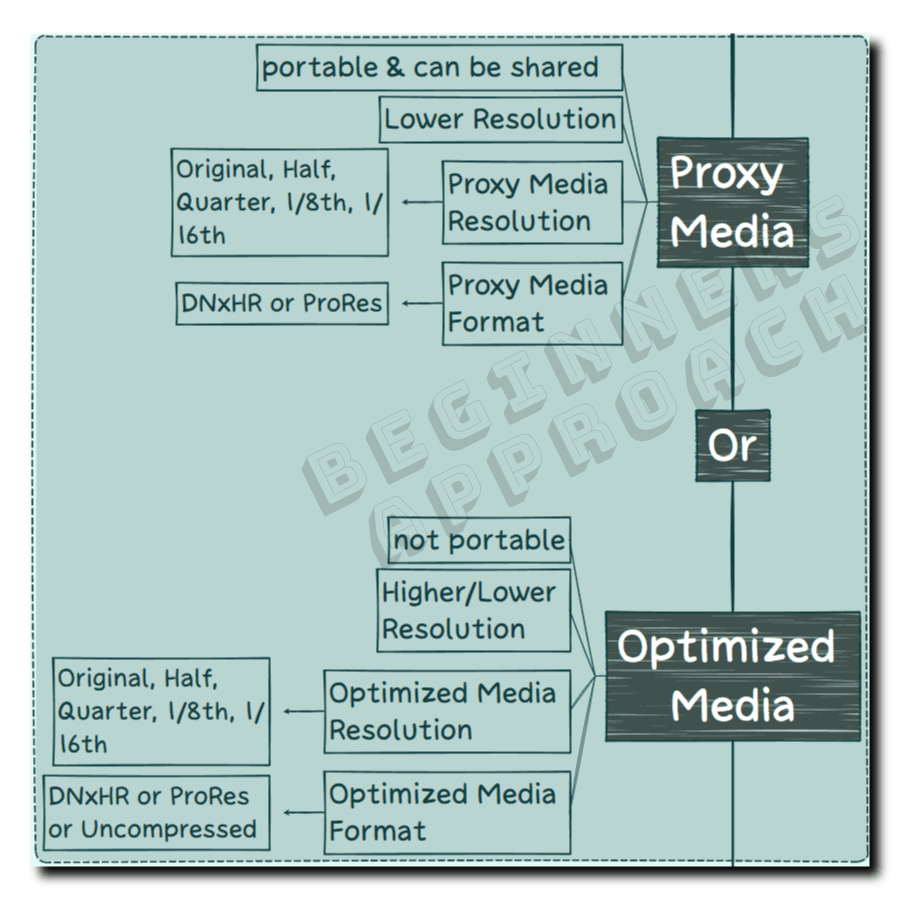
- Choose processor-friendly formats like DNxHR (Windows) or ProRes (Mac) = Project Settings > Master Settings > Optimized Media and Render Cache > Proxy Media Format.
- Proxy Media Resolution = Choose according to your requirements – Original, half, quarter, one-eighth, one-sixteenth, or Choose Automatically.
- After importing source clips into the “Media Pool”, select all of the desired clips, then right-click and click on “Generate Proxy Media…”.
- Enable Proxy = From the menu toolbar, click Playback > Proxy Handling > Prefer Proxies.
The main advantage of working with proxy media is that they are portable – they can be easily exported to other computers and over the internet.
For more details and a quick step-by-step guide to generate proxy media and other helpful tips to keep in mind in the latest DaVinci Resolve version, click on the below:
#2) Generate Optimized Media
Optimized media (similar to proxy media in some aspects) are editor-friendly media files generated from the source files, which playback in real-time without lag.
- Choose processor-friendly formats like DNxHR (Windows) or ProRes (Mac) or Uncompressed ones = Project Settings > Master Settings > Optimized Media and Render Cache > Optimized Media Format.
- Optimized Media Resolution = Choose according to your requirements – Original, half, quarter, one-eighth, one-sixteenth, or Choose Automatically.
- After importing source clips into the “Media Pool”, select all of the desired clips, then right-click and click on “Generate Optimized Media…”.
- Enable Optimized Media = From the menu toolbar, click on Playback > check “Use Optimized Media if Available“.
Compared to proxy media, optimized media can’t be exported and accessed.
But it offers more codecs like Uncompressed 10/16 bits, DNxHR 444-HDR, ProRes, etc., which produce higher image quality and are processor efficient.
Optimized media also takes up more storage space (if you choose the above codecs) than the proxy versions.
It is recommended to generate optimized media before starting your work.
Click here for more details, quick tips, and a step-by-step guide on optimized media to speed up your playback.
Can I Use Both Proxy Media and Optimized Media at the Same Time?
You can use both proxy and optimized media in Resolve if you have generated and enabled both. As Blackmagic says – they’re not an either/or proposition. But generating either of them makes sense, keeping the storage space and your specific requirement in mind.
#3) Timeline Proxy Mode
It is an instant solution wherein you can lower the resolution of the clips in the timeline on-the-fly.
Go to the menu, click on “Playback” > “Timeline Proxy Resolution” > choose either “Half” or “Quarter”. Done!
#4) Render Cache in DaVinci Resolve
It helps you cache (or render) clips in the timeline with all the computationally intensive effects baked in so that the playback is smooth and real-time without any dropped frames.
Even if you are working with proxy or optimized media, effects like Fusion Effects, Resolve FX, transitions, etc., can strain your computer resources.
This is the right time to render-cache them.
- Choose processor-friendly codecs like DNxHR, ProRes, or Uncompressed 10/16 bits, from the Project Settings > Master Settings > Optimized Media and Render Cache > Render Cache Format.
- From the menu, Playback > Render Cache > choose “Smart” to make DaVinci Resolve automatically cache clips containing computationally intensive effects in the timeline.
- Right-click the clip in the timeline > Render Cache Fusion Output > Set it to On or Auto.
The above is the set-it-and-forget-it approach.
This automatic caching should take care of most scenarios. If not, then you might need manual caching.
The following post clearly explains the basics of render-caching in Resolve – step-by-step. (If you want more manual control over the caching mechanism to suit your needs, then there is one more detailed tutorial inside the below post.)
DaVinci Resolve Render Cache (3 Settings for Smooth Playback)
#5) Render In Place
One of the best ways to render your clips is by selecting all of the clips in the timeline and rendering them.
- Go to the “Edit” page.
- Select your desired clips by “Ctrl” clicking (or “Cmd” clicking).
- Right-click and click on “Render in Place”.
DaVinci Resolve will render the clips in the format you chose from the “Project Settings”. (Refer to the above section).
#6) Reduce Decode Quality
If you are working with raw files, the best way to get smooth playback is to choose lower quality for debayering.
Click on the “Project Settings” > “Camera RAW” > “Decode Quality” > choose an appropriate one like “Half res.” or “Quarter res.”.
An important thing to keep in mind:
While exporting from the “Deliver” page, enable the “Force debayer res to highest quality” checkbox in the “Advanced Settings” of the “Render Settings” for original high-quality resolution.
Other Project Settings to further improve the performance:
#7) Performance Mode
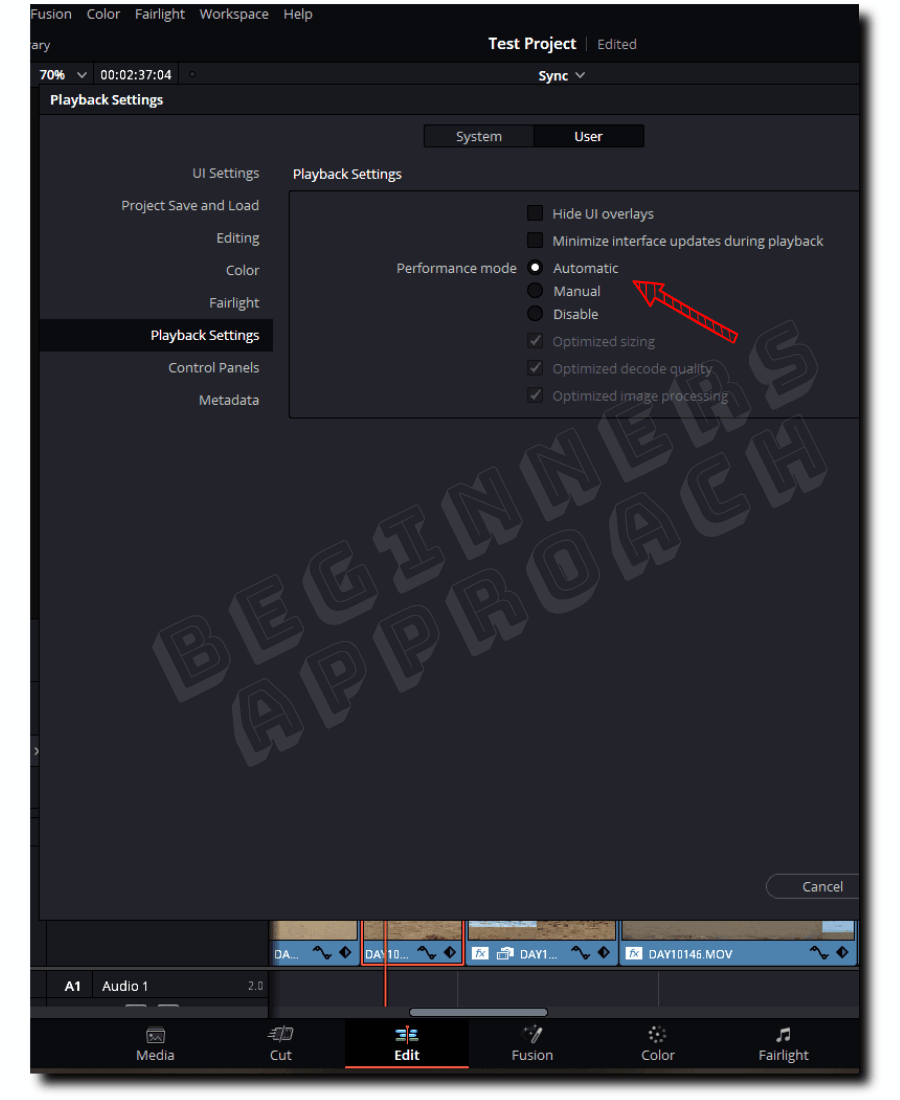
“Performance Mode” Improves the overall Performance – Resolve automatically optimizes and tunes under-the-hood image processing, editing, grading, etc., on less powerful computers.
To enable the “Performance Mode”, go to the menu DaVinci Resolve > Preferences > User > Playback Settings > Performance Mode > Automatic (which is the default value).
#8) Lowering the Timeline Resolution
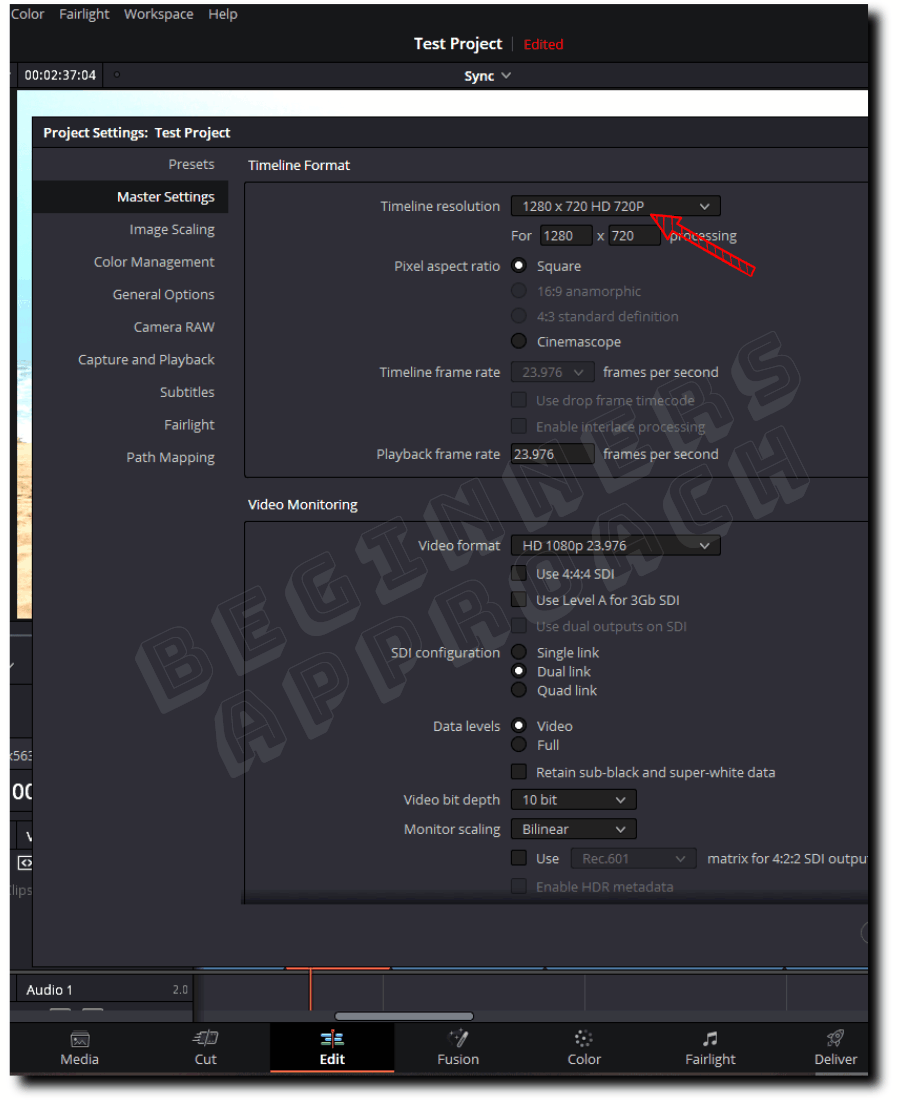
If you have 4k, 6K, or 8K footage, then instead of having the timeline resolution at the exact resolution, try to lower the timeline resolution to, say, 1080p or 720p for better playback.
To lower the timeline resolution in Resolve, click on the bottom right gear icon “Project Settings” > “Master Settings” > “Timeline Format” > “Timeline Resolution” > set it to a lower resolution, say, “1280 x 720 HD 720p”.
Don’t forget to increase timeline resolution (from the “Project Settings”) to the desired size before rendering (exporting) from the “Deliver” page.
#9) Set Video Bit Depth to 8 Bit
Setting the “Video Bit Depth” to 8-bit improves playback at the expense of lower image quality (possibly banding).
To change “Video Bit Depth” in Resolve, go to the “Project Settings” > “Master Settings” > “Video Monitoring” > “Video Bit Depth” > “8 bit”.
#10) Resize Filter (Image Scaling Settings)
Resize filter setting comes into the picture whenever you resize your clips.
Changing the “Resize Filter” to “Bilinear” (instead of Sharper) can improve the playback performance.
But it can also lower the image quality.
To change the “Resize Filter” in DaVinci Resolve, click on the bottom right gear icon “Project Settings” > “Image Scaling” > “Resize Filter” > select “Bilinear”.

#11) Hide UI Overlays
As the name suggests, when you enable the “Hide UI Overlays” setting, onscreen controls such as the cursor, Power Window outlines, and split-screen views are disabled and hidden during playback. When playback is paused, all onscreen controls reappear.
These come in handy when you have underpowered GPUs.
To enable “Hide UI Overlays”, go to the menu and click on “DaVinci Resolve” > “Preferences” > “User” > “Playback Settings” > enable “Hide UI Overlays”.
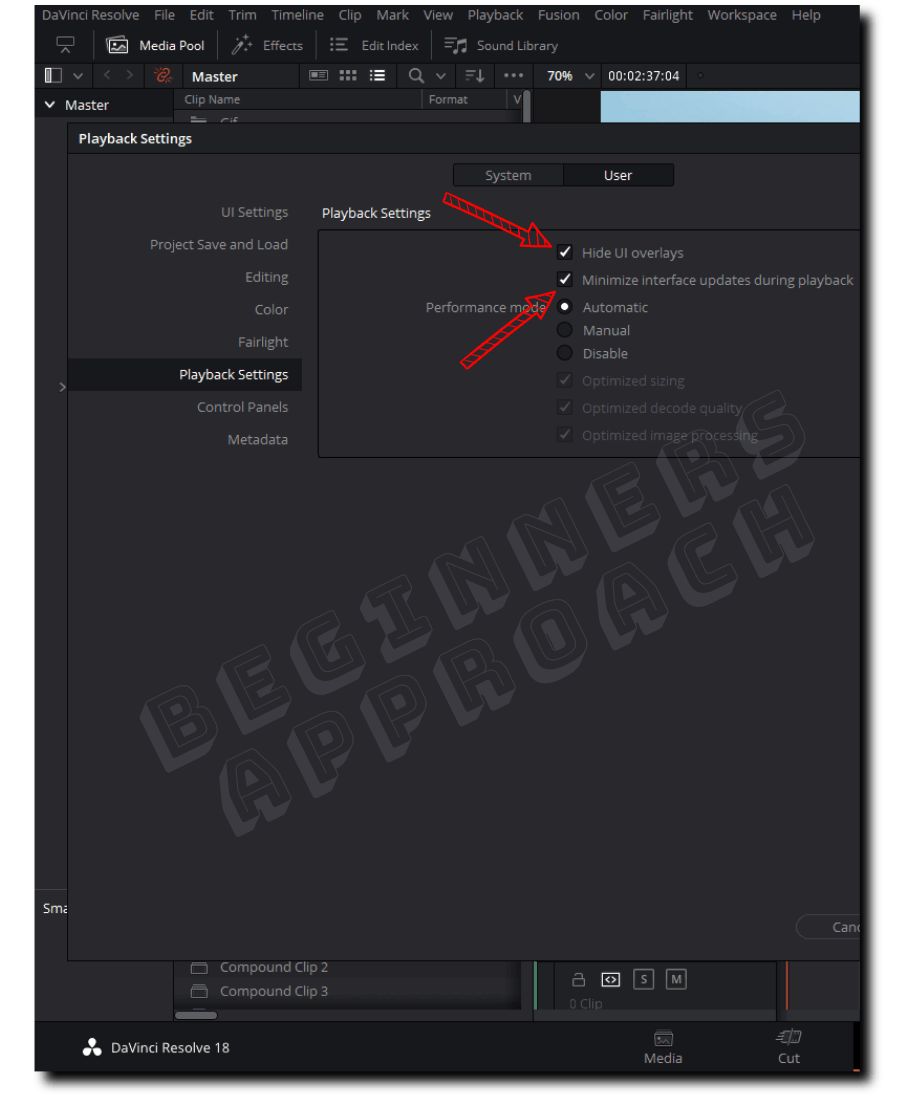
#12) Minimize Interface Updates During Playback
Similar to “UI Hide Overlays”, this feature comes in handy for underpowered GPUs.
Onscreen controls such as the Power Window outlines, cursor, etc., are disabled and hidden during playback. When playback is stopped, all onscreen controls re-appear.
To enable “Minimize Interface Updates During Playback”, go to the menu and click on “DaVinci Resolve” > “Preferences” > “User” > “Playback Settings” > enable “Minimize interface updates during playback”.
My Closing Thoughts
I have found generating optimized media or proxy media before starting the editing to be very helpful.
And when I introduce complex effects inside the timeline, I enable “Smart” or “User” render caching – which automatically starts the render caching whenever I hit the play button or inactive for 5 seconds.
I also do “render in place” to force rendering of clips with heavy effects – for smoother playback.
And sometimes, I change the “Timeline Proxy Mode” to half or quarter for editing and switch it back to “Full” when I am color grading.
To push things further, I lower the timeline resolution to 720p because I primarily work with 4K H.264/H.265 23.976/60 FPS footage – which is not editor friendly.
You can mix and match the above techniques to suit your needs and achieve real time playback in Resolve.
Always remember that before exporting from the “Deliver” page, enable appropriate settings to get high-resolution output (as discussed in the above sections).