One of the best ways to improve real-time playback performance is by generating proxy files in DaVinci Resolve.
Proxy media are lower-resolution versions of your original highly compressed source files. Proxy media help achieve real-time playback without stuttering. They are portable, meaning, they can be transferred between computers and across the internet.
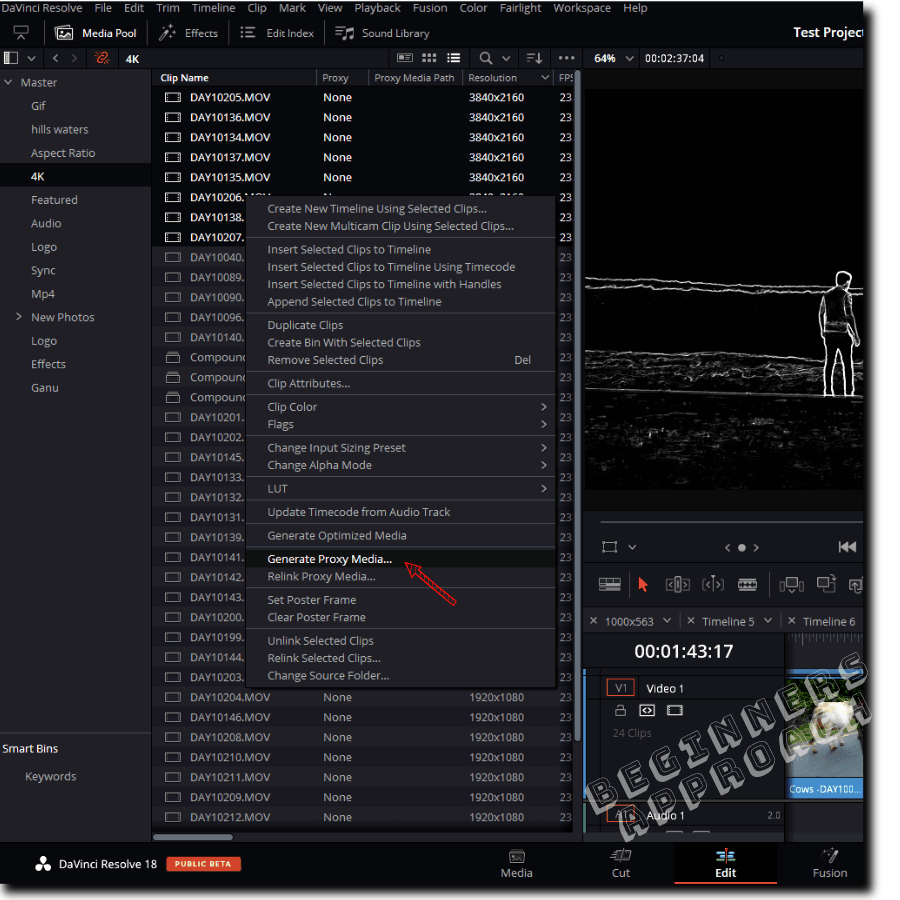
To generate proxy media in DaVinci Resolve, go to the “Edit” page. Select your clips, right-click and choose “Generate Proxy Media” under the “Media” tab. The proxy files are generated.
If you’re a beginner or newcomer to DaVinci Resolve (versions 18.5, 18, etc.), today’s guide will show you how to create proxies and related important tips in detail – step-by-step with pictures!
- How to Generate Proxy Media in DaVinci Resolve?
- How Does DaVinci Resolve Connect to Proxy Files?
- How to Toggle or Disable Proxy Media For All the Files in Resolve?
- How to Unlink Proxy Media From the Original Source Media in Resolve?
- Where Does Resolve Store Proxy Media?
- How to Choose Proxy Resolution and Format in Resolve?
- How to Remove DaVinci Resolve Proxy?
- Export Proxy Media to Original Resolution in Resolve
- Proxy Handling vs Timeline Proxy Mode in DaVinci Resolve
- Proxy Vs Optimized Media in DaVinci Resolve
- Proxy Media vs Render Cache in DaVinci Resolve
- Proxy Media Failed to Generate in DaVinci Resolve
- Blackmagic Proxy Generator
(Before generating proxy media, you need to set the resolution of your proxy media – which will be discussed in a while).
How to Generate Proxy Media in DaVinci Resolve?
- Launch Resolve and open your project.
- Go to the “Edit” page > “Media” tab.
- Select all of your source files that need to be converted to the proxy format.
- Right-click and select “Generate Proxy Media”.
- Resolve will now display a “Generate Proxy Media” pop-up, where the proxy media files are generated with the “remaining time” displayed.
Once the files are converted to lower resolution proxies, the pop-up will disappear.
The proxies are ready. Before you do any other thing, please follow the below steps.
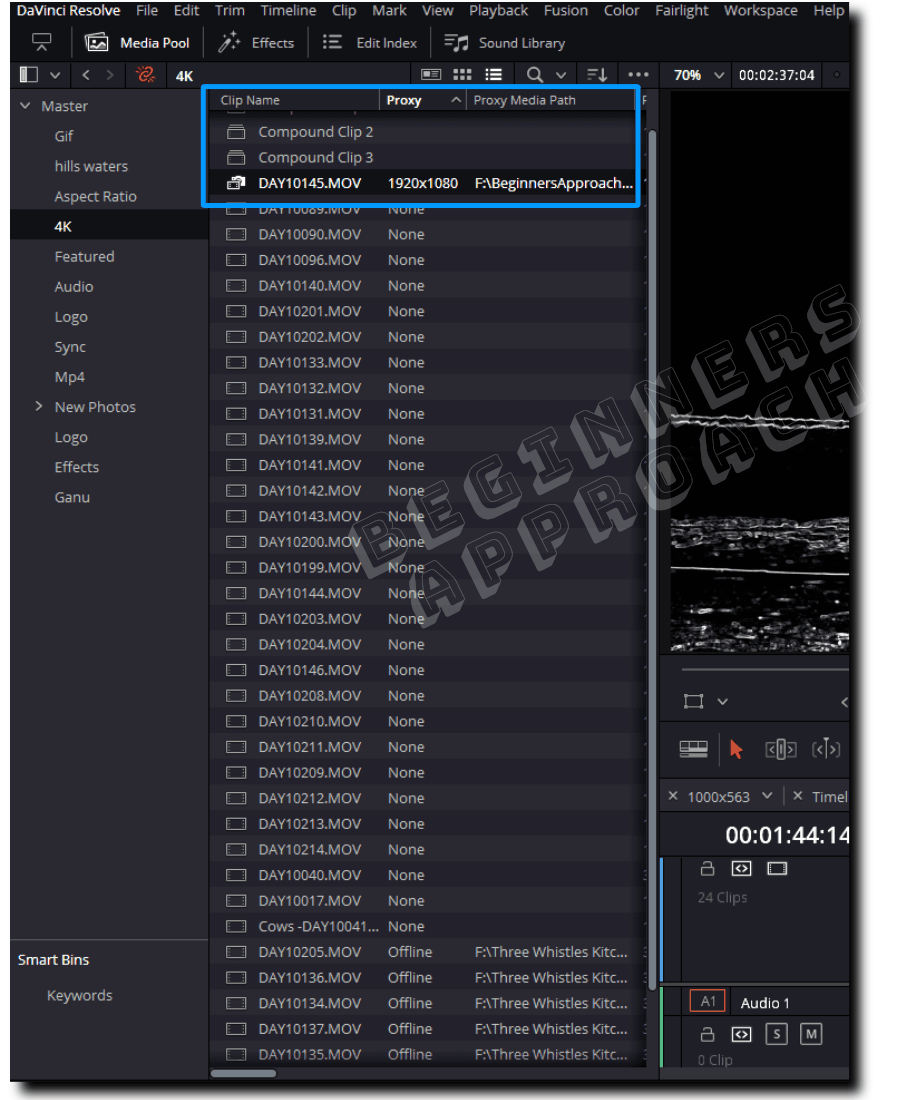
How to Check If Proxy Files are Generated?
On the same page (“Edit“), click on the “Media Pool“, right-click on any one of the column names like “Clip Name”, then select “Proxy” and “Proxy Media Path” as shown in the screenshot below.

Then scroll to the right and drag and drop both of the columns to the left-most side – where you can see them all the time.
These 2 columns will display:
- Proxy = The actual resolution of the proxy generated.
- Proxy Media Path = The location where the proxy is generated.
These are very handy and will quickly reveal the status of your proxy files and original source files.
Now the next important question is – how to enable the proxies that were generated?
How Does DaVinci Resolve Connect to Proxy Files?
To connect DaVinci Resolve to the proxy files, go to the menu “Playback” > “Proxy Handling” > select “Prefer Proxies”. Enabling “Prefer Proxies” will let Resolve to choose the proxy versions instead of the original high-resolution files.
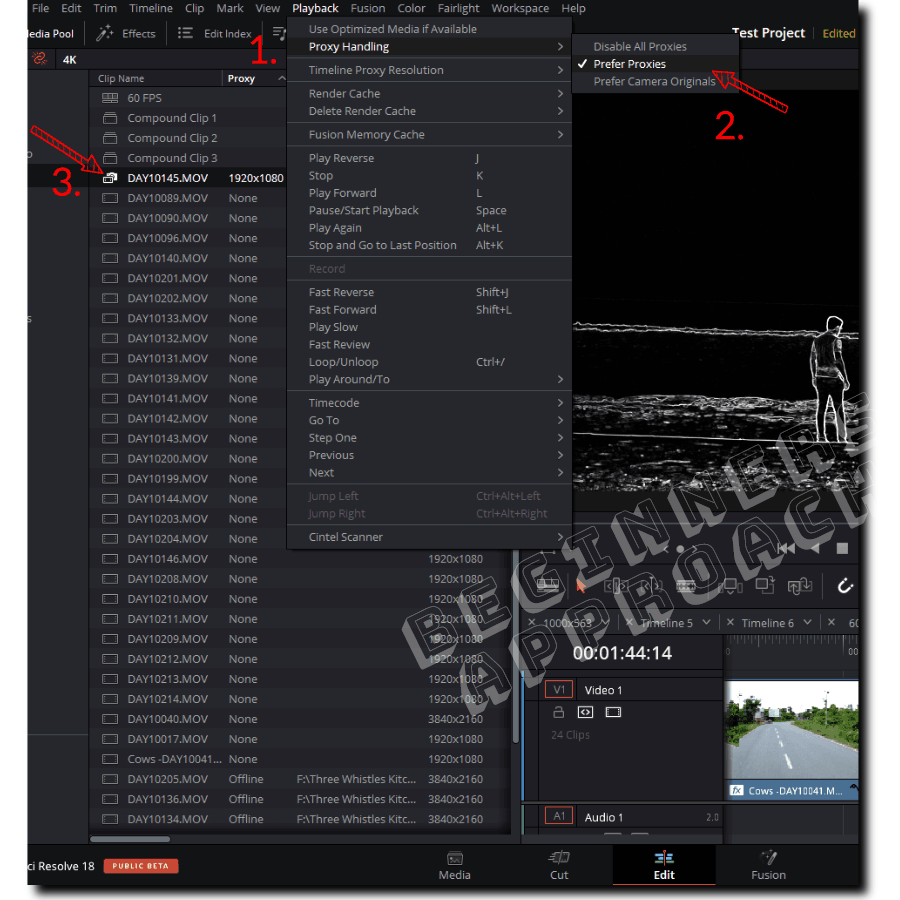
Keep in mind that the above is for DaVinci Resolve 18. In the older versions like DaVinci Resolve 17, you enable proxies by going to “Playback” > select “Use Proxy Media If Available”.
Also, keep in mind that this setting affects all the clips which have their proxies generated.
(For individual clip level control over the proxies, I will let you know in a while.)
After you select “Prefer Proxies”, the icon of the video file changes to something that represents the proxy version. (Refer no. 3 in the above screenshot.)
When it comes to handling proxy files inside Resolve, the latest DaVinci Resolve versions (like version 18) will have three options after you click on “Playback” > “Proxy Handling”:
- Disable All Proxies
- Prefer Proxies
- Prefer Camera Originals
Let’s discuss these in detail.
How to Toggle or Disable Proxy Media For All the Files in Resolve?
You can simply navigate to the menu “Playback” > “Proxy Handling” > and select “Prefer Camera Originals”. When this option is selected, you will note that the proxy icon immediately changes back to the normal video icon (for files that have proxy generated.)
Toggling is as easy as selecting either “Prefer Proxies” or “Prefer Camera Originals”.
This is useful when you need to color grade and need original high resolution instead of the proxy version.
How to Unlink Proxy Media From the Original Source Media in Resolve?
You can unlink the generated proxy from the source media by right-clicking on the clip in the “Media Pool” and then selecting “Unlink Proxy Media”. This will remove the connection between the source file and the generated proxy.
You can cross-verify by checking the status of the “Proxy” column which should now display “None” instead of the resolution of the proxy.
Consider this scenario – you have proxies generated from other applications like Premiere Pro or Final Cut Pro.
Now you need to bring them inside Resolve as a proxy. So…
How to Relink Proxy Media to the Source Media in Resolve?
To link a generated proxy with the source media or clip, you right-click on the clip from the “Media Pool” and then select “Relink Proxy Media”. Then locate the proxy media in your system and then give ok.
Now both the original file and the proxy media are linked.
Where Does Resolve Store Proxy Media?
You can find the location of the generated proxy media by clicking on the “Project Settings” cogwheel from the right bottom of your screen (the shortcut key is “Shift + 9”). Click on the “Master Settings” and then scroll down to locate “Working Folders“. Look for “Proxy generation location“. Click on “Browse” to open up the folder.
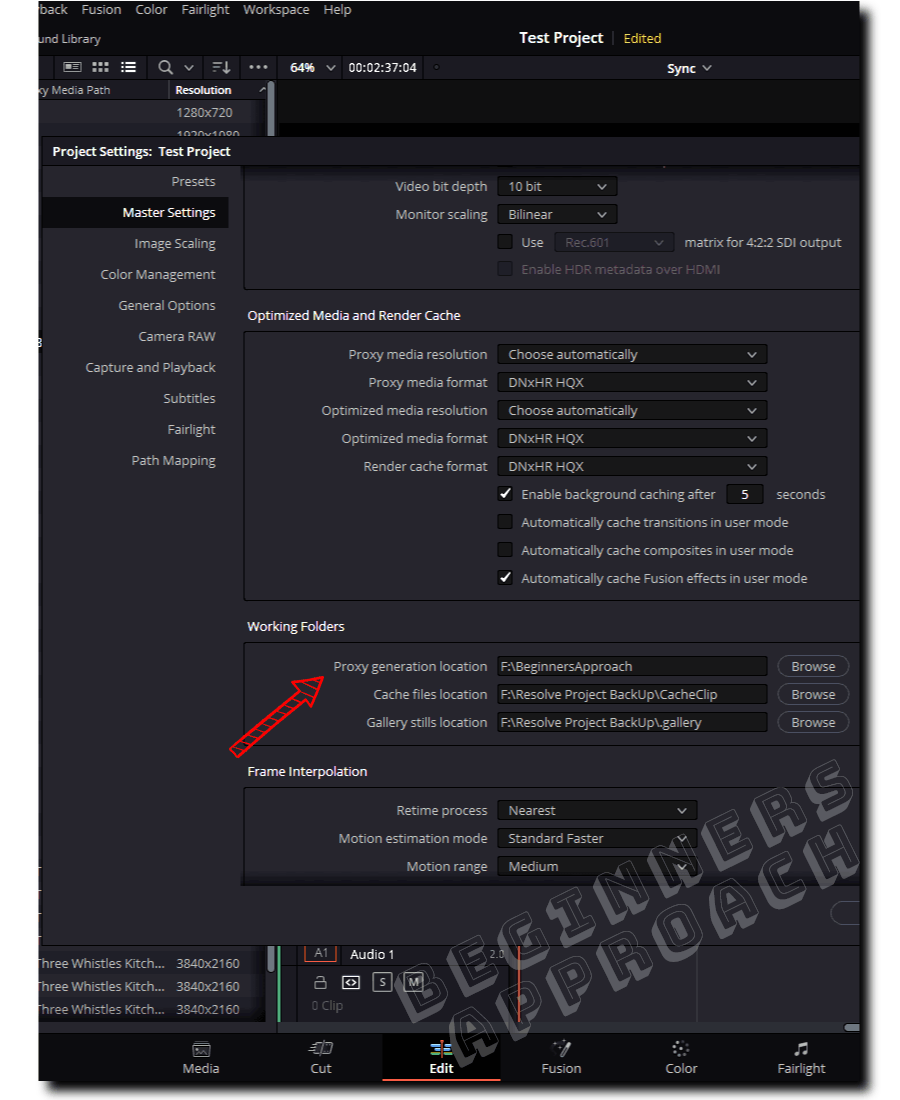
You can also change this location to your desired folder.
How to Choose Proxy Resolution and Format in Resolve?
To choose proxy resolution and format, click on the “Project Settings” cogwheel from the right bottom of your screen (the shortcut key is “Shift + 9”). Click on the “Master Settings” and then scroll down to locate “Optimized Media and Render Cache”.
The “Proxy Media Resolution” will contain options like “Original”, “Half”, “Quarter”, “One Sixteenth” and so on. It is up to you to decide the resolution of your choice.
If your machine is really underpowered, then choose the lowest resolution – one-sixteenth or one-eighth, for smooth real-time playback.
What is the BEST Proxy Media Format in Resolve?
The best format is DNxHR (Windows) and Prores (Mac). If space is a big constraint for you, then the lowest resolution (low bit rate file) DNxHR LB should do the job for you. This should take less space compared to other formats.
If space is not a thing for you and you need a better-looking proxy file (when compared to DNxHr LB), then DNxHR HQX should do the job.
How to Remove DaVinci Resolve Proxy?
You can first unlink the proxy by right-clicking on the required clip in the “Media Pool” and then clicking “Unlink Proxy Media“. If you want to save space, then you can go ahead and then delete the proxy files from your drive.
(But make sure you have a backup before deleting anything.)
If you’re done with your post-production work, then it’s time for you to export. You definitely would want the original high-resolution export.
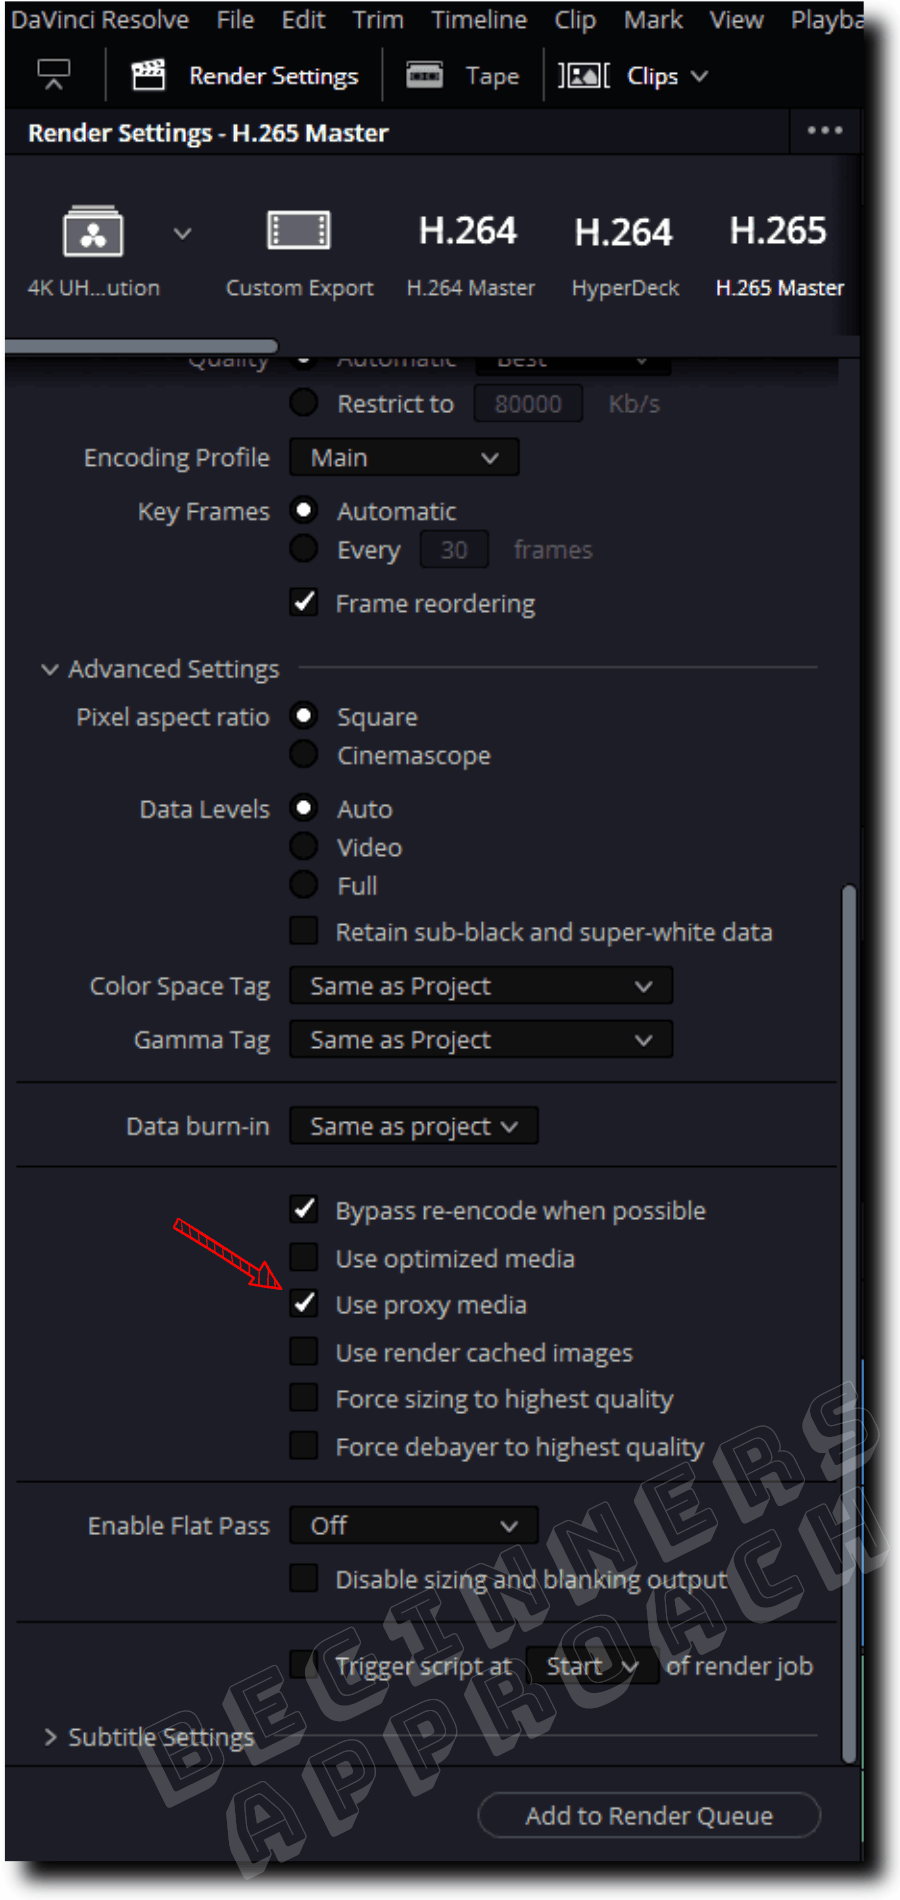
Export Proxy Media to Original Resolution in Resolve
By default, when you export your timeline which contains the proxy media, DaVinci Resolve reverts the proxies to the original high-resolution files. You don’t have to do anything. No settings to enable!
But if you want only the proxy versions, then go to the “Deliver” page, under the “Video” tab, click on the “Advanced Settings” and check the “Use Proxy Media” checkbox. This should export your footage to the proxy versions.
Proxy Handling vs Timeline Proxy Mode in DaVinci Resolve
The “Proxy Handling” feature was introduced in the DaVinci Resolve 18 version. There are subtle differences between the new feature and the existing “Timeline Proxy Resolution” (previously known as Proxy Mode) feature.
“Proxy Handling” provides you options to select “prefer proxies, disable proxies and prefer camera originals”. In order to use this feature, you need to first generate proxy media (as discussed in this article above) which consumes some time.
Whereas “Timeline Proxy Resolution” gives you options like “Full”, “Half”, and “Quarter” which instantly reduces the resolution based upon what you select.
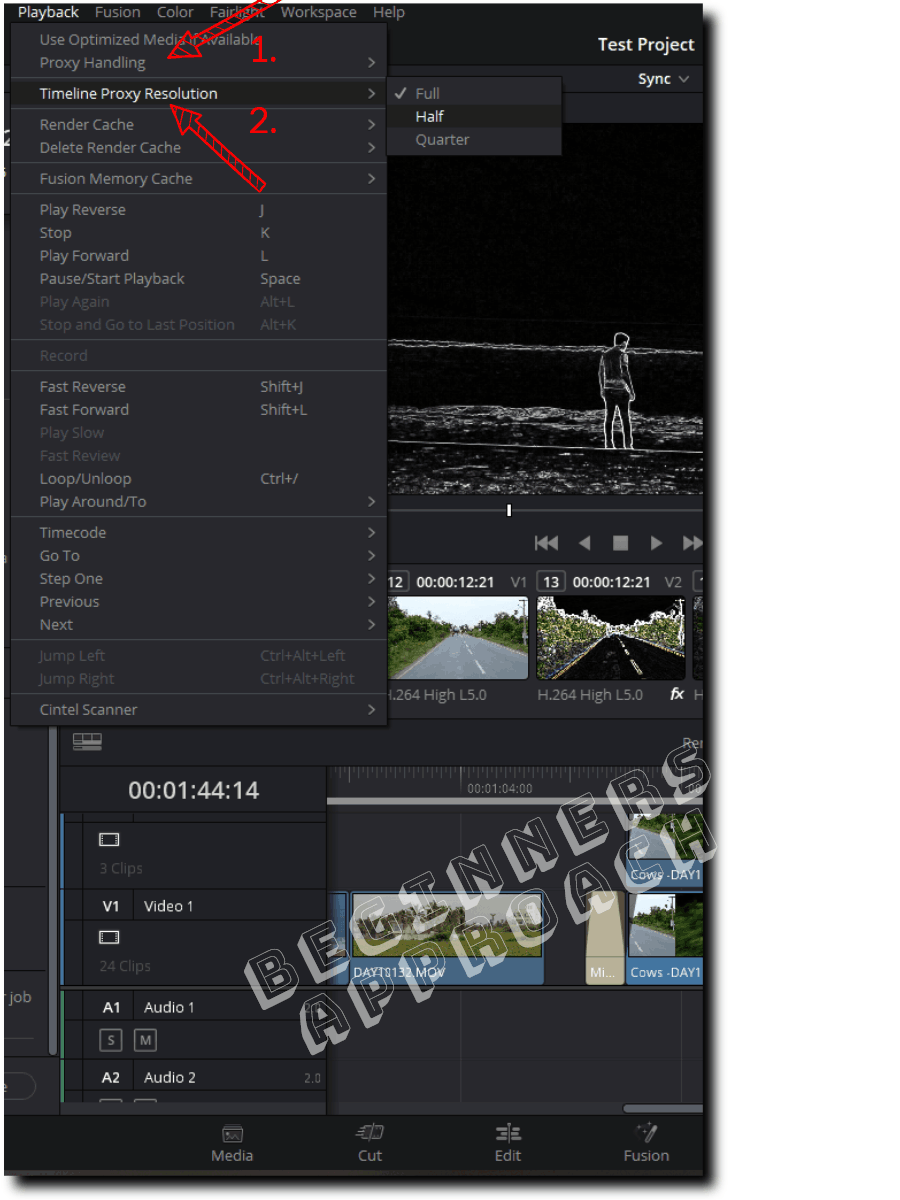
In the “Proxy Handling” feature, you get to decide the proxy resolution and format of your choice, whereas in the ” Timeline Proxy Resolution” Resolve simply cuts the resolution in “Half” or “Quarter” based upon your selection.
There are other features in DaVinci Resolve which also help you improve the real-time performance, like:
- Optimized Media
- Render Cache
Proxy Vs Optimized Media in DaVinci Resolve
Generating optimized media and proxy media look the same on the surface as both of them produce editor-friendly files.
However, proxy files are portable and can be transferred across computers and the internet, whereas optimized media aren’t portable. They are internally managed in Resolve and are not user-accessible.
Optimized media support a lot of formats like uncompressed 10 bit/16 bit, GoPro Cineform 10/16 bit which result in larger files, that is, the files take up huge space in your hard disks.
Whereas proxy media has limited formats that result in smaller-sized files compared to the source files.
Proxy Media vs Render Cache in DaVinci Resolve
Generally, proxy media are generated before starting editing – to get a good real-time playback performance. Whereas render cache feature is used to improve the real-time performance after adding computationally intensive effects like noise reduction, video effects, color correction/grading, etc.
Throwing a computationally intensive effect even on proxy media (the one with the lower resolution), can cause a significant hit on the real-time playback. This is where render cache helps you.
This is usually the case even with powerful computers having huge GPU, CPU, and RAM. Certain effects like Fusion effects and noise reduction can really stress the computer resources. Render caching the clips eases out the CPU, GPU, RAM, etc., and helps you achieve real-time playback.
Proxy media is portable and user-accessible, whereas render cache is internal only to a specific project inside Resolve. It can’t be moved.
Proxy Media Failed to Generate in DaVinci Resolve
If you get an error saying – Proxy media failed to generate, then most probably it could be the resolution of the proxy. Generating one-sixteenth or one-eighth of the original resolution, which could result in any one of the dimensions – height or width, being lesser than 256 pixels can throw this error.
Try to change the resolution for the proxy and then generate it again.
It could be also due to bugs. Make sure you are using a stable version of Resolve.
Blackmagic Proxy Generator
DaVinci Resolve 18 comes shipped with a lightweight app called the Blackmagic Proxy Generator lite. This app lets you create proxies in the background while you are working inside Resolve.
For a more detailed guide, click on the below:
This was very helpful, thank you.
Glad to know it was helpful to you.