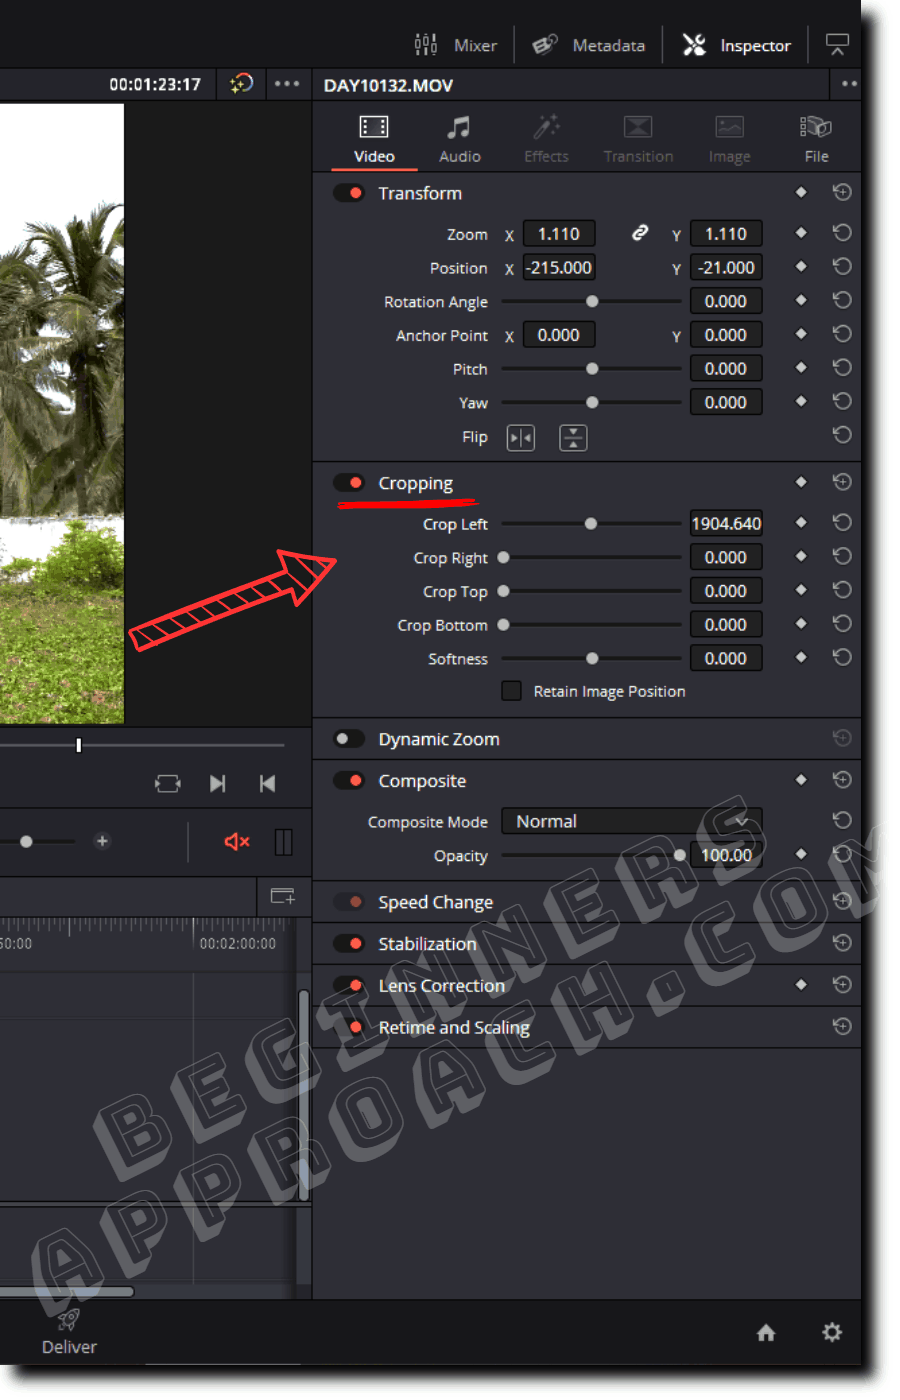
The best and quick way to crop videos, images, and clips in DaVinci Resolve is by using the onscreen crop control. You can also do the same by accessing the “Cropping” controls under the “Inspector” tab on the “Edit” page.
You can combine the cropping and transform controls like zoom, pan, tilt, rotate, etc., to achieve the look you want.
In fact, you can even keyframe the cropping if your editing demands.
Today we’ll see how to crop video in DaVinci Resolve free version using onscreen controls, Inspector Settings, and fix issues.
Without wasting time, let’s dive right in!
- How to Crop a Video in DaVinci Resolve?
- Onscreen Crop Video in DaVinci Resolve – The Best Way
- How to Crop and Resize in DaVinci Resolve?
- How to Crop Multiple Clips in DaVinci Resolve?
- How to Turn Off the Onscreen Crop Controls in Resolve?
- How to Keyframe Crop in DaVinci Resolve?
- DaVinci Resolve Cropping Related Issues and Fixes
- Before You Go
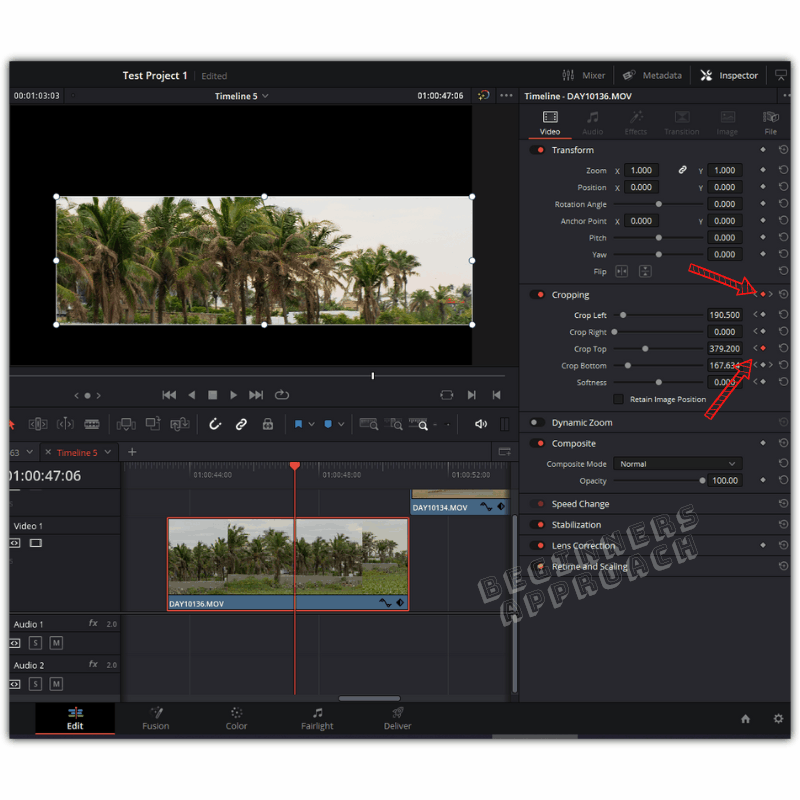
How to Crop a Video in DaVinci Resolve?
- On the “Edit” page, click on your clip in the timeline to select it.
- Now click on the “Inspector” tab (top right corner).
- Click on the “Cropping” label to reveal the settings.
- There are 4 options – Crop Left, Crop Right, Crop Top, and Crop Bottom.
- Drag the respective slider to the left or right to crop your clip in the direction you want – left, right, top, or bottom.
- Done!
If you’re facing issues like getting black background, cropping happening in the opposite direction, etc, you can scroll down for the fixes.
A few key things to note:
- “Softness” – Changing this value will blur the edges of the video, which makes it look softer.
- If your clip doesn’t have other clips below it (placed on lower tracks), then the cropping will leave black bars (empty areas) in the timeline viewer. This means if you export the video, it will display black bars wherever you cropped it.
- If your clip has other clips underneath it, cropping will reveal the video underneath it. Most probably, this is why the cropping technique is used in the first place. (We will discuss more in the below sections).
Onscreen Crop Video in DaVinci Resolve – The Best Way
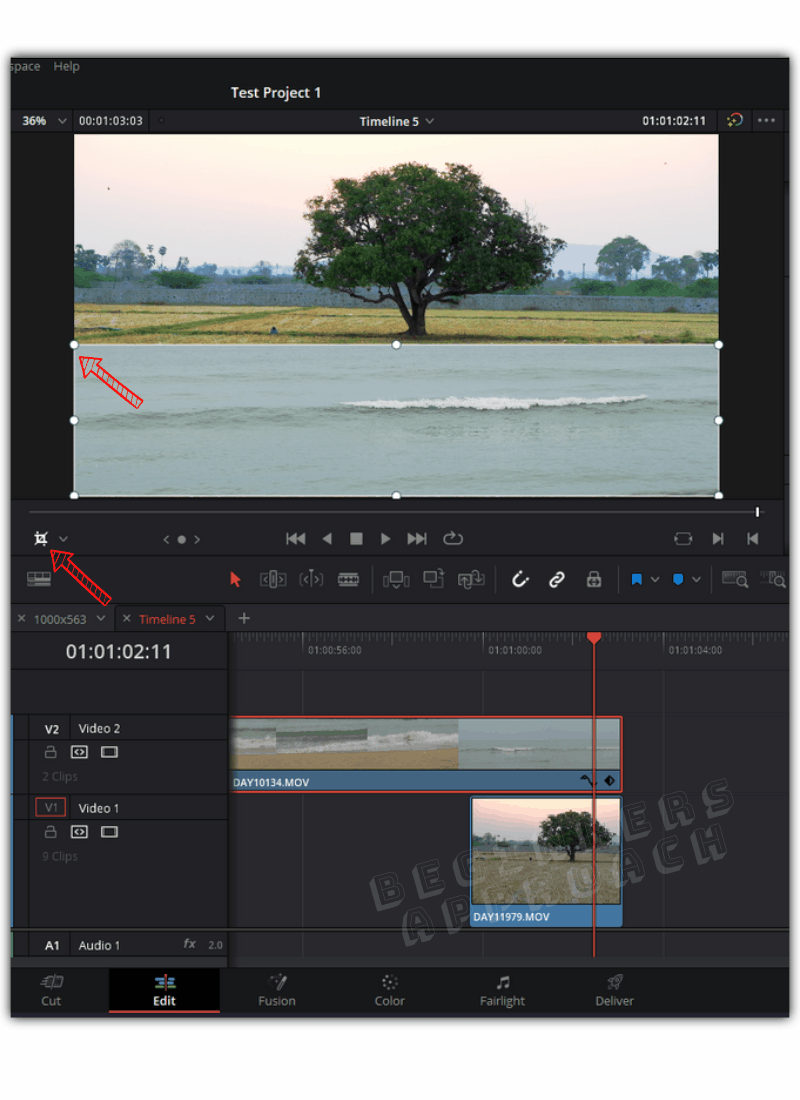
- On the “Edit” page, select your clip in the timeline.
- Below the timeline viewer, click on the dropdown from the bottom left corner and select the “Crop” option.
- The video will have handles at the borders.
- You can drag the handle to crop the video directly inside the viewer.
- Cropping directly inside the viewer saves a lot of time!
- You can also click on the dropdown to select “Transform” onscreen controls to pan, tilt, rotate, zoom, etc., to achieve your look quickly.
Always remember to use the onscreen controls from the dropdown below the viewer for a quicker workflow.
Using the onscreen crop control, you can drag the handles to crop the video from the top and bottom to display the black bars – to get the cinematic look.
If you need more detail on achieving the cinematic look using aspect ratio, please read the below post:
Cropping is just one part of the operation required to get the look you want. Your work might require you to crop, re-size, and zoom in/out the video for stylistic reasons.
So here we go…
How to Crop and Resize in DaVinci Resolve?
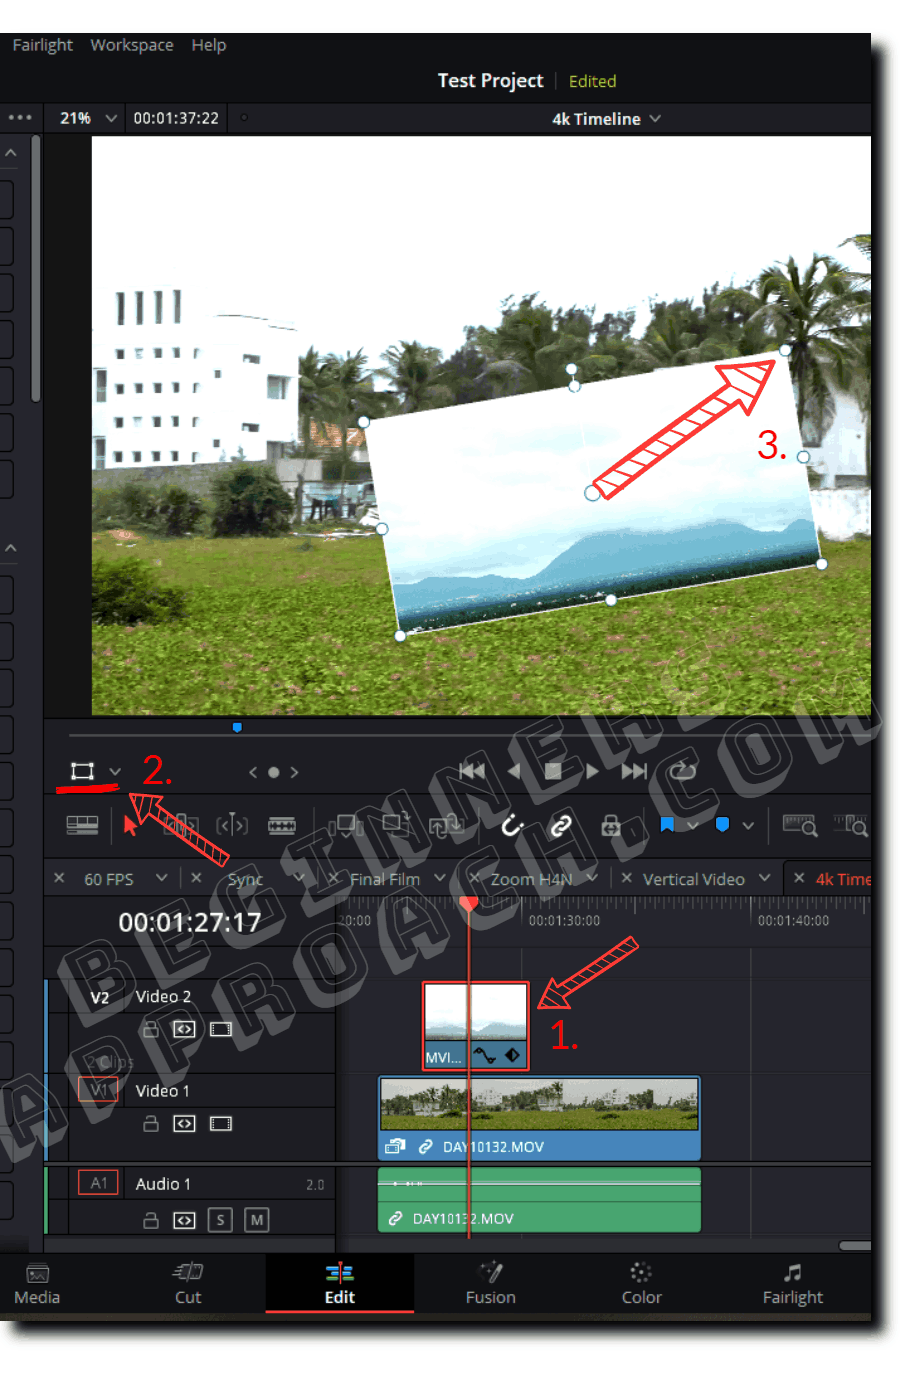
Below the timeline viewer, select the crop icon from the dropdown. Drag the handles to crop the video. Then select the “Transform” icon. Now again, drag the corners to resize the video – zoom in or out. You can also rotate the video using the center handle. Click on the middle of the clip and drag it to reposition.
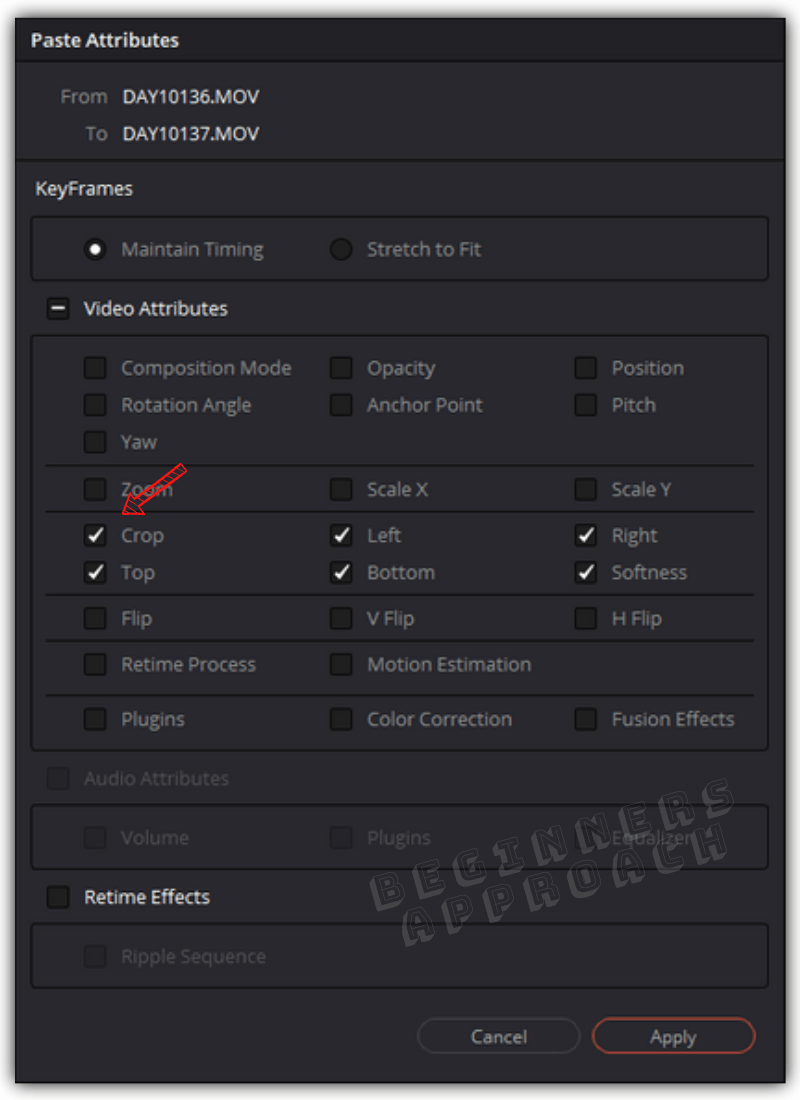
How to Crop Multiple Clips in DaVinci Resolve?
- First, select a particular clip in the timeline and crop it either using the “Inspector” tab > “Cropping” settings or “Crop” onscreen control which is available below the timeline viewer as a dropdown.
- Copy the clip using “Ctrl + c” or “Cmd + c”.
- Then select all the required clips (“Ctrl” / “Cmd” clicking or dragging a box around the clips).
- Right-click and click on “Paste Attributes” (the shortcut for paste attributes is “Alt + v”).
- Check the “Crop” checkbox (all other checkboxes like Left, Right, Top, bottom, and Softness will also be automatically checked).
- Click on “Apply“. The crop settings are now applied to all the clips.
If you want to do a “picture in picture” effect, then read the below for step-by-step instruction:
How to Crop Image in DaVinci Resolve?
To crop an image in Resolve, select the image from the timeline. Select the crop icon from the dropdown located below the timeline viewer. Then drag the handles from the left, right, up, or down for the relevant crop.
Refer to the above images to get a quick understanding.
How to Turn Off the Onscreen Crop Controls in Resolve?
If you selected the crop icon from the dropdown below the timeline viewer, then you’ll see handles around the video. To turn it off, again click on the crop icon from the dropdown.
If you want to reset the crop settings, go to the “Inspector” > “Video” > “Cropping”, and click on the “circular arrow icon with a plus inside” to totally reset the cropping values. This will bring the video back to its original size.
How to Keyframe Crop in DaVinci Resolve?
- Under the “Edit” page, select your clip in the timeline.
- Click on the “Inspector” tab and click on the “Cropping” label to open up the settings.
- Click on the keyframe – small diamond shape, placed rightmost to the “Cropping” label. This will turn on the keyframing (highlighted in red).
- Place the playhead in the first frame of the clip and drag the small circle against the “Crop Left” to the right – it will crop the image from the left. A keyframe is created.
- Move the playhead a few seconds after the first frame.
- Now drag the small circle against the “Crop Right” to the left – to crop the image from the right. A keyframe is created.
- Crop top and bottom till you reach the end of the clip (according to your requirement). Whenever you change the values of the crop, keyframes will be created.
- Now play the clip. You will see cropping happening gradually in the direction you cropped in the clip.
DaVinci Resolve Cropping Related Issues and Fixes
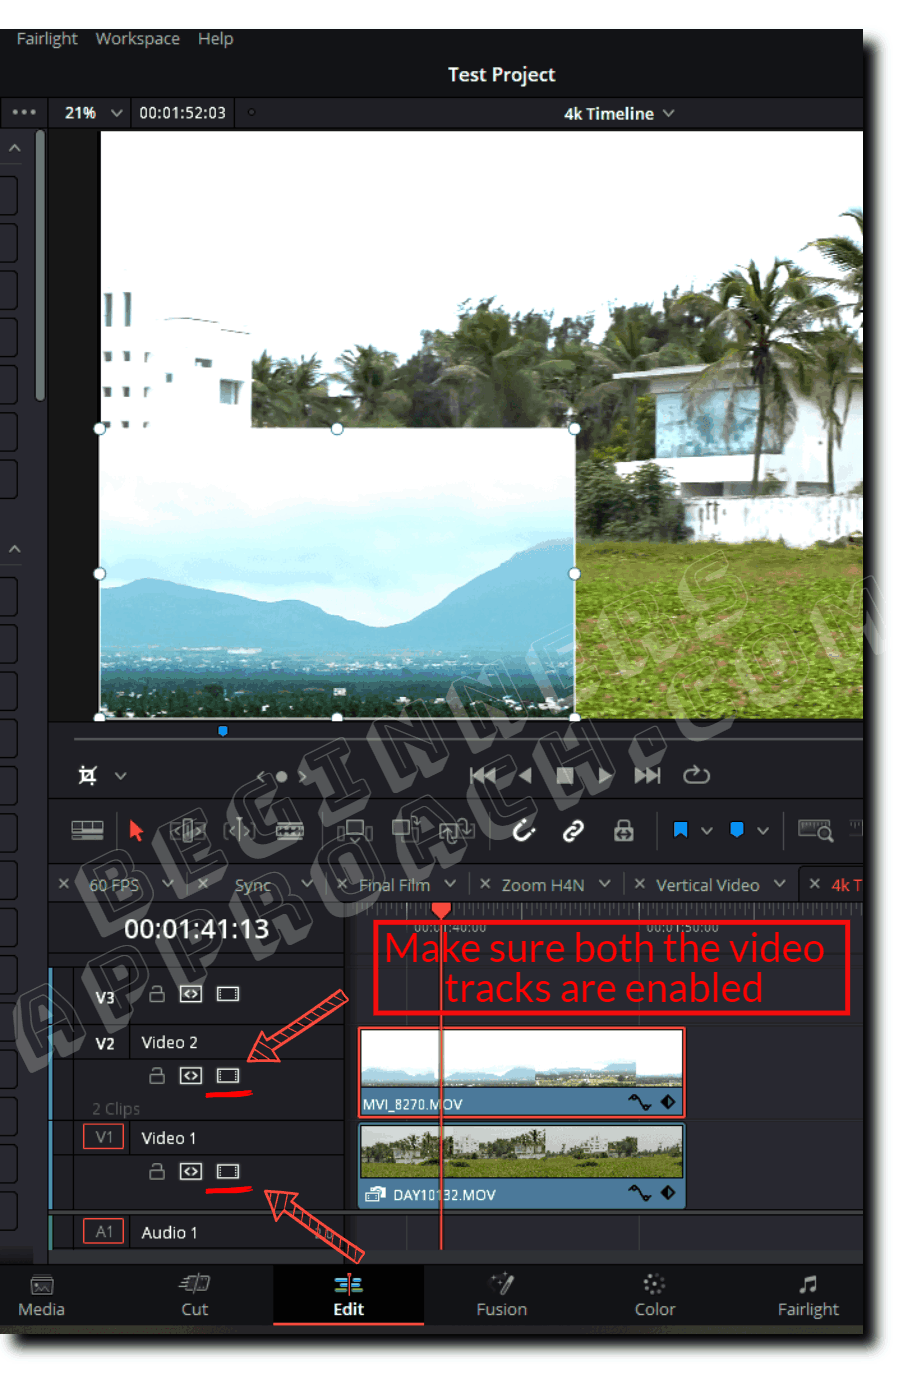
1. Black Background – Cropped Part is Black
When you crop a video, you see that the screen is black instead of revealing the image behind it.
Fix 1: Interchange the videos in the tracks. The one you are trying to crop should be placed on top of the background video. Place the cropped video on video track 2 and the background video on video track 1.
Fix 2: Make sure both video tracks are enabled.
2. Crop the Clip and Fill the Screen without Black Part
If you want to crop part of the clip, then fill the entire screen with the cropped video without getting the black part, then zoom the clip by selecting the “Transform” icon underneath the timeline viewer. Using the handles, you can zoom, re-position, and rotate.
But during the course of filling the screen, you’ll find that zooming will inevitably cut other parts of the video. This issue is because of the difference in the aspect ratio of the cropped clip and the original clip.
Zoom in and re-frame the most important part so that you can fill your screen with the cropped video.
3. Cropping a single video crops all the videos below it
Make sure only the topmost clip is selected in the timeline. If all the clips are selected, then when you crop using the “Inspector” tab > “Cropping” settings, then all of the video clips will be simultaneously cropped.
Before You Go
As you work on cropping your videos in DaVinci Resolve, you will feel limited with the shape of the crop on the “Edit” page.
You naturally will like to have a different custom-shaped crop, like a circle, oval, diagonal, etc., for enhancing your video.
This is where “Fusion” comes into the picture. No need to worry, though; it’s not complicated.
You need to do simple operations in the “Fusion” page and quickly return to the “Edit” page for further fine-tuning.
For a detailed step-by-step guide, click on the below post: