
Picture in Picture is actually a video inside another video.
This is famous in YouTube videos – when YouTubers want to demonstrate something; they show another small video (within the main video) – like a meme, product, etc.
You can absolutely do picture in picture in DaVinci Resolve (also known as video inside a video). You can also add a border or frame to the video inside the main video. On top of that, you can also zoom the picture in picture without expanding the boundary.
You can make use of DaVinci Resolve’s in-built effect to save steps.
Let’s explore the picture-in-picture effect in DaVinci Resolve (versions 18.5, 18, 17, etc.) in detail – step-by-step with pictures.
How to Do Picture in Picture in DaVinci Resolve Quickly?
- Go to the “Edit” page and create a new timeline.
- Place the first video – the one in full screen – in the first track “V1”.
- Place the second video – the picture in picture – in the second track “V2”, which is on top of the first video.
- (All you will see is the second video in your timeline viewer. No need to worry, we will resize it in just a few seconds.)
- Click on the second video on track 2 to select it.
- Below the timeline viewer, click on the dropdown from the bottom left corner and select the “Transform” option.
- This will display onscreen controls with handles to zoom out, pan, tilt, rotate, etc.
- Zoom out the video by dragging the corner handle.
- Click inside the box and drag it to your required place.
- Done!
You can also crop the video from the top, bottom, left or right as per your taste.
To know more about different techniques in cropping, click on “How to Crop in DaVinci Resolve” for a detailed step by step guide.
DaVinci Resolve Picture in Picture Border or Frame
A border or frame enhances the picture in picture video, clearly distinguishing itself from the full-screen video. Creating a border or an outline around the picture in a picture video is very simple in Resolve.
All you have to do is drop an effect called “Colored Border” on the second clip, change the color to your taste, compound the clip and then resize to make it small.
Here’s how you do it – step by step.
How to Create a Border or Frame for a Picture in Picture Video in DaVinci Resolve?
Step 1 – Place the 2 video clips on top of one another
- Under the “Edit” page, place the first video – the one in full screen – in the first track, “V1”.
- Place the second video – the picture in picture – in the second track, “V2”, on top of the first video.
Step 2 – Drag and drop “Colored Border” effect and change it’s settings
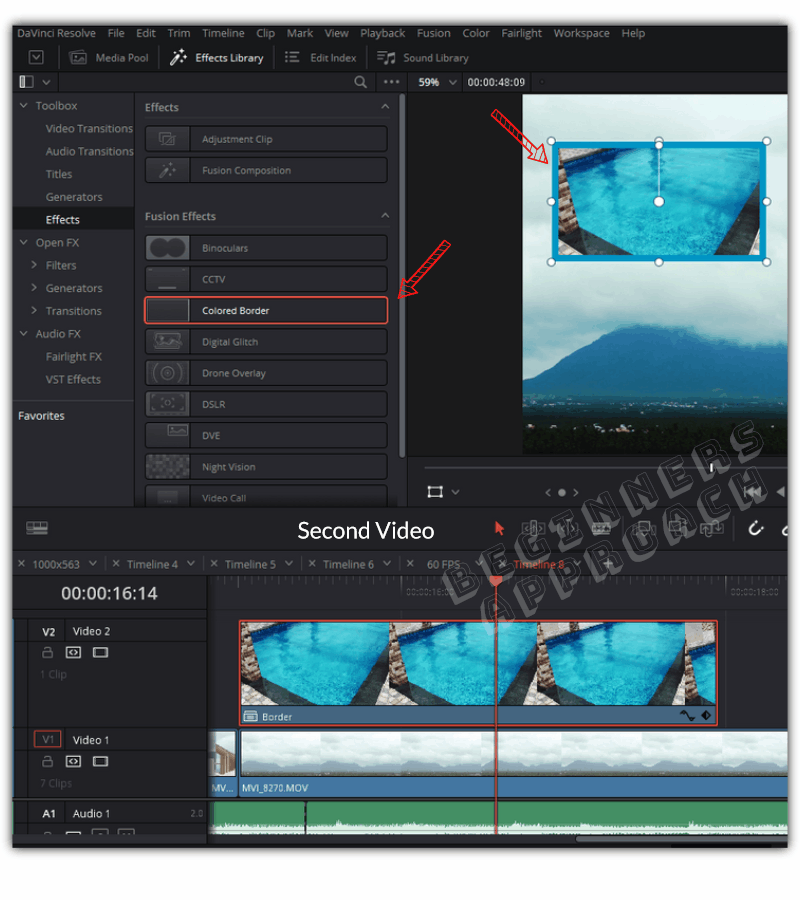
- Click on the second video on track 2 to select it.
- Now, go to the “Effects Library” > “Effects” > “Fusion Effects” > “Colored Border”.
- Drag and drop the “Colored Border” on the second video clip.
- You will see a default white border.
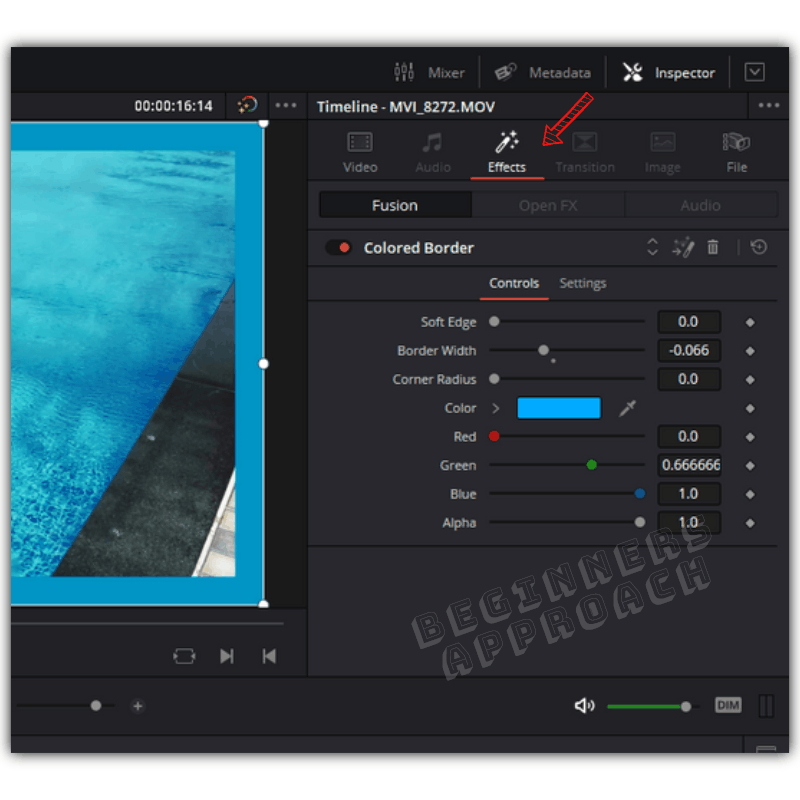
- Now, click on the second clip and go to the “Inspector” tab > “Effects” tab.
- Under the “Colored Border”, change the “Border Width” and pick a “Color” of your taste.
Step 3 – Make a compound clip
- Right-click on the second clip and select “New Compound Clip“.
- Give any name you want.
- This action will make sure your “Colored Border” effect is baked into the second video clip.
Step 4 – Resize the compound clip
- Below the timeline viewer, click on the dropdown from the bottom left corner and select the “Transform” option.
- With the help of onscreen controls, zoom out the video by dragging the corner handle.
- Click inside the box and drag it to your required place.
- Done!
If you want to change your border’s color or width, you will have to right-click on the clip and select “Decompose in Place”.
This will revert to the previous state where you can click on the clip, then go to the “Inspector” > “Effects” and update the border width or color to your taste.
Then after you are satisfied, right click the clip and then select “New Compound Clip” and resize it.
You can do this again and again till you are satisfied!
DaVinci Resolve Picture in Picture Zoom
Zooming in on a picture in picture video is a tricky one.
When you want the second video to zoom in (with the first video as the background) as the video progresses, you will find that the frame as a whole zooms in when you try to keyframe zoom controls from the “Inspector” tab.
But this is not what you want. You want the second video frame to be fixed and let the zoom happen inside the frame without expanding it.
Well, then you will have to “compound” the clip with the zoom-in keyframes and colored border baked in.
This is how you do step by step.
How to Zoom in the Picture in Picture Video Without Expanding it in DaVinci Resolve?
Step 1 – Add the 2 video clips on top of one another in the timeline
- Under the “Edit” page, place the first video in the first track, “V1” (the background one in full screen).
- Place the second video – the picture in picture – in the second track, “V2”, on top of the first video.
- You will only see the second video in the timeline viewer. (No need to worry, we will resize it in just a few seconds.)
Step 2 – Keyframe the second video for zoom in effect
- Move the playhead to where you want the zoom-in to end.
- Under the “Inspector” > “Video” > “Transform“, click on the keyframe (a small diamond symbol) against the “Zoom X & Y“.
- Zoom in your video. This is where your zoom-in will end. (You can also set a keyframe for “Position X & Y” and reposition your video for correct framing).
- Now move your playhead to the point in the video where you want to start the zoom-in.
- Change the “Zoom X & Y” value to “1” (the default state). A keyframe will be automatically placed.
- (You can also update the “Position X & Y” value to zero – if needed. A keyframe will be automatically placed).
- Now run the video and see if zoom-in is working as expected.
- Good. Now on to the next step!
Step 3 – Drag and drop “Colored Border” effect and change it’s settings
- Click on the second video on track 2 to select it.
- Now, go to the “Effects Library” > “Effects” > “Fusion Effects” > “Colored Border”.
- Drag and drop the “Colored Border” on the second video clip.
- You will see a default white border.
- Now, click on the second video (the same one where you dropped the effect) and go to the “Inspector” tab > “Effects” tab.
- Under “Colored Border”, change the “Border Width” and pick a “Color” of your taste.
Step 4 – Make a compound clip
- Right-click on the same second video and select “New Compound Clip”.
- Give any name you want.
- This action will make sure your zoom-in operation and border are baked together in the second video clip.
Step 5 – Resize the compound clip
- Below the timeline viewer, click on the dropdown from the bottom left corner and select the “Transform” option.
- With the help of onscreen controls, zoom out the video by dragging the corner handle.
- Click inside the box and drag it to your required place.
- Done!
Now when you run the video, you will see the second video zooms in smoothly without expanding its frame while the background video is playing!
There you go.
You can always come back and update the settings for “Colored Border” or Zoom keyframes, by right-clicking the clip and selecting “Decompose in Place“.
Recommended Reading
Apart from picture in picture, there are other important techniques you must know: