To change the aspect ratio in DaVinci Resolve, first determine your output format, like, cinematic wide look (2.35), vertical (9:16), portrait (4:5), etc. For a cinema-wide look, divide 2.35 from the width of your footage to get the height. Then enter the width and height in the Timeline Resolution settings.
After finishing your editing and color grading, you can export with the same resolution to get the look of your requirement.
Let’s go through the above in detail – step by step with pictures.
- How to Change Aspect Ratio in DaVinci Resolve?
- How to Preview the Desired Aspect Ratio Without Actually Applying It
- Other Ways to Change Aspect Ratio in DaVinci Resolve?
- How to Work with Multiple Aspect Ratios in a Single Timeline in Resolve?
- How to Achieve a Wide Screen Look without Letterboxing or Black Bars in DaVinci Resolve?
How to Change Aspect Ratio in DaVinci Resolve?
Step 1 – Determine Your Output Aspect Ratio Format
The aspect ratio defines the shape of your image or video. It is the relationship between the width and height of your video. It is expressed in the ratio (like 16:9) or in decimal (like 2.35).
The most common aspect ratio is 1.77 (16:9). DSLRs, Mirrorless cameras, Action Cameras like GoPros, Drones like DJI Mavics, and Smartphones – almost all of them shoot in an aspect ratio of 16:9 (1.77), 4:3 (1.33), etc.
The common aspect ratios are listed below:
| Final Delivery Look | Aspect Ratio | Aspect Ratio (in Decimal) | Width (Horizontal) | Height (Vertical) |
|---|---|---|---|---|
| Vertical Videos – YouTube Shorts, Instagram Stories | 9:16 | 0.56:1 | 1080 | 1920 |
| Square Look | 1:1 | 1:1 | 1080 | 1080 |
| Widescreen Cinema Standard – Hollywood Movies for 4K UHD | 2.35:1 | 3840 | 1634 | |
| Old TV Look | 4:3 | 1.33:1 | 1920 | 1443 |
| Common Wide Look 1080p | 16:9 | 1.78:1 | 1920 | 1080 |
| Common Wide Look 4K UHD | 16:9 | 1.78:1 | 3840 | 2160 |
| 35mm Motion Picture Standard – Hollywood Movies for 4K UHD | 1.85:1 | 3840 | 2075 | |
| IMAX for 4K UHD | 1.43:1 | 3840 | 2685 |
Step 2 – Determine the Width and Height of Resolve’s Timeline Resolution
Let’s say, your footage was shot in Full HD = “1920 x 1080”.
If you choose a vertical video output (9:16) delivery, then your timeline’s width should be 1080 and height 1920 (to get the vertical look).
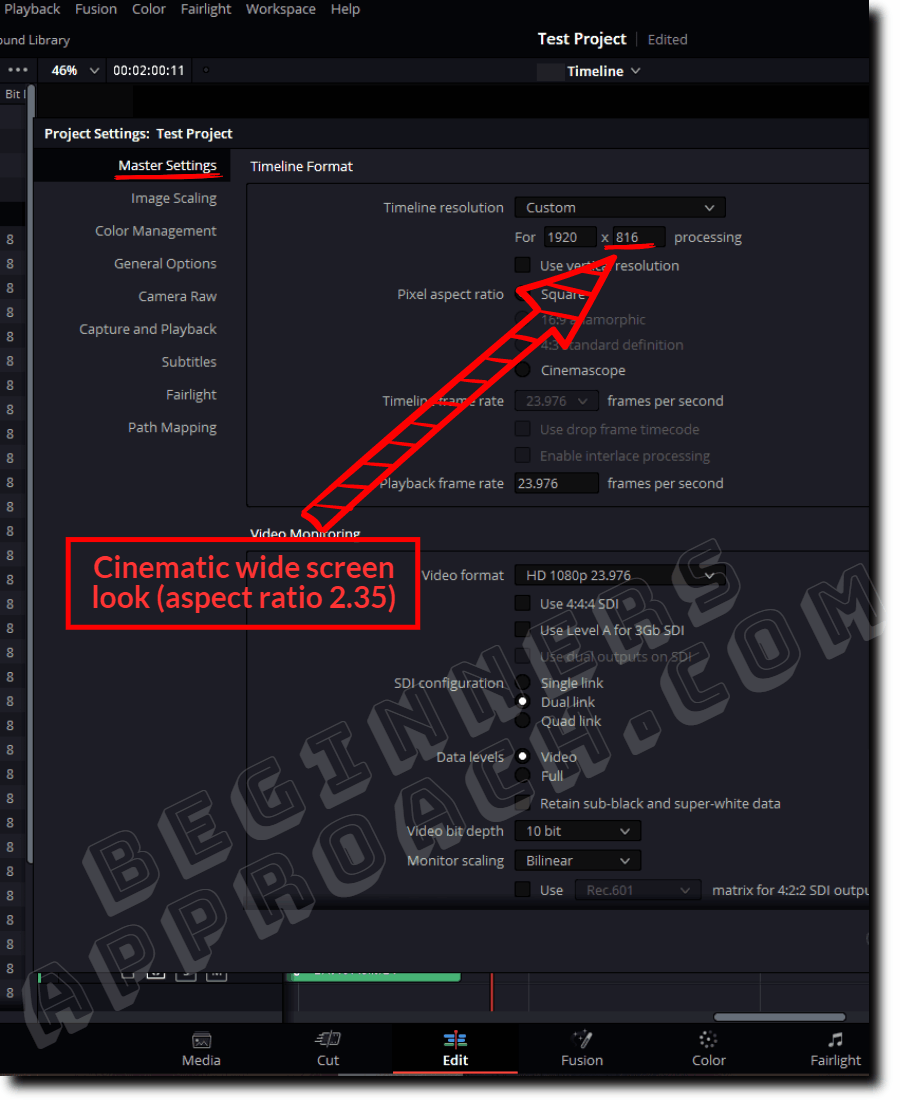
If you choose a cinematic wide-screen look (2.35), your timeline’s resolution should be:
- Width = 1920
- Height = Width/2.35 = 817 (In Resolve, you can’t export resolution with an odd number, hence the height could be adjusted to 816).
(Refer to the above table for more information.)
Now it’s time to enter the width and height in the “Project Settings” > “Timeline Resolution” as discussed below.
Step 3 – Changing Aspect Ratio in Master Settings under Project Settings
- Click on “Project Settings” (bottom right-hand corner – gear icon).
- Go to “Master Settings” > “Timeline Format“.
- Select “Custom” from the “Timeline Resolution“.
- Enter the relevant height in “For processing” (which is based on your aspect ratio. If your AR is 2.35, then divide the width by 2.35. For example, for a width of 1920, the height for 2.35 aspect ratio is 816).
- Then under “Image Scaling” > “Input Scaling” > select “Scale Entire Image to Fit” or “Scale Full Frame with Crop” based on your need.
- Click on “Save“.
- This change affects all the timelines under this particular project.
- Done. Your timeline viewer will display your expected aspect ratio.
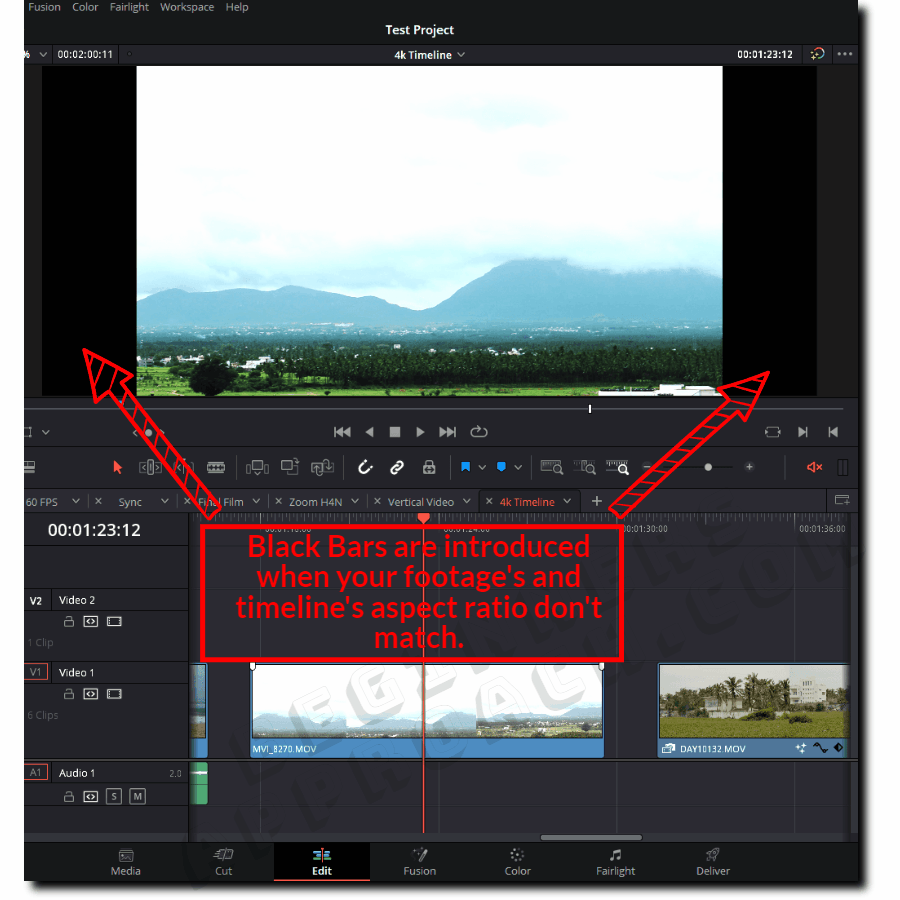
Keep in mind that, as soon as you update the project or timeline resolution, black bars will be introduced (since you’re reducing your height to achieve a widescreen look).
If you select “Scale Entire Image to Fit” under “Image Scaling” (“Project Settings”), it will introduce black bars. You can zoom in/out to remove the black bars from the “Inspector” settings.
Or…
If you select “Scale Full Frame with Crop”, the image will be zoomed to fit the screen with no black bars. You might have to re-position a bit if needed using the “Inspector” settings > “Position X , Y”.
Related Article:
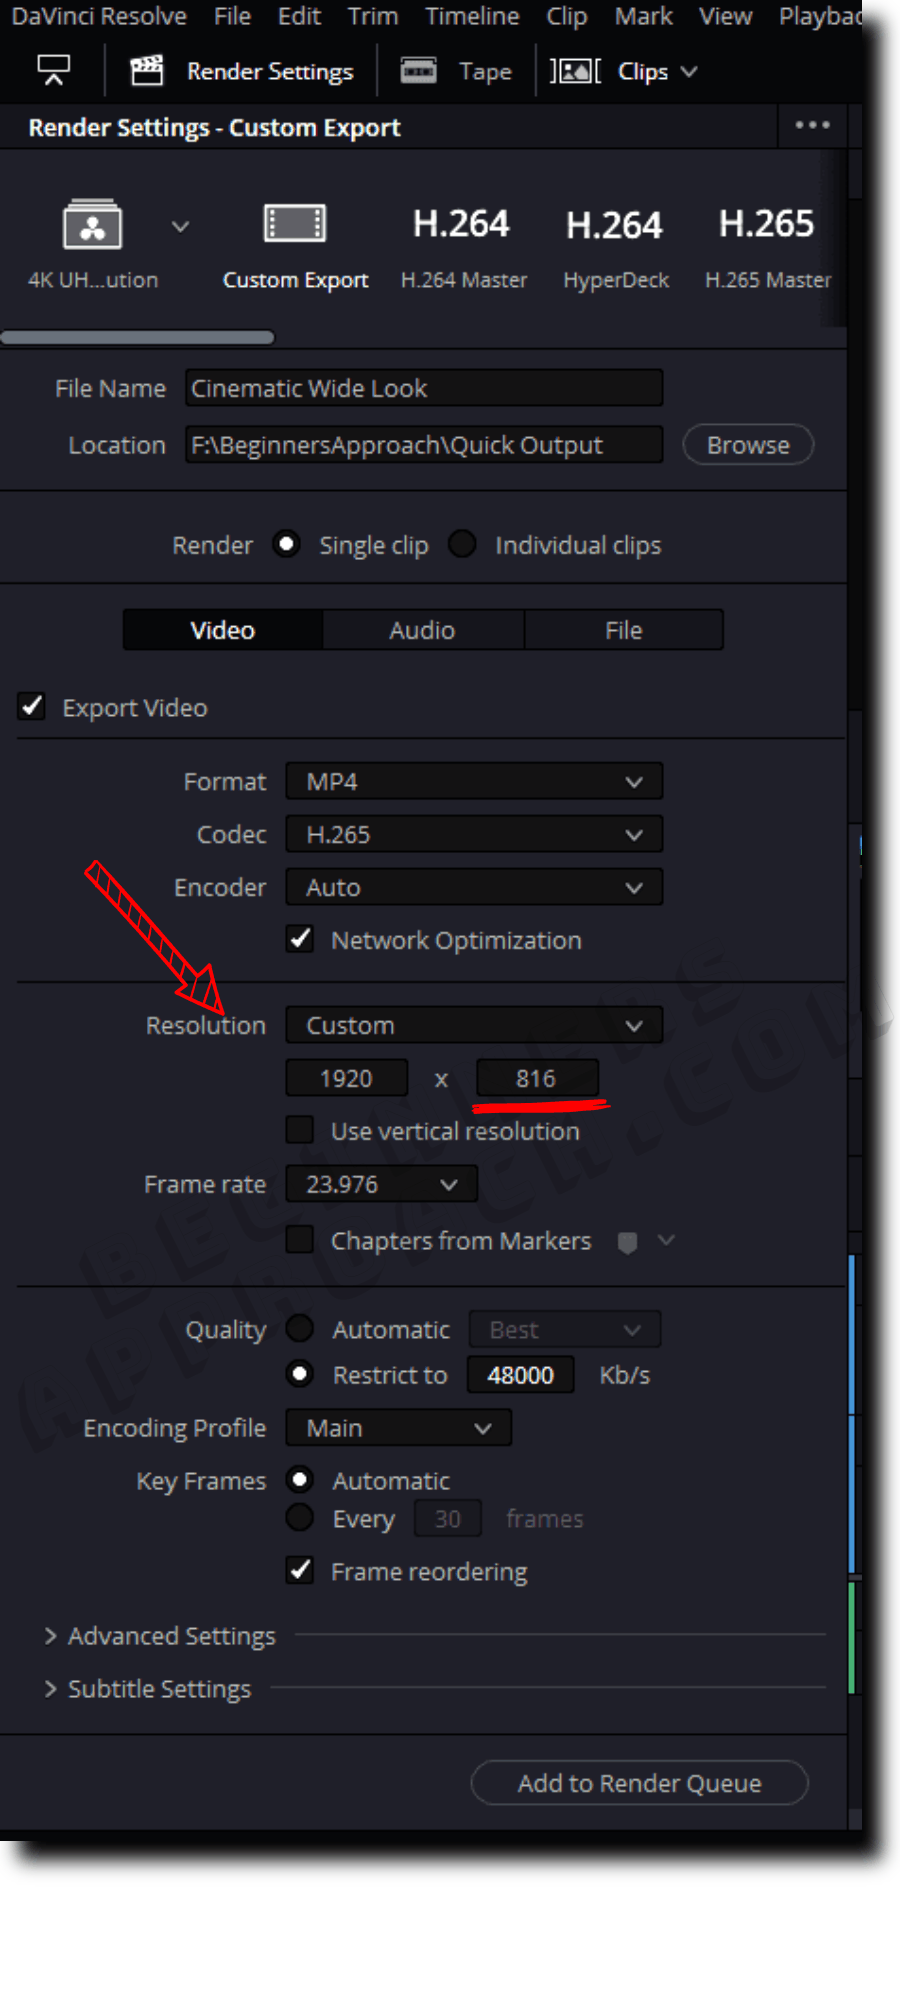
Step 4 – Export With the Same Width and Height To Get the Desired Aspect Ratio
- Go to the “Deliver” page.
- Click on the “Custom Export” tab under the “Render Settings”.
- Choose “Resolution” > “Custom”.
- Enter the same width and height, that is, “1920 x 816”. (Note – Resolve won’t render resolution with an odd number, so make it even).
- Click on “Add to Render Queue”.
- Click on “Render All” to start the render process.
For more information on achieving high-quality output and best render settings like codec, bit rate, etc., I’d highly recommend the below detailed guides with pictures:
How to Preview the Desired Aspect Ratio Without Actually Applying It
DaVinci Resolve helps us by displaying various aspect ratios and their effect on our footage through a feature called “Safe Area”.
- Go to “View” > “Safe Area” > Turn it “On“.
- Go to “View” > “Select Aspect Ratio” > Select your desired aspect ratio like “2.35“.
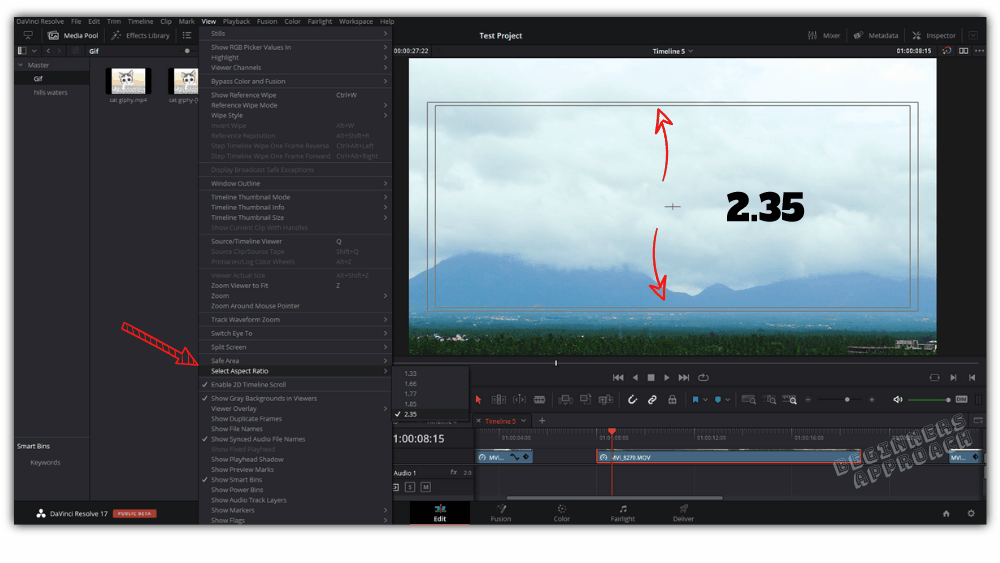
Here you can play with different aspect ratios like 1.33, 1.66, 1.77, and so on.
Note how changing the aspect ratio will affect the shape of your image. It’s always a good practice to adjust your video (transform controls in the “Inspector” tab) such that the action areas are safe and are not left out when actually applying the aspect ratio.
Once you actually apply your desired aspect ratio, it will introduce black bars on the top and bottom of your video (which is also called letter-boxing).
Other Ways to Change Aspect Ratio in DaVinci Resolve?
You can change or set your own aspect ratios by one of the following methods:
- Output Blanking.
- Cropping individual clips.
Changing Aspect Ratio using Output Blanking
- Go to “Timeline” > “Output Blanking“
- Select your desired aspect ratio, say, 2.35.
- Done!
After you’ve applied the output blanking, you might have to adjust the “Y position” under “Transform” in the “Inspector” settings.
Based on your requirement, you might also need to zoom in or out to keep your action in focus.
Also, note that you can always “Reset” the output blanking.
Output blanking is a timeline-wide change, it affects all the clips (within the timeline).
If there are multiple timelines and you want to change the aspect ratio of a single timeline, then you can do so by changing the settings for that particular timeline.
If you want to change the aspect ratio for a particular timeline, then follow the below steps.
Changing Aspect Ratio for a Particular Timeline
- Go to Media Pool which has all your timelines.
- Select your timeline and right-click it.
- Click on “Timelines” > “Timeline Settings“.
- Uncheck “Project Settings“.
- Under “Timeline Resolution” select “Custom“.
- Enter the relevant height in “For processing”, e.g., “1920 x 817” for an AR of 2.35.
- Then under “Mismatched Resolution” > Select “Scale Entire Image to Fit” or “Scale Full Frame with Crop”.
- Click on “Ok”
Instead of altering the project or timeline aspect ratio, you can simply change the aspect ratio of a clip or a group of clips under “Inspector“.
Changing the Aspect Ratio of a Particular Clip
- Select the clip from the timeline.
- Go to the “Inspector” (top right corner).
- Click on the “Cropping” settings.
- Crop the top and bottom portions of the clip. Set a value of, say, 100 for both the top and bottom.
- If needed, change the position y or x values.
- Play with the settings till you get your desired letterbox.
- Then copy the clip, select your desired clips, and press “Alt + V” or “Opt + V” for “Paste Attributes”.
- Select all the options under “Video Attributes” and click on “Apply“.
How to Work with Multiple Aspect Ratios in a Single Timeline in Resolve?
This is a challenging situation.
If you change the aspect ratios using “Output Blanking”, “Master Settings” or “Timeline Settings”, it will affect all the clips in the timeline.
The best way is to not apply any aspect ratio using the above settings, but rather change the aspect ratio of the desired clips as and when needed.
Let me explain.
Let’s say, you shot your footage at 1920 x 1080 – 16:9 (1.77) aspect ratio. Let this be your project or timeline resolution so that the entire screen is filled without any black bars (no letter-boxing or pillar-boxing).
Now there might be a few clips that need a 4:3 (1.33) old movie look. Then you select those clips and change their aspect ratios manually by cropping in the “Inspector” tab. Copy and Paste attributes to the remaining clips (as we saw in the last section).
There might be a few other clips that need a wider 21:9 (2.35) look. You select them and change their aspect ratios.
And finally, there will be clips that might need a letterbox at the start and vanish as the scene ends (resulting in a full-screen look). In these cases, you will have to keyframe them over time.
Keyframing Aspect Ratio in Resolve
- Go to the “Inspector” tab.
- Click on the Keyframe button for “Cropping” (the keyframe turns red).
- At the first frame of your desired clip, set a value of “100” for “Crop Top“.
- Set the same value for “Crop Bottom“.
- Go to the end of the clip, and set a value of “0” for “Crop Top”.
- Set the same value for “Crop Bottom”.
- Now play the clip, and you’ll see that the black bars gradually vanish – resulting in a full-screen look.
The above method will quickly become time-consuming if you have a huge timeline with a lot of clips.
(This is the method I can think of for working with multiple aspect ratios in a single timeline. If you know of any other faster method, then please let me know in the comments.)
How to Achieve a Wide Screen Look without Letterboxing or Black Bars in DaVinci Resolve?
To achieve a wider full-screen look, you’ll have to keep the height of your video intact and change the width according to your aspect ratio.
For example, if you want a Cinemascope (wide look) of 2.35, then multiply 2.35 by the height of your video.
For a 1920 x 1080 video, 2.35 multiplied by 1080 results in 2538.
So, your project timeline resolution should be updated to “2538 x 1080”.
Now, this might cause black bars on the left and right – which is called pillar-boxing.
Now you’ll have to zoom in to fill the screen and re-position as needed, from the “Inspector” tab.
This will give you a wider full-screen look with no black bars in DaVinci Resolve!
You may be also interested in the below posts: