Beginners and newcomers to DaVinci Resolve (versions 18.5, 18, 17, etc.) should know about changing the timeline resolution which is key to editing, rendering, and other post-production processes.
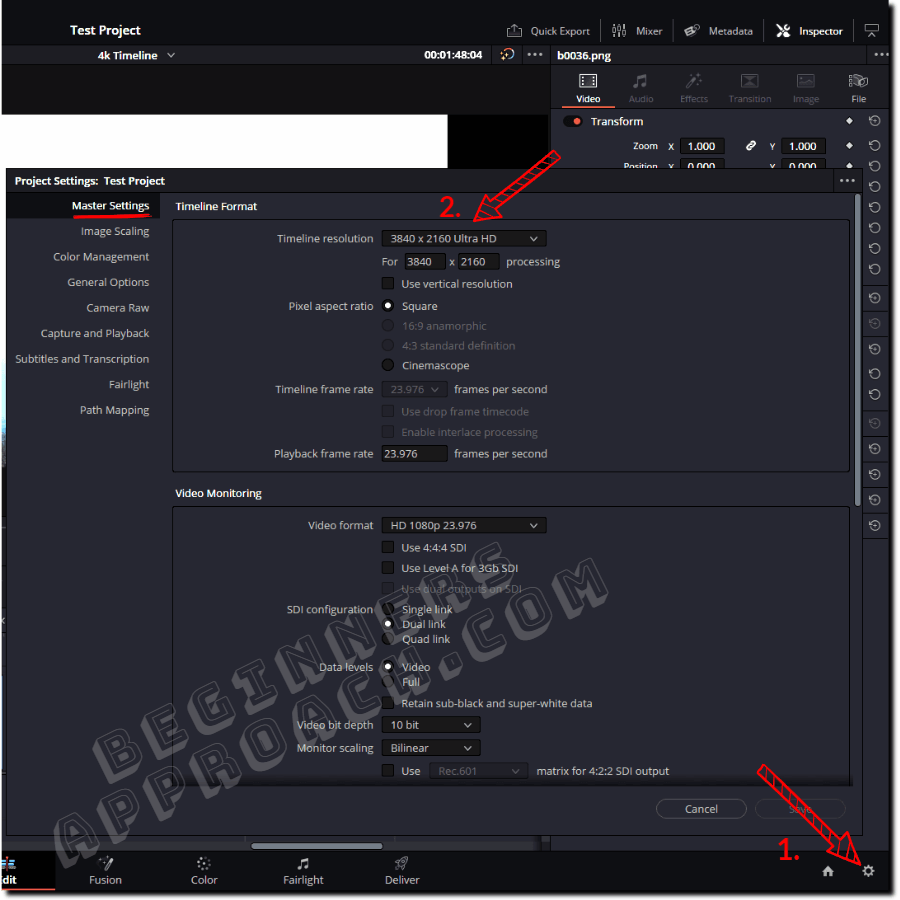
To change timeline resolution in DaVinci Resolve, go to the “Project Settings”, then click on the “Master Settings”. Under the “Timeline Format”, select your desired resolution, say, 3840 x 2160 UHD for a 4K UHD project, from the “Timeline Resolution” drop-down.
Timeline resolution is the frame size or resolution (say 1920 x 1080, 3840 x 2160, etc.) of the timeline you need for editing and image processing like color grading, effects, transitions, etc. in Resolve.
Today we’ll see how to change the timeline resolution, reduce timeline resolution for performance, render in higher resolution for your delivery, and much more – in detail with pictures!
- How to Change Timeline Resolution in DaVinci Resolve Quickly?
- DaVinci Resolve Timeline Resolution Settings
- How to Set Custom Timeline Resolution in DaVinci Resolution which is Not Available in the Drop-Down Menu?
- Difference between Timeline Resolution & Clip/Footage Resolution
- DaVinci Resolve Timeline Resolution and Render Settings – Issues
How to Change Timeline Resolution in DaVinci Resolve Quickly?
- Launch DaVinci Resolve and open the project.
- Go to “Project Settings” by clicking on the gear icon from the bottom right corner.
- Click on the “Master Settings“.
- Under the “Timeline Format“, select your desired resolution (say 3840 x 2160 UHD) from the drop-down menu of “Timeline Resolution“.
- Click on the “Save” button.
Similarly, you can also reduce the timeline resolution, say, from “3840 x 2160” to “1920 x 1080” instantly for all the timelines inside a given project using the “Project Settings” (as shown above).
Related Articles:
Timeline Resolution is Resolution Independent in DaVinci Resolve
As per BlackMagic, DaVinci Resolve is resolution-independent which means the resolution can be changed any point of time – during starting a new project, during editing, or before rendering.
DaVinci Resolve is very smart when it comes to dealing with resolution across:
- Timeline
- Clip or Frame
- Monitoring
- Exporting.
If you shot your footage at 4K UHD (3840 x 2160) 60 FPS, you can set your timeline resolution to a lower one, say, 1920 x 1080, for a better performance while editing, color grading, etc.
Before exporting or rendering, you can change the timeline’s resolution to the original one, that is, 4K UHD.
This way, you can change the timeline resolution as needed at any time to fit your requirements. (This is because, as already stated, Resolve is resolution independent).
Resolution and aspect ratio are tightly interlinked.
You must know the basics of aspect ratio for a better understanding of how to get the desired look for your priceless movie. I highly recommend the below for more information:
DaVinci Resolve Timeline Resolution Settings
Desired resolution can be set for timelines in 2 ways in Resolve:
- For all timelines within a project under “Project Settings”
- For individual timelines within a Project under “Timeline Settings“.
So when you are getting started, you can set your own default timeline resolution for all future timelines.
And…
Change the resolution of individual timelines according to the needs, down the line, within a project.
How to Change Existing Timeline Resolution for Individual Timelines in Resolve?
In some cases, you might need to downscale an individual timeline.
Let me explain…
Suppose you had 5 timelines whose resolution was set at “3840 x 2160” (4K UHD) at the project level in “Project Settings”, and now you want one of the timelines to be downscaled to “1980 x 1080 HD”.
If you change the “Timeline Resolution” from “Project Settings”, it will affect all 5 timelines – which is undesirable.
So you need to change the resolution for only one timeline without affecting other timelines within the same project.
In this case, you’ll need to update the “Timeline Settings“.
This is how you change individual timeline resolution without affecting other timelines inside a project:
- Under the “Edit” page, click on “Media Pool” which contains the Master and other bins.
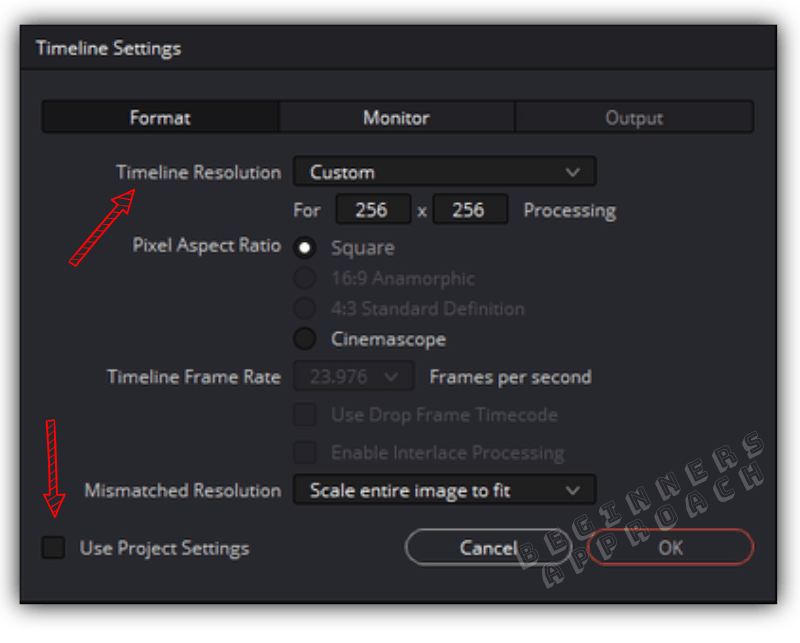
- Locate your desired timeline, right-click, and select “Timelines” > “Timeline Settings…“.
- Click on the “Format” tab (by default, it is clicked)
- Uncheck “Use Project Settings” (this is very important because if checked the timeline resolution is greyed out and cannot be modified).
- Update the “Timeline Resolution” to your desired one.
- Click on “Ok“.
- The timeline resolution is now updated for the desired timeline!
How to Change Timeline Resolution For a New Timeline in Resolve?
- Go to the “Media Pool“.
- Right-click on any clip and select “Create New Timeline Using Selected Clips“.
- Uncheck “Use Project Settings”.
- Click on the “Format” tab.
- Set your desired “Timeline Resolution”.
- Click on “Create“.
- Done!
How to Set Custom Timeline Resolution in DaVinci Resolution which is Not Available in the Drop-Down Menu?
- Open “Project Settings” by clicking on the cogwheel – bottom right corner.
- Click on “Master Settings” > under “Timeline Format” > “Timeline Resolution” > select “Custom” from the drop-down menu (the first option).
- Against “For Processing” (directly below “Timeline Resolution”), enter your desired resolution, say, 1080 x 1920 – Vertical video frame size.
- Click on “Save”.
What is the use of “For Processing” in DaVinci Resolve?
“For Processing” is used to set custom resolutions that are not available in the “Timeline Resolution” drop-down menu.
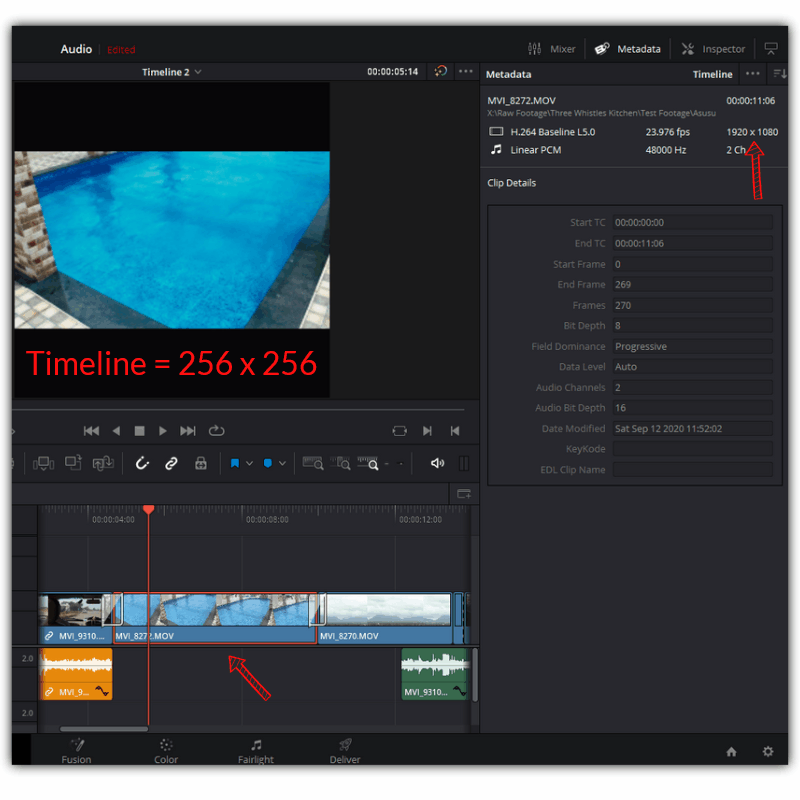
By default, any resolution you choose from the “Timeline Resolution” will reflect in the “For X x Y Processing” field.
If you choose “1920 x 1080” from “Timeline Resolution” and enter any other resolution, say 256 x 256, in “For Processing” which is not available in the resolution menu, then the “Timeline Resolution” will be automatically set to “Custom”.
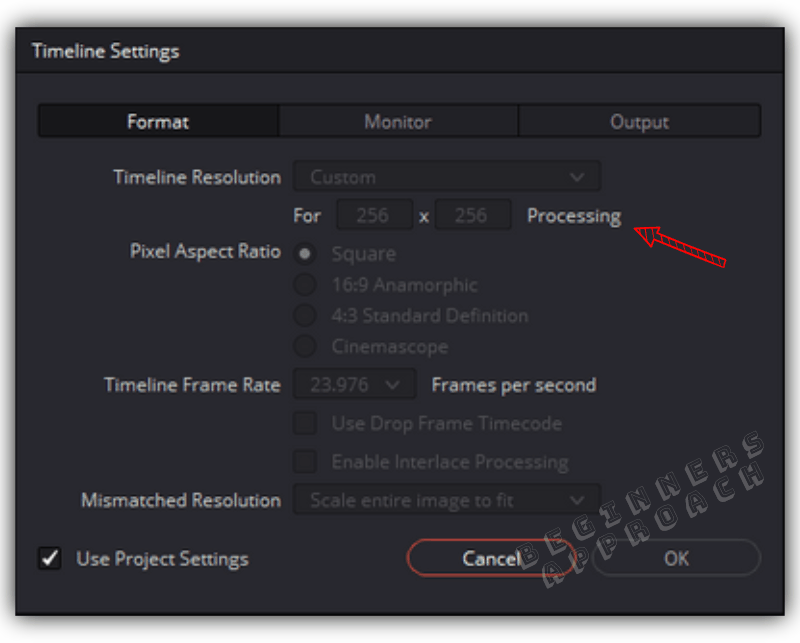
You can cross-check by right-clicking on the timeline from “Media Pool” > then selecting “Timelines” > “Timeline Settings”.
Difference between Timeline Resolution & Clip/Footage Resolution
The footage or clip resolution is the original resolution shot through a DSLR/mirrorless camera, drone, or smartphone. Whereas a timeline resolution is set according to the editing and color grading needs.
A timeline resolution and clip resolution may or may not match based on the editing, color grading, and visual effects needs.
If you set the timeline resolution to a lesser one compared to the clip resolution, then when you drop the clip into the timeline, naturally, all the clips will be part of the timeline resolution.
(But if you check the clip’s properties using the “Metadata” tab, it should display the original resolution in which it was shot)
After doing all your editing, color grading, sound design, etc, you can change the timeline resolution to match the clip’s original resolution for high-quality output.
DaVinci Resolve Timeline Resolution and Render Settings – Issues
Consider the following scenario:
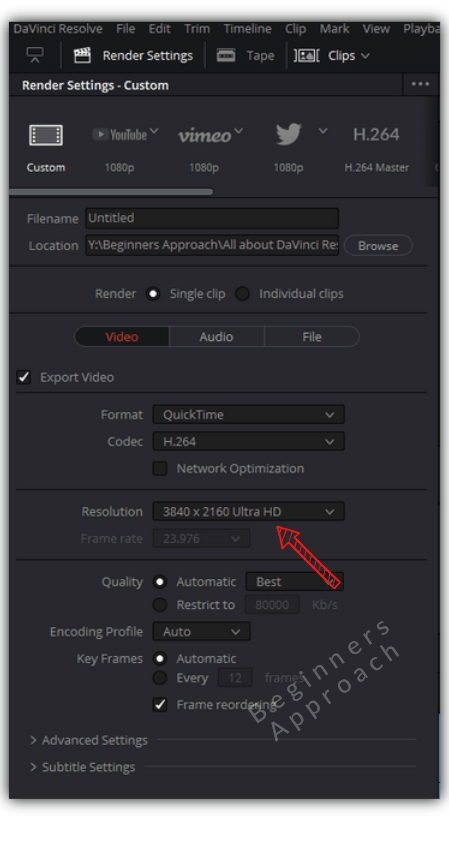
- Source footage resolution = 3840 x 2160 (4K UHD)
- Timeline resolution = 1920 x 1080 (HD)
- Render resolution during export = 3840 x 2160 (4K UHD)
When your timeline resolution is lesser than the render resolution, then you’ll get a warning:
Are you sure you want to add to render queue at a resolution larger than your timeline resolution? Image processing is performed at the timeline resolution which can be set in project settings under Timeline Format. Choosing an output resolution that is larger than the timeline resolution might not result in the desired image quality.
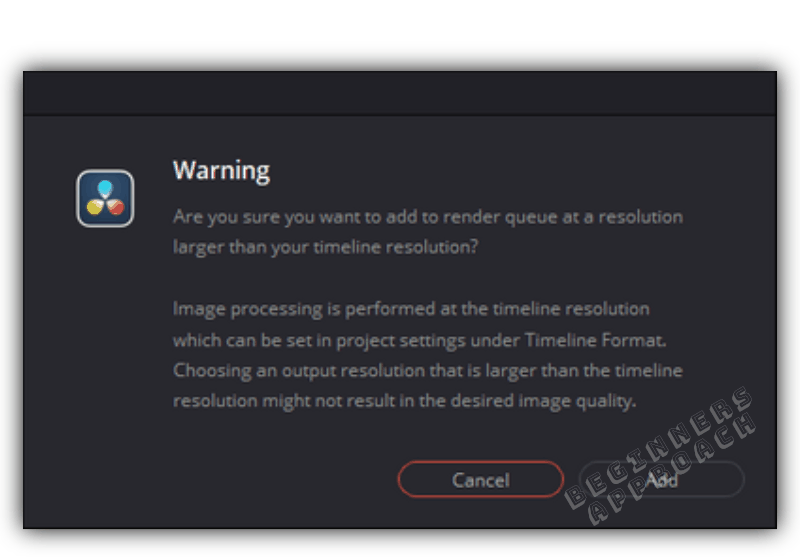
The point to understand is that if your render setting resolution is greater than the timeline resolution, then Resolve will throw a warning, and when you go ahead and render, it will upscale your footage which might not result in the desired image quality.
This often happens when people shoot in 1080p, and their final delivery requires 4K UHD. This will definitely result in upscaling which could compromise a little bit of image quality.
But if there is no option, you could upscale it to a higher resolution as required for your final delivery.
But if you shot in 4K, set the timeline in 1080p, then render again at 4K – you’ll not get the original 4K resolution, simply because your source footage is in 4K.
What matters is the timeline resolution.
To get the best results – before rendering to the highest quality, change your timeline resolution to the original resolution of the footage (if you shot it in higher resolution, say 4K) and then render the original high resolution for the best image quality!
As already stated above, it only takes a few clicks to change your timeline resolution at the “Edit” page before starting the rendering process.
DaVinci Resolve will automatically re-calculate windows, tracking data, keyframes, etc, to fit the updated resolution – that’s why Resolve is Resolution independent!
Hi Rag,
Thank you for explaining the difference between timeline resolutions and video monitoring settings in terms of output. I found this information very helpful and it answered my exact question.
Cheers, Dan & Beck (Travel Made Me D o It)
Glad you found it helpful!
If I shot at 8K by Nikon Z9, can I get a still in that resolution. There is no option for 8K in timeline setting. But when I chose custom option with 8K, it did not work.
Hi HJ,
The free version of Resolve supports resolution upto 4K UHD – 3840 x 2160. If you need an 8K timeline or 8K export, you’ll have to upgrade to the Studio version (paid).
Hi Raju,
I shot 8K by Nikon Z9. However, there is no option for that resolution at timeline setting. When I put custom by 8256×4644, it exports a different resolution image.
Thanks for help in advance.
HJ
Hi HJ,
You CAN import an 8K file in the free version of DaVinci Resolve, but the timeline and export settings support only upto 4KUHD (3840 x 2160) – free version. You need Studio version to export at that resolution.