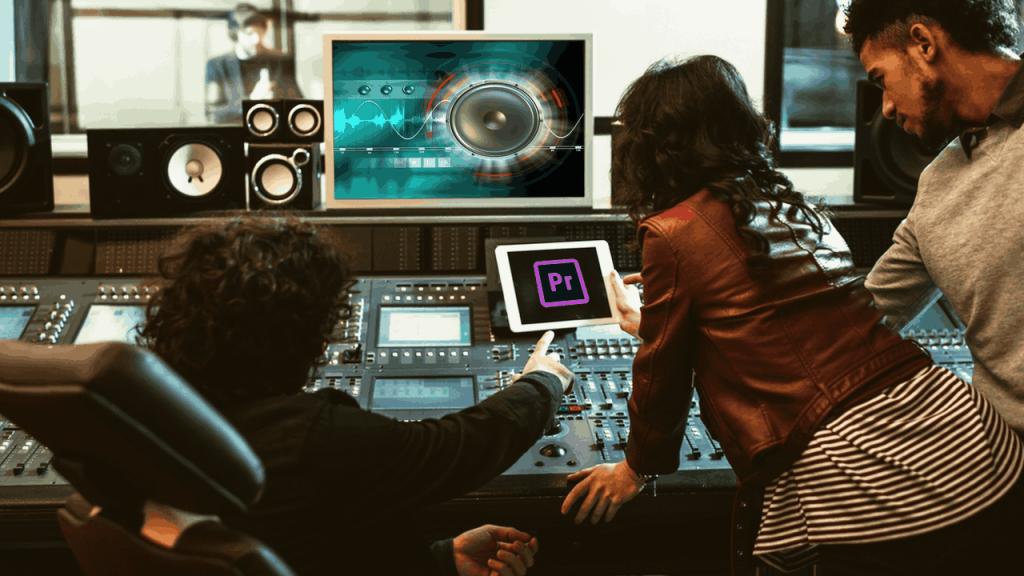
I have worked on Adobe Premiere Pro and Adobe Audition for audio editing.
Even though Audition is entirely dedicated to audio post-production, Premiere Pro is not far behind in terms of audio editing and sweetening.
Can You Edit Audio in Premiere Pro?
You can definitely edit audio in Premiere Pro without depending on other applications like Adobe Audition or Audacity. The “Audio” workspace and the audio tools are more than enough to finish and polish your audio. Beginners will find it easy to get started with audio editing in Premiere Pro.
Is Premiere Pro Good For Audio Editing?
Premiere Pro is definitely good for audio editing. The built-in features like the “Essential Sound” panel, auto-ducking, audio repair, enhancement tools, etc., make it a very good choice. You don’t have to switch to other applications for audio editing and sweetening processes. More importantly, you can quickly get started!
Premiere Pro has packed so many audio post-production features inside it so that you don’t have to leave the platform.
With features like “Essential Sound” and Adobe Stock music, you have everything it needs to finish your movie or YouTube video inside Premiere Pro!
Especially if you are a beginner who is in the process of getting used to editing inside Premiere Pro, you can quickly pick up audio editing without getting frustrated.
Once you are comfortable with the audio post production in Premiere Pro, you can then move to Adobe Audition for a dedicated and advanced workflow down the line.
Keep in mind that Adobe Audition would cost you an extra monthly subscription fee apart from Premiere Pro’s subscription.
Related Article:
Is Premiere Pro Good For Beginners? (Here’s What You Should Know!)
Here’s Why Premiere Pro is Good for Audio Editing
1. Essential Sound Panel Speeds Up Audio Post Production
A beginner who is unsure of the steps needed to sweeten audio would find it extremely frustrating to learn the various concepts.
When I started out in audio editing, I had to spend countless hours going through online tutorials to edit, repair, and enhance audio.
It was time-consuming and frustrating to know all the technical concepts related to audio post like noise reduction, normalization, compression, EQ, de-hum, gates, dynamics, buses, lufs, etc.
Especially the order of operations was crucial to get the sound right.
With the introduction of the “Essential Sound” panel, it is no longer the case.
Premiere Pro essentially runs you through step-by-step to clean up and enhance your audio.
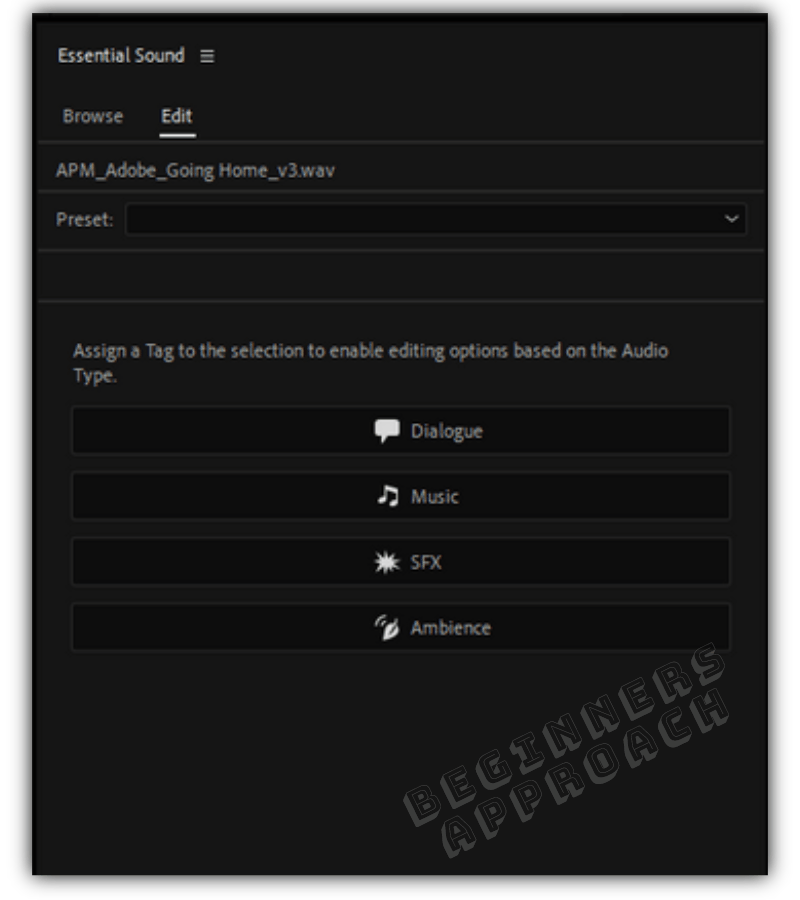
For example, if you have different audio clips like dialogue, music, sound effects, etc., in your sequence, then you can individually assign them to the below categories for further processing:
- Dialogue
- Music
- SFX
- Ambience
This makes your life easier and quickens your audio post-production.
How to Assign Sounds to Different Categories in the “Essential Sound” panel?
- Click on the “Audio” workspace.
- Go to the “Essential Sound” panel on the right. (If not displayed, go to the menu “Window” -> select “Essential Sound”).
- From your sequence, select, let’s say, dialogue clips.
- Next click on the “Dialogue” button under “Essential Sound”.
- Both the clip and “Dialogue” category are linked.
Now click on the “Edit” (if not already opened) from the “Essential Sound” panel and you’ll see operations necessary for dialogue post-processing:
- Loudness
- Repair
- Clarity
- Creative
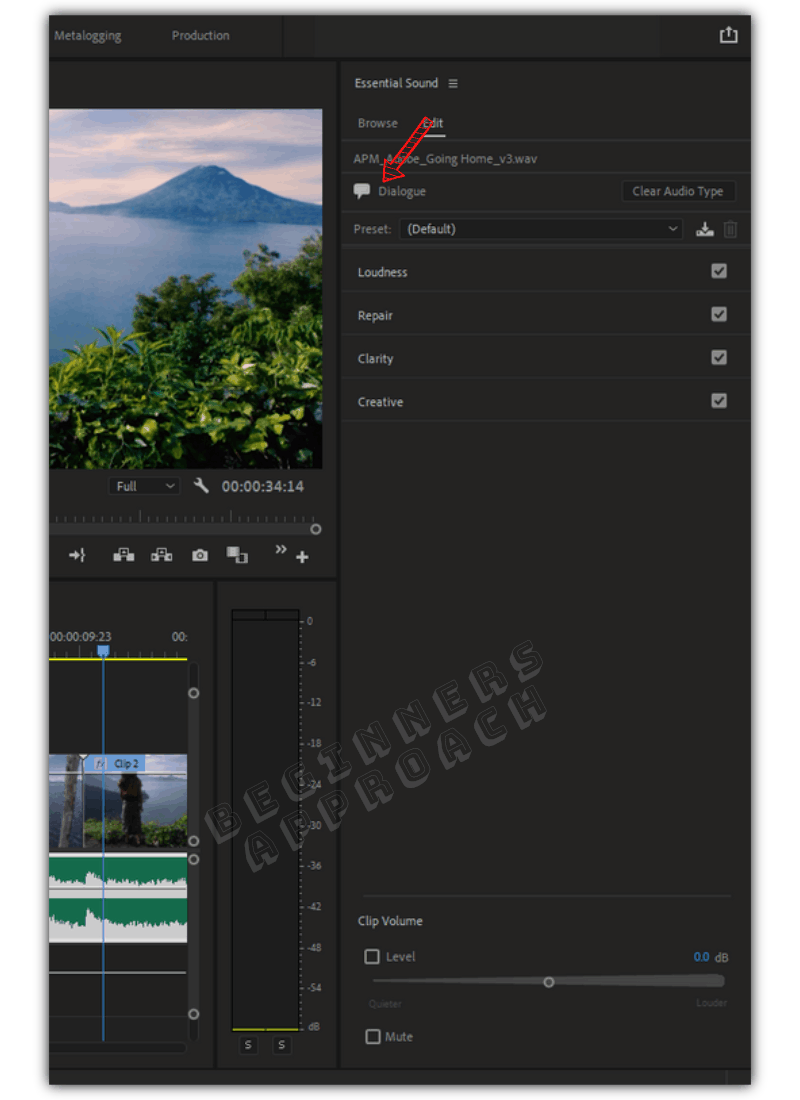
Click on them to expand further options. Play with the different settings till you get the sound right.
For more detailed information on the “Essential Sound” panel, click on the below 5 minutes tutorial from Adobe:
2. Instantly Set Different Sounds to the Same Level Automatically
The “Auto Match” feature inside the “Essential Sound” panel is a huge time saver. By clicking on “Auto Match”, Premiere Pro will automatically set the levels of your audio to a target value of, say, -23 lufs (loudness unit).
Let’s say, you captured the dialog of your subjects indoors and outdoors.
Now naturally, the different audio will sound at different levels. Without leveling the sounds, one might sound louder, and the other might be quieter – which is not desirable.
It’s your job to take the different audio and mix them such that the loudness level is set right. This is where the “Auto Match” feature comes in handy.
Here’s How You Auto Match Loudness Levels in Premiere Pro
- From the timeline, select all of your audio clips that are dialogues.
- Then click on the “Dialogue” button under “Essential Sound“.
- Click on the “Loudness” section and then again click on “Auto-Match“.
- Premiere Pro takes a few seconds, auto-matches the loudness levels, and makes the different clips sound at the same level, say, -23 lufs.
- That’s it! You saved a lot of manual effort and time.

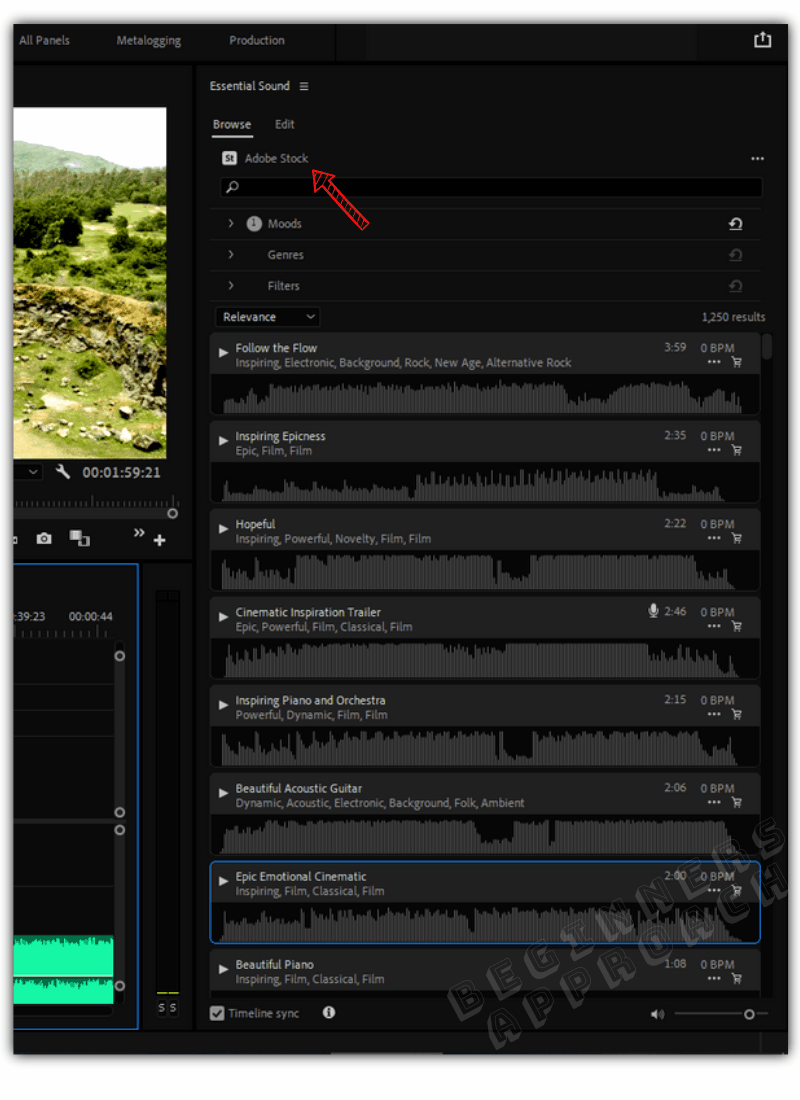
3. Adobe Stock Music Right Inside Premiere Pro
To elevate your video to the next level, you need high-quality music. Be it an emotional scene, cutting a trailer, or epic bgms, you need to have a huge collection of music at your disposal.
Adobe provides royalty-free stock music right inside Premiere Pro. You can access it by opening up the “Essential Sound” panel and then clicking on “Browse”.
You can go through the collections and preview them. You can even filter them by “Genres”, “Moods” , etc.
You can drag and drop soundtracks to your timeline.
Choose the best one that suits you and then click on the cart icon to license it. Once it is licensed, the low-quality soundtrack will be replaced with a higher-quality one.
Read this from adobe stock music’s official website for more information.
4. Automatic Audio Ducking in Premiere Pro
If you are working on post-production works of a short film, YouTube video, or documentary, you might naturally need a music track along with the dialogue.
So you add dialogue clips in one track and music in another track.
Whenever the scene involves dialogue, you need to manually lower the volume of the music so that the dialogue is heard clearly on top of the music. You’ll have to resort to keyframing.
This is a manual process – which takes time and effort.
With the auto-ducking feature, Premiere Pro will automatically lower the music volume down whenever there is any dialogue, with the help of keyframes.
Here’s How to Auto Duck Music Against Dialogue
- Select the music clip or any audio clip – like sound effects or ambience that needs to be ducked against dialogue.
- Click on the appropriate category based on your audio, like “Music” under the “Essential Sound” panel.
- Then check the checkbox against “Ducking” found under the “Edit” tab under the “Essential Sound” panel.
- Click on the dialogue icon for “Ducking Against“.
- Click on “Generate Keyframes“.
- That’s it. Premiere Pro will automatically create keyframes in the music track that are lowered down in volume whenever there is any dialogue.
- You can further finetune the keyframes if needed.
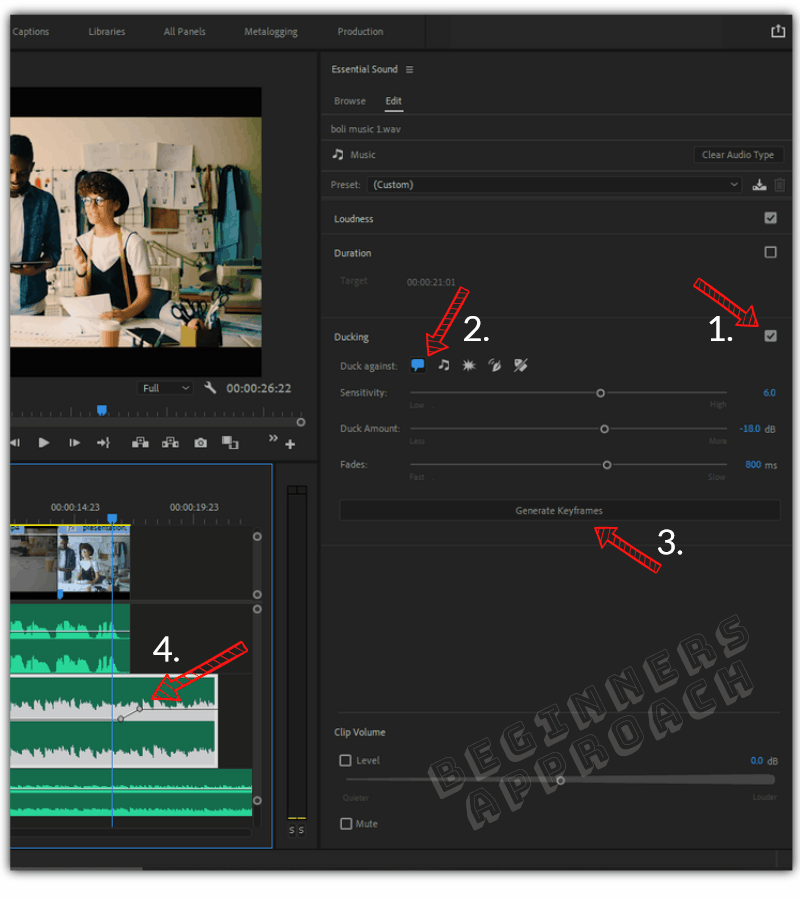
You can vary the “Duck Amount” under the “Ducking” until the music volume is brought down and the dialogue is heard clearly.
If you have a very complex sequence with a lot of dialogues, music, Foley sounds, etc., auto-ducking will save you a TON of time and frustration!
5. Record Audio Inside Premiere Pro
For voice-over and ADR (automatic dialog replacement), you can leverage the audio record feature inside Premiere Pro.
Make sure you have a USB or a built-in microphone to record audio and the same show up in Premiere Pro before recording.
Once that is in place, rest is easy.
Follow this quick and informative tutorial from Adobe in a Minute YouTube channel:
6. Elevate your Sound Design using Audio Effects and Transitions in Premiere Pro
There will be times when you might need a dialogue sounding from an underground tunnel or a television.
Sometimes it’s impossible to record them in the field due to many restrictions and constraints. The audio effects inside Premiere Pro can solve many of your problems for you.
For example, you could record your voice from the comfort of your home and make it sound like it was from under the bridge from the outdoors. The “Convolution Reverb” feature achieves this.
- Go to the “Effects” panel (“Window” -> “Effects”).
- Click on the “Audio Effects” > “Reverb” > “Convolution Reverb”
- Play with the settings till you get the desired sound.
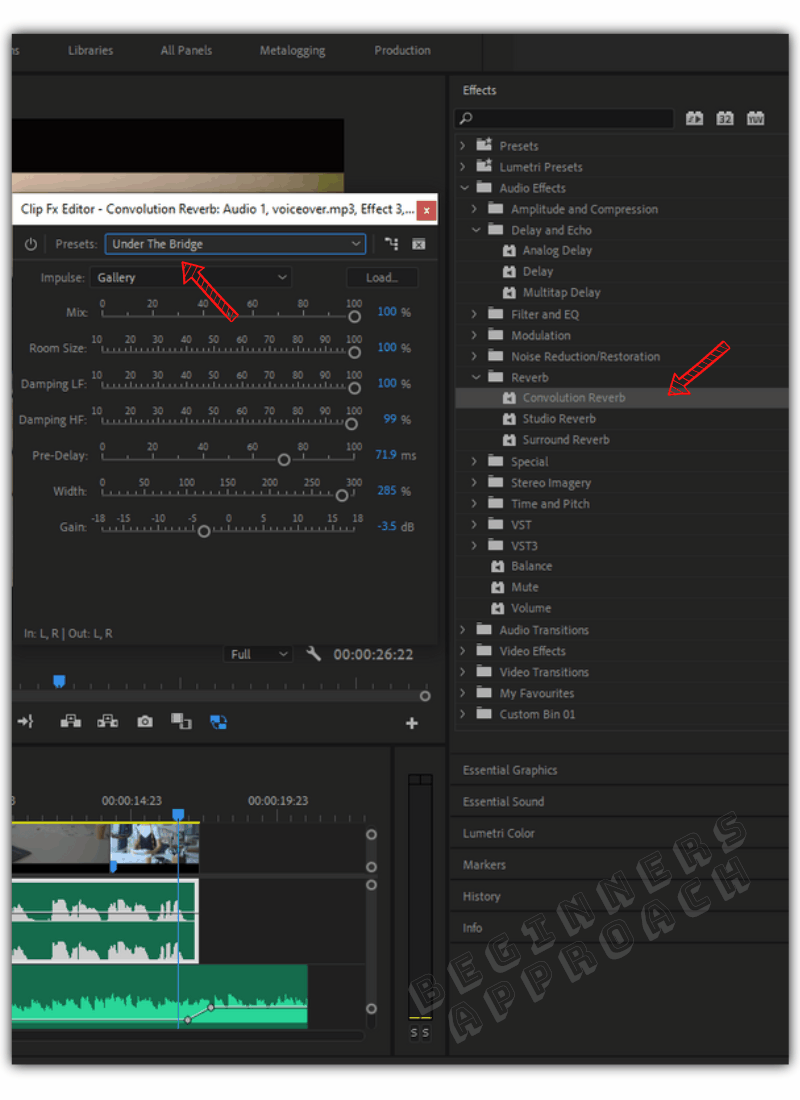
This was just an example. You could also try many other effects like “Delay and Echo”, “Time and Pitch” etc., accordingly as needed.
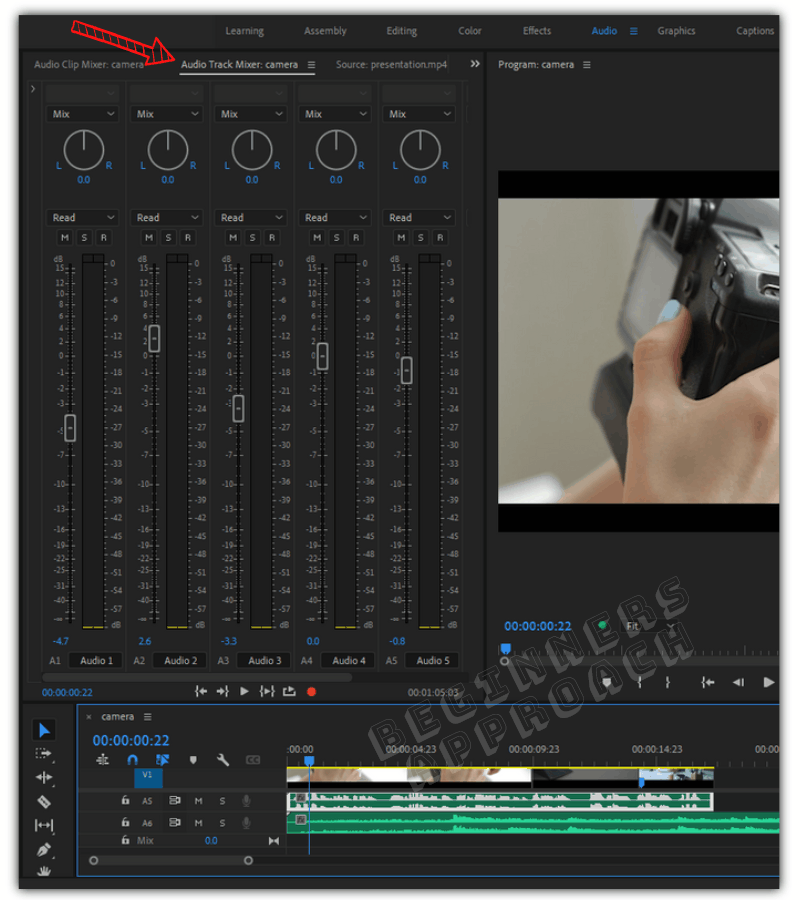
7. Working with the Track Mixers in Premiere Pro
If you have many audio tracks, sometimes it would be cumbersome to go through each of them for any corrections.
The “Track Mixer” inside Premiere Pro is a great feature that shows all of the audio tracks together that makes audio editing manageable.
You can play the video and while it’s running, you can make changes to various audio tracks at the same time through automation.
This saves a lot of time and effort, especially if you have a ton of audio tracks.
By adjusting the knobs, you can increase or decrease the decibels (sound level) of your various tracks.
The rightmost will be the master track with the help of which you can increase or decrease the volume globally.
8. Noise Reduction and Improving Clarity in Premiere Pro Quickly
Whenever you record live audio sound outdoors, your microphone (like the Rode NTG series) will inevitably pick up distant noise like wind, factory, etc. And when you record your audio inside a room, your microphone will pick up noises like AC, rumbles, etc.
Clearing noise is a necessary step, and Premiere Pro does that with the “Essential Sound” panel and audio effects like noise reduction, de-hummer, de-esser, filters, and EQ.
The “Essential Sound” panel’s “Dialogue” has a lot of features to clear and enhance audio.

The “Repair” includes the following features:
- Reduce Noise
- Reduce Rumble
- DeHum
- DeEss
- Reduce Reverb
You can adjust the knob for each of the above till you get the right sound.
After repairing your clips, you might need to enhance them. Sometimes noise reduction might need an overall boost (in decibels). For a boost in certain frequencies, EQ (Equalizer) comes handy.
Sometimes you might need to work with “Dynamics” so that the high, low and mid frequencies of the dialogue are opened up and are heard correctly.
The “Clarity” includes:
- Dynamics
- EQ
- Enhance Speech
To get your audio to sound right, you will need to perform all of the above operations. Without the “Essential Sound” panel it would be time-consuming.
Go Through This One Video for In-Depth Audio Editing in Premiere Pro
If you want to learn Premiere Pro audio editing in detail, check out Adobe Creative Cloud’s masterclass hosted by the world’s top instructor Jason Levine.
In this video, he runs you through audio mixing for a short film – step by step.
Concluding Thoughts
Adobe Premiere Pro is a very good choice for audio editing.
If paying a monthly subscription fee is not a big deal to you, you will love Premiere Pro for its features, especially audio editing.
You can even subscribe to Audition and carry out advanced audio workflows. Any changes you make in Audition will reflect in Premiere Pro through dynamic linking.
But if you are tight on budget, then you should check out free tools like DaVinci Resolve (which supports audio editing), Audacity, etc.
You may also like the below posts: