Is Premiere Pro Good for YouTube?
Premiere Pro is an excellent choice for YouTube. A newbie can quickly get started and create great-looking videos with the help of Premiere Pro’s stylized effects, transitions, free graphics templates, sound effects, color grading (for film look), green screen removal, etc.
Premiere Pro provides simple as well as advanced tools to get the film look of your taste – for YouTube.
If you are ok with the monthly subscription fee, then you can surely opt for Premiere Pro.
To know more about the pricing and other beginner related stuff, check out the below article:
Premiere Pro For Beginners? (Here’s What You Should Know!)
Quickly Change Resolution & Aspect Ratio in Premiere Pro (in 1 Min)
- Is Premiere Pro Good for YouTube?
- What Do You Need to Get Started in Premiere Pro for YouTube?
- What Specific Skills Do You Need in Premiere Pro For YouTube?
- Transitions in Premiere Pro
- Stylized Effects in Premiere Pro
- Stylized Motion Graphics Templates from Adobe Stock
- Adding Sound Effects to Elevate Your Video
- Premiere Pro's Essential Sound Panel and Adobe Stock Music
- Green Sreen Removal For YouTube in Premiere Pro
- Get the Film Look of your Choice Using "Lumetri Color"
- Concluding Thoughts
What Do You Need to Get Started in Premiere Pro for YouTube?
If you’re a complete newbie, the first thing you should do is to learn the basics of Premiere Pro.
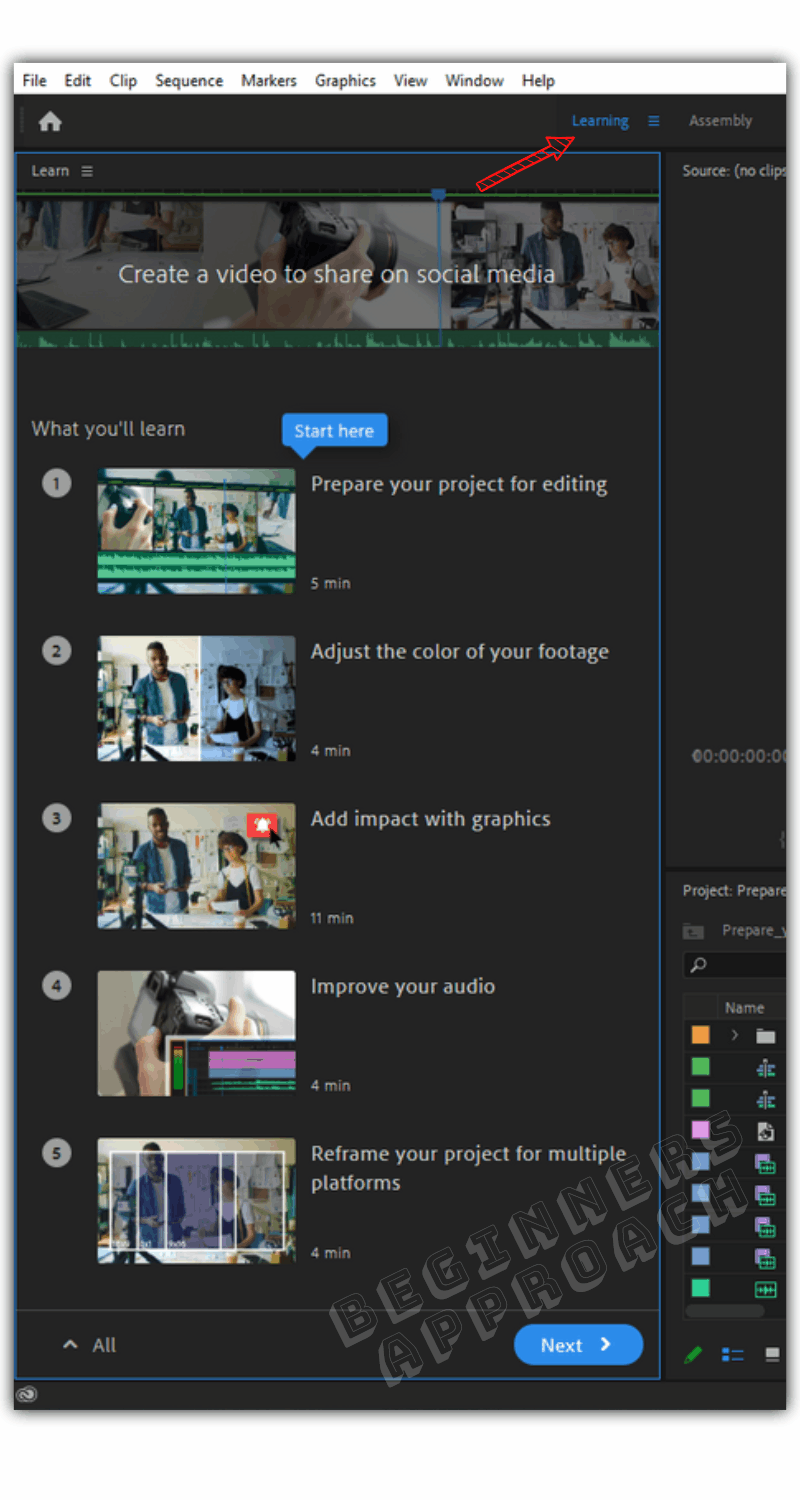
This is where Premiere Pro scores big time. You can follow the interactive tutorials right inside Premiere Pro, where you can quickly get a feel of the editor as well as the basic editing concepts.
Especially, you can click on the “Create a Video to Share on Social Media” interactive tutorial, which is tailor-made for social media like YouTube, Instagram, etc.
The whole tutorial is just around 30 minutes!
Inside Premiere Pro, click on the “Learning” workspace to access the tutorial.
What Specific Skills Do You Need in Premiere Pro For YouTube?
If you’re planning to start a YouTube channel, upload videos regularly, and build subscribers, then you might certainly need the below (not all of it):
- Catchy Intro and outro videos
- Stylized video transitions, video effects like blur, texturize, etc.
- Stylized Titles (like lower thirds) with animations
- Sound Effects to enhance the production value
- Green screen compositing
- Motion graphics templates
- Memes, etc.
Any famous YouTuber will have most of the above stuff in their video – that’s why their video looks cool and great.
With Premiere Pro, you can easily accomplish all of these cool stuff.
And…
For your information, most of the famous YouTube influencers use Premiere Pro as their favorite editor!
Transitions in Premiere Pro
There are a lot of transitions built inside Premiere Pro to get the desired transition of your choice.
To access the video transitions, click on the “Effects” workspace. This will open a workspace dedicated to effects’ works.
On the right hand side, you can see “Effects” panel. Under that, click on the arrow mark against “Video Transitions” to reveal the options underneath.
As you can see, there are a lot of different transitions like:
- Dissolve
- Slide
- Wipe
- Zoom
- Immersive Video
- 3d motion, etc.
Drag the transition of your choice (let’s say, “Cross Zoom” under “Zoom”) and drop it between edit point of 2 clips.
Click on the transition that you just dropped and open up “Effect Controls” panel by going to the menu “Window” -> “Effect Controls”.
You can further play with the settings to change the duration of the transition, alignment options, etc.
If you need more transitions and effects, you can try third party transition plugins from BorisFX, Red Giant, etc, which could cost you money.
Stylized Effects in Premiere Pro
You can enhance your video with various built in effects in Premiere Pro.
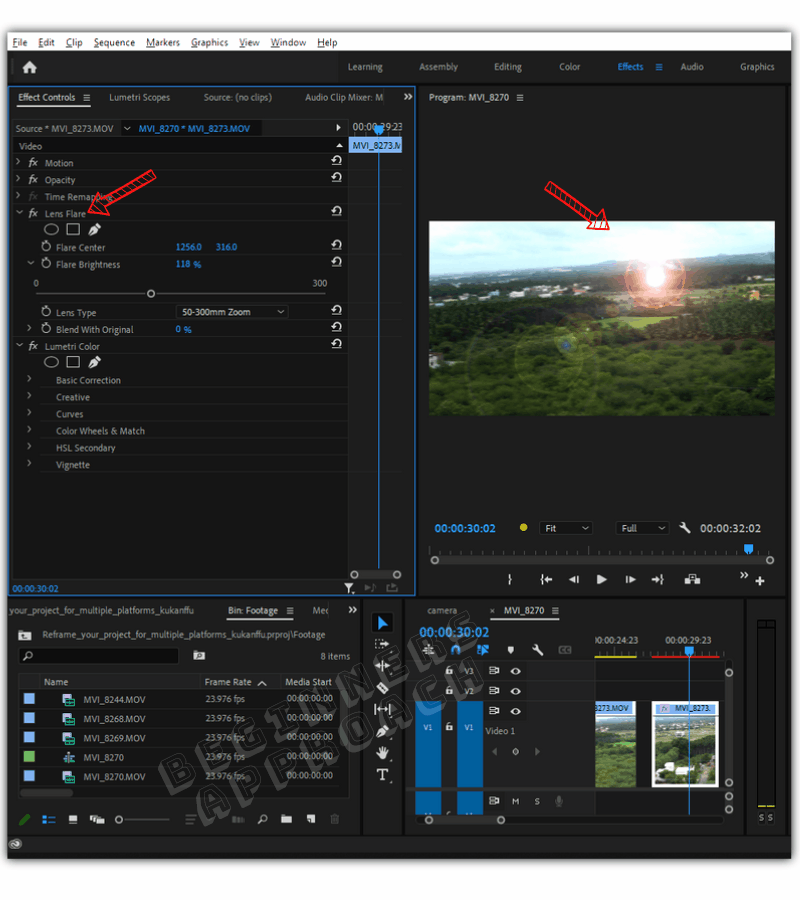
Go to the “Effects” panel. Click on the arrow mark against “Video Effects” to reveal the options underneath.
Choose any effects you want (let’s say, “Lens Flare” under “Generate“), drag and drop it on any clip.
Now, go to the “Effects Controls” panel -> “Lens Flare” and play with the settings like “Flare Center”, ‘Flare Brightness”, “Blend with Original”, etc., till you get the desired look.
There are also dedicated “Stylized” effects under “Video Effects” like:
- Brush strokes
- Find Edges
- Alpha Glow
- Replicate, etc.
Drag and drop them on the clips and get your hands dirty till you get the desired look!
Stylized Motion Graphics Templates from Adobe Stock
You can elevate your videos with the in-built motion graphics templates. You can create catchy intro and outro videos using these templates.
All you have to do is choose your template and then drop it onto the timeline. That’s it!
These motion graphic templates are offered by Adobe stock – which has free as well as premium templates.
To access them, click on the “Graphics” workspace. Then go to the “Essential Graphics” Panel, click on the “Adobe Stock” tab. Click on “Free” or “Premium” as per your choice.
Go through the options. Select the template by clicking on it and then hover your mouse from left to right to preview it (also called scrubbing).
Choose one and drop it on to timeline. (The template is downloaded from adobe stock to your pc).
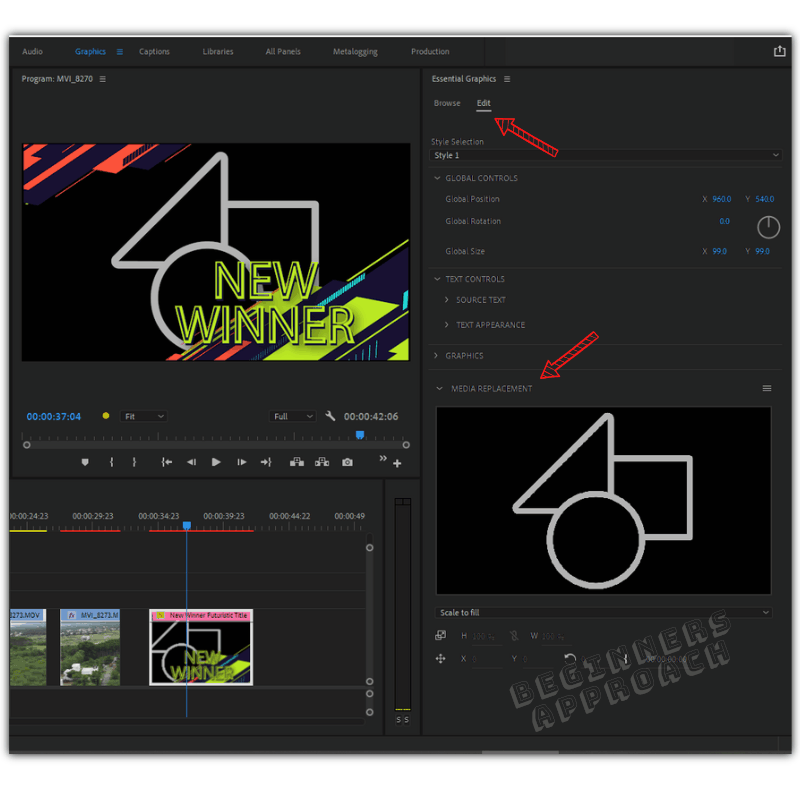
Then click on the graphics template (from the timeline), click on the “Edit” tab next to the “Browse” tab.
Here you can edit and update your text.
In the latest version of Premiere Pro, you can even replace the media with your own (like logo image)! This is an awesome feature.
Basically this “Essential Graphics” panel harnesses the power of Adobe After Effects – which is an advanced visual effects and motion graphics software.
You don’t have to create motion graphics templates in After Effects (which is time consuming). It’s already made available to you inside Premiere Pro in the form of Essential Graphics.
This is a huge time saver.
Stylized Titles in “Essential Graphics” Panel
To make great looking looking titles like lower thirds, film titles, basic titles, you can use the same “Essential Graphics” panel.
You can search for “title” in the search box and go through the various titles available from “Adobe Stock” or “My Templates“.
You can also either buy or try free motion graphics templates (.mogrt) from third-party sites like “MotionArray.com“, “PremiumBeat.com“. They have an extensive collection for Premium Pro.
Adding Sound Effects to Elevate Your Video
Adobe offers free sound effects like foley sounds, atmospheric sounds and other sound effects to enhance your production.
Navigate to these Adobe’s royalty free sound effects and download them for use inside Premiere Pro.
You can download different sound effects like:
- Ambience
- Cartoon
- Crashes
- Drones
- Fire and Explosions
- Horror
- Production Elements, etc.
Premiere Pro’s Essential Sound Panel and Adobe Stock Music
The Premiere Pro includes Adobe stock music right inside the “Essential Sound” panel which can be accessed by clicking on the “Audio” workspace.
Click on “Browse” under the “Essential Sound” panel. You’ll see a lot of sound tracks. You can even filter using “Moods”, “Genres”, etc.
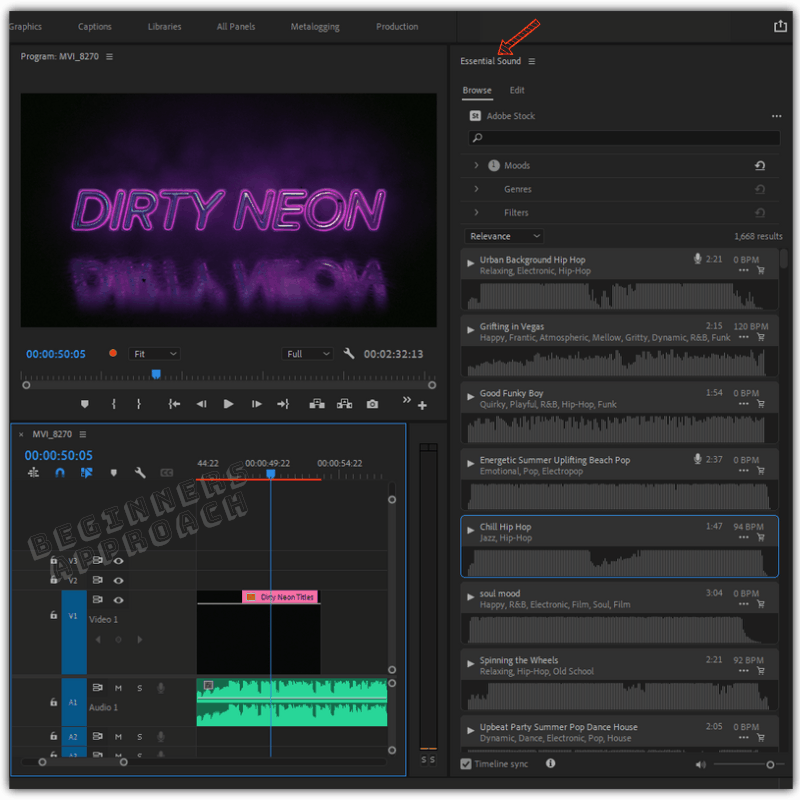
As part of your subscription, you get around 10 free Adobe soundtracks. Apart from that you can purchase license for individual tracks.
Apart from adobe stock music, other premium options include the “FilmStro” plugin which can be accessed inside Premiere Pro for selecting your favorite tracks.
With sound effects, sound tracks and your dialogue ready, you can quickly finish your sound design using “Essential Sound” panel.
Assign your different audio to relevant categories like “Dialogue”, “Music”, “SFX”, and “Ambience” and edit them individually till you get the right sound.
For more detailed information, click on the below post:
Green Sreen Removal For YouTube in Premiere Pro
To remove green screen in Premiere Pro, go to the “Effects” panel, click on the “Video Effects” -> “Keying” and select “Ultra Key”.
Drag and drop it onto the green screen footage in the timeline. Go to the “Effect Controls” panel and click on the eye-dropper tool against “Key color”. Then click on the green screen in the program monitor.
Green screen should now be removed. Play with the settings till you get the clean output.
Get the Film Look of your Choice Using “Lumetri Color”
Getting the film look is easy and quick with the help of Premiere Pro’s Lumetri Color.
Click on the “Color” workspace. You’ll find “Lumetri Color” panel in the right hand side.
If you’re a newbie and need to quickly get started, then the best tutorial is the interactive one inside Premiere Pro “Learning” workspace.
The name of the tutorial is “Creative and Stylistic Edits” -> “Adjusting the Color of Clips”.
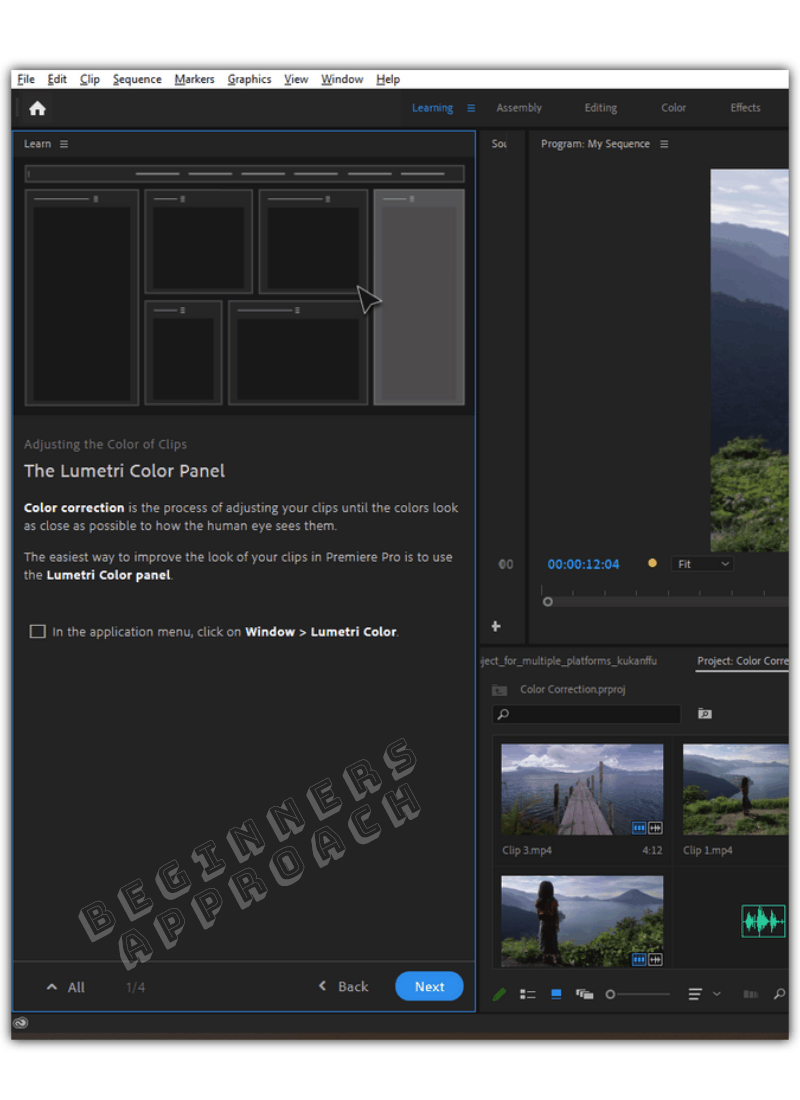
Follow the steps and you should be able to color correct and color grade your footage in no time.
If you want more advanced color grading and film simulation, you can try “FilmConvert” plugin for Premiere Pro which is a paid version.
After finishing your editing, sound, stylized titles, color correction, etc, export the sequence to mp4 with H.264 codec with resolution of your choice (say 4K UHD – 3840 x 2160p).
Then the last step would be uploading your video to YouTube and publishing it to the world.
Concluding Thoughts
Hopefully, now you should have an understanding of the various features inside Premiere Pro, specifically needed for YouTube, which should motivate you to explore further.
Adobe Premiere Pro is an excellent choice for making great looking YouTube videos.
But it comes with a monthly subscription price which could be costly. People on a budget could consider Hitfilm Express or DaVinci Resolve which are free.
Other than pricing, you can quickly get started and leverage Premiere Pro’s excellent features for your YouTube journey.
You may also like the below post: