One of the fundamentals of editing is knowing how to change your video’s resolution – width, and height in Premiere Pro.
You should know the frame size (resolution) before creating a new project (even before shooting).
This is essential for your final delivery – like YouTube, Vimeo, Instagram, Film Festival, Cinema Projection, etc.
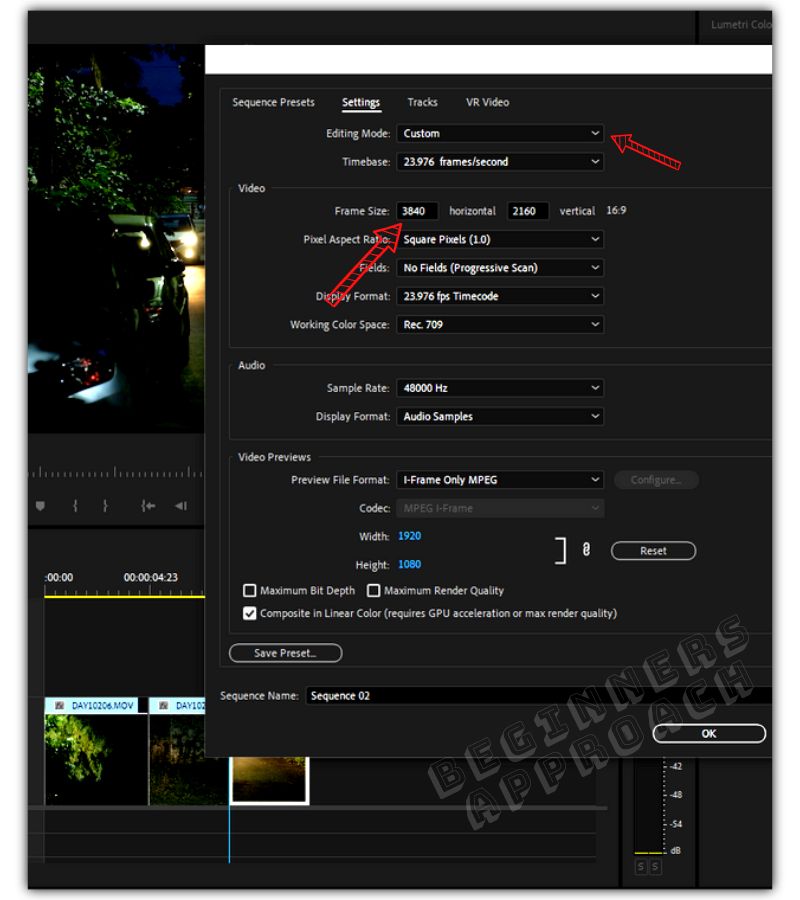
To change the resolution in Premiere Pro, create a new Sequence by going to “File” > “New” > “Sequence”. Click on the “Settings” tab. Select “Editing Mode” to “Custom“. Against “Frame Size“, change the horizontal and vertical resolution to, say, “3840” and “2160” for a 4K UHD project.
Now let’s go through the detailed – step-by-step process.
But before that…
The next thing you should know is the aspect ratio (the shape of your video). Your resolution determines your aspect ratio and vice versa.
You must know what aspect ratio is needed for your final delivery.
| Final Delivery Look | Aspect Ratio | Aspect Ratio (in Decimal) | Width (Horizontal) | Height (Vertical) |
|---|---|---|---|---|
| Old TV Look | 4:3 | 1.33:1 | 1920 | 1443 |
| Common Wide Look 1080p | 16:9 | 1.78:1 | 1920 | 1080 |
| Common Wide Look 4K UHD | 16:9 | 1.78:1 | 3840 | 2160 |
| Common Wide Look 8K UHD | 16:9 | 1.78:1 | 7680 | 4320 |
| 35mm Motion Picture Standard – Hollywood Movies for 4K UHD | 1.85:1 | 3840 | 2075 | |
| Widescreen Cinema Standard – Hollywood Movies for 4K UHD | 2.35:1 | 3840 | 1634 | |
| IMAX for 4K UHD | 1.43:1 | 3840 | 2685 | |
| Square Look | 1:1 | 1:1 | 1080 | 1080 |
| YouTube Shorts, Instagram Stories – Vertical Videos | 9:16 | 0.56:1 | 1080 | 1920 |
For a detailed step-by-step guide on changing aspect ratio in Premiere Pro, click on the below helpful guide:
There are two scenarios based on which you might need to change the resolution:
1. While creating a new sequence – when you will start a new timeline for editing.
2. For already existing sequences – when you are in the middle of editing.
How to Change Resolution in Premiere Pro For a New Sequence?
- Create a new Sequence by going to the menu “File” > “New” > “Sequence”. (Shortcut for the new sequence is “Ctrl + n” or “Cmd + n”).
- The “New Sequence” window will open up.
- Click on the “Settings” tab (next to the “Sequence Presets”).
- Select “Editing Mode” to “Custom“.
- Against “Frame Size“, change the horizontal and vertical resolution to, say, “3840” and “2160” for a 4K UHD project.
- Click on the “Ok” button.
- You have successfully changed the resolution!
How to Change Resolution in Premiere Pro For an Already Existing Sequence?
- In the “Editing” workspace, go to the “Project Panel“.
- Right-click on the sequence that needs to be updated and select “Sequence Settings”.
- The “Sequence Settings” window will be displayed.
- Against “Frame Size“, change the “horizontal” and “vertical” resolution to, say, 1920 and 1080 for a 1080p HD project.
- Click on “Ok“. Done!
To make a 1920 x 1080 video in Premiere, you need to set the “Horizontal” and “Vertical” values to “1920” and “1080” respectively, against “Frame Size” in the “Sequence Settings” window.
(To get the sequence settings, right-click on the existing sequence and click “Sequence Settings” or go to “File” > “New” > “Sequence”, for a new one).
You can update the resolution in the middle of your editing through the above steps.
How to Change the Video or Frame Size in Premiere Pro?
To change the frame or video size, create a new Sequence by going to “File” > “New” > “Sequence”. In the “New Sequence” window, click the “Settings” tab. Set the “Editing Mode” to “Custom“. Against the “Frame Size“, change the horizontal and vertical resolution to, say, “1920” and “1080” for an HD project.
(Changing the video size or the frame size, or the resolution – all mean the same thing.)
How to Change Project Resolution in Premiere Pro?
A project is a collection of sequences. You can change the resolution of a sequence that you’re editing by going to the “Editing” workspace > “Project Panel”. Right-click on your required sequence, and select “Sequence Settings”. Against “Frame Size”, change the “horizontal” and “vertical” resolution to, say, 3840 and 2160 for a UHD project.
You may also be interested in the below posts:
7 Reasons Why Premiere Pro is GOOD for Audio Editing