Screen recording is a very useful feature, especially for beginners, gamers, YouTube content creators, etc.
Today we’ll see if Premiere Pro can record (capture) your screen. Plus, many helpful tips to get you started in the right direction.
Premiere Pro can not record screen. It doesn’t support screen video recording functionality. Alternatively, use a screen recording software like OBS with the best settings for Premiere Pro. Make sure the output file format of the screen recorder is recognized by Premiere Pro.
(Read on to find out – how to ensure Premiere recognizes the output file format of screen recording software.)
- How To Screen Record Directly into Premiere Pro?
- Best Screen Recording Software for Premiere Pro
- How to Download OBS Studio for Free?
- How to Setup OBS Studio for the First Time?
- Best OBS Recording Settings for Premiere Pro
- How to Record Your Screen in OBS Studio?
- How to Convert MKV format into MP4/MOV Inside OBS Studio?
- Does Premiere Pro Support OBS Studio Files?
- How to Add OBS Videos to Premiere Pro
- OBS Videos Troubleshooting for Premiere Pro
- Before You Go
How To Screen Record Directly into Premiere Pro?
Recording video directly inside Premiere Pro is not possible, however you can directly record the audio inside. The in-app screen recording feature is not yet available in Adobe Premiere Pro.
If you need to record your screen or live stream, then you will have to use dedicated screen recording applications.
After recording your videos, you need to bring them back inside Premiere Pro and start editing because most screen recording applications don’t support video editing.
There are a lot of free and premium video recorders like:
- OBS Studio
- Movavi Screen Recorder
- Flashback Express
Best Screen Recording Software for Premiere Pro
One of the best free screen recording software for Premiere Pro is OBS Studio. A lot of Youtubers and gamers recommend it. It is a perfect screen recorder and also supports live streaming. You can change the settings inside OBS Studio to make sure the recording is compatible with Premiere Pro.
Related Article:
How to Download OBS Studio for Free?
- Navigate to OBSProject.com
- Select your OS.
- The download installer should start automatically.
- Double-click on the installer and finish the installation.
How to Setup OBS Studio for the First Time?
When you launch OBS for the first time, it will launch “Auto-Configuration Wizard” and ask you to select one option out of the 3:
- Optimize for streaming, recording is secondary.
- Optimize just for recording, I will not be streaming.
- I will only be using the virtual camera.
Choose your desired option, like “Optimize just for recording...” and click on “Next“.
In the next window,
- Select your base resolution, like “1920 x 1080” based on your monitor resolution/content resolution.
- Select FPS value based on your needs. If you are planning for 60 FPS, then select 60 only.
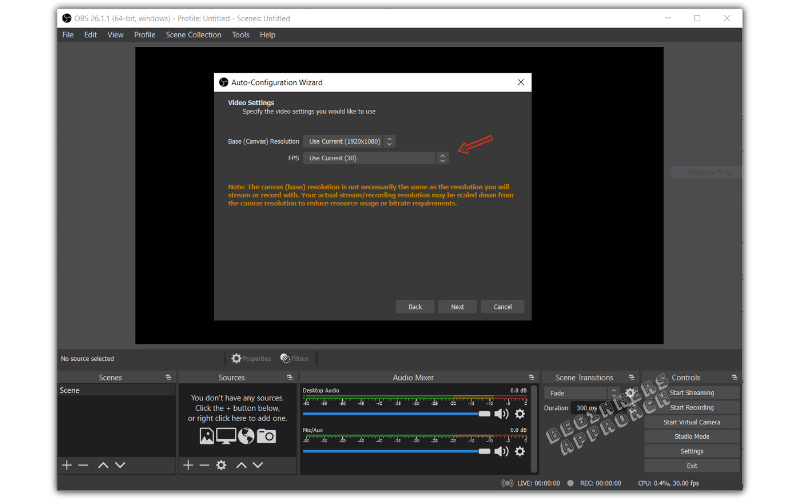
Don’t select “Either 60 or 30, but prefer 60 when possible” or “Either 60 or 30, but prefer high resolution”.
Because selecting these can lead to variable frame rate issues, which sometimes can result in audio and video being out-of-sync with each other.
Best OBS Recording Settings for Premiere Pro
There are a few settings in OBS that needs to be set right, if not:
- It can cause out-of-sync or offline media issues.
- We will not be able to import footage into Premiere Pro.
After launching, click on the “File” > “Settings” . The “Settings” window will be displayed. This is where you update the settings so that your recording works well with Premiere Pro.
The best OBS settings for Premiere Pro:
Output Tab
- Click on the “Output” tab.
- Under the “Recording” section, for “Recording Format,” the default setting will be “.mkv”. But Premiere Pro doesn’t support “.mkv”. (If you try to import, you’ll get a “File format not supported” error message).
- You can do 2 things here. Either you can select “mp4,” which is recognized by Premiere Pro, but you will get a warning from OBS saying, “Recordings saved to Mp4/MOV will be unrecoverable if the file cannot be finalized…”.
- Or let the recording format be “mkv” and later, remux (convert) the file into mp4 inside OBS studio. (This is the best option, and we’ll see how to do it in a few minutes).
- For “Encoder” > select “Hardware (NVENC)” ( or VCE for AMD) – OBS will use your GPU for faster encoding or rendering of your recorded file.
Video Tab
- Click on the “Video” tab.
- Update your “Base (Canvas) Resolution” to match your monitor resolution – generally 1920 x 1080. This is more of a design/layout option.
- Update your “Output (Scaled) Resolution” to “1280 x 720” – This is the output resolution at which your recording will be encoded or rendered.
- Set the “Downscale Filter” to “Lanczos” which will give you a high-quality video after encoding, but it will take more time compared to “Bilinear”.
OBS Studio recommends downscaling your output resolution since encoding is a CPU-heavy task. If your content resolution or monitor resolution is 1920 x 1080, then downscale it to 1280 x 720 to reduce the CPU load.
(But if you have a powerful GPU, then you can set the output resolution the same as the base resolution because OBS will use your GPU for encoding purposes).
Make sure the aspect ratio is the same for both base and output resolution. If not, it can introduce black bars.
How to Record Your Screen in OBS Studio?
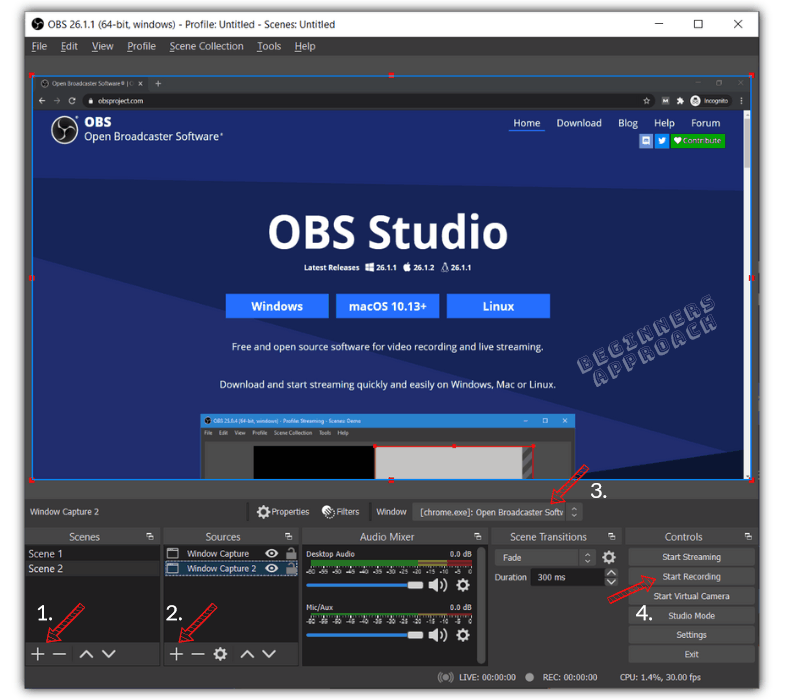
- Under “Scenes“, click on the plus button to create a scene. Enter any relevant name.
- Under “Sources“, click on the plus button to create a source.
- Choose your desired window from the dropdown. Select “Window Capture” if you want to record your desktop, which should contain your desired window. (or “Game Capture” to record desktop games like “Fortnite”.)
- Click on “Start Recording“.
- Record your actions.
- Stop your recording.
- Go to “File” -> “Settings” -> “Output” -> “Recording Path”, to find your recorded file in your computer.
(Do a few recordings with different settings like base resolution, output resolution to check everything is correct as expected before any serious recording or streaming).
The output file will be generated with the extension “.mkv“.
Since Premiere Pro doesn’t support mkv, you’ll have to convert the file into mp4 or mov.
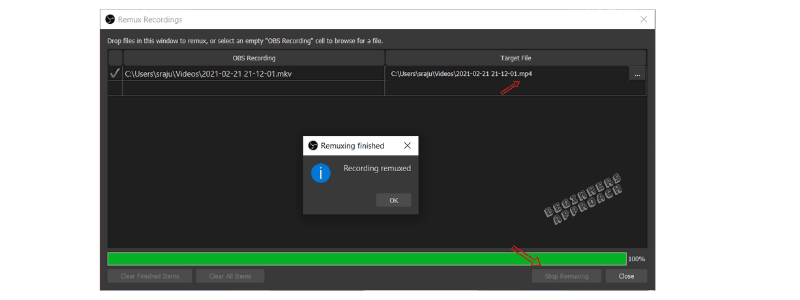
How to Convert MKV format into MP4/MOV Inside OBS Studio?
- Go to “File” -> “Remux Recordings” in the OBS Studio.
- Under “OBS Recording” (the first column), click inside the first row and then click on the 3 dots to open up windows pop up. Choose your mkv file from the saved location.
- Under “Target File“, you’ll automatically see the same file name with the mp4 extension. (To change it to mov, click on the 3 dots to its right and type .mov and save).
- Click on “Remux“.
- The file is converted to mp4 or mov (or to your desired file extension).
Does Premiere Pro Support OBS Studio Files?
Premiere Pro supports OBS Studio files as long as they are NOT in flv or mkv format. Adobe Premiere can support OBS Studio files in mp4, mov, etc.
How to Add OBS Videos to Premiere Pro
After you successfully record your screen in OBS Studio, it’s time for you to edit, color correct and add some music and sound effects to it.
Like any other supported video files, you can import OBS videos inside Premiere Pro.
- Launch Premiere Pro.
- Go to the “Assembly” or the “Editing” workspace.
- Go to the menu “File” > “Import” (or press “Ctrl + i” shortcut) and choose your desired file with extension “.mp4”.
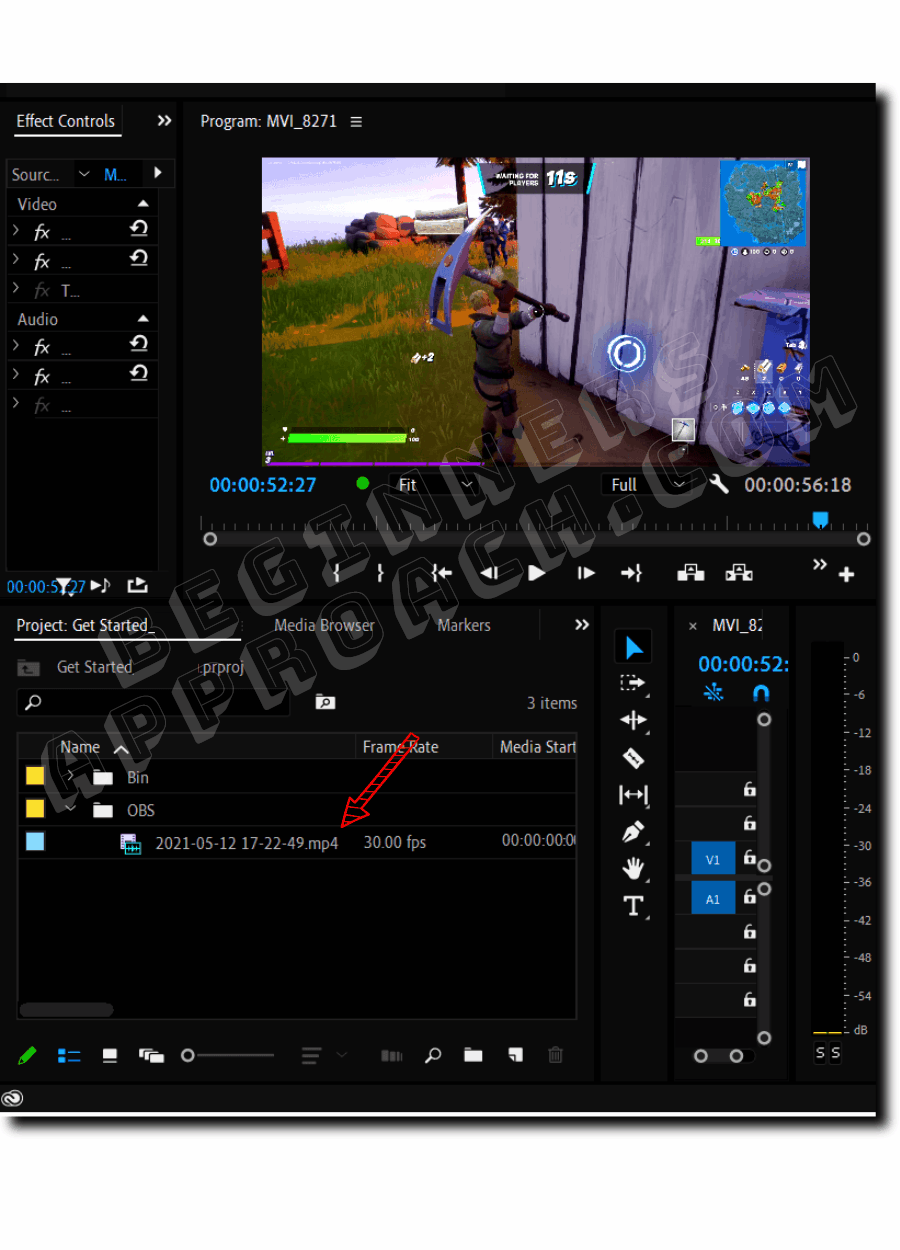
- The file will now be imported and will be placed in your “Project” panel.
- You can drag and drop the file onto your timeline like any other video clip and start editing it!
OBS Videos Troubleshooting for Premiere Pro
As discussed earlier, you’ll have to make sure you get the settings right before recording in OBS Studio. Some common problems are:
Not Able to Import My OBS Videos in Premiere Pro
Whenever you have your OBS file extension as either flv (flash video format) or mkv (Mastroska format), Premiere Pro can’t import these extensions.
- You’ll either have to remux the recordings to supported formats like mov or mp4 inside OBS before importing to Premiere Pro. Or…
- Transcode the mkv or flv file using the Handbrake application and then import it into Premiere Pro as mp4 or mov. You can even use the FFMPEG utility to transcode the files to Prores or DNxHD, which are editor-friendly codecs.
OBS Video & Audio are Out of sync in Premiere Pro
You are able to import OBS videos successfully but are seeing
- The video and audio are out of sync.
This is because the OBS files could have been recorded using variable framerates.
This usually happens when you select FPS values as:
- “Either 60 or 30, but prefer 60 when possible” or
- “Either 60 or 30, but prefer high resolution”.
… instead of explicitly 30 or 60 FPS.
This is generally seen in recording your screen during gaming which has frames that are of very high speed, because of which there might be a drop in frames.
Which automatically results in variable frames (and out of sync audio video).
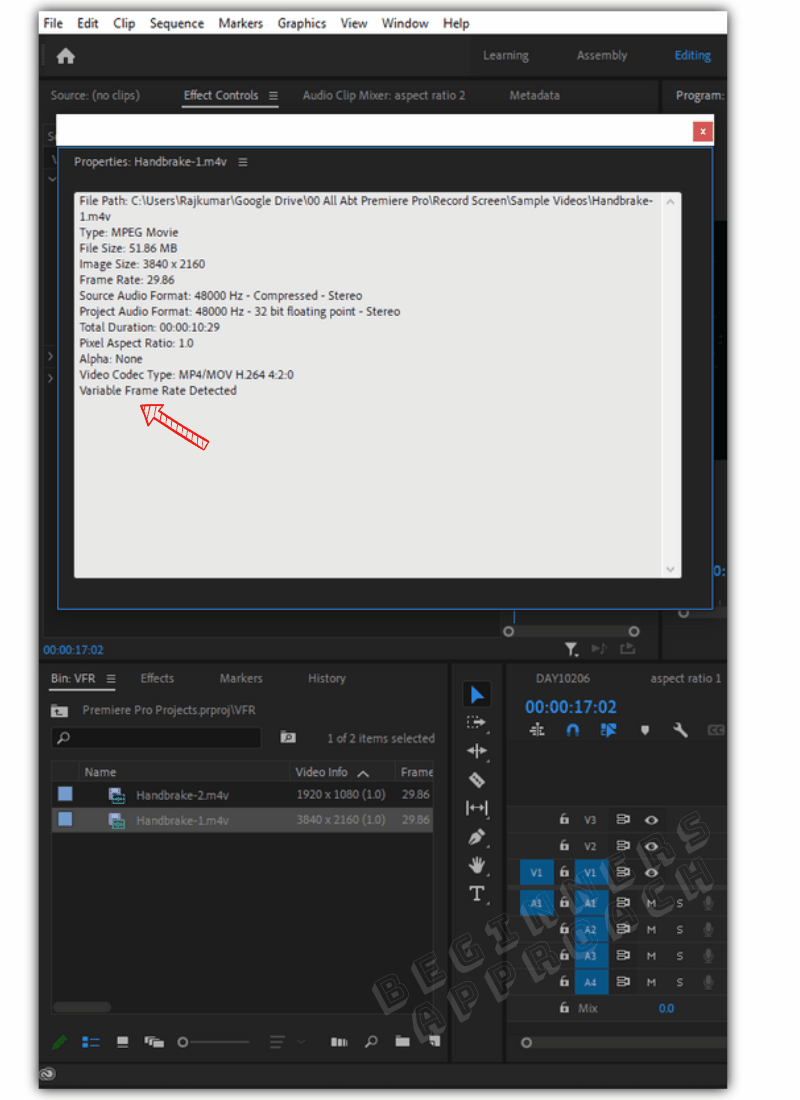
How to Check Variable Frame Rate in Premiere Pro
- Import the footage into the “Project” panel either in the “Assembly” or “Editing” workspace.
- Right-click on the footage and select “Properties”.
- Premiere Pro will display “Variable Frame Rate Detected” if your footage is one. Else it won’t be displayed, which means it’s a constant frame rate one.
How to Convert Variable Frame Rate Video into Constant Frame Rate for Premiere Pro
#1. Navigate to the “Handbrake” website.
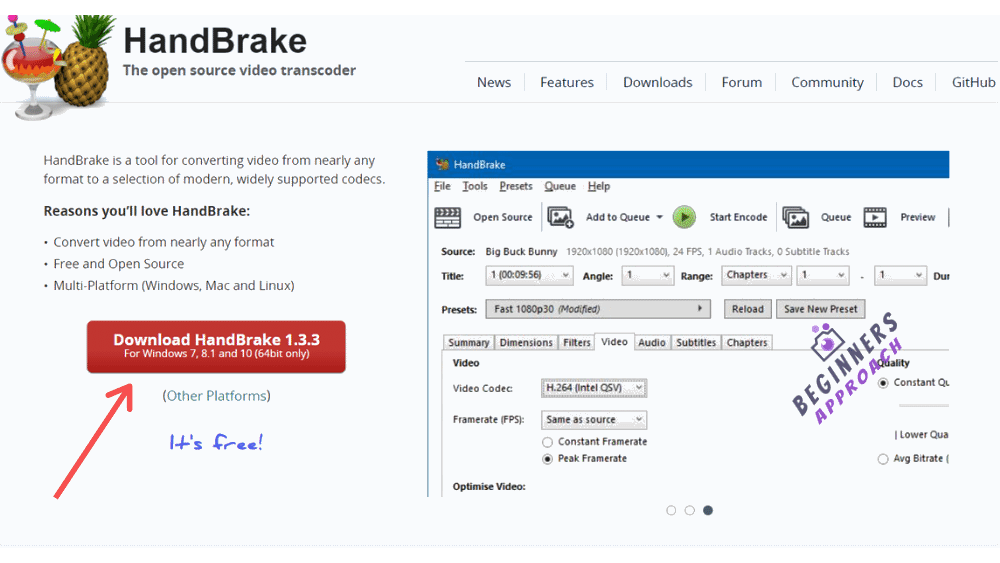
#2. Go to the “Download” section and select the installer file based on your OS.
#3. Install the setup and launch the application.
#4. Go to “File” > “Open Source” > Select your video file.
#5. Select the required “Preset” (Most probably you will find your required resolution under the “Web” or “General” menu).

#6. Head over to the “Video” tab -> Select your required framerate from “Video Codec”.
#7. Then select the “Constant Framerate” radio button.
#8. Click on “Start Encode” on the top.
#9. After the re-encoding is complete, import the footage into Premiere Pro and check its “Properties“. “Variable Frame Rate Detected” should not be displayed!
Before You Go
Now that you know Premiere Pro doesn’t record the screen (and you need to come up with work-arounds), the next step would be to learn about changing the resolution and aspect ratio. I highly recommend the below detailed guides to get you quickly started on the subject:
Quickly Change Resolution & Aspect Ratio in Premiere Pro (in 1 Min)