If you’re a beginner or newcomer to DaVinci Resolve (versions 18.5, 18, 17, etc.), today’s guide will show you how to add images to the video in Resolve.
To add an image to a video in DaVinci Resolve, first, import the images by selecting Individual Frame Display Mode on the “Media” page. Then place your video on video track 1 in the timeline. Next, from the “Media Pool”, drag and drop your image on top of the video, creating a new video track number 2.
Then you can go to the “Inspector” tab to further transform, crop, choose a composite mode or change the transparency of your image.
Read on for a detailed step-by-step guide with images for a better understanding.
We’ll also look at making an image transparent, taking a picture, and related issues & fixes!
- How to Add Image to a Video in DaVinci Resolve?
- How to Add an Image to Timeline in DaVinci Resolve?
- How to Make an Image Transparent in DaVinci Resolve?
- How to Take a Picture in DaVinci Resolve?
- How to Insert an Image Directly into the Timeline in Resolve?
- How to Overwrite an Image Directly into the Timeline in Resolve?
- How to Replace an Image Directly into the Timeline in Resolve?
- How to Sharpen Image in DaVinci Resolve?
- Quickly Implement a Border for an Image in DaVinci Resolve
- How to Export an Image in DaVinci Resolve?
- Issues While Adding Images in DaVinci Resolve
How to Add Image to a Video in DaVinci Resolve?
Step 1. Import Image into DaVinci Resolve
- Launch DaVinci Resolve.
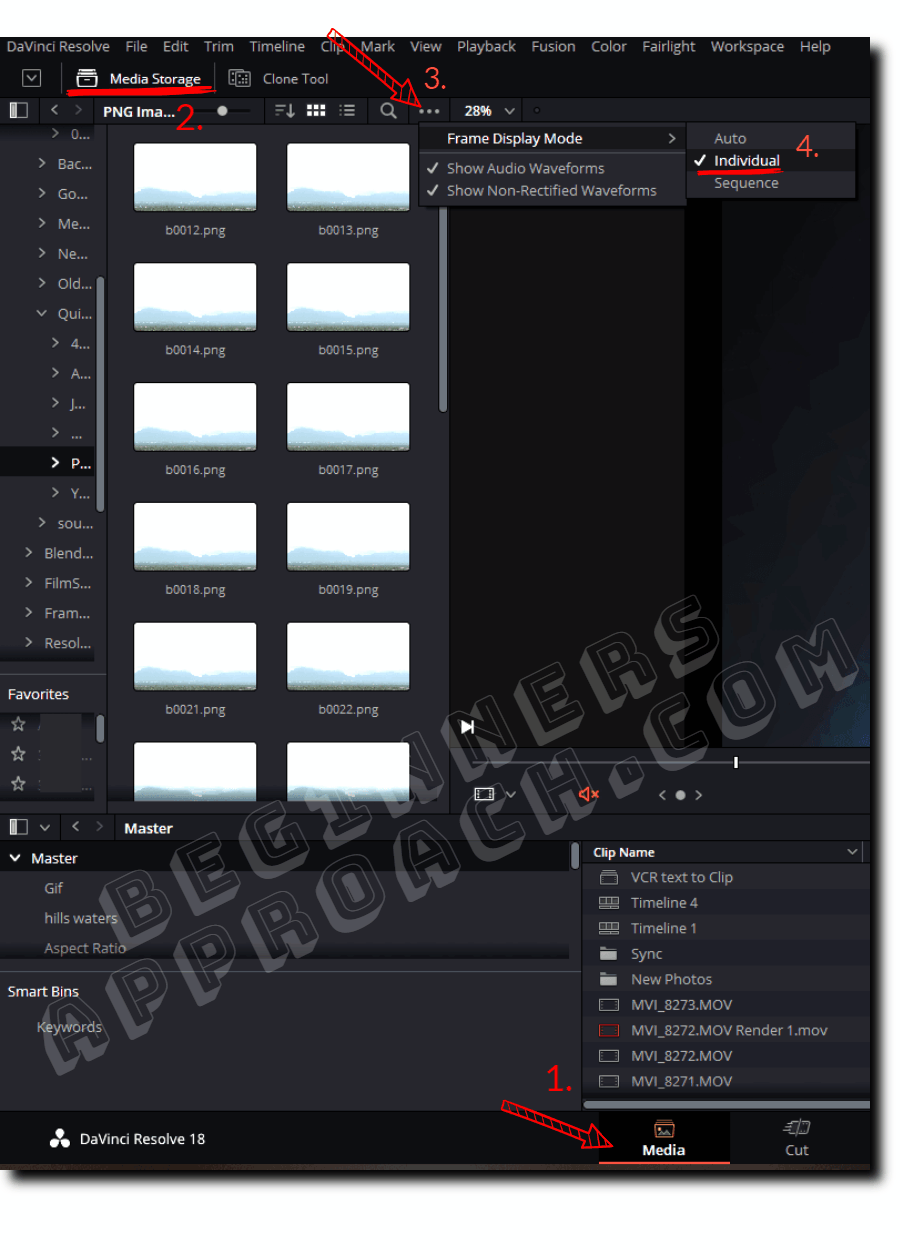
- Click on the “Media” page. (See the screenshot below)
- Click on the “Media Storage” tab from the top.
- Click on the 3 dots and select “Frame Display Mode” > “Individual”.
- Select the location of your images from the left-hand side, which displays all your connected hard disks.
- Select all of your images, right-click, and select “Add into Media Pool”.
- Click on the “Edit” or “Cut” page, click on “Media Pool”, and you’ll see all the imported images in the “Master” bin.
Key things to note:
Frame Display Mode – Individual. This will display individual images instead of clubbing them together as an image sequence. Previously this was known as “Show Individual Frames” in the earlier versions of DaVinci Resolve.
This option will ensure you get a single image when you drop it in the timeline. If it were set to “Auto” or “Sequence”, chances are that when you drop the image into the timeline, you might get a series of images which is totally unnecessary.
Click here for a detailed step-by-step guide on importing and exporting image sequences in Resolve.
#2) Add the Video to the Timeline
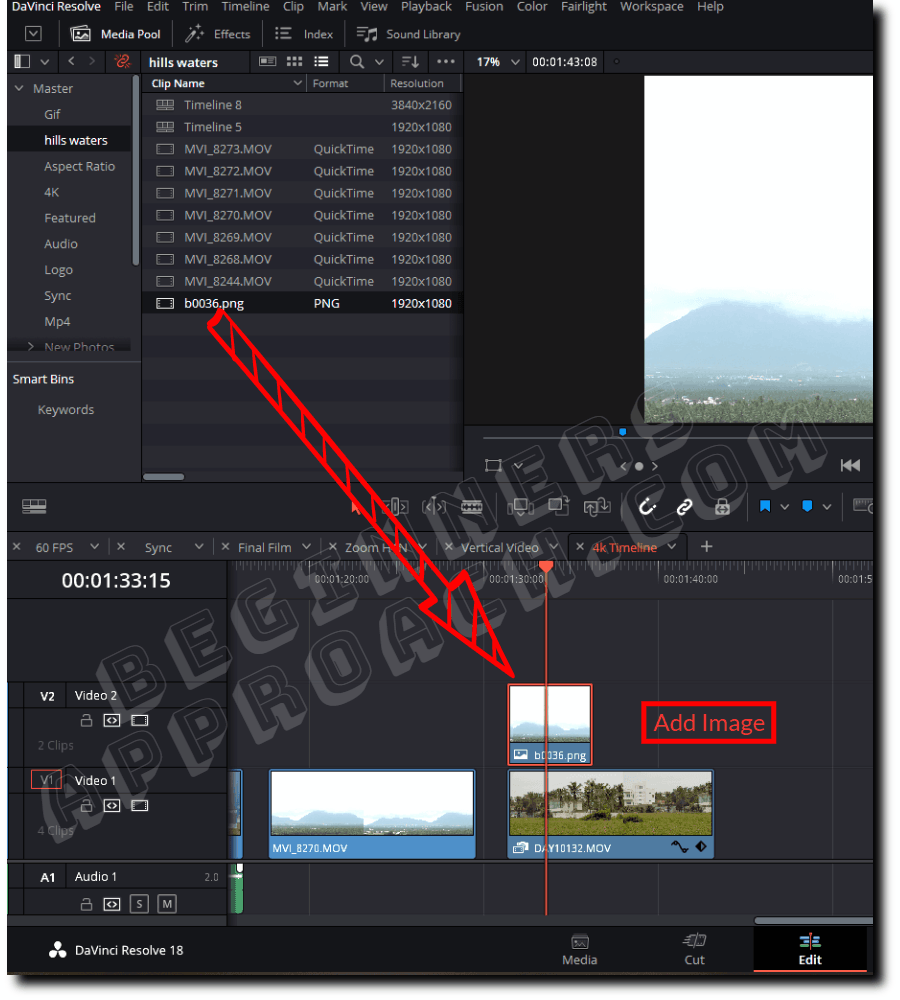
Go to the “Edit” page. From the “Media Pool”, pick your desired video and drag it into the timeline. A new video track, number 1, will be created.
#3) Overlay the Image On Top of The Video
From the “Media Pool”, drag and drop your image on top of the video in the timeline. A new track – video 2 – will be created.
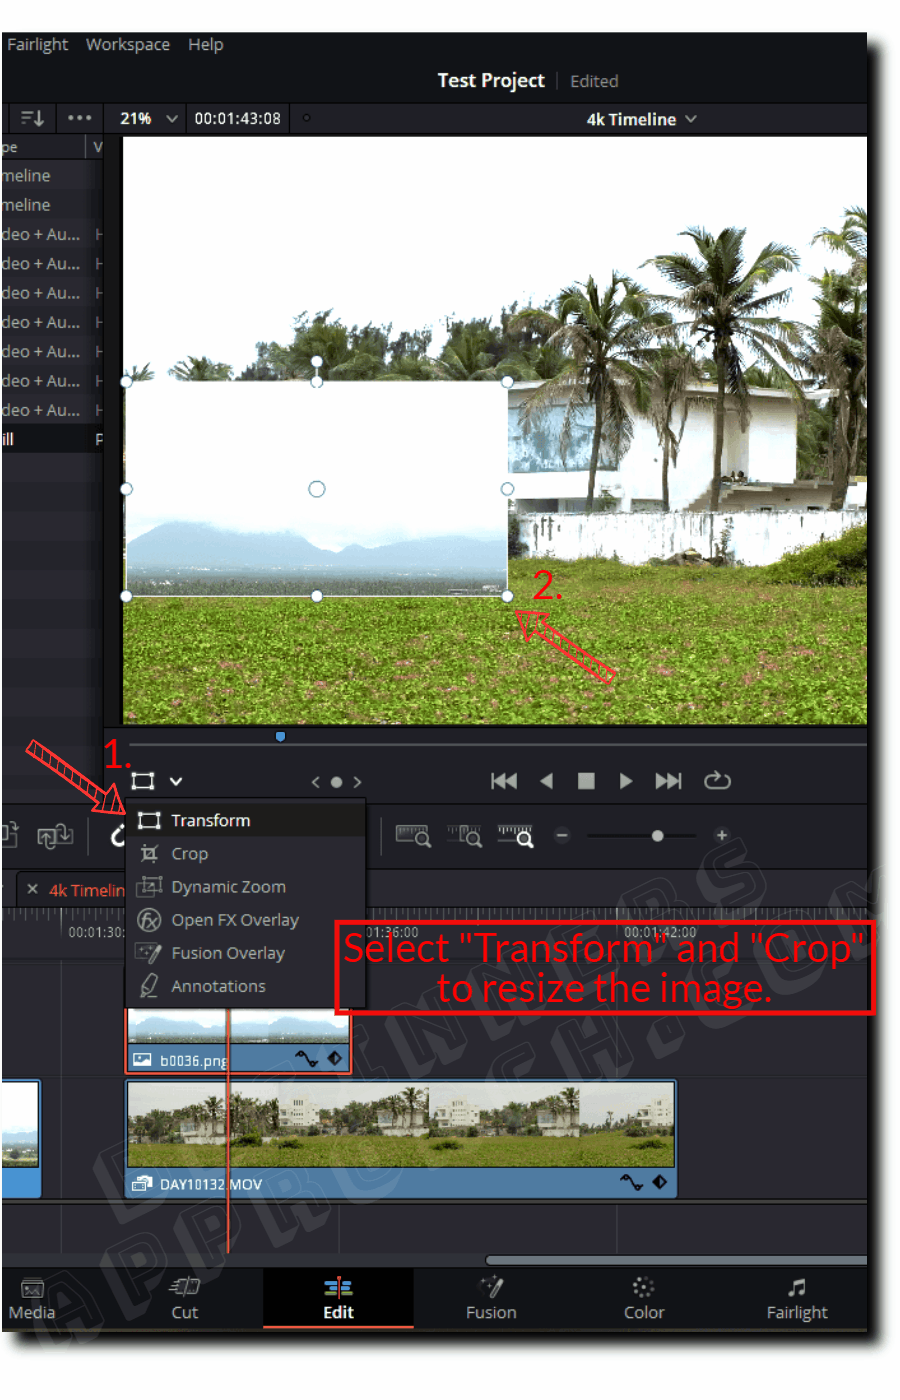
#4) Resize the Image According to Your Requirement
Click on the image in the timeline. Then go to the bottom left corner of the timeline viewer. From the dropdown, click on “Transform”. The image will now have a white border with handles.
Grab the handle to zoom in/out, re-position, and rotate the image to fit your requirements.
For more information on editing your images, read the below step-by-step guides:
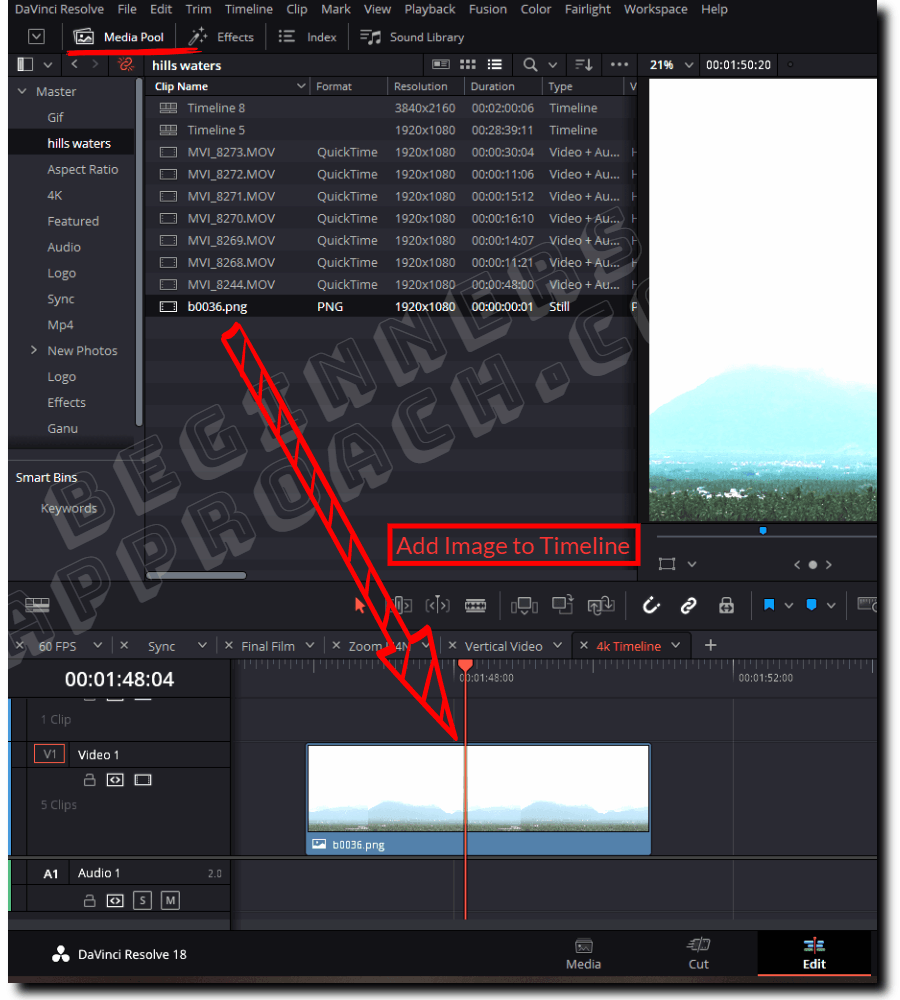
How to Add an Image to Timeline in DaVinci Resolve?
- Go to the “Media Pool” on the “Edit” page.
- Press “Ctrl + i” (or “Cmd + i”) to open the import popup.
- Select all the required images and import them.
- Drag and drop your image onto the timeline.
- A new timeline with a video track will be created automatically.
Now that you know how to add an image to the timeline (on top of a video), it’s time to go to the next set of operations.
How to Make an Image Transparent in DaVinci Resolve?
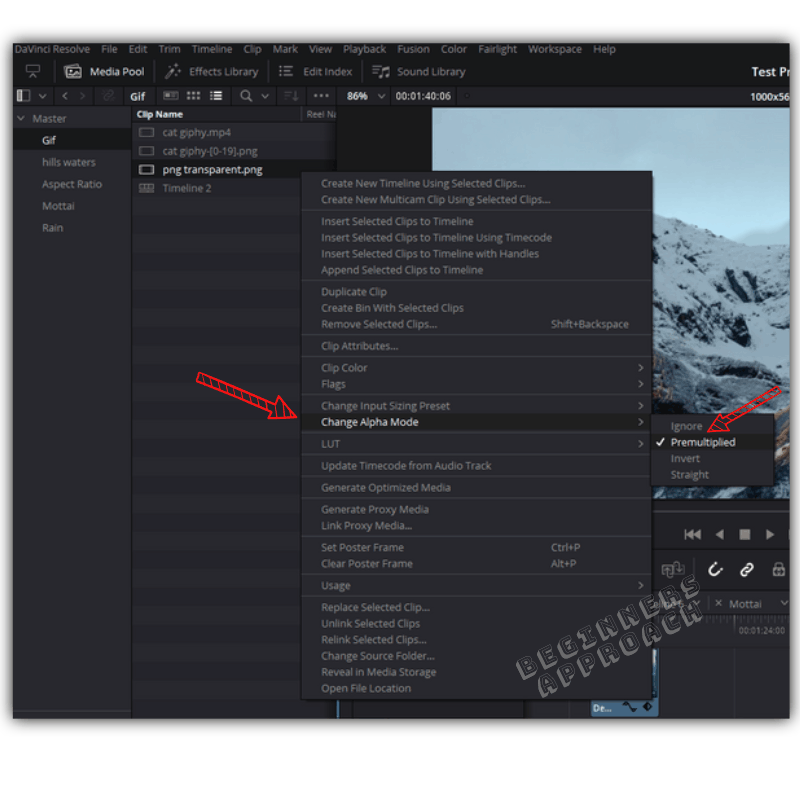
- Import the image (preferably png format) image into the “Media Pool” under the “Edit” page.
- Right-click on the image.
- Click on the “Change Alpha Mode” > select “Straight” or “Premultiplied“.
- Drag and drop the image into the timeline, preferably above a video track.
For more information, read the below step-by-step guide:
DaVinci Resolve PNG: Add, Transparent, Export (+ FIX Issues)
Grabbing a still in DaVinci Resolve is easy. This is how you do it step-by-step.
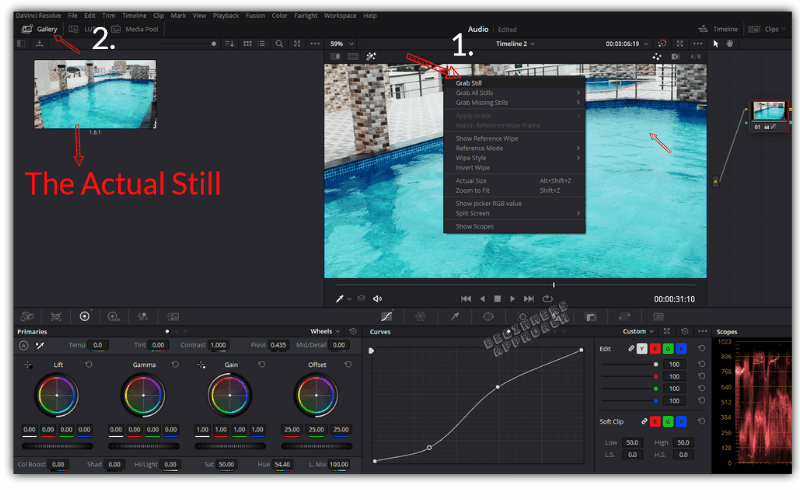
How to Take a Picture in DaVinci Resolve?
- Under the “Edit” page, select your desired video clip or image.
- Go to the “Color” page.
- Right-click on the viewer and select “Grab Still“.
- Click on the “Gallery” tab (left-hand side) to reveal the screenshot.
How to Insert an Image Directly into the Timeline in Resolve?
- Place the playhead in the timeline where you would like to insert the image.
- Select the image from the “Media Pool” or double click it to bring it to the “Source Viewer”.
- Press the “F9” shortcut key to insert the clip directly into the timeline.
- “Insert” operation will push the clips to the right.
How to Overwrite an Image Directly into the Timeline in Resolve?
- Place the playhead in the timeline where you would like to overwrite the image.
- Select the image from the “Media Pool” or double click it to bring it to the “Source Viewer”.
- Press the “F10” shortcut key to overwrite the clip directly into the timeline.
- “Overwrite” will not push the clips to the right rather will overwrite any other clip with the selected clip.
How to Replace an Image Directly into the Timeline in Resolve?
- Select the clip in the timeline which you would like to replace the image from “Media Pool” or “Source Viewer”.
- Select the image from the “Media Pool” or double click it to bring it to the “Source Viewer”.
- Press the “F11” shortcut key to replace the clip directly into the timeline.
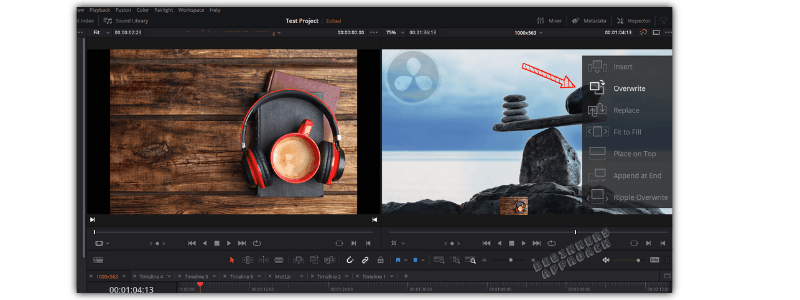
There is also one another way to – insert, overwrite, replace, fit to fill, place on top, append at end, ripple overwrite.
Drag the image the “Source Viewer” and place it on the “Timeline Viewer”, Resolve will bring up options for you to choose.
You simply need to drop on the required option to execute that particular operation.
Before executing this, make sure you place the playhead to where you want the operation to be executed in the timeline.
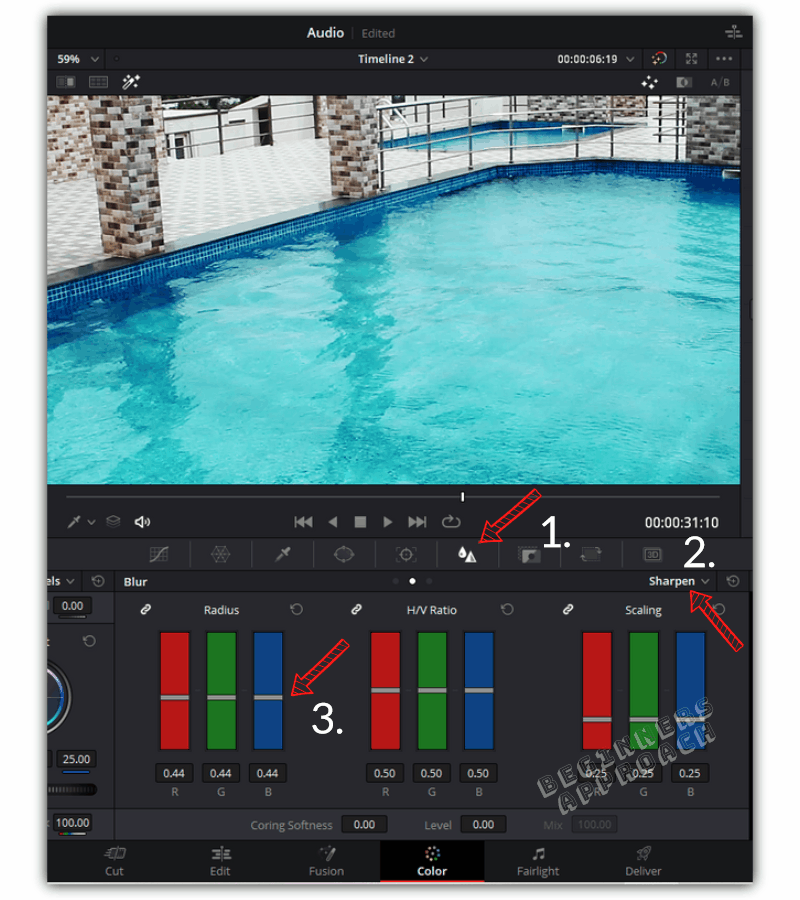
How to Sharpen Image in DaVinci Resolve?
- Under the “Edit” page, Import your desired image and place it on a timeline.
- Go to the “Color” page.
- Click on the “Blur” button.
- From the right side dropdown, select “Sharpen“.
- Adjust the “Radius” knob to, say, 0.44, to get some good sharpening.
- Play with other settings till you get your desired result!
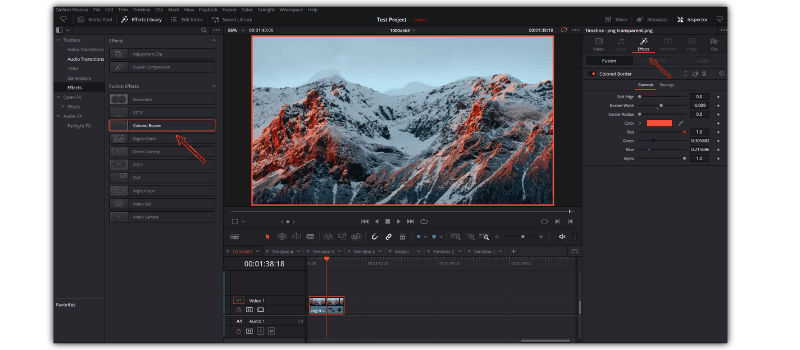
Quickly Implement a Border for an Image in DaVinci Resolve
Implementing an image border is very simple in DaVinci Resolve 17.
- Under the “Edit” page, Import the desired image and place it on the timeline.
- Click on the “Effect Library“.
- Click on the “Effects” option under “Toolbox” from the left.
- Under “Fusion Effects“, click “Colored Border“, and drag & drop it onto the desired image.
- Click the image on the timeline.
- Click on the “Inspector” tab > click on the “Effects” tab.
- Adjust the various settings and colors to get the border of your taste!
How to Export an Image in DaVinci Resolve?
- After grabbing a still from the video clip on the “Color” page, click on the “Gallery” tab.
- Locate your still and right-click it.
- Select “Export“.
- From the “Export Stills” window, choose your destination folder to save the still.
- Enter a name in the “Export” field.
- Select an extension (let’s say, png or jpg) from the “Save as type” dropdown.
- Click on “Export“.
For a detailed step-by-step guide with pictures, read the below post:
Issues While Adding Images in DaVinci Resolve
Issue 1: When you drag an image into the timeline, nothing happens. You don’t see the image placed in the timeline.
Fix: Disable and enable the video track. Or delete the existing track and create a new video track for the image.
Issue 2: Unable to import a single image. The images are always combined in a sequence.
Fix: Go to the “Media Pool” and delete the image. Now again, go to the “Media” page > “Media Storage“. Click on the 3 dots and select “Frame Display Mode” > “Individual”. Again import the images. This will ensure individual images are imported without combining or clustering.
(See the first screenshot above).
More and more of this kind of instructional content is moving to video tutorials, which are impossible to quickly search, and take much longer to consume than well-written, well-organized text. This helped incredibly to find the settings that I was looking for within seconds. Thanks, and keep up the good work!
Thanks for your wonderful comment!