
DaVinci Resolve supports PNG image file formats on Windows, MacOS, and Linux. You can import, edit, and export PNG in the free version of Resolve. PNGs have alpha channel information for transparency.
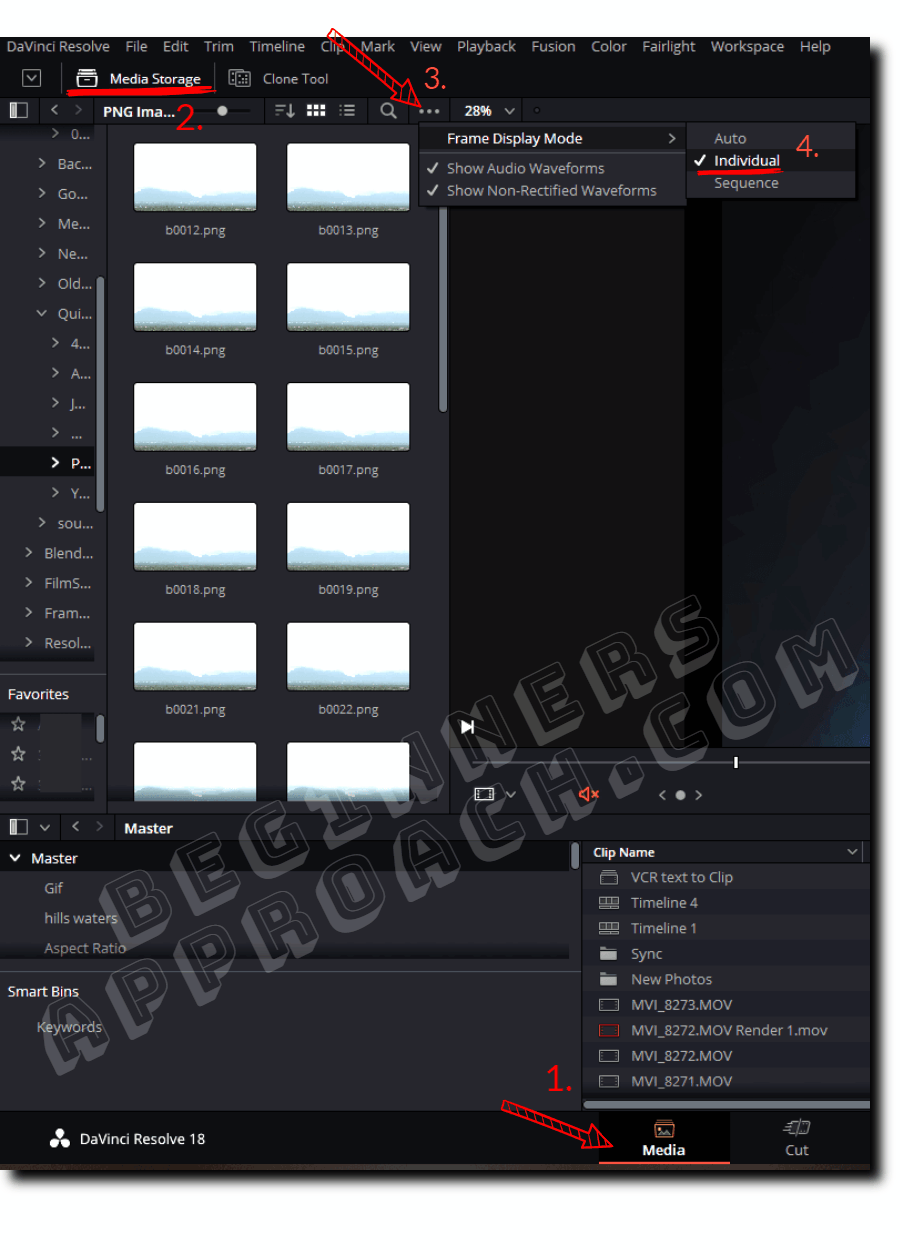
To add a PNG to DaVinci Resolve, go to the “Media” page > “Media Storage” tab. Click on the 3 dots and select “Frame Display Mode” > “Individual”. Select the location of your images and add them to the “Media Pool”. The PNG images are added.
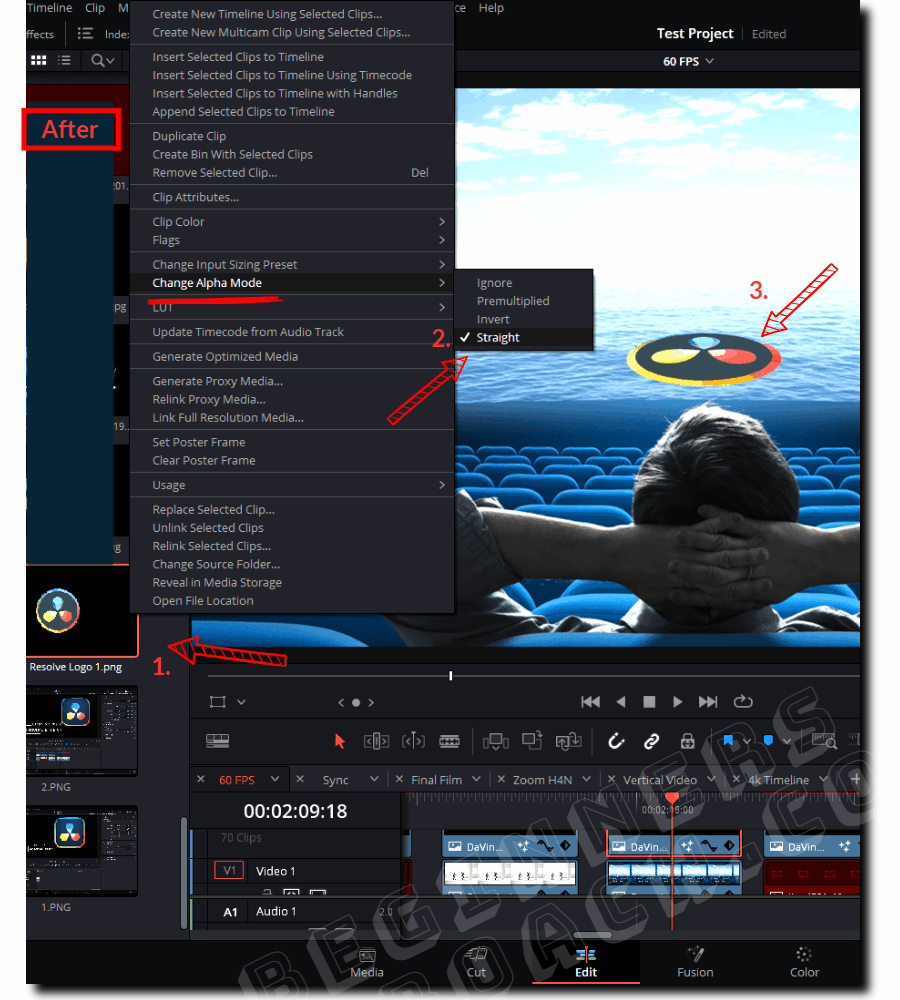
To make a PNG transparent in DaVinci Resolve, go to the “Edit” page > “Media Pool” and locate your PNG. Then, right-click > click on “Change Alpha Mode” > select either “Straight” or “Premultiplied“. The png becomes transparent after dropping it on the timeline.
PNGs can be made transparent because they support alpha channel, that contains information for transparency.
Apart from PNG, DaVinci Resolve supports JPG image format as well. But JPG doesn’t support alpha channels.
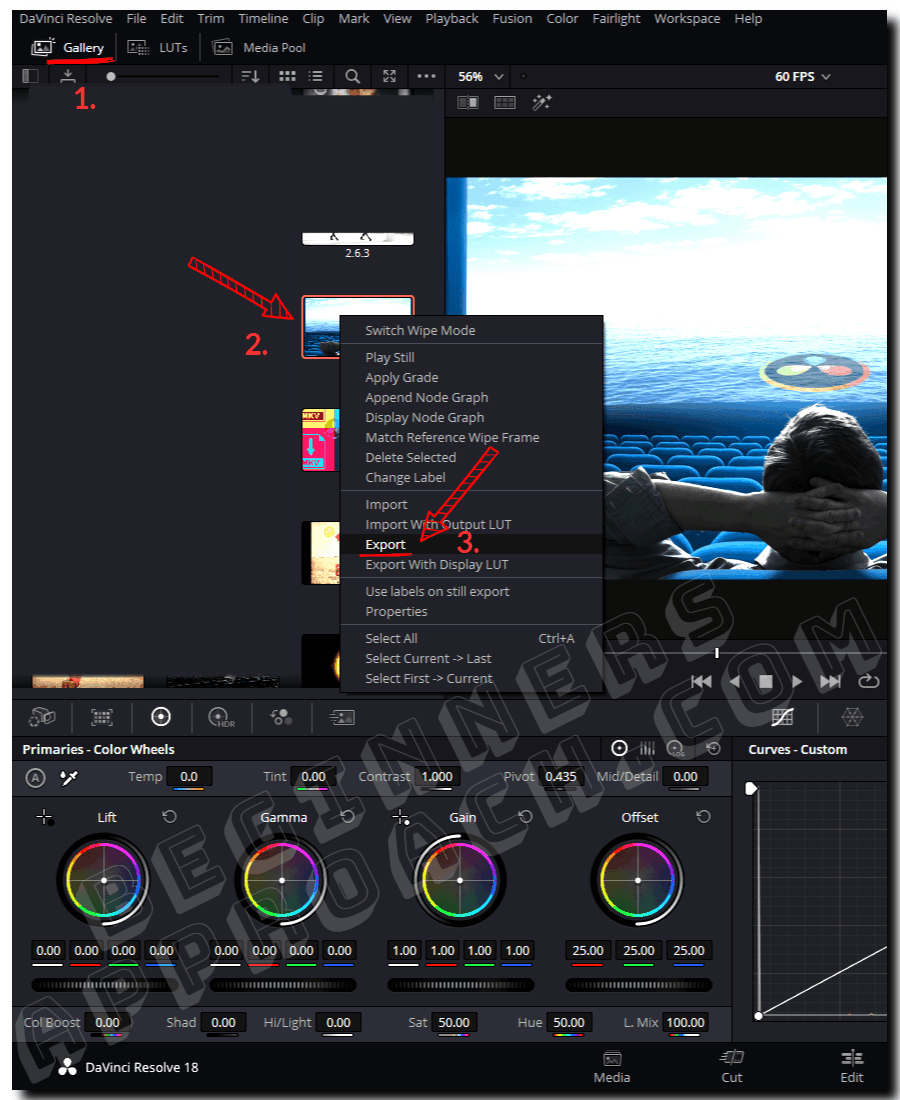
To export a PNG in DaVinci Resolve, go to the “Color” page. Right-click on the viewer and select “Grab Still“. Click on the “Gallery” tab. Locate your still and right-click it. Select “Export“.
We’ll also cover importing and exporting PNG image sequences, and fixes for PNG related issues in DaVinci Resolve – very useful for beginners and newcomers to DaVinci Resolve versions 18.6, 18.5, 18, 17, etc.
Before that, click here to learn about the basics of adding image to a video and related tips in Resolve.
How to Add (Import) PNG to DaVinci Resolve?
- Launch DaVinci Resolve.
- Click on the “Media” page. (See the screenshot below)
- Click on the “Media Storage” tab from the top.
- Click on the 3 dots and select “Frame Display Mode” > “Individual”. (Previously “Show Individual Frames”.)
- Select the location of your images from the left-hand side, which displays all your connected hard disks.
- Select all of your images, right-click, and select “Add into Media Pool”.
- Click on the “Edit” or “Cut” page, then click on the “Media Pool”, and you’ll see all the imported images in the “Master” bin as shown in the below image.
Please note:
Frame Display Mode – Individual. This will display individual images instead of clubbing them together as an image sequence. This was known previously as “Show Individual Frames” in the earlier versions of DaVinci Resolve.
This option will ensure you get a single image when you drop it in the timeline. If it were set to “Auto” or “Sequence”, you might get a series of images that is totally unnecessary for your workflow.
How to Add PNG to Timeline in DaVinci Resolve?
Go to the “Edit” page. From the “Media Pool”, pick your desired png image and drag it into the timeline. A new video track, number 1, will be created.
You might probably want to place your PNG on top of a video background – to display a logo or add effects like snow, rain, fire, etc., on top of a video. If this is the case, then place your video on video track 1, and then place the png on video track number 2.
How to Make PNG Transparent in DaVinci Resolve?
- Go to the “Edit” page.
- Click on the “Media Pool” tab.
- Locate your PNG.
- Right-click the png > click on “Change Alpha Mode”.
- Select either “Straight” or “Premultiplied“.
- Your png becomes transparent when you drop it on the timeline as shown in the below images.

If you face any issues like the png is not transparent or not working, then scroll down to the last section.
What is an Alpha Channel?
To make an image transparent in Resolve, the image format (like PNG) should support an alpha channel capable of producing transparency. Now before it gets too technical, let’s first understand…
To put it in simpler terms, an alpha channel contains information about an image’s color and its transparency (or opacity) values.
So if you work with an image’s transparency, you must ensure it supports the alpha channel.
Not all images support the alpha channel.
As per BlackMagic, the following still images support the alpha channel, which means you can make them transparent as needed.
Image Formats & Alpha Channel Support in DaVinci Resolve
The table below shows various image file formats and the alpha channel support in DaVinci Resolve.
| Image File Format | Support of Alpha Channel |
|---|---|
| tif | Yes |
| png | Yes |
| jpg | No |
| dpx | No |
| exr | Yes |
| dng | No |
| psd | No |
| tga | Yes |
A few things to note:
- PNG is the most used image format for making an image transparent.
- JPG doesn’t support the alpha channel, which means it can’t be made transparent.
Now that you know which image formats support an alpha channel, the next question is:
Does DaVinci Resolve Support JPG?
DaVinci Resolve supports JPG image format. You can import, edit, and color-correct a JPG file like any other clip.
JPG doesn’t support the alpha channel – meaning you won’t be able to make it transparent.
For more information on editing your images, read the below step-by-step guide:
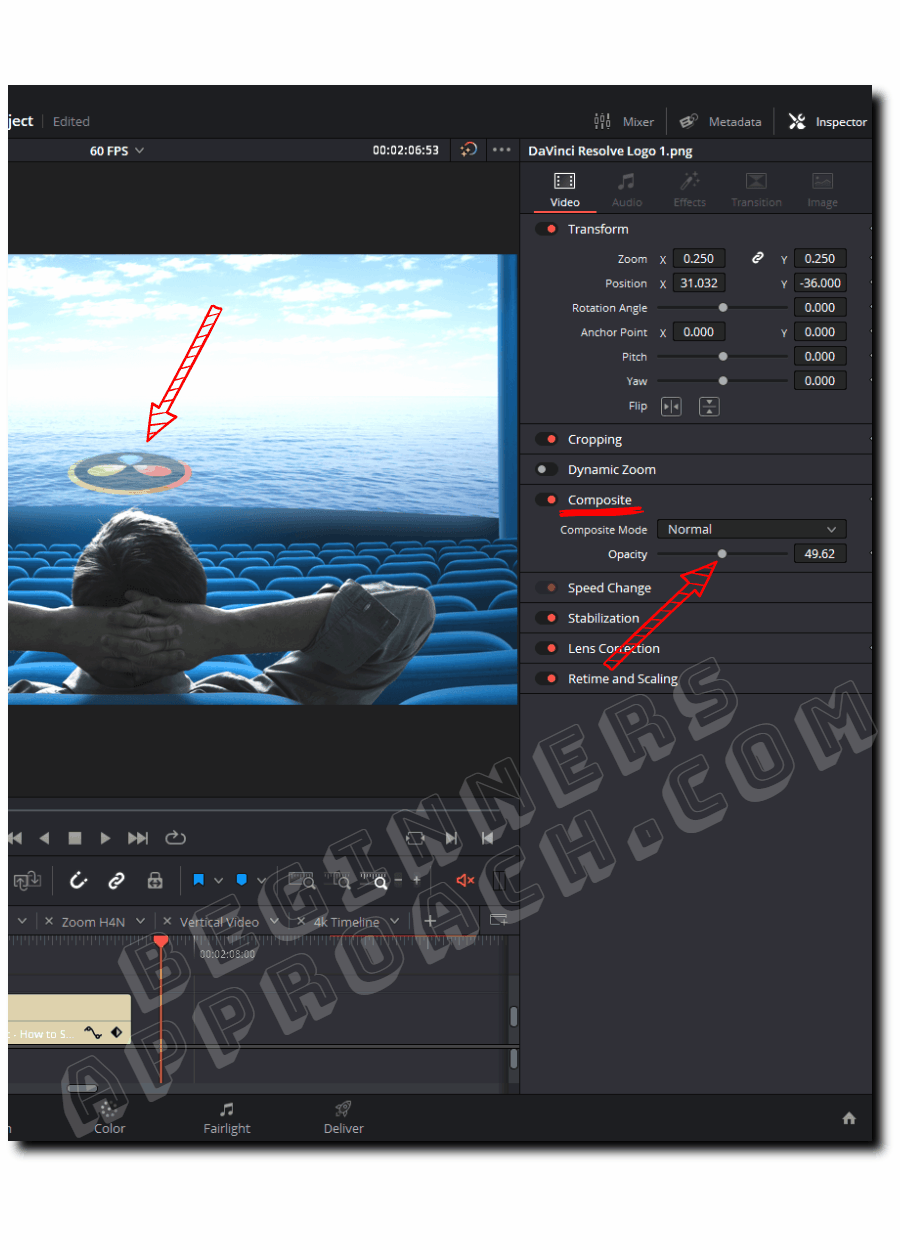
To merge or overlay your PNG file into the background image or video, go to the “Inspector” tab > “Video” > “Composite” and reduce the “Opacity” value as shown in the below screenshot.
Also, try changing the “Composite Mode” values till you get the desired result.
After you’ve edited the png file, it’s time to export it.
How to Export PNG in DaVinci Resolve?
- Under the “Edit” page, click on your desired png image to select it.
- Go to the “Color” page.
- Right-click on the viewer and select “Grab Still“.
- Click on the “Gallery” tab (left-hand side) to reveal the screenshot.
- Locate your still and right-click it.
- Select “Export“.
- Choose your destination folder from the “Export Stills” window to save the still.
- Enter a name in the “Export” field.
- Select the “png” extension from the “Save as type” dropdown.
- Click on “Export” as shown in the image below.
When you open the exported folder, you’ll see the “.drx” file along with png. You can choose to either delete or keep it. In most cases, you won’t need the “.drx” file.
Import and Export PNG Image Sequences
If you want to work with importing and exporting png image sequences, then I would highly recommend going through the below detailed step-by-step guide:
PNG Issues in Resolve
1. DaVinci Resolve is Unable to Import PNG files
In some cases, DaVinci Resolve might not be able to recognize or import png files.
If this is the case, the folder containing the png files could have been corrupted.
Try copying the pngs to a different folder and then import them inside DaVinci Resolve.
2. DaVinci Resolve PNG Not Transparent
If your png is not becoming transparent, it could be a fake one, meaning jpegs have a white/black background – there is no transparency in them. So if you work with them, you can’t make them transparent.
One fix is to go to the “Color” page and use a qualifier to remove the unwanted areas so that the image is now merged with the background.
Another fix is to import the image to any photo editor, remove the unwanted background, export it as a png file, and then again import it back into Resolve.
DaVinci Resolve PNG Not Working
If the “Straight” option in “Change Alpha Mode” doesn’t work, then select the “Premultiplied” option. (You have to right-click on the image from the “Media Pool” to locate the “Change Alpha Mode”. Refer to the above screenshot for more details.)
If none of the options make it transparent, then you might have a png that doesn’t have transparency information in the alpha channel. (Please refer to the previous fix.)
So ensure you have a valid png file before bringing it inside Resolve.