The best 4K export settings in DaVinci Resolve – for YouTube, choose “H.265” codec under the “Mp4” format on the “Deliver” page if you have time constraints. For the highest quality output, choose “QuickTime” format and codec “DNxHR” for Windows (“ProRes” for MacOS). Set the bit rate value to a minimum of 2000 times the frames per second.
Before you start importing or editing your 4K footage, make sure to go to “Project Settings” > “Master Settings > “Timeline Resolution” and set it to “3840 x 2160” for a 4K UHD workflow.
Today we’ll look at how to export your project at 4k with the best render settings for a high-quality output (as well as for YouTube) in the free version of DaVinci Resolve (versions 18.6, 18, 17, etc.).
We’ll also look at choosing the best codec, format and bit rates for a high quality ouput.
- How to Export 4K in DaVinci Resolve With The Best Export Settings?
- Best Export Settings in DaVinci Resolve
- Important Things to Consider Before Exporting 4K
- Best 4K Render Settings for High Quality Output in Resolve
- Best YouTube 4K Export Settings in DaVinci Resolve
- Can DaVinci Resolve Export 4k 60fps?
- Before You Go…
How to Export 4K in DaVinci Resolve With The Best Export Settings?
- Go to the “Deliver” page after finishing your editing.
- Click on “Custom Export” under the “Render Settings” panel (found on the left-hand side of the screen).
- Enter your desired file name and choose a location for the output.
- Choose “Format” > “Mp4” (“QuickTime” is also fine – this is based on your requirement).
- Choose “Codec” > “H.265” (highly efficient and has a lower file size compared to H.264)
- (If you see the “Encoder” dropdown, leave it to the default – if possible, select “Nvidia” – if it is displayed).
- Set the “Resolution” to “3840 x 2160 Ultra HD” for a 4K UHD export.
- Set your desired “Frame Rate“, let’s say, “23.976” (my source files’ fps are 23.976)
- Set the “Quality” to “Automatic” > “Best” (you can also manually set the quality, but you should know the bit rate – more on that later).
- “Encoding Profile” > “Main”.
- Click on the “Audio” tab and make sure the “Export Audio” checkbox is enabled (if you require audio).
- Click on the “Add to Render Queue” button.
- Go to the right-hand side and click on “Render All“.
- Done!
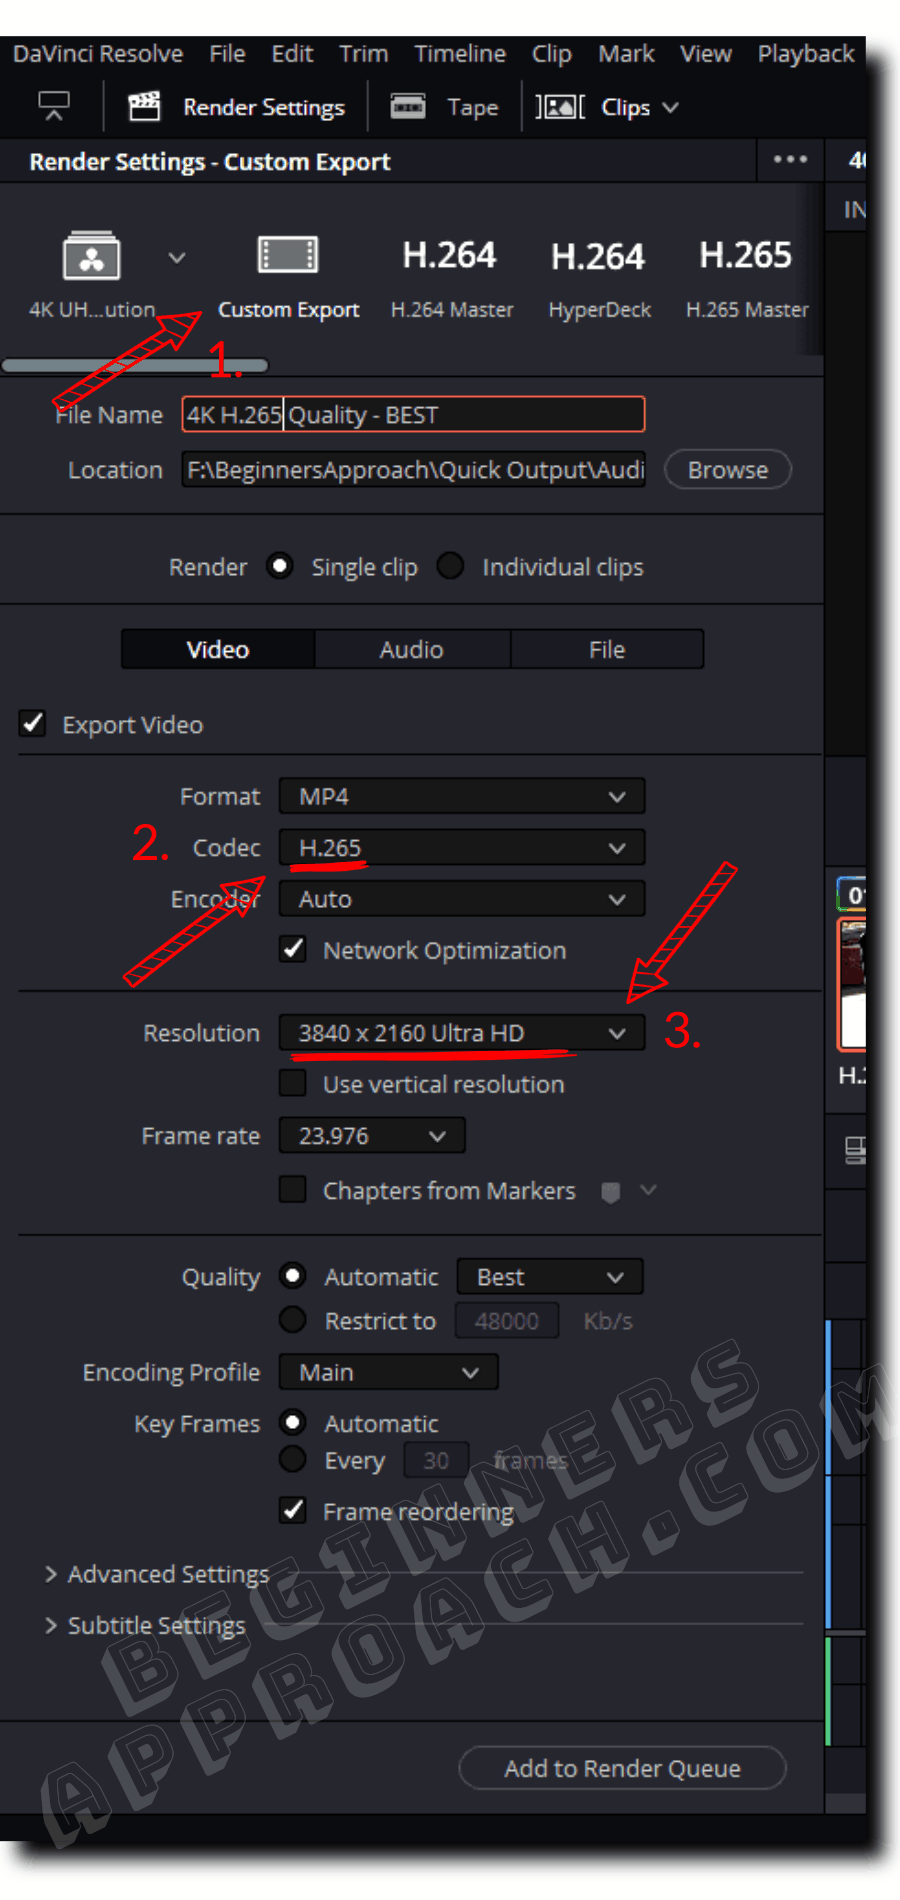
If you have an option for selecting “Constant Bit Rate”, select it. Otherwise, you might not get the expected bit rate. Refer the above screenshot.
Related article:
Best Export Settings in DaVinci Resolve
#1) Codec
Codec is one of THE most important settings that determine your final output quality and size.
You can decide the codec based on the below scenarios:
- High-Quality Master = DNxHR or ProRes – The best possible highest-quality output that acts as a master copy.
- Delivery – H.265 = Highly efficient codec that lowers the file size of your output. But do remember that some of the devices might find it hard to play it back.
- Delivery – H.264 = Most common delivery codec (widely used).
- YouTube = Use H.265 for a higher quality and lower file size upload. If you need the highest quality, you should upload the DNxHR or ProRes output which takes a lot of time to upload. Also, keep in mind that YouTube will further compress your uploaded video to suit the platform’s requirements. Going with a high-quality clean upload is recommended to avoid artifacts.
A small note on H.264 – Most experts recommend not using H.264 codec inside Resolve. Instead, they suggest first rendering the output using DNxHR or ProRes. Then go to Handbrake or Adobe Media Encoder and transcode using H.264 codec for better quality.
#2) Format
Mp4 or Mov should be fine for most scenarios.
#3) Bit Rate for 4K Video in Resolve
It is the amount of information packed in 1 second of a video. The bit rate determines the quality of a video. The higher the bit rate, the more details packed per second – the better the video quality.
You can let Resolve to determine the bit rate for you. Just set the “Quality” to “Automatic” > “Best”, in the “Deliver” page render settings. Or you can set it manually – For an H.265 codec, experts suggest a bit rate value equivalent to a minimum of 2000 times the frames per second of your footage.
For example, if your fps is 24, the bit rate should be = 2000 x 24, that is, 48,000 Kb/s.
A 60 fps will result in 2000 x 60 = 120,000 Kb/s.
Now go to the “Deliver” page render settings, and enter the above bit rate value against the “Quality” > “Restrict to” field.
But you can play with different bit rates till you get the desired quality.
The option “Best” should be fine for most scenarios.
(I did a little testing on different bit rates and the output. More on that below).
Important Things to Consider Before Exporting 4K
As mentioned above, for a high-quality render, ensure you work with 4K footage in the timeline. It doesn’t matter if you set the project timeline resolution to 1080p (for a good playback performance) as long as you’re only editing.
Once you’ve locked your editing and color grading, before moving on to the “Deliver” page, change the timeline resolution to 4K and save it.
Then go to the Deliver page and export it.
Anyways, even if you forget to change the timeline resolution to 3840 x 2160 from 1920 x 1080, you’ll get a warning pop-up from Resolve on the “Deliver” page – when you try to add it to the render queue.
You can then open the “Project Settings” > “Master Settings > “Timeline Resolution” and set it to “3840 x 2160 Ultra HD”, before rendering.
Best 4K Render Settings for High Quality Output in Resolve
For a high-quality output irrespective of the file size, choose “DNxHR” – Windows ( or “ProRes” – “Mac”) from the “Codec” dropdown. To enable this, choose “QuickTime” from the “Format” dropdown. Then select “DNxHR 444 12-bit” from the “Type” dropdown.
Keep in mind this will result in a huge file.
Let me explain through a real-world result.
I shot a 1-minute video in the Fuji XT series (mirrorless camera). Then I imported the footage into Resolve, did some color correction, and added a fusion title on the Edit page.
Then I rendered to get a high-quality 4K output. Here’s a table with all the technical details:
| 1 Minute Source File | 1 Minute Output File |
|---|---|
| 4K video (3820 x 2160) | 4K video (3820 x 2160) |
| 23.976 frames per second | 23.976 frames per second |
| H.264 (AVC) codec | DNxHR 444 12 bit codec |
| Bit rate – 102 Mb/s (or 102,000 Kb/s) | Bit rate – 1398 Mb/s |
| File size – 729 MB | File size – 9.77 GB |
The below image displays the settings of the 4K render export with DNxHR codec.
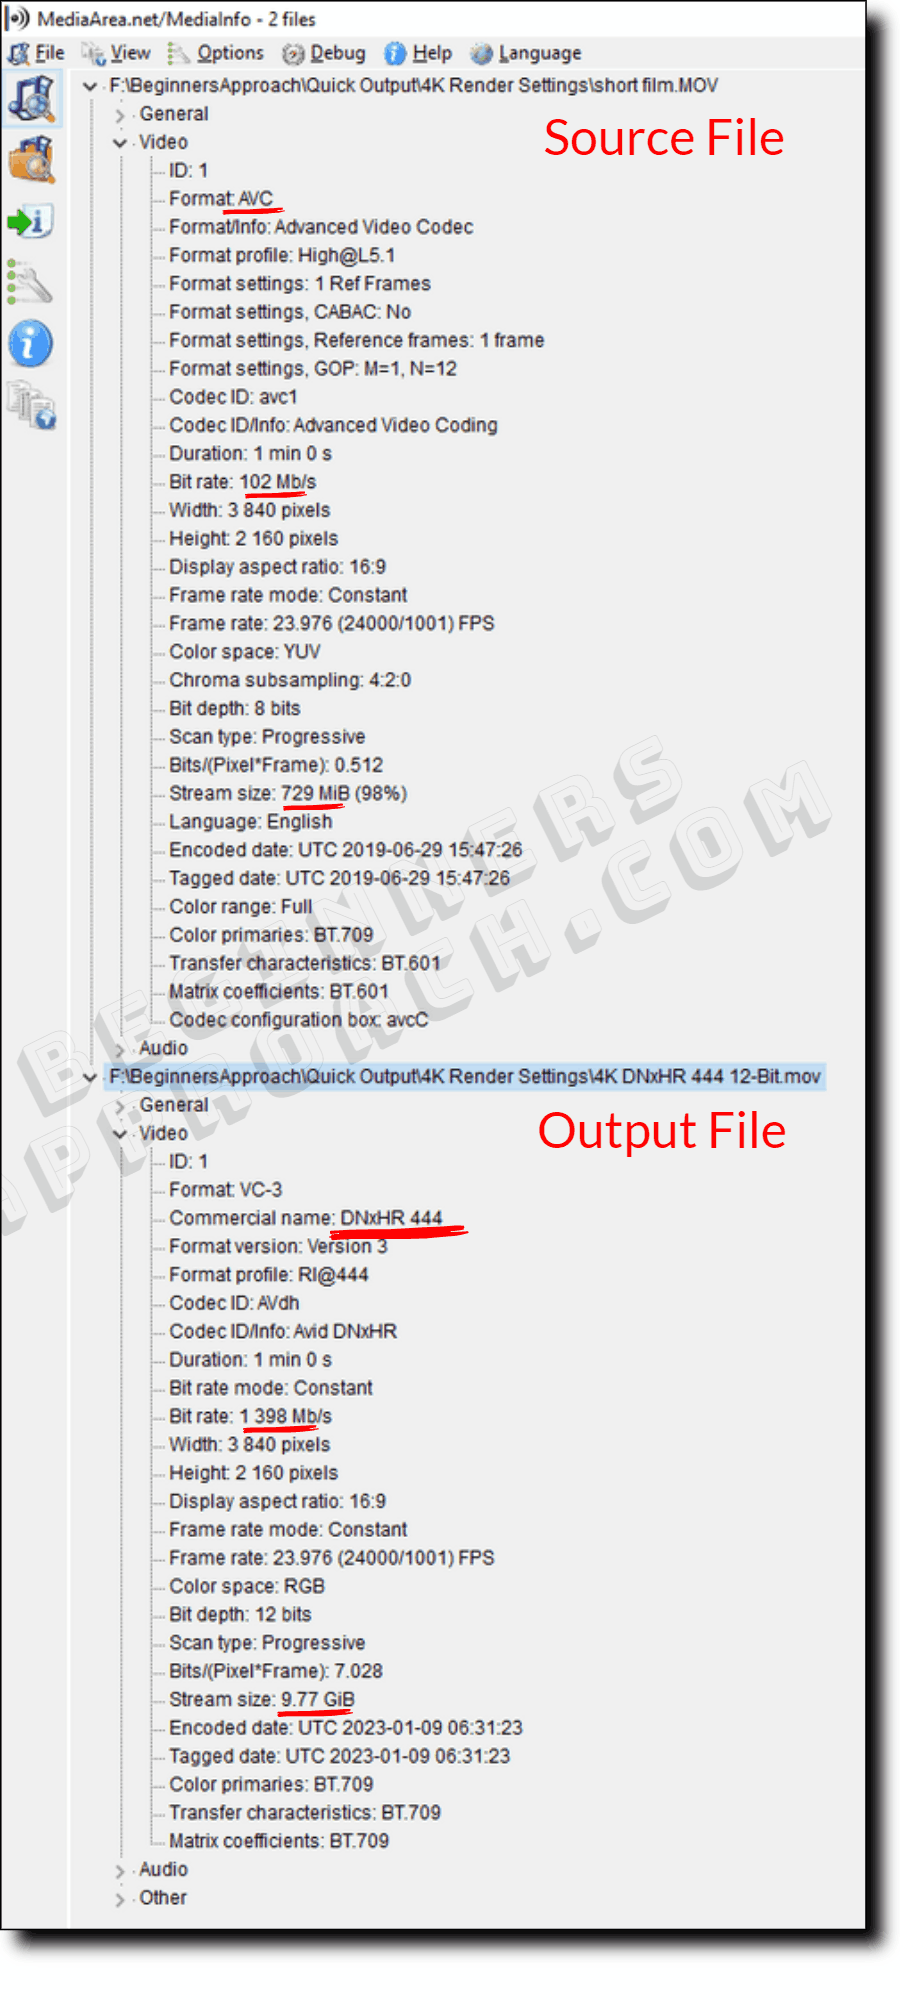
As you can see, the output file size is a huge 9.77 GB compared to the 729 MB source file.
The output rendered with the highest quality settings of “DNxHR” (or Prores in Mac) is called a master.
This is the highest quality possible out of your render settings.
You can convert use this master copy and convert it to other formats like H.265/H.264 codecs for final deliveries.
Best YouTube 4K Export Settings in DaVinci Resolve
For YouTube, choose the “H.265” codec for a high quality and low file size 4K output, which is further compressed by YouTube. If the file size and upload time are not a factor, then the “DNxHR” or “ProRes” codec is the best one – for high-quality output. It ensures YouTube has the best possible cleanest copy for further compression.
The below findings should give you a good idea of the different bit rates, and the resulting file sizes with H.265 codec.
Related post:
As already mentioned, I took a 1-minute 4k video (shot by a Fuji XT series mirrorless camera). Imported into Resolve and did some color correction and then added a fusion title on the Edit page.
Then I rendered the 1 minute video to get a high-quality 4K output. Here’s a table with all the technical details:
| 1 Minute Source File | Output with “BEST” Quality Bit Rate | Output with Bit Rate set to 2000 times of FPS (48,000 Kb/s) |
|---|---|---|
| 4K video (3820 x 2160) | 4K video (3820 x 2160) | 4K video (3820 x 2160) |
| 23.976 frames per second | 23.976 frames per second | 23.976 frames per second |
| H.264 codec | H.265 (HEVC) codec | H.265 (HEVC) codec |
| Bit rate – 102 Mb/s (or 102,000 Kb/s) | Bit rate – 117,000 Kb/s | Bit rate – 49,400 Kb/s |
| File size – 729 MB | File size – 837 MB | File Size – 354 MB |
The below image displays the settings of the 4K render export with H.265 (HEVC) codec.
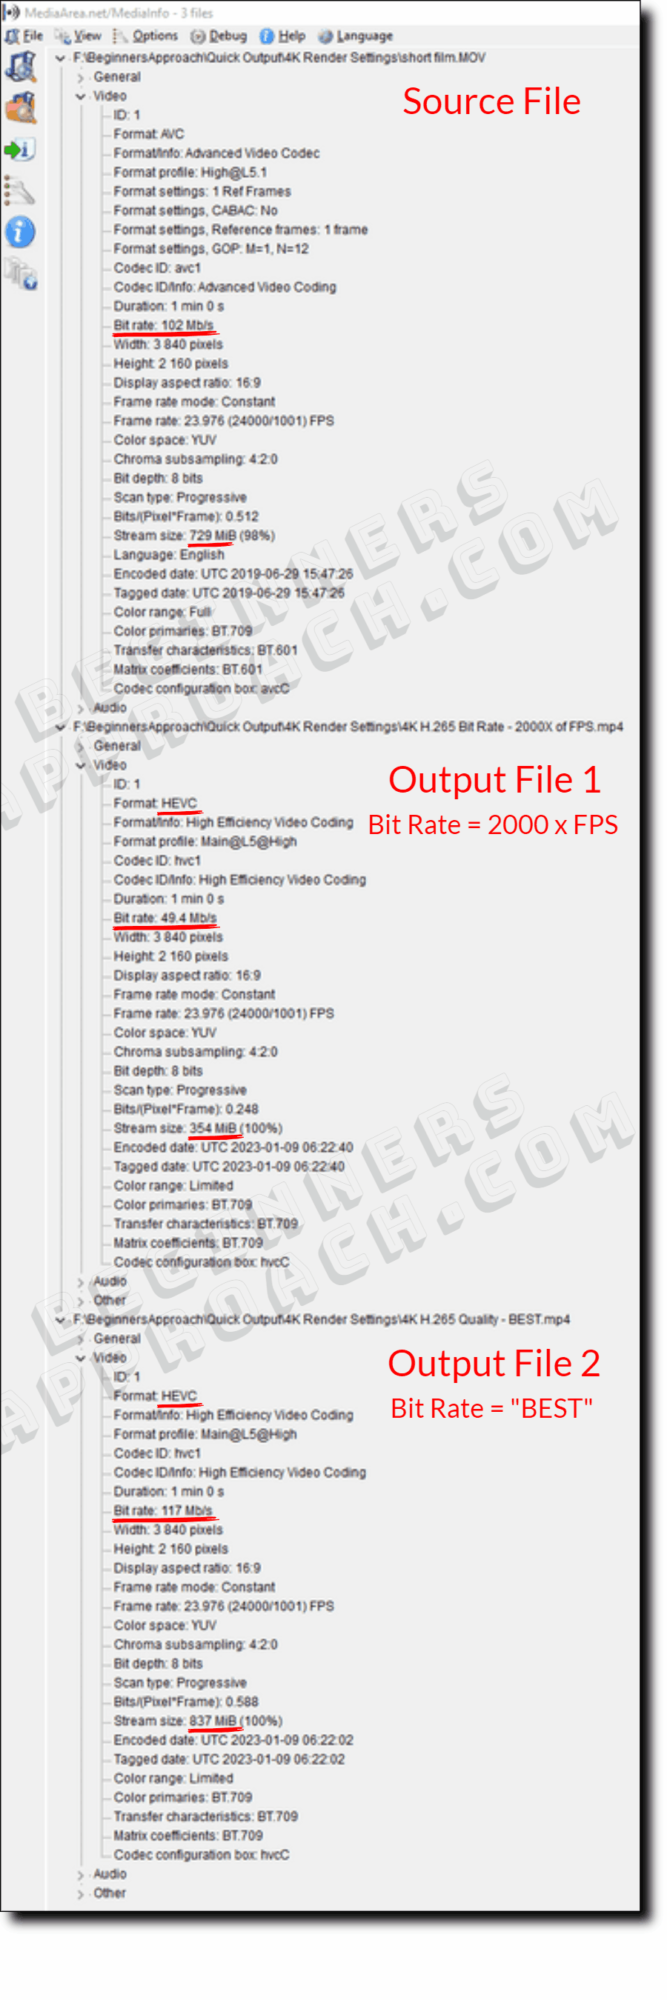
The above table and screenshot quickly let us know the following things (this finding is applicable to the above example only):
The source footage has a bit rate of approximately 102,000 Kb/s with a file size of approx. 729 MB.
If we apply the concept of setting the bitrate to 2000 times the fps, that is, approx. 48,000 Kb/s, we get an output file with a bit rate close to 50,000 Kb/s and a file size of 354 MB which is nearly half of the source file!
This setting saves you a huge space without compromising much on the quality.
If we set the bit rate to the “BEST” quality setting, the output file size is nearly 2 times the source file – because of the higher bit rate (approx 117,000 kb/s) which Resolve automatically sets on our behalf.
You can then playback the output with different bit rates to check the quality before uploading (or delivery).
Can DaVinci Resolve Export 4k 60fps?
The free version of DaVinci Resolve can export up to 4K (3840 x 2160 Ultra HD) at 60 fps. If you want to export video with fps greater than 60 fps, like 120 fps, then you need to get the paid version (Studio).
Before You Go…
Not only the 4K export settings, you should also know the best 1080p HD render settings in DaVinci Resolve.
Before that, might need to downscale 4K videos to 1080p HD. Even though it might sound simple, you unexpectedly end up with black bars or artifacts (and pixelations). Read my next article to ensure you get the downscaling right – without losing quality!