The best and important DaVinci Resolve Project and Timeline settings are: Master Settings >Timeline Resolution, Timeline Frame Rate, Video Monitoring, Optimized Media and Render Cache, Working Folders, and Image Scaling.
Today we’ll see the best project/timeline settings required to create a 4K project and 4K timeline in DaVinci Resolve – useful for beginners and newcomers to DaVinci Resolve (versions 18.6, 18, 17, etc.).
We’ll also look at the best 4K export settings for a high-quality output in DaVinci Resolve.
Before moving on, you should know the following:
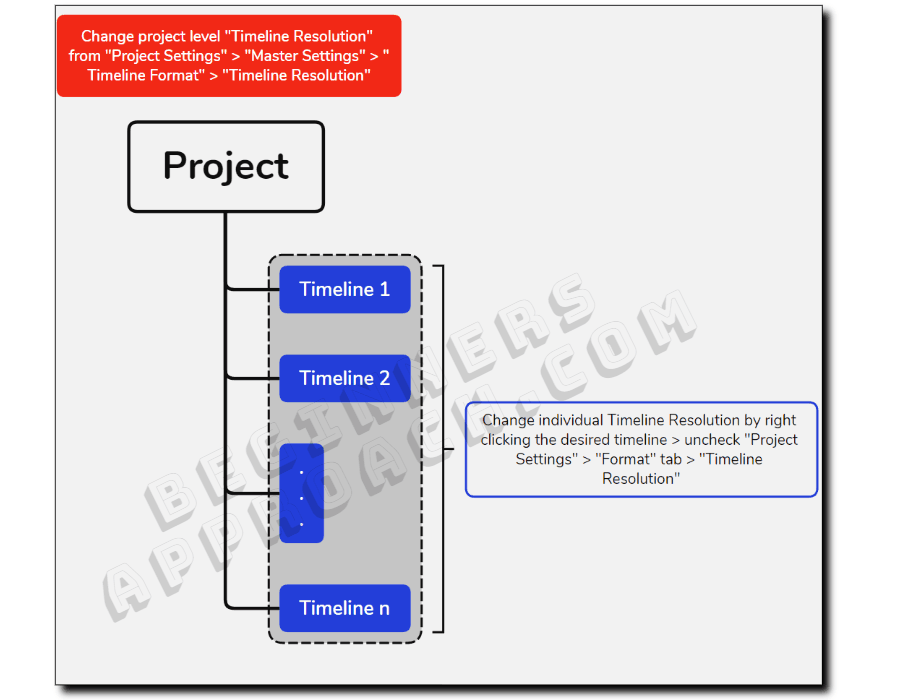
- A project is a collection of timelines – When you create a 4K project, the timelines you create inside this project will have a 4K timeline resolution.
- A timeline can have its own resolution – Even though you have a 4K project, you can still change the resolution of an existing timeline or create a new timeline with a different resolution.
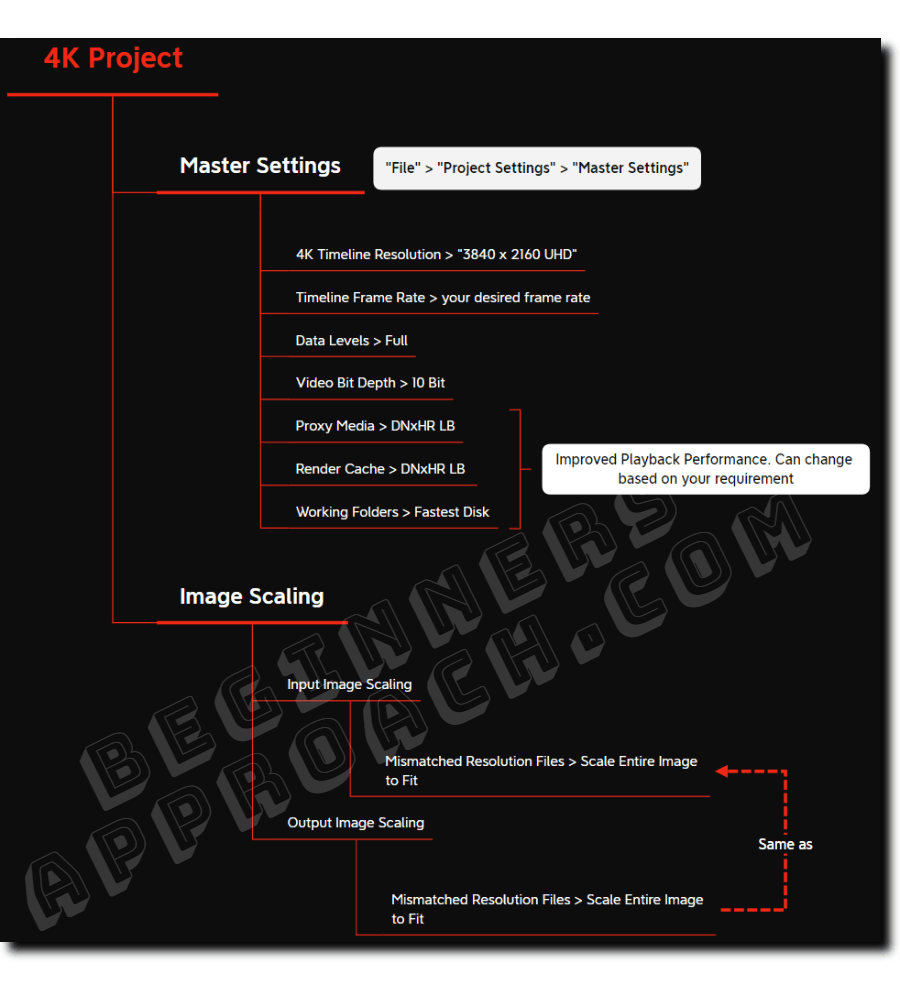
- The below image visually explains the most important and best settings for project and timeline inside DaVinci Resolve
Important 4K Project and Timeline Settings in DaVinci Resolve
#1) Master Settings (“File” > “Project Settings” > “Master Settings” )
1. Timeline Format
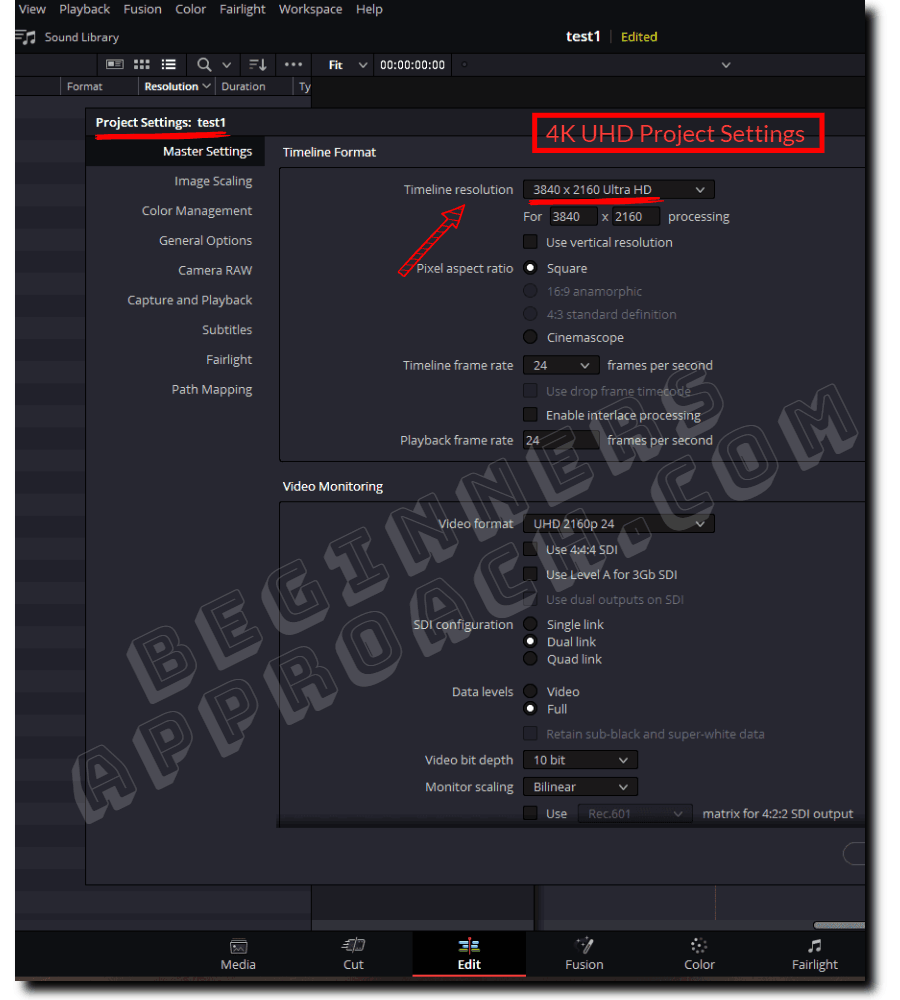
This is where you set the “Timeline Resolution” to 4K Ultra HD. The free version of Resolve allows resolution up to 3840 x 2160 Ultra HD.
If you want 4K DCI – 4096 x 2160, then you need to pay for the Studio version.
But keep in mind – you don’t need to set a 4K timeline resolution while you’re editing. You can set the resolution to “1920 x 1080p” HD or even lower, say, 1280 x 720p, and get a better playback performance.
The below image shows the best project settings for a 4K timeline.
But there are scenarios where you might need to set the timeline resolution back to 4K UHD:
- Before exporting – this is to ensure you get the original full resolution (if your clips are in 4K).
- 4K Upscaling – if your clips were shot in 1080p and your requirement is to upscale 1080p to 4K before uploading to YouTube for better compression using VP9 codec, setting the timeline resolution to 4K makes sense.
2. Timeline Frame Rate
Timeline frame rate should be determined by the fps of most of your footage and the required export for delivery.
Before you start importing your footage, you can change the frame rate as per your requirements.
Once the footage is imported, the frame rate will be locked out!
Read this post to learn more about changing timeline frame rate in DaVinci Resolve.
3. Playback Frame Rate can be the same as the Timeline Frame Rate
4. Video Monitoring
1. Video Format – You can set the video format to the same value that is set for the timeline resolution
2. Data levels – Full
3. Video bit depth – 10 bit. Most cameras, like mirrorless, DSLR, etc, record in 8 bits and 10 bits. Make sure this is set to 10 bits to preserve all captured details.
5. Optimized Media and Render Cache
To improve and achieve the real-time performance of your system while dealing with the 4K footage, Resolve offers the below functionalities:
- Proxy Media
- Optimized Media
- Render Cache
You can set the proxy media format to “DNxHR LB”; that is, when you generate proxy media for your 4K footage, then Resolve will convert your original 4K source footage to an editor-friendly codec.
Optimized Media for 4K footage – Before starting editing, you can generate high-quality and higher-resolution optimized media files for better real-time playback.
Render Cache – You can render cache your 4K footage to achieve real-time playback whenever you drop CPU or GPU-intensive effects on the timeline. Right-click the clip and select “Render in Place”.
Click on the below post for a detailed guide on achieving real-time playback:
6. Working Folders in DaVinci Resolve
Working folders are locations in your storage drives (like HDD, SSD) for your 4K cache files, gallery stills, and proxy files.
If you have dedicated fastest data storage drives like SSDs (solid state drives), choose this location for your proxy, cache files, etc.
Keep your source media files, OS, cache, and proxy files in separate drives.
These improve the performance of your 4K post-production workflow and can offer real-time playback.
#3) Image Scaling
When the resolution of imported clips, say, 4K UHD, doesn’t match the timeline resolution, say, 1080p HD, then DaVinci Resolve handles this situation using the “Image Scaling” setting – as shown in the image below.
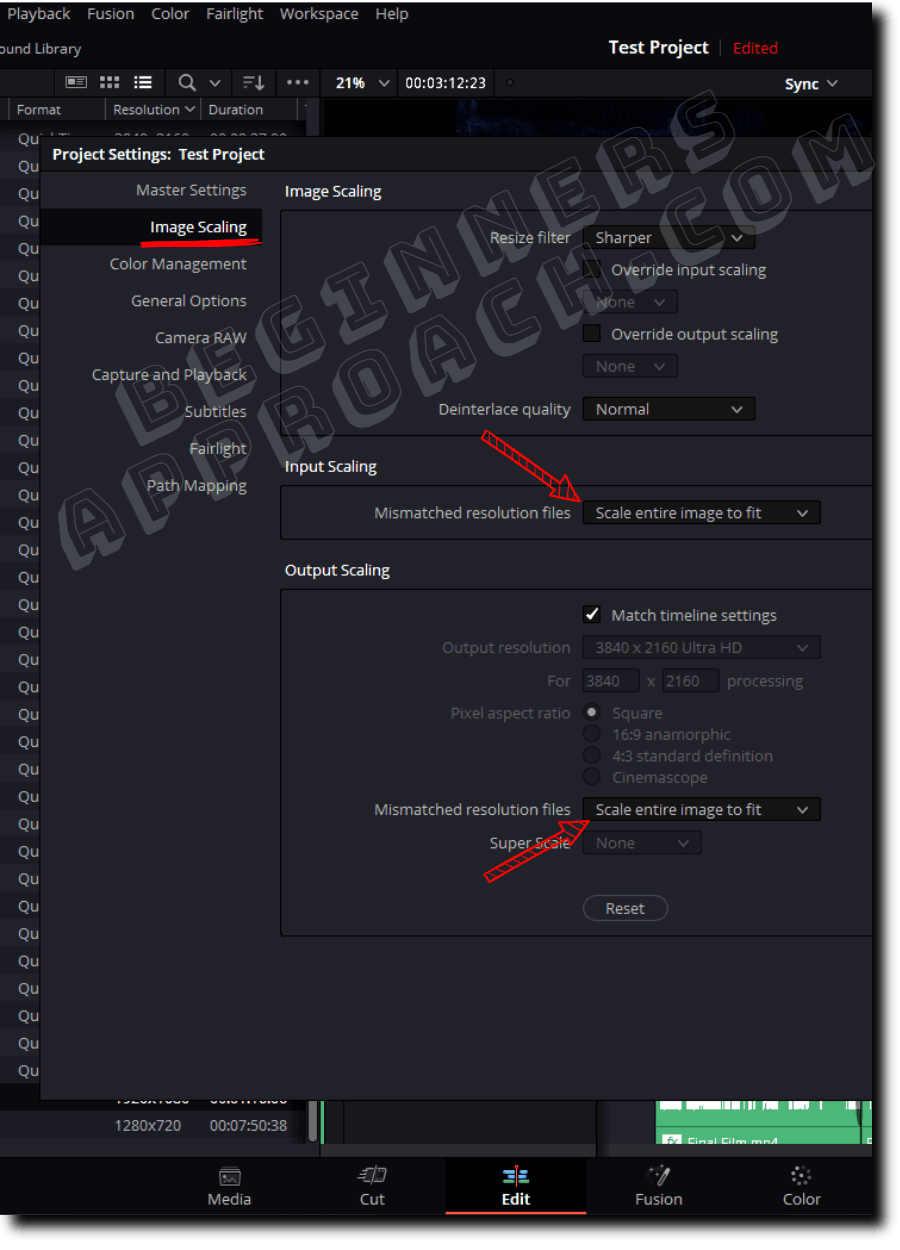
There are 2 settings here – Input and Output image scaling.
Both of them display this dropdown – “Mismatched Resolution Files”, which has the below options:
- Scale Entire Image to Fit – the Default option, which is usually fine for most scenarios.
- Center crop with no resizing
- Scale full frame with crop
- Stretch frame to all corners – Don’t use this unless you’re working on anamorphic media.
To get an idea of how the 4K image scaling happens, read the below for detailed information:
Always ensure the output image scaling dropdown value is the same as the one selected in the “Image Scaling”.
How To Create a 4K Project in DaVinci Resolve With Best Project /Timeline Settings?
- Go to the menu > “File” > “New Project” (you can also click on the house icon found in the bottom right corner).
- Enter your project’s name and click on Create.
- Go to the menu > “File” > “Project Settings” (the shortcut for project settings is “Shift + 9”).
- Go to “Master Settings” > “Timeline Format”.
- Set “Timeline Resolution” > “3840 x 2160 Ultra HD” for the 4K project.
- Set the desired frame rate, say, “24”. (This should be based on the fps of the majority of your footage and the required export)
- Click on “Save”.
- You now have a 4K project created! The below image shows the 4K Master Settings inside DaVinci Resolve.
You can also change the timeline resolution of an existing project, say 1080p, to 4K. This is called upscaling. Click here to learn more about upscaling 1080p footage to 4K UHD in Resolve.
As mentioned above, a project is a collection of timelines. By default, creating a new timeline will follow the project timeline resolution. However, you can also change the resolution by unchecking the “Use Project Settings” checkbox while creating a new timeline (covered in detail below).
How to Create a 4K Timeline in DaVinci Resolve?
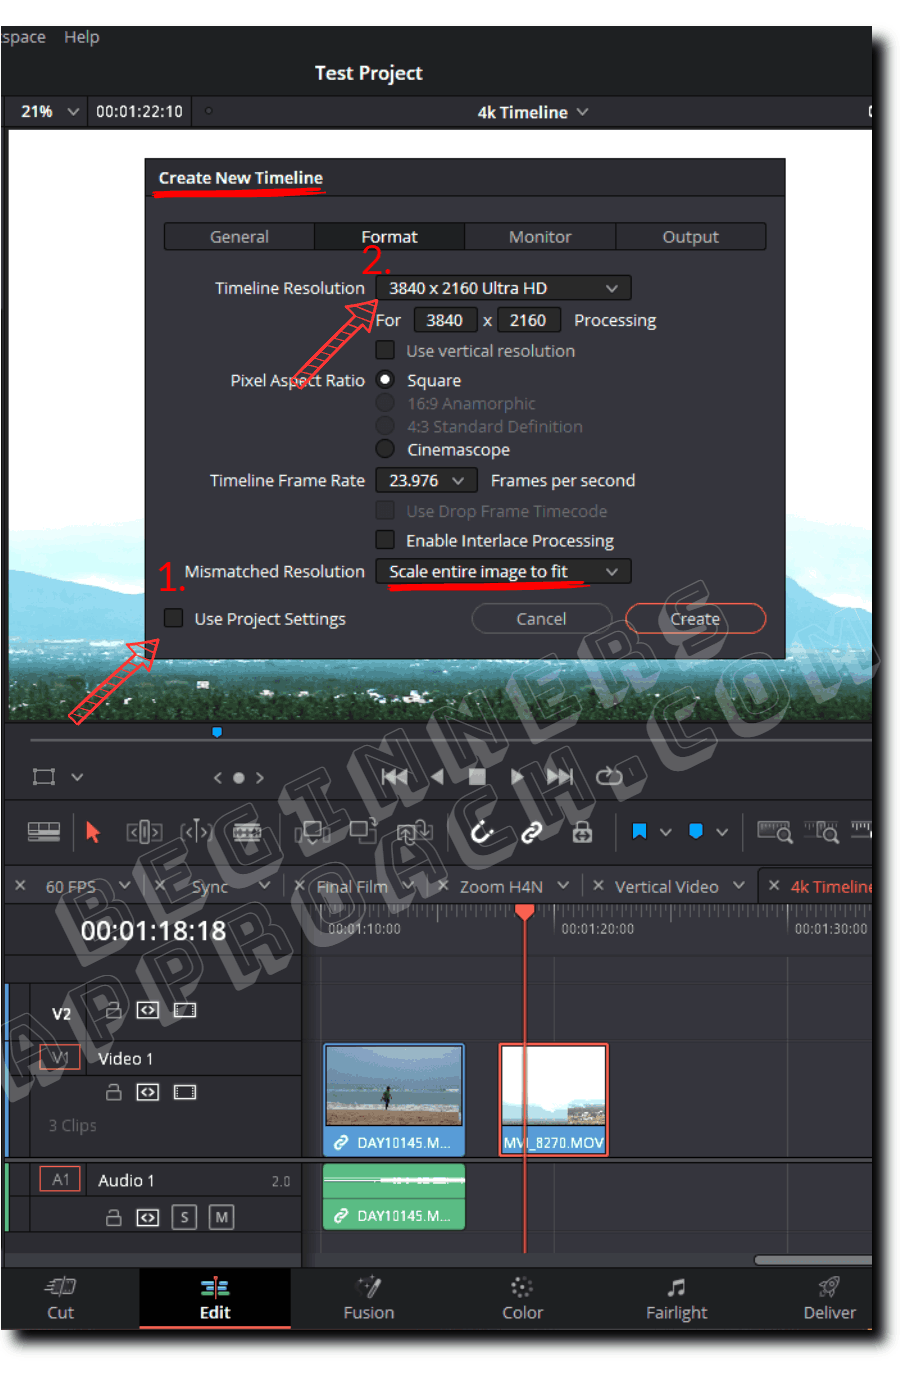
- Create a new timeline by going to the menu “File” > “New Timeline” (the shortcut for creating a new timeline is “Ctrl + n” or “Cmd + n”).
- Uncheck “Use Project Settings”.
- Enter your timeline name.
- Click on the “Format” tab.
- Set the “Timeline Resolution” to “3840 x 2160 Ultra HD”.
- “Mismatched Resolution” > “Scale Entire Image to Fit” (this is the default value).
- Click on the “Output” tab.
- Ensure the checkbox is checked for “Use Timeline Settings for Output Scaling”.
- Let the “Mismatched Resolution” be set to > “Scale Entire Image to Fit” (same as the input scaling).
- Click on “Create”.
Best DaVinci Resolve 4K Export Settings
Apart from knowing the best 4K project and timeline settings in DaVinci Resolve, it is also important to know the best 4k export settings for a high-quality output. Click on the below for a detailed step-by-step guide: