Unlinking audio and video in DaVinci Resolve is the process of separating audio from video so that both of them can be independently edited.
To unlink audio from video in DaVinci Resolve, right-click on the clip in the timeline, then un-select “Link Clips”. The shortcut for unlinking is “Ctrl + Alt + L” or “Option + Command + L”. This unlinks the audio from the video.
Unlinking audio is different from removing audio. To remove or delete audio, first unlink the audio from the video. Then select only the audio clip and press backspace.
Let’s explore the unlinking of audio from video clips in DaVinci Resolve in detail, step-by-step, with pictures – which is helpful for beginners and newcomers to DaVinci Resolve (versions 18.6, 18.5, 18, 17, 16, etc.)
We’ll also look at how to successfully delete audio from a video clip in DaVinci Resolve.
By default, a clip has both video and audio linked together. You can unlink audio from the video so that both of them are independent of each other.
How to Unlink Audio From Video in DaVinci Resolve?
- Go to the “Edit” page.
- Drag & drop the desired clip into a timeline from the “Media Pool” (if not already).
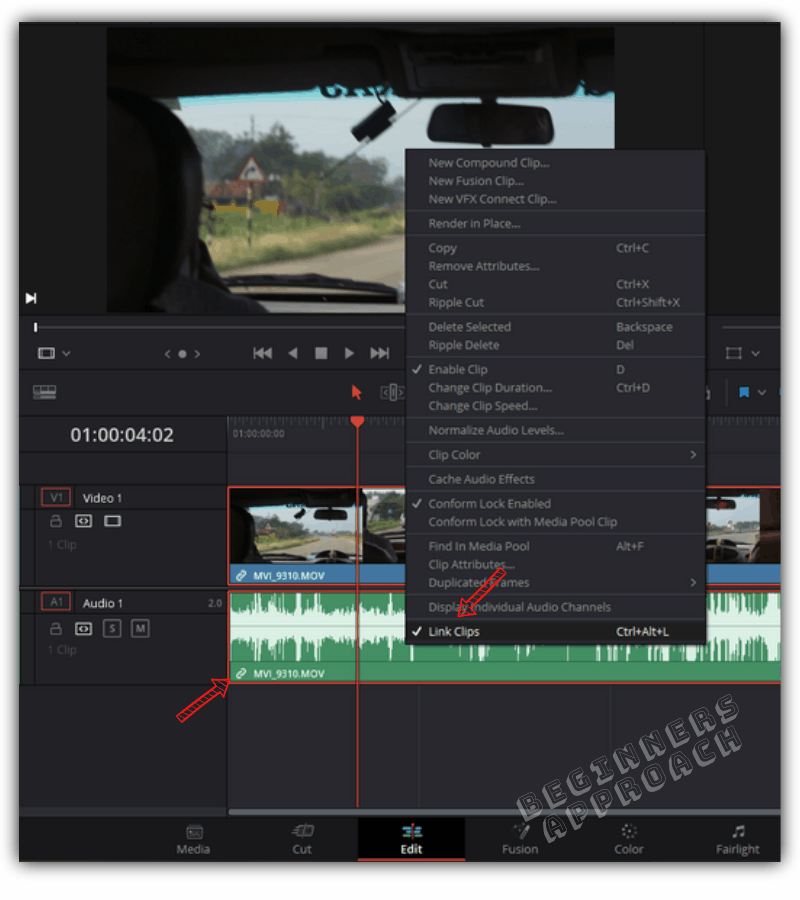
- Right-click on the clip.
- Un-select “Link Clips”. Shortcut = “Ctrl + Alt + L” or “Option + Command + L”
- The audio is unlinked or separated from the video as shown in the image below.
The unlinked audio can be moved in the timeline without affecting the video.
This separated audio can now be further processed according to your requirements.
Similarly, the unlinked video can be processed individually without affecting the audio.
How to Re-link Audio and Video in DaVinci Resolve?
To re-link both the audio and video clips after doing all the editing and color grading, select both of them in the timeline by “Ctrl” or “Cmd” clicking. Right-click > select “Link Clips”. The audio and video are re-linked.
Click here to learn more about linking audio and video clips in DaVinci Resolve – for a detailed step-by-step guide.
How to Separate Audio From Video in DaVinci Resolve?
To separate audio from video in DaVinci Resolve, go to the “Edit” page, and then go to the timeline containing your audio and video clips. Click on the chain icon in the toolbar above the timeline (under the Timeline Viewer). This separates the audio from the video.
Note that the above is also similar to unlinking audio from video, where you select the required clips and right-click to un-select “Link Clips”.
How to Delete Audio From Video in DaVinci Resolve?
As discussed earlier, unlinking audio from video is mainly done to edit them individually.
However, deleting audio from a video also requires unlinking it in the first place. If you don’t unlink and then try to delete the audio, then the whole clip – the audio and video – is deleted, which is undesirable.
- Unlink the audio from the video using “Ctrl + Alt + L”.
- Click on the audio clip so that only the audio part is selected (if not then, click on somewhere else and again click on audio to select it).
- Press “Backspace” or right-click on the clip and select “Delete Selected”.
- (Pressing the “Delete” button is not recommended.)
(Now when you click the “Delete” button, sometimes it can delete the video clip or other clips as well apart from your audio – which is undesirable.
Click here to learn more about removing audio from video in DaVinci Resolve – with all the time saving shortcuts, tips and more!