Speeding up audio in DaVinci Resolve is the process of increasing the speed of the audio clip to more than 100% (normal) value for stylistic purpose.
To speed up audio in DaVinci Resolve, right-click on the audio clip in the timeline on the “Edit” page and click on “Change Clip Speed”. Change the “Speed” value greater than “100%”, say, 200% for doubling the speed.
Slowing down audio in DaVinci Resolve is the process of decreasing the speed of the audio clip to less than 100% (normal) value for stylistic purpose.
To slow down audio in DaVinci Resolve, right-click on the audio clip in the timeline on the “Edit” page and click on “Change Clip Speed”. Change the “Speed” value lesser than “100%”, say, 50% which slows down to half of the original speed.
Let’s explore the speeding up and slowing down in detail, step-by-step. (Very useful for beginners and newcomers to DaVinci Resolve versions 18.6, 18.5, 18, 17, etc.)
How to Change the Speed of Audio in DaVinci Resolve?
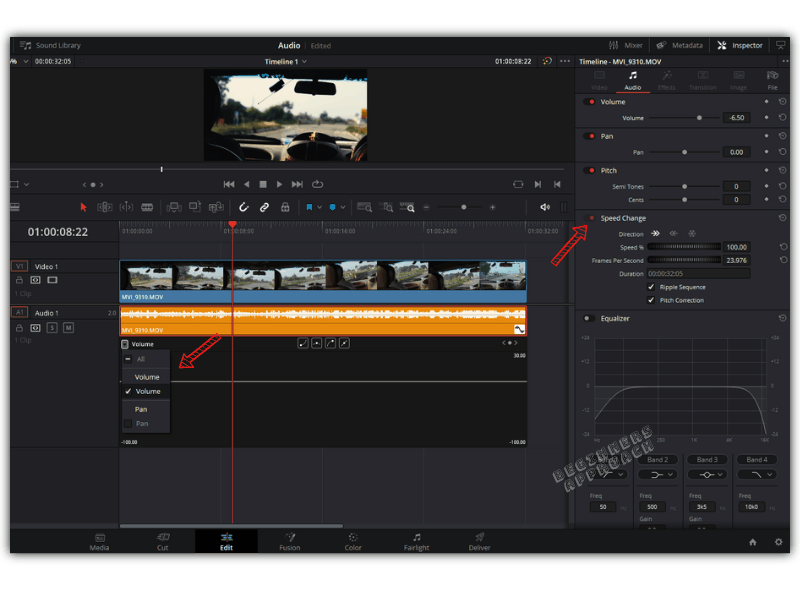
- Go to the “Edit” page and locate your audio clip in the timeline.
- Right-click on the audio clip and click on “Change Clip Speed“.
- Change the “Speed” value other than “100%”.
- Lowering the speed value will slow down your audio and increasing the value will speed it up.
- Uncheck or check the “Pitch Correction” accordingly for natural-sounding audio, as shown in the image below.
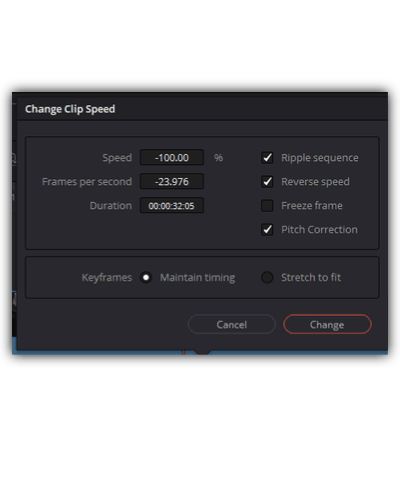
If you want to speed up or slow down a reverse audio clip, then enable the “Reverse” option in the “Change Clip Speed” window and enter a negative value in the “Speed” field accordingly.
Click here to learn more about reversing an audio clip in DaVinci Resolve.
Under the “Edit” page, you can only do a simple linear change like speeding up or slowing down the audio clips. Variable speed changes or stretching of audio is not possible using speed keyframes on the “Edit” page.
How to Stretch Audio in DaVinci Resolve?
To stretch audio in DaVinci Resolve, use the “Elastic Wave” feature inside the “Fairlight” page. This helps you speed up and slow down different sections within the same audio clip. This stretch feature is not available under the “Edit” page.
You can make non-linear changes or variable changes to the video clips with the help of speed keyframes on the “Fairlight” page.
Let me explain.
If you take a video clip, you can slow down, speed up, and freeze the frame. But the same is not possible with an audio clip under the “Edit” page.
But if you’d want to speed up and slow down all in the same audio clip with keyframes, then you’ll have to head over to the “Fairlight” page. And make use of the “Elastic Wave” feature.
What is “Elastic Wave” in DaVinci Resolve?
The “Elastic Wave” feature in DaVinci Resolve Fairlight helps you to speed up and slow down different sections within the same audio clip. This is an audio retiming feature that is similar to keyframing at different speeds within a video clip.
You can keyframe your audio to sound like it’s stretched and compressed without changing the pitch – all in the same clip!
This means you can easily match your variable-speed video with variable-speed audio.
This is a powerful feature of Resolve Fairlight.
For example…
If you have a video clip that has been re-timed to slow-mo and fast-forward – now you can match the video with your re-timed audio (thanks to the “Elastic Wave” feature).
Similarly, with the help of “Elastic Wave” you can retime sound effects to your taste.
And one more thing…
If you have two audio files recorded – one from the camera and the other one from an external recorder – there can be audio drifts.
This means when you place both the audio in adjacent tracks, the starting and middle might be in perfect sync.
But as you play further toward the end, there might be sync issues with the two audio tracks. Chances are one of them might lead or fall behind (visually looking at the waveforms will reveal the issue). This out-of-sync issue can be solved through the elastic wave feature.
What is the Use of “Elastic Wave” in DaVinci Resolve?
- “Elastic Wave” can retime audio – stretch and compress within the same audio clip.
- Used to retime voiceover and ADR to match with the video.
- Enables keyframing the speed of audio to our taste.
- “Elastic Wave” doesn’t change the pitch of the audio.
How to Retime Audio Using Keyframes in DaVinci Resolve?
- Go to the “Fairlight” page.
- Right-click on your audio clip.
- Click on “Elastic Wave.”
- “Elastic Wave” will be displayed at the top left corner.
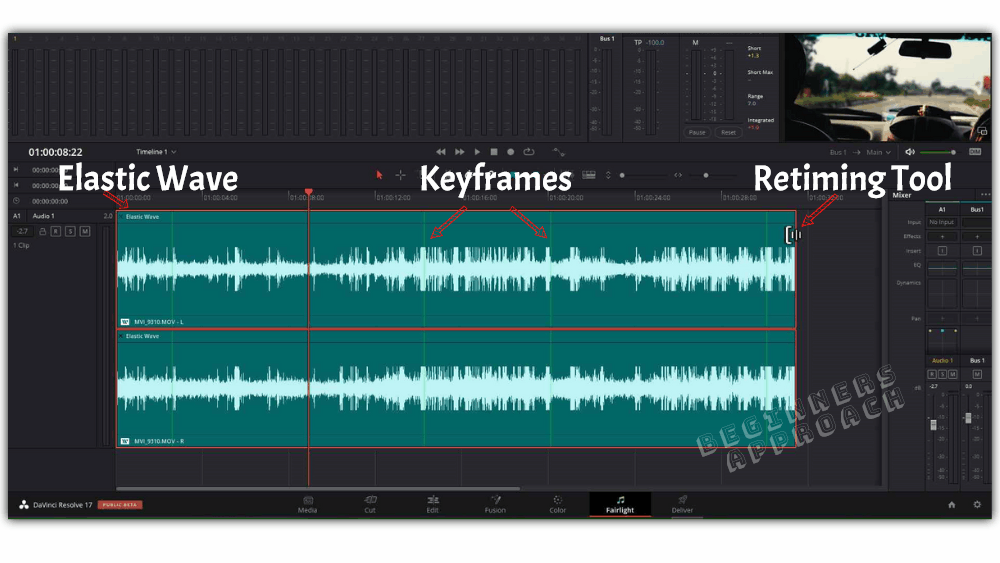
- Hover your mouse toward the left or right edge (on the upper half of the clip) to get the “retiming tool”.
- Drag to the left to compress the audio (speeding up) and toward the right to stretch it (slowing down).
How to Add Speed Keyframes to the Audio Waveform in DaVinci Resolve?
- “Ctrl + Click” or “Cmd + Click” wherever you want in the waveform by hovering your mouse.
- It will place a speed keyframe in the form of a green line. (Refer to the screenshot above).
- Drag the keyframe to the right or left based on your requirement.
- Place as many keyframes as needed for your work.
- To delete the keyframe, right-click on it and select > “Remove Speed Keyframe“.
There you go! Play with the controls till you get the hang of it.
If you want to reverse or rewind a particular segment between the keyframes (like the one present under “Retime Curve” in the “Edit” page for video clips), it is not available in Elastic Wave as far as I can think of.
You can cut the particular segment, right-click on the standalone clip and select “Reverse Clip“.
In Summary:
Under the “Edit” page, for audio, you can only do a straightforward reverse, slow motion, and fast forward across the entire clip.
To really stretch audio to your requirements and if you want to have different audio speeds within the same clip, then you should use the “Elastic Wave” feature under the “Fairlight” page.
You may be also interested in the below posts:
How to Make Voice Deeper in DaVinci Resolve? (For Beginners)
How to Normalize & Balance Audio Levels in DaVinci Resolve? (Quick Tips)
How to Split Audio Channels / Tracks in DaVinci Resolve (Explained!)