
Sometimes simple operations like adding and editing text in Resolve might not work as expected.
Today, we’ll see fixes to the most common text issues in DaVinci Resolve – especially useful for beginners and newcomers to DaVinci Resolve (versions 18.5, 18, 17, etc.)
So without wasting time, let’s dive right in!
- DaVinci Resolve Text Cut Off
- DaVinci Resolve Text Not Showing – Black Screen
- I am Not Able to Edit Text in Resolve
- After Adding Title, the GPU FPS Drops (Computer Slows Down)
- How to Solve Text Media Offline Issue in Resolve?
- Unable to Add Title in a New Video Track in Resolve
- Text Goes Behind Video
- Unable to Move "Text+" box Using Onscreen Controls
- How to Insert Title into the Beginning of an Edited Video in the Timeline?
- Dropping the Text Box Squishes the Video Tracks Underneath It
- Text Disappears After I Export or Render the Video
After adding the title box into the timeline, when you type or copy-paste a lengthy sentence into the text box, you will see that the text is cut off.
DaVinci Resolve Text Cut Off
To solve the text cut off issue, click on the text box in the timeline and then click on the “Inspector” > “Title”. Next, double-click inside the editor and press enter key at the end of the first line. Now you can see your entire text in the timeline viewer.
If you have a big paragraph, you might need to press enter key as often as required.
This is a manual effort because Resolve version 18 (and older versions) doesn’t support the word wrap feature for a title at the time of this writing.
Word wrap should automatically solve the text cut-off issue, but since it’s unavailable in Resolve, you will have to manually press the enter key to solve the text cut-off issue.
DaVinci Resolve Text Not Showing – Black Screen
Many users have faced this issue – after dragging and dropping the title or text box into the timeline, the title is missing, or black background is displayed with no text.
This could mostly happen when you drop a fusion title with effects – these are computationally intensive effects that could strain your computer resources.
So when you have a title in a black background and hit play, you’ll only see the black background first. That is because it is struggling to playback in real time.
To solve the text not showing issue, right-click on the text in the timeline and select “Render In Place”. Resolve will render the clip. Once it’s rendered, and if you hit the play button, the title should display and play out with the black background.
Another important setting you must know is – the render cache.
Go to the menu and click on the “Playback” > “Render Cache” > select “Smart”. When you enable the “Smart” render cache, you’ll see a red line on top of your text box in the timeline, indicating the text has a computationally intensive effect.

Since you’ve selected “Smart”, DaVinci Resolve will automatically render cache the clip when you hit the play button or be inactive for 5 seconds.
Once the line turns blue, the text box will play back smoothly and you’ll see the title playing out as intended.
To solve the Fusion titles not showing issue, right-click on the Fusion title > select “Render In Place”. Or, enable smart cache, so that Resolve will automatically cache the clip and display the Fusion title.
(For more details, search this blog for “Render Cache” and you’ll get helpful articles that guide you step by step on the same.)
I am Not Able to Edit Text in Resolve
To edit a text or title, either you can edit it directly on-screen or from the “Inspector” tab.
Editing On Screen is easy – double-click on the text (we are talking about the “Basic Title” text) inside the timeline viewer. You should now be able to do basic editing like zooming in and out, rotating, changing position, etc.
(You can’t edit a “Text +” or fusion titles on-screen. See below sections for more information.)
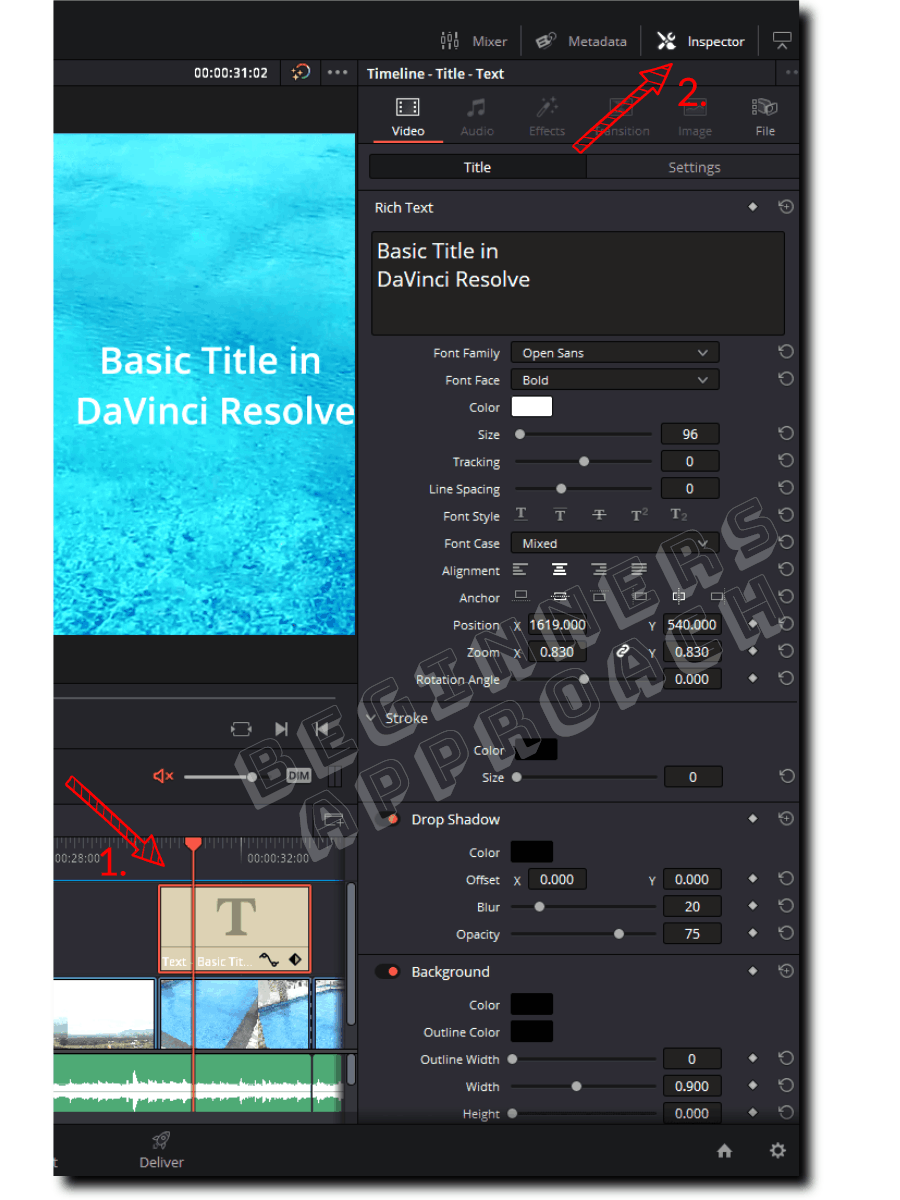
To enable the “Inspector” tab, make sure you are on the “Edit” page. Then, click the text box in the timeline (this is super important !) to highlight it. Most beginners tend to forget to click the text box before accessing the “Inspector”.
(Even I used to miss clicking the relevant text box in the timeline when I was getting started.)
After selecting the desired text box in the timeline, go to the upper right corner and click on the “Inspector” tab. This should reveal all the settings to modify the text.
After Adding Title, the GPU FPS Drops (Computer Slows Down)
Title blocks like the “Text +” and other Fusion Titles, such as – Call Out, Background Reveal, Digital Glitch, etc., have built-in effects which can stress your computer’s resources.
The playback can be choppy or stuttering, and the export (render) time can be time-consuming!
To have a real-time playback and make the GPU status indicator green, first generate optimized media or proxy media. But if you’ve already generated optimized media (or proxy media), you can “Render In Place” the desired clips in the timeline.
For an efficient workflow, turn on the automatic caching. But if you use third-party title effects, you need to manually render cache the title by right-clicking it and selecting “Render Cache OFX Filter” > choose the desired effect to enable it.
Do keep in mind – before generating Optimized media or Proxy Media or Render Cache, you should have selected the correct format like DNxHR for Windows or ProRes for Mac from the “Project Settings” > “Optimized Media and Render Cache” section.
How to Solve Text Media Offline Issue in Resolve?
Sometimes titles like the “Text+” or other fusion titles which are computationally effective, like Jitter, Digital Glitch, Background Reveal, etc., can cause media offline issues if your computer is stressed.
The following are the fixes that can solve the text media offline issues:
- Render in Place = Right-click on the title box (the “Text+” or other fusion titles) and click “Render In Place”.
- Go to the menu, click on “Playback” > “Timeline Proxy Resolution” > make it “Half” or “Quarter”.
- Go the menu > “Playback” > “Render Cache” > select “User”. Right-click the title on the timeline > select “Render Cache Fusion Output” > “On”. We are forcing Resolve to render cache the clip for smooth playback.
Unable to Add Title in a New Video Track in Resolve
Sometimes when you drop a text box or title in the timeline, it doesn’t create its own track. But it overwrites the already existing video track, thereby cutting the existing video clip.
The expected functionality is to have a new video track automatically created if you drag and try to drop the title on top of an existing video track.
If this is not working, right-click on the video track header and click “Add Track”. A new video track has been created. Now you can drag and drop the title in this new video track in the timeline.

Text Goes Behind Video
When you add a text on top of your video (in a new track), you see that the text hides behind the video. If you disable the video track, you can see the text in the timeline viewer.
But when you enable the video track, the text is hidden. It could be due to the following:
You might have placed the text below the video track. So the clip in the upper track takes precedence during display in the timeline viewer. If this is the case, then interchange your title and video. That is, move the title up and bring the video down.
If this is a track-wide issue, right-click on the track header of the title track and click on “Move Track Up“. This will shift the title track on top of the video track.
This should solve the issue.
If your title is on top of the video track and still hidden behind the video, then do the following:
- Click on the video clip, then go to the “Inspector” tab > click on the “Settings”.
- Under the “Composite” section, choose “Add” for “Composite Mode”. This should solve the issue.
- Or you can also click on the title box and change composite to “Add”.
- Play with different settings till you get the result.
Unable to Move “Text+” box Using Onscreen Controls
The “Text+” box lacks on-screen controls to change its position with the help of the mouse, unlike the “Text” box – which can be moved on the screen in the timeline viewer with the help of the mouse.
The best place to move the “Text +” and other Fusion-based titles are by going to the “Inspector” > “Settings” or “Title” > then change the “Position X and Y”. With the help of this, you can move your text anywhere you want.

Alternatively, you can also click on the “Transform” tool in the left bottom corner of the timeline viewer.
You’ll see a rectangular border, with the help of which you can zoom in/out, rotate the “Text+” on-screen, etc. You can also click on the “Crop” below the “Transform” tool for cropping the “Text+” or other fusion titles.
How to Insert Title into the Beginning of an Edited Video in the Timeline?
- Make sure you place the playhead at the beginning of the timeline (the very first frame of your clip).
- Make sure none of the tracks are locked. This ensures all tracks shift together to the right without leaving any gaps.
- Now drag the title box from the “Effects” tab and try to place it over the right side of the timeline viewer screen (don’t drop it yet).
- You’ll see that a few options are displayed.
- Now drop your title on top of the “Insert” option.
- When you do that, you’ll notice the title has been placed in the beginning, and it has successfully pushed all the existing clips to the right.

Dropping the Text Box Squishes the Video Tracks Underneath It
Whenever you drag and drop a title block into the timeline, to accommodate the text box, your timeline gets squished along with the existing video tracks underneath the text box track.
The fix is easy – take your mouse pointer to the upper edge of the header of the title track and resize it to your desired height. Similarly, expand the video tracks underneath the title track by adjusting the height of the video tracks.
Another trick is to place the mouse pointer over the header of the tracks, press the “Shift” key and then scroll up or down the middle button of your mouse. This will enlarge or squish the tracks.
Text Disappears After I Export or Render the Video
Ensure the track containing the title is not disabled on the “Edit” page, before exporting your video from the “Deliver” page.
