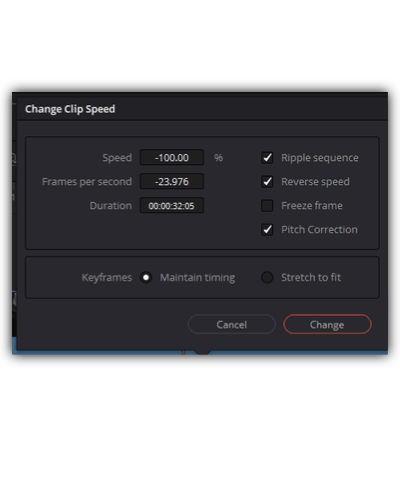
To reverse audio in DaVinci Resolve, import your audio clip, and right-click > “Change Clip Speed”. Enable the “Reverse Speed” option. The speed turns to “-100”. Click on “Change”. This reverses the audio in Resolve.
Reversing audio is essential for stylistic effects, often needed by beginners and newcomers to Resolve (versions 18.5, 18, 17, etc.)
Let’s explore the audio reversing in detail, step-by-step, with pictures.
Let’s get started!
Audio can be reversed in DaVinci Resolve with the help of “Change Clip Speed” settings.
Before that you should know whether you’d want to reverse both video & audio or audio only.
If you want audio only and don’t want to affect video, then right-click on the clip > unselect “Link Clips“.
But if you have only an audio clip (like a sound effect), then no need to worry about unlinking the clip (because it’s a standalone clip).
How to Reverse Audio Only in DaVinci Resolve?
- Go to the timeline on the “Edit” page.
- Import your audio clip (if not already).
- Right-click > “Change Clip Speed“.
- Enable the “Reverse Speed” option.
- The speed will turn to “-100” showing the audio has reversed.
- Click on “Change“. This will play the audio in reverse.
Few important things to note:
“Ripple Sequence” – Enabling this option will ripple the timeline, which means it will push all the clips in the timeline to accommodate the speed change. Unchecking this option and doing speed changes might leave gaps in the timeline.
“Pitch Correction” – This refers to the pitch of the audio. Enabling this will let Resolve automatically change the pitch. Sometimes it works out and sometimes it doesn’t.
Related Article:
For example, when you speed up the audio with the pitch correction enabled, it sounds right. But when you slow down the audio to say 20% of the speed, enabling this option results in an unnatural sound. Unchecking this solves the issue. Just check for yourself and play with it!
Note – Let the “Keyframes” option be set to the default option – “Maintain Timing”.
This option will be useful for video clip speed changes, which are done with the help of keyframes. Since there are no keyframes involved in audio speed changes, leave this option to the default one. (Audio will have keyframes for Volume and Pan on the “Edit” page).
How to Reverse Audio without Reversing Video in DaVinci Resolve?
If you have a clip with both video and audio, then right-click the clip, and unselect “Link Clips”. This will separate the clips. Now right-click on the audio clip, select “Change Clip Speed” > select the “Reverse Speed” option and click on “Change“. Done!
Before You Go:
Now that you’ve learned how to reverse an audio clip in DaVinci Resolve with or without a video, the next natural step is to know how to speed up, slow down and stretch audio to your requirements.
I highly recommend the below detailed step-by-step guide which can help you quickly get started in your audio post-production journey:
Click here to learn more about speeding up and slowing down audio in DaVinci Resolve