Splitting audio is different from separating audio from video in DaVinci Resolve.
Splitting audio can result in different formats, say, from stereo to mono, from 5.1 to individual audio tracks, etc.
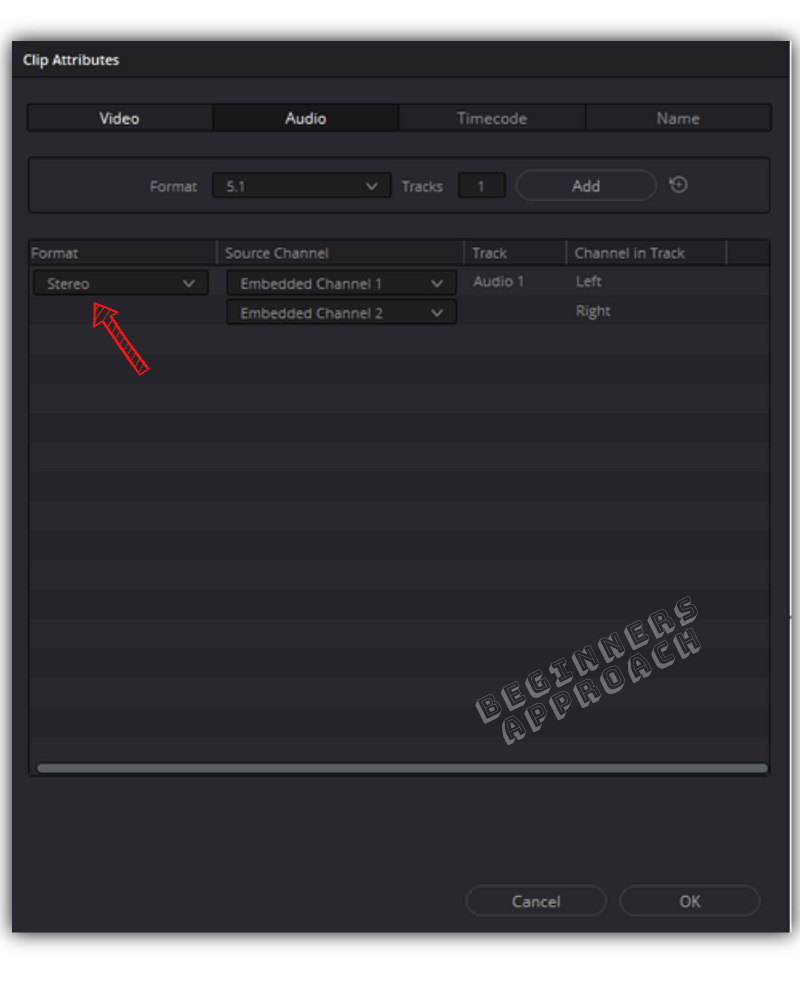
To split audio in DaVinci Resolve, go to the “Media Pool”, and right-click on your stereo audio clip. Select the “Clip Attributes” > “Audio” tab. Select “Mono” from the “Format”. Set “2” for “Tracks”. Click on “Add”. For the first “Mono” track, select “Embedded Channel 1”, second one > “Embedded Channel 2”.
Let’s explore the audio splitting in detail, step-by-step with pictures – useful for beginners and newcomers to DaVinci Resolve (versions 18.5, 18, 17, etc.).
- Audio formats and Channels
- How to Check Audio Format and Channels in DaVinci Resolve?
- How to Make Stereo Audio Mono in DaVinci Resolve?
- How to Split Stereo into Dual Mono in DaVinci Resolve?
- How to Split 5.1 or 7.1 Audio into Individual Tracks in DaVinci Resolve?
- How to split audio clips when they are already part of a timeline with all the edits in place?
Often times we record multiple audios using in-built cameras and external microphones like booms, lavaliers, and smartphones like iPhones, etc, for our video or b-rolls.
You might need certain types of recorded channels – mono, stereo, or 5.1 – to be split into dedicated channels and tracks, to have a granular control.
Before we start, you should know a bit about the different audio formats and channels and how DaVinci Resolve handles them.
Audio formats and Channels
| Format | Channels |
|---|---|
| Mono | 1 Channel |
| Stereo | 2 Channels – Left and Right |
| 5.1 | 6 Channels – Left, Right, Center, LFE, Left Surround, Right Surround |
| 7.1 | 8 Channels – Left, Right, Center, LFE, Left Surround, Right Surround, Left Surround Rear, Right Surround Rear |
| Adaptive Tracks | Up to 24 Channels |
A Very important thing is – you must use the correct track format in the timeline to match the audio format.
For example…
If you have a stereo audio clip in the media pool, and if your audio track in the timeline is set to mono, then when you drag and drop the audio clip onto the track, obviously you’ll have only one channel, to match the track format. You’ll lose the other channel.
Similarly, when you have a mono audio clip and drag and drop it over a stereo audio track, you’ll have 2 channels displayed with one of them being empty!
Make sure to match the track format to the clip audio format. (More on that later).
But before even dragging and dropping your audio clips into the timeline, you must determine the audio format of your clips.
First set right the clip format and then determine the track format.
It all starts with the clips in the media pool.
How to Check Audio Format and Channels in DaVinci Resolve?
- Import your audio and video clips into the “Media pool“.
- Right-click on the desired clip > select “Clip Attributes…“.
- Click on the “Audio” tab.
- Check the “Format” and “Source Channel“.
- The “Format” will reveal “Mono”, “Stereo”, or “5.1”.
- The “Source Channel” will reveal the number of channels based on the format.
If you click on the “Embedded Channel 1” dropdown underneath “Source Channel“, it will expose the number of embedded channels this clip might have.
Let me explain…
If you had 2 different microphones recording audio (which is formatted as Stereo), then the dropdown will display the many numbers of embedded channels to choose from. You’ll have to select each channel and listen to them to round in on the best-sounding one.
Sometimes, a mono audio recording might be wrongly mapped as stereo, which will result in one of the channels being empty.
How to Make Stereo Audio Mono in DaVinci Resolve?
- Go to the “Fairlight” page (you can do this on the “Edit” page as well).
- Click on “Media Pool“.
- Right-click on your stereo audio.
- Select “Clip Attributes…“.
- Click on the “Audio” tab.
- Under “Format” select “Mono” instead of “Stereo”.
- Under “Source Channel“, select the channel which has your desired audio, in this case, “Embedded Source Channel 1“.
- Click on “Ok“.
Now the stereo audio is converted to a mono channel audio clip. Now you can drag and drop this clip into the timeline. (Keep in mind that the track which receives this clip should be configured to “Mono” as well).
For more information on converting mono to stereo, filling the right channel audio with the left channel, etc, click on the below for a detailed step-by-step tutorial with pictures:
DaVinci Resolve Mono to Stereo (FIX: Audio Only On One Side)
If you want to have separate audio tracks for each channel for a stereo clip (instead of a single track), you can do so by converting it to dual mono channels. This is how you split a stereo into dual mono:
How to Split Stereo into Dual Mono in DaVinci Resolve?
- Go to the “Fairlight” page (you can do the same on the “Edit” page as well).
- Click on “Media Pool”.
- Right-click on your stereo audio clip.
- Select “Clip Attributes...”.
- Click on the “Audio” tab.
- Select “Mono” from the “Format“.
- Set “2” for “Tracks“.
- Click on “Add“.
- For the first “Mono” track, select “Embedded Channel 1” or the one which has the desired audio.
- For the second “Mono” track, select “Embedded Channel 2” or the one which has the desired audio.
- Delete the “Stereo” track.
- Click on “Ok“.
Now you’ll have dual mono tracks with different audio on channels 1 and 2.
When you drop this clip onto the timeline, 2 audio tracks will be created for each track. You can manipulate them separately.
You can follow the same procedure for multiple clips in your media pool, which require the same operation.
How to Batch Split Audio Channels in DaVinci Resolve?
- Go to the “Fairlight” page (or the “Edit” page).
- Click on “Media Pool“.
- Select all of your required clips.
- Right-click on any audio clip.
- Select “Clip Attributes…“.
- Click on the “Audio” tab.
- Add 2 mono tracks with your desired audio under “Source Channel”.
- Click on “Ok“.
- All the selected clips will be batch converted to dual mono clips.
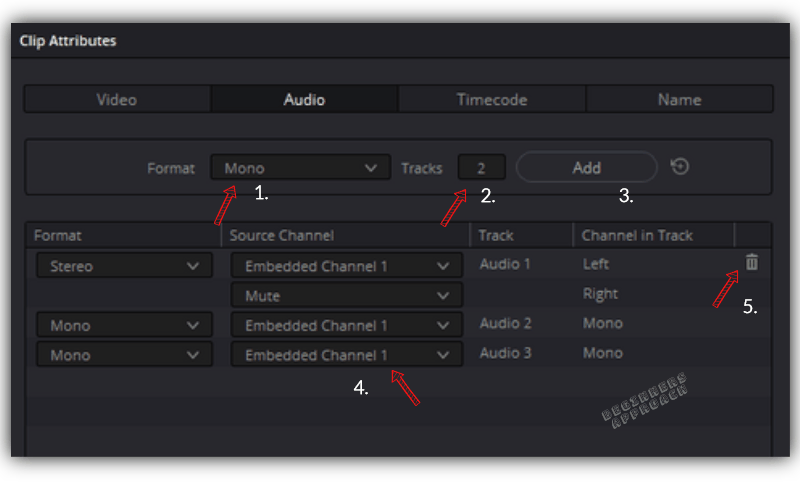
How to Split 5.1 or 7.1 Audio into Individual Tracks in DaVinci Resolve?
5.1 has 6 audio channels and 7.1 has 8 audio channels.
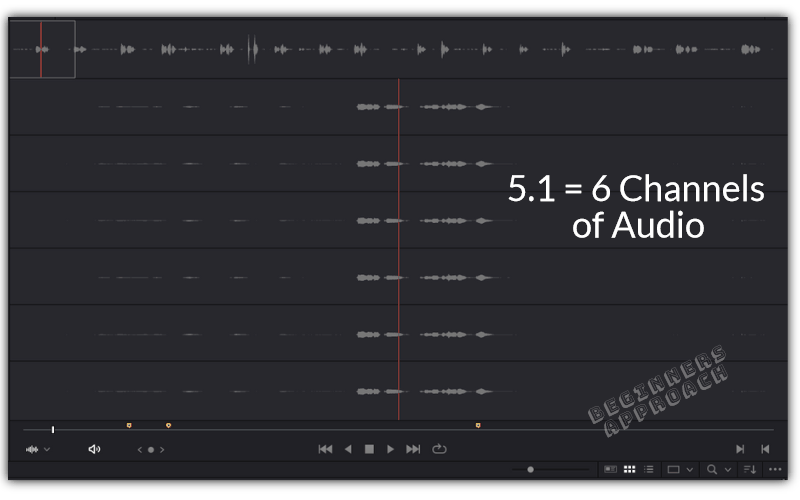
When you drag and drop a 5.1 audio clip on an audio track, it will have 6 channels within the same track. It becomes difficult to work with different channels on the same track.
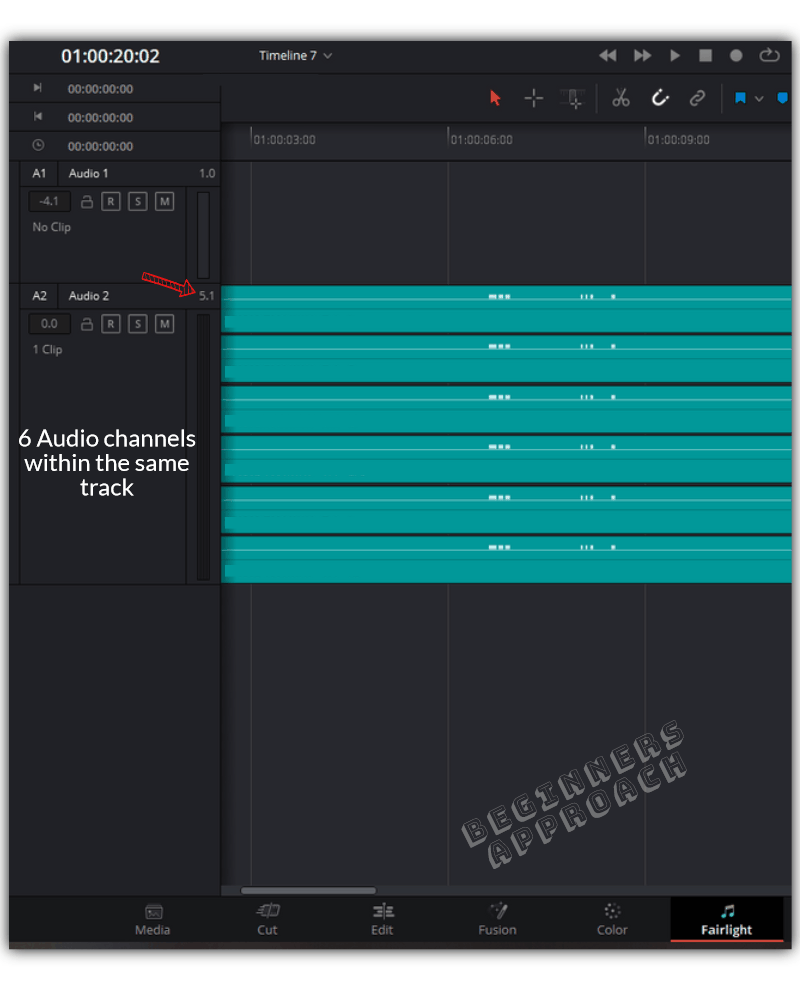
Here, you’d like to have separate tracks for each channel to change levels individually. This means you need to split the 5.1 into 6 mono channels.
So, let’s see how to split a 5.1 or 7.1 audio into individual tracks in Resolve:
- Go to the “Fairlight” page.
- Click on “Media Pool“.
- Right-click on your stereo audio clip.
- Select “Clip Attributes…“.
- Click on the “Audio” tab.
- Select “Mono” from the “Format“.
- Set “6” for “Tracks“.
- Click on “Add“.
- Under “Source Channel“, for all the 6 “Mono” tracks, select appropriate embedded channels.
- Delete the “5.1” track.
- Click on “Ok“.
Now when you drag and drop this clip onto the timeline, 6 new individual tracks will be added!
Till now we had seen how to split audio when the clips were in the “Media Pool”.
The next natural question is:
How to split audio clips when they are already part of a timeline with all the edits in place?
- Right-click on the clip (inside the timeline).
- Select “Clip Attributes…“.
- Change the format to whatever you want, like “Mono”.
- Under the “Source Channel“, select an appropriate embedded channel.
- Click on “Ok“.
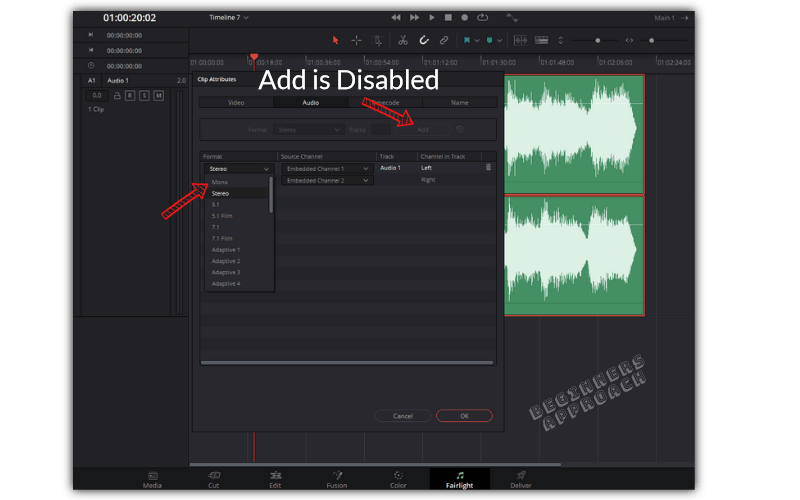
You’ll note 2 things:
- “Add” is disabled – because since it is already part of an audio track in the timeline, you can’t add new tracks. (This can only be done from the “Media Pool“).
- Inside a stereo track, converting a stereo clip into a “Mono” will leave one channel empty.
Go ahead and convert the track to “Mono“.
This is how you change the track type in DaVinci Resolve
- Go to the “Edit” or “Fairlight” page.
- Right-click on the required track header (in this case A1)
- Select “Change Track Type to” > “Mono“.
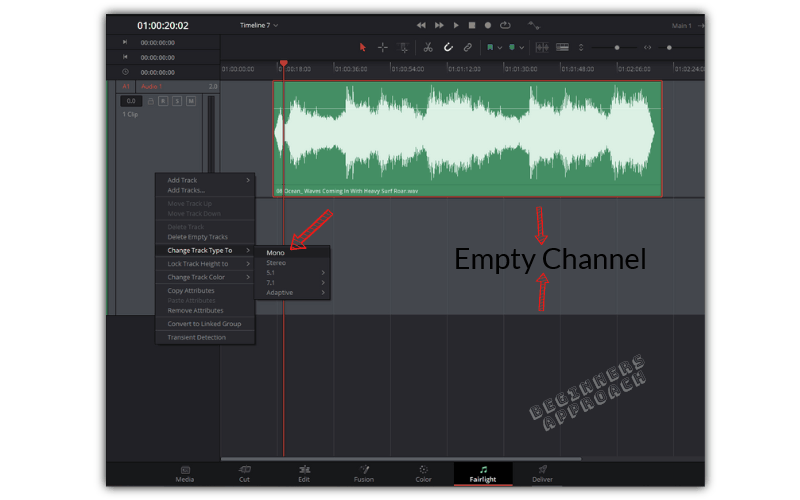
- After changing the track to mono, it will have only one channel.
How to Split a Stereo or 5.1 or 7.1 Audio into Individual Tracks After Finishing Editing in the Timeline
After you’ve done all your audio editing – now a need arises to split the tracks.
You don’t want to go to “Media Pool” and split them and then again place them in the timeline because it’s very time-consuming.
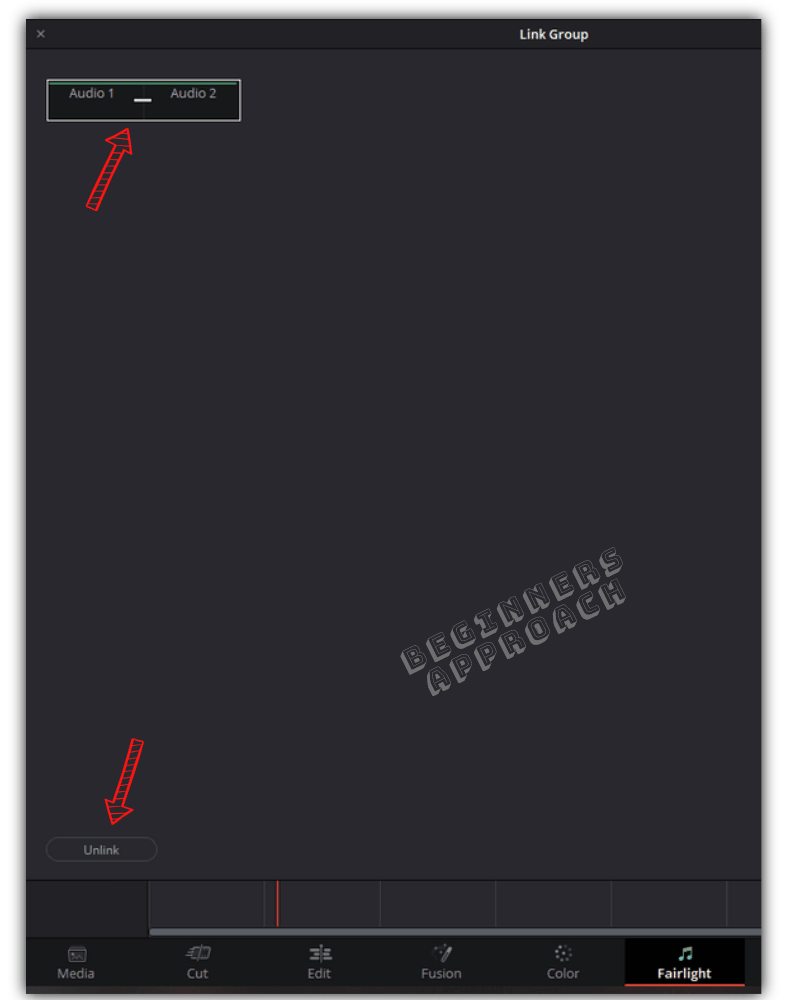
You can split your audio into separate tracks with the help of “Convert to Linked Group” and then unlink the groups.
This is how you do it step by step:
- Go to the “Fairlight” page.
- Right-click on the audio track header which has your stereo or 5.1 or 7.1 clip.
- Select “Convert to Linked Group“.
- This will split the channels into dedicated tracks.
- All the tracks are linked because when you click on one track header, all the tracks will be selected.
- To unlink them, go to the menu “Fairlight” > select “Link Groups”.
- Click on the linked tracks ( a border is highlighted).
- Click on “Unlink“.
- All the tracks are now individual!
There is another workaround to it.
If you want to separate a stereo clip into 2 mono tracks, then add 2 empty audio tracks above or below the original one. Copy the original stereo into the 2 empty tracks (Select the clip and “Alt-drag” or “Opt-drag” to the empty tracks for copying).
Right-click the copied track and select “Clip Attributes” to change the format to “Mono” with one embedded channel. Do the same to the other track and select the other embedded channel.
This way you’ll have 2 separate mono tracks with 1 original stereo (you can mute the original – to have it as a backup).
You may also be interested in the below posts:
How to Sync Audio / Clips in DaVinci Resolve (Quickly)?
How to Normalize & Balance Audio Levels in DaVinci Resolve? (Quick Tips)
I am working on figuring out how to do the opposite of this with no luck. I have a 4 channel audio file with Ambisonic Audio, I am trying to add two channels to it and make it a 6 channel file by adding a stereo track to it.
For this to work the way I need it to work, it cant be a separate track in the final render, it needs to be a single track with all 6 channels.
I tried compound clips, bouncing the files, and buss routing so far with no luck. I feel it should be possible, just missing something.
Unfortunately with Adaptive audio tracks it only lets me choose what channel to use based on the data already in the track, not reference a different track, that would be the easiest fix. Or some kind of routing two make the tracks together as one, but buss routing doesnt allow me to create an adaptive buss.