
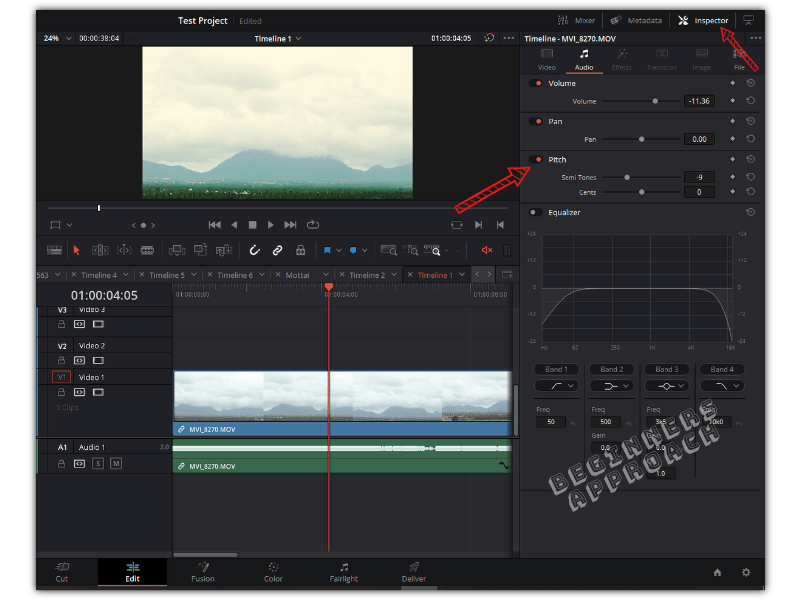
To change the voice in DaVinci Resolve, go to the “Edit” page, click on your audio clip, then click on the “Inspector” tab > “Audio” tab. Under the “Pitch” section, change the values of “Semi-Tones” and “Cents” to get the desired effect.
Let’s explore the above pitch correction in detail, step-by-step, with pictures.
Changing the pitch should help you change the voice, make it deeper, or disguise it.
DaVinci Resolve offers in-built audio feature which should get the job done quickly for beginners and newcomers to Resolve (version 18.5, 18, and 17) in 2023.
Let’s get started!
Can I Change My Voice in DaVinci Resolve?
You can change your voice in DaVinci Resolve by changing the pitch settings under the “Inspector” tab on the “Edit” page.
How to Make Voice Deeper in DaVinci Resolve?
You can make your voice deeper by changing the pitch of your voice. Changing the value of pitch in either direction (left and right) can make your voice sound deeper or sound squeaky.
How to Change the Pitch in DaVinci Resolve?
DaVinci Resolve pitch correction can be done by going to the “Edit” page, and clicking on your audio clip (assuming you already have a timeline created). Click on the “Inspector” > “Audio” tab > “Pitch” > reduce the “Semi Tones” value to a negative one to make the voice deeper.
To make your voice sound squeaky, increase the “Semi Tones” value to a positive one.
The “Semi Tones” changes the pitch of your voice by a large value.
The “Cents” setting helps you do finer adjustments to the pitch.
Importantly, changing the pitch settings doesn’t change the speed of your audio clip.
Before making any adjustments to your voice, make sure you remove any unwanted background noise from your audio clip.
How to Change Pitch in DaVinci Resolve Fairlight?
You can also change the pitch (or make your voice deeper) on the “Fairlight” page.
We’ll see how to change the pitch of all the sound clips placed on a track.
- Go to the “Fairlight” page.
- Click on “Mixer” to open up the mixer section, which displays all of your audio tracks.
- Under your audio track, say, A1, click on “+” against “Effects“.
- Select “Pitch” > “Pitch“.

- Turn the “Semitones” knob to the left to make your voice deeper and turn it right for a squeaky sound.
The above is a track-level change – affecting all the clips on the tracks.
How to Change Pitch Over Time in DaVinci Resolve?
You can change the pitch of your voice over time using keyframes on the “Edit” page.
Let’s say, you want your voice to sound natural at the beginning of your audio clip and gradually make it deeper towards the end.
This is how you do.
- Place your playhead at the starting (first frame) of your audio clip.
- Under the “Inspector” tab, click on the small circle (the keyframe) against the “Pitch“. The keyframe turns red, which means Resolve is ready for keyframing.
- Slightly change the value of your “Semi Tones” so that a keyframe is placed. Just do a minor adjustment around 0 (because we don’t want your voice changed at the beginning of the clip).
- Now go to the end of the clip and again change the value of “Semi Tone” to a negative value.
- This places another keyframe.
- That’s all.
Now when you play the clip, you will hear your voice getting deeper over time!
Before You Go:
Changing the voice in DaVinci Resolve with the help of pitch correction should make your voice sound deeper or squeaker as per your requirements. Soon, you’ll realize that there is more to sound/audio post-production in Resolve like normalizing the audio clips, adding sound effects, and reversing and re-timing your audio to sweeten it further.
I highly recommend the below quick guides to get you started without wasting time: