If you’re a beginner or a newcomer to DaVinci Resolve (version 18.5, 18, 17, etc.), then today’s guide on reversing a clip will be helpful to you.
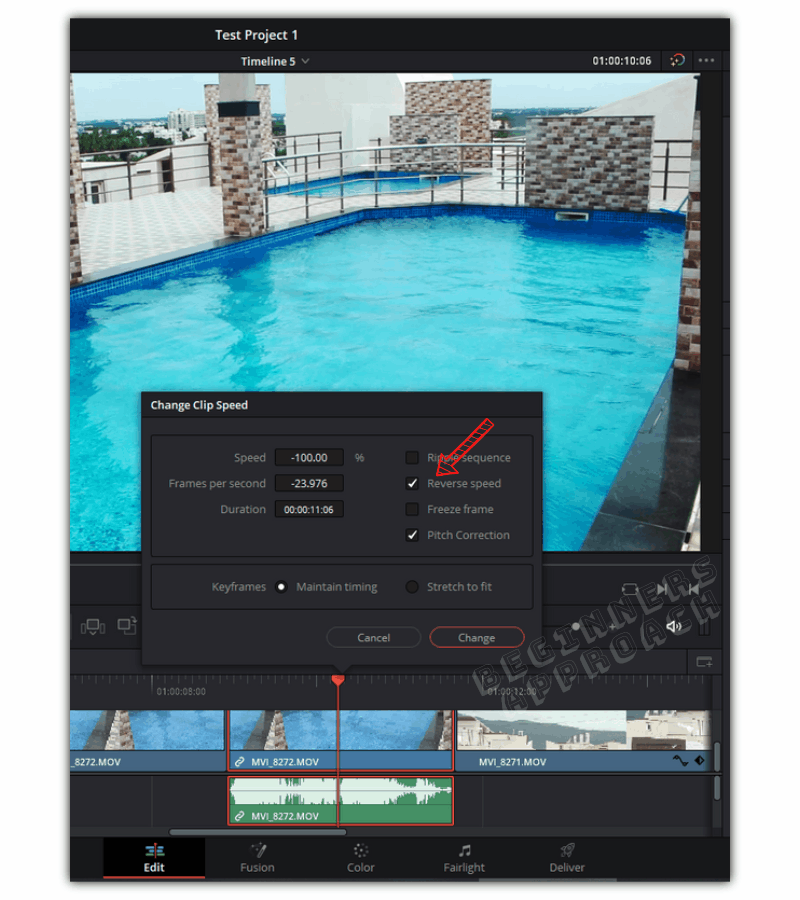
To reverse a clip in DaVinci Resolve, right-click on the clip in the timeline. Then select “Change Clip Speed…”. Enable the “Reverse Speed” checkbox. Your video is now reversed!
If you want to reverse a part of the video clip (and not the entire clip), it will take a few extra steps.
The speed change controls in DaVinci Resolve help you accomplish reverse, rewind effects, etc., quickly.
We will also look at ways to reverse an inbuilt transition in Resolve.
How to Reverse A Clip in DaVinci Resolve?
- Go to the “Edit” page > your timeline.
- Right-click on the clip in the timeline.
- Select “Change Clip Speed…“.
- Click on the “Reverse Speed” checkbox.
- If needed, change the “Speed” value to speed up or speed down the clip.
- Click on “Change“.
- The clip now plays backward.
A few things to note:
What is Ripple Sequence in Change Clip Speed?
If you enable “Ripple Sequence“, the subsequent clips will automatically adjust according to the length of the selected clip. In other words, the timeline will be rippled.
If you don’t enable it, the current clip will either leave a gap in the timeline or override the subsequent clips.
What is Freeze Fame in Change Clip Speed?
Enabling “Freeze Frame” converts the selected clip into a freeze frame based on the position of the playhead. The clip looks like a still.
What is Pitch Correction in Change Clip Speed?
By default, the “Pitch Correction” is checked to maintain the pitch of the sound to make it sound natural, whenever there is any change to the speed of the video clip.
If you would like to know more about audio during reversing or retiming a clip, check out the below resource:
How to Reverse & Retime Audio in DaVinci Resolve (Must Read!)
What is Maintain Timing & Stretch to Fit Options in Change Clip Speed?
“Maintain Timing” and “Stretch to Fit” affect the keyframes within the clip (if you have any). Selecting the “Maintain Timing” option will leave the keyframes locked to their position, while the “Stretch to Fit” will stretch the keyframes according to the speed change.
If you’re not sure what to do, then select “Maintain Timing”.
Can I Reverse Part of a Clip in DaVinci Resolve?
Instead of an entire clip, part of a clip can be reversed by selecting the “Rewind” option under “Retime Controls”. Selecting this option will automatically place 2 “Speed Points” inside the clip which divides the clip into 3 segments.
The first part of the clip will play forward, the second part will play in reverse, and the third part will again play in the normal forward direction.
How to Reverse Part of a Clip in DaVinci Resolve?
- Right-click on the required clip.
- Select “Retime Controls” (the shortcut for retime controls is “Ctrl + R” or “Cmd + R”).
- Click on the small inverted triangle at the bottom of the clip.
- Click on “Rewind” and select a speed, say, 200. This will play the reverse portion 2 times faster compared to the normal forward portion.
- Two-speed points will be placed. The first portion of the clip will play at normal (100%) speed. The second portion of the clip will play in reverse twice as faster, followed by the normal speed of the third portion.
- You can alter the speed of any portion by clicking on the small inverted triangle, and select “Change Speed” to the required value of your taste.

Reverse Segment in DaVinci Resolve
The “Reverse Segment” option reverses the speed of the entire clip or between two-speed points within the clip. You can access the “Reverse Segment” option by right-clicking the clip and selecting “Retime Controls”, then clicking on the small inverted triangle at the bottom of the clip.
Now you know how to reverse/rewind video in DaVinci Resolve. The next natural question would be about reversing a transition in Resolve.
Can I Reverse a Transition in DaVinci Resolve?
You can reverse a transition in DaVinci Resolve as long as the transition has the “Transition Curve” feature in the “Inspector” tab under the “Edit” page.
You have a cool DaVinci Resolve transition, but you want it to be reversed. At first, it might seem difficult, but with a few extra steps, it can be reversed.
All you have to do is keyframe the transition curve from 1 to 0, instead of 0 to 1 (we’ll look at this step by step below).
0 to 1 will play in the normal forward direction, whereas 1 to 0 will reverse the direction of the transition.
How to Reverse a Transition in DaVinci Resolve?
- Under the “Edit” page, click on “Effects Library“.
- Under “Toolbox“, click on “Video Transitions“.
- Select a transition, say, “Split” under “Motion”.
- Drag and drop it onto the required clip.
- Click on the transition and go to “Inspector” -> “Transition” tab.
- Locate “Transition Curve”.
- Place the timeline playhead in the first frame of the transition.
- By default, the keyframe should be red – indicating it is selected. (If not red, then please click on the keyframe to turn it on.)
- Change the “Transition Curve” value to “1“.
- Place the timeline playhead to the last frame of the transition.
- Change the “Transition Curve” value to “0“.
- Now when you play the clip with the transition, the transition will be reversed!
Before You Go
Apart from playing the video clip backward, your work will also involve reversing the audio. Reversing the audio clips is not as simple as it sounds and requires a few extra steps.
I highly recommend going through the below detailed guide on reversing and retiming audio: