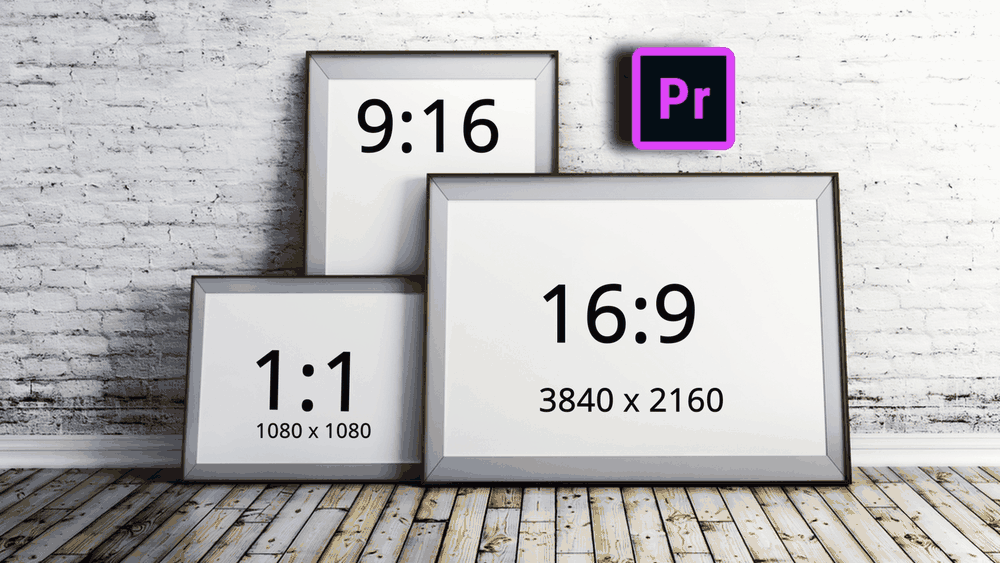
The aspect ratio in Premiere Pro defines the shape of the video frame – vertical, square, widescreen, old TV look, etc., which is important for final delivery – YouTube, Instagram, Vimeo, Film Festival, Cinema Projection, etc.
To change the aspect ratio in Premiere Pro, first change the “Frame Size” by going to “File” > “New” > “Sequence”. Click on the “Settings”. Under the “Video” section, set the “horizontal” and “vertical” values. To get a vertical aspect ratio of 9:16, enter 2160 and 3840 in the horizontal and vertical fields.
To find the aspect ratio of your footage, divide the height from the width of your footage’s resolution.
For a given aspect ratio, to find the height (or vertical value), divide the width (or Horizontal) value by the aspect ratio.
For an aspect ratio having horizontal black bars, drag and drop an adjustment layer on top of your video clip and crop the top and bottom parts.
You can also have multiple aspect ratios in the same timeline in Premiere Pro. (More on that later).
Knowing the aspect ratio before shooting will help you frame your important action accordingly and set the right resolution while creating a new sequence in Premiere Pro.
Resolution and aspect ratio are tightly interrelated because changing one of them affects the other.
- How to Change Aspect Ratio in Premiere Pro?
- How to Determine Aspect Ratio from Your Footage?
- How to Find Height or Vertical Value Based on Aspect Ratio?
- For an Aspect Ratio of 2.35:1, what are the height and width values?
- What Should I Put in Horizontal and Vertical Frame Size Values for an Aspect Ratio of 1.85:1 in Premiere Pro?
- What will Happen If I Drop Footage on a Timeline with a Different Aspect Ratio in Premiere Pro?
- What will Happen If I Drop a Lower Resolution Footage on a Timeline with Higher Resolution with Different Aspect Ratios?
- How to Add Horizontal Black Bars to Multiple Clips in Premiere Pro?
- Can I Change Aspect Ratio in the Middle of Editing in Premiere Pro?
- How to Have Multiple Aspect Ratios in the Same Timeline in Premiere Pro?
How to Change Aspect Ratio in Premiere Pro?
- To change the aspect ratio, first, create a new sequence = “File” > “New” > “Sequence”.
- Go to the “Video” section.
- Update the “horizontal” and “vertical” value – displayed against the “Frame Size”.
- To get a vertical aspect ratio of 9:16, enter 2160 and 3840 in the horizontal and vertical fields.
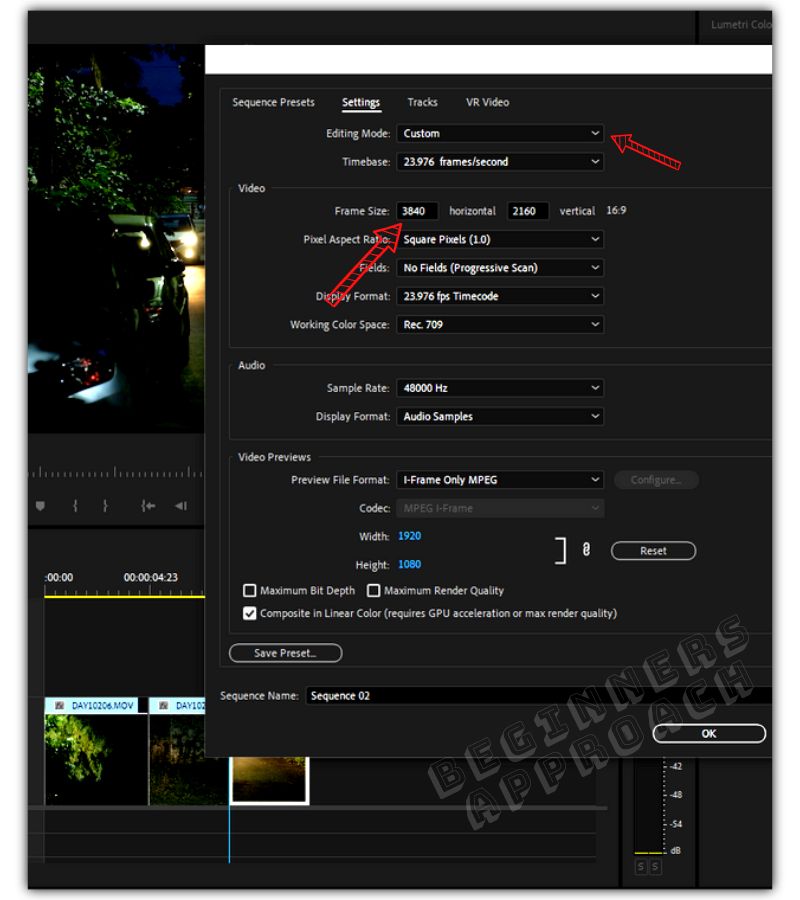
The above image shows the aspect ratio sequence settings inside Premiere Pro.
If you want to learn more about changing resolution in Premiere Pro, then click on the below helpful guide:
This holds good when you are going to create a new sequence.
What if you had built a sequence and are in the final stages of delivery and would like to modify the aspect ratio?
There is an efficient way for that as well, which will be discussed in a few seconds. The table below shows aspect ratios for various final looks.
| Final Delivery Look | Aspect Ratio | Aspect Ratio (in Decimal) | Width (Horizontal) | Height (Vertical) |
|---|---|---|---|---|
| Vertical Videos – YouTube Shorts, Instagram Stories | 9:16 | 0.56:1 | 1080 | 1920 |
| Square Look | 1:1 | 1:1 | 1080 | 1080 |
| Widescreen Cinema Standard – Hollywood Movies for 4K UHD | | 2.35:1 | 3840 | 1634 |
| Old TV Look | 4:3 | 1.33:1 | 1920 | 1443 |
| Common Wide Look 1080p | 16:9 | 1.78:1 | 1920 | 1080 |
| Common Wide Look 4K UHD | 16:9 | 1.78:1 | 3840 | 2160 |
| 35mm Motion Picture Standard – Hollywood Movies for 4K UHD | | 1.85:1 | 3840 | 2075 |
| IMAX for 4K UHD | | 1.43:1 | 3840 | 2685 |
(The resolution – width & height – is just for giving you an example. Each aspect ratio could have multiple resolutions based on source footage and final delivery. The important thing is to find the height by dividing the aspect ratio from the Width)
Before that, you should know how to find the aspect ratio – of your footage and for the final delivery.
How to Determine Aspect Ratio from Your Footage?
To find the aspect ratio of your footage, divide the height from the width of your footage’s resolution. If your resolution is 1920 x 1080p HD, then 1920 divided by 1080 is 1.78. In aspect ratio terms, it is called 1.78:1 (also called 16:9 / landscape / wide, etc.)
This is how your camera, smartphone, or screen recording captured your footage.
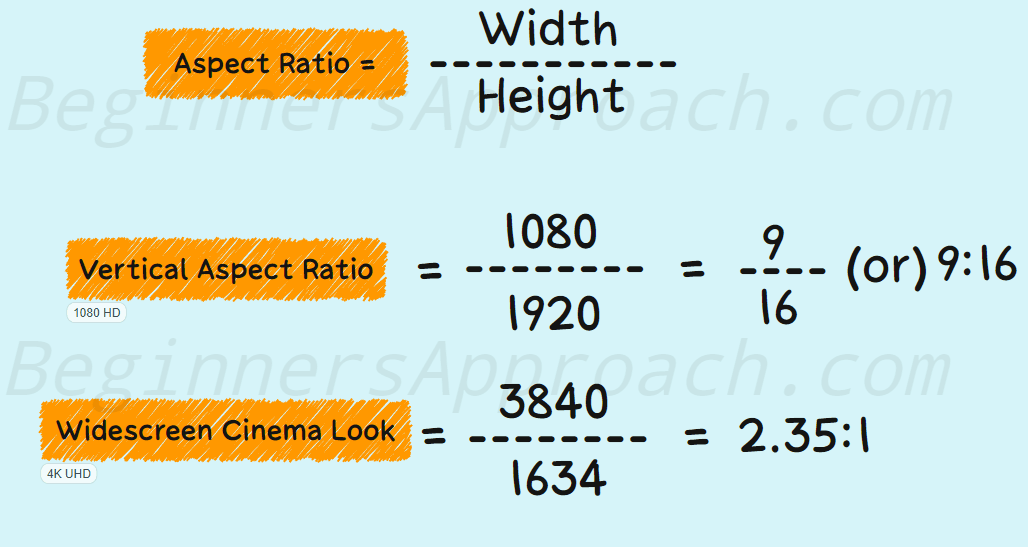
The above image visually explains the concept of aspect ratio.
Next, you’ll have to determine the aspect ratio for your final delivery (cinematic widescreen or vertical YouTube Shorts or square Instagram videos). This is something you should know yourself or get the information from your client.
After you know the aspect ratio, let’s say, 2.35:1, which is a cinema widescreen look, the next step is finding the height (or vertical value) of the frame size with respect to the width (or horizontal).
How to Find Height or Vertical Value Based on Aspect Ratio?
The width (or Horizontal) value divided by the aspect ratio gives you the height (or Vertical) value for your video.
Let me explain.
If your footage was originally shot at 4K UHD 16:9, which is 3840 x 2160…
…and you plan to deliver in widescreen cinema standard, say, 2.35:1…
…then to find the required height, divide 2.35 from 3840, that is, 3840/2.35 = 1634.
Width/Aspect Ratio = Height (Refer to the above infographics for a visual representation.)
Therefore, your resolution should be horizontal – 3840 and vertical – 1634 to get the wide-screen cinema look of 2.35:1.
(Refer to the above table for different aspect ratios according to your final delivery or look.)
In the below section, let’s determine the height and width for a 2.35:1, 16:9, 1.85:1 aspect ratios
For an Aspect Ratio of 2.35:1, what are the height and width values?
To get an aspect ratio of 2.35:1, for a 4K UHD delivery, enter “3840” in the “Horizontal” and “1634” in the “Vertical” fields on the “Sequence Settings” in Premiere Pro.
What Should I Put in Horizontal and Vertical Frame Size Values for an Aspect Ratio of 1.85:1 in Premiere Pro?
To get an aspect ratio of 1.85:1, for a 4K UHD delivery, enter “3840” in “Horizontal” and “2075” in “Vertical” and for a 1080p HD delivery, enter “1920” in “Horizontal” and “1038” in “Vertical” in the “Sequence Settings” in Premiere Pro.
What will Happen If I Drop Footage on a Timeline with a Different Aspect Ratio in Premiere Pro?
When you drop a 16:9 aspect ratio (or 1.78:1) footage onto a timeline with a 2.35:1 aspect ratio with the same resolution, Premiere Pro will throw a “Clip Mismatch Warning” pop-up. Click on “Keep exiting settings” to follow the timeline aspect ratio (as defined in the “Sequence Settings”).
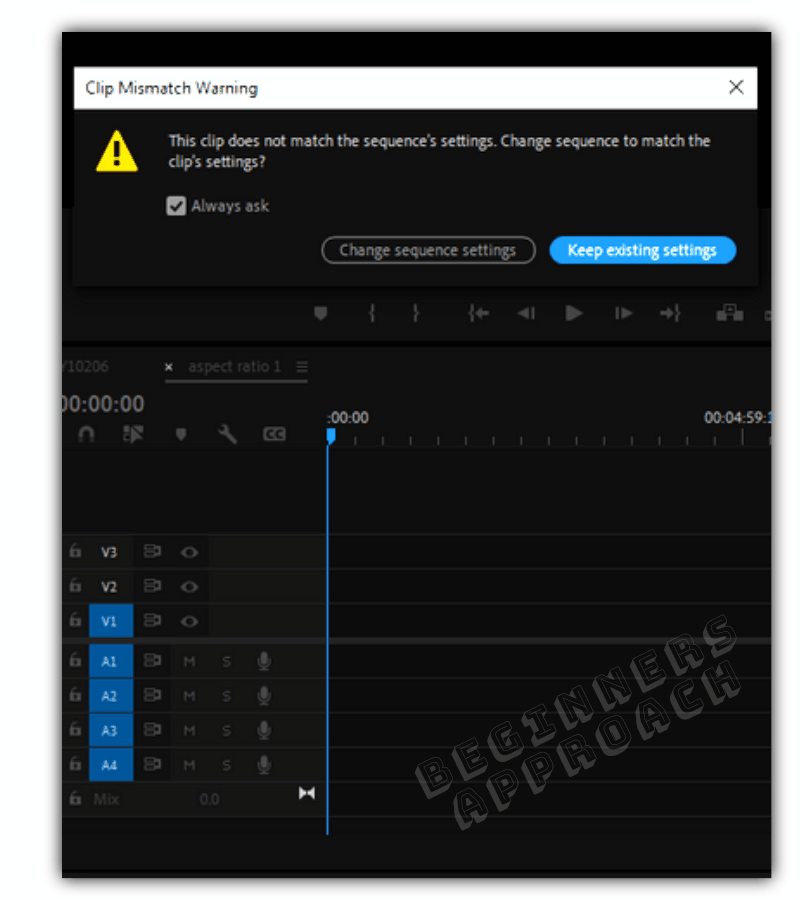
The above image shows the “clip mismatch warning” due to conflicting aspect ratios.
At the same time, there will be no black bars at the top and bottom (also known as letterboxing). The video will be zoomed in to fill the wide screen.
What will Happen If I Drop a Lower Resolution Footage on a Timeline with Higher Resolution with Different Aspect Ratios?
When you drop a lower resolution footage of 1.78:1 aspect ratio on a higher resolution timeline with 2.35:1, then obviously, the footage will be surrounded with black bars from all sides. Right-click on the footage in the timeline and select “Set to Frame Size”.
This will introduce black bars on the left and right (called pillar boxing). Zoom the video further in to fill the screen until there are no black bars.
If you want letterboxes or black bars on the top and bottom for a cinematic look, do the following:
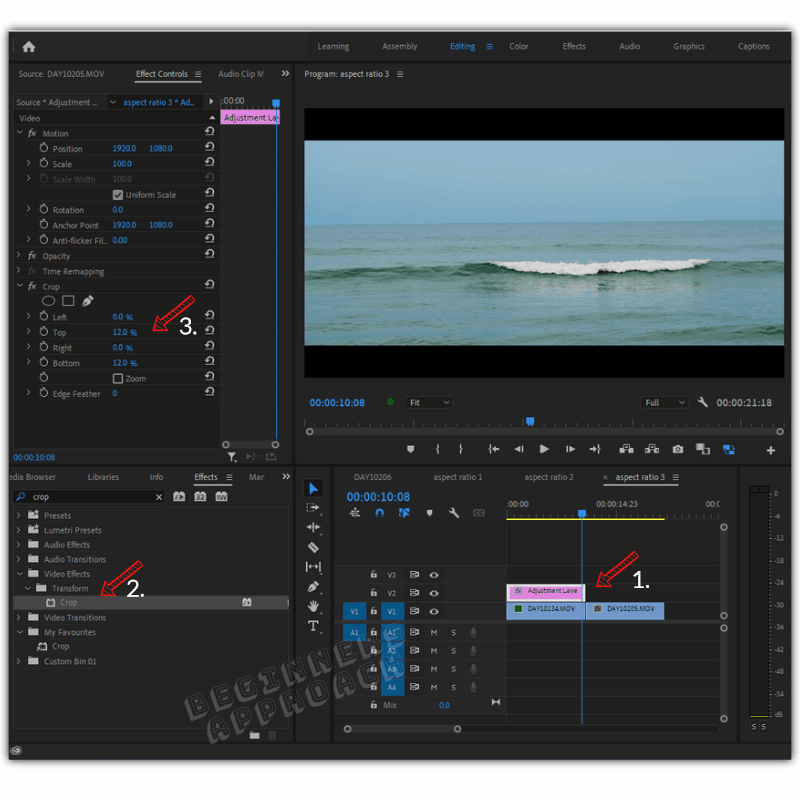
How to Add Horizontal Black Bars to Multiple Clips in Premiere Pro?
- Go to the “Project Panel” and click on the new item from the bottom right.
- Click on “Adjustment Layer“. Let the resolution be the same as the timeline resolution.
- Drag the adjustment layer and drop it on top of your clip in a different video track.
- Go to “Effects” and search for “Crop”. It will be under “Video Effects” > “Transform” > “Crop”.
- Drag and drop the effect on the adjustment layer.
- Now go to the “Effect Controls” panel.
- Change the “Top” and “Bottom” crop values to, say, 12% to get the cinematic letterbox look. (You can play with different crop values to get the look you want).
- Drag the adjustment layer to multiple clips! The below image shows the horizontal black bars created using the adjustment layer.
Can I Change Aspect Ratio in the Middle of Editing in Premiere Pro?
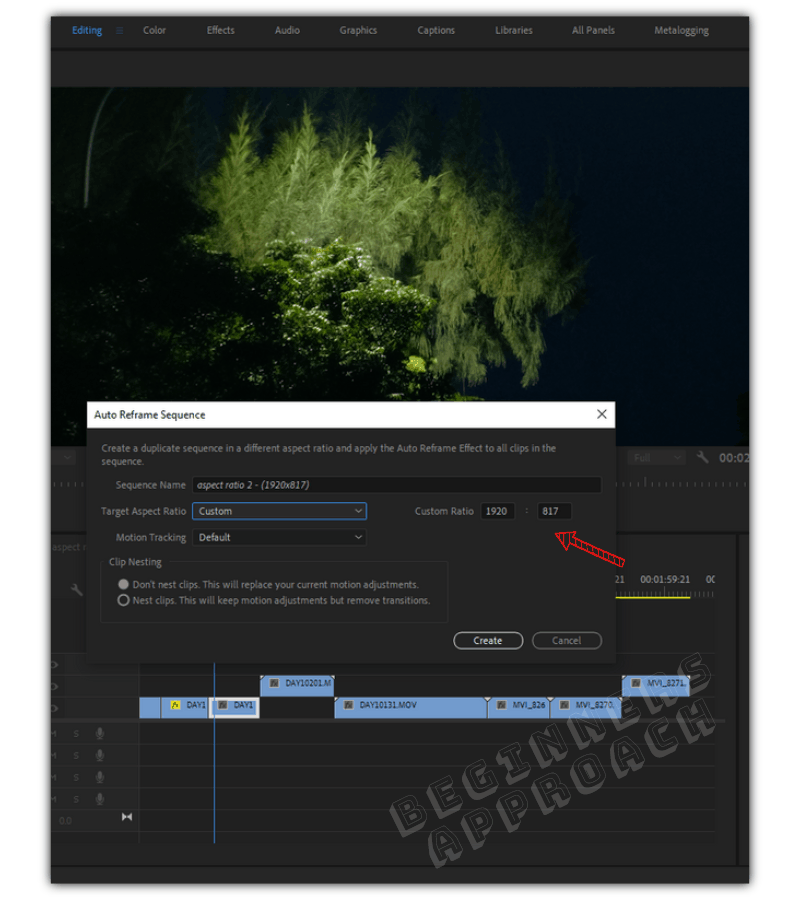
You can change the aspect ratio of your timeline in the middle of editing in Premiere Pro. You have to make use of Premiere Pro’s feature called “Auto Reframe Sequence”, which provides different aspect ratios to choose from, like square 1:1, vertical 9:16, horizontal 16:9, and custom.
If you want a cinema widescreen look, then you will have to choose the “Custom” option as shown in the below image.
How to Change Aspect Ratio in the Middle of Editing in Premiere Pro Instantly?
- From the “Project Panel”, right-click on the required sequence with your timeline, and select “Auto Reframe Sequence…“
- Select the “Target Aspect Ratio” to your required one, say vertical 9:16.
- Let the “Motion Tracking” be at “Default”.
- Let the clip nesting be at the default value.
- Click on “Create“.
- Premiere Pro will analyze and create a duplicate sequence with the updated aspect ratio automatically!
- Now go through the clips. Premiere Pro does a very good job of keeping the main action in the frame.
- You can still go ahead and click on individual clips to adjust the framing using “Motion” parameters in the “Effect Controls” panel.
The “Motion” effects might be disabled due to “Auto Reframe Sequence”. Simply click on the “fx” to enable the effects.
Now go ahead and play with the “Position” and “Scale” parameters to adjust the framing.
If your project demands multiple aspect ratios in the same timeline, there is a workaround for that.
How to Have Multiple Aspect Ratios in the Same Timeline in Premiere Pro?
- Create a timeline with an aspect ratio that the majority of the clips share.
- Then choose which clips need different aspect ratios.
- Go to the “Effects” panel and search for “Crop“. (It will be under “Video Effects” -> “Transform” -> “Crop”).
- Now go to the “Effect Controls” panel.
- Change the “Top”, “Bottom”, “Left”, or “Right” crop values to get letterbox or pillarbox (vertical bars on the sides) black bars.
- Follow the same method for clips that need different aspect ratios.
- Done.
You may also be interested in the below posts:
7 Reasons Why Premiere Pro is GOOD for Audio Editing