If you’re a beginner or newcomer to DaVinci Resolve (versions 18.5, 18, 17, etc.), today’s guide will show you how to implement VHS effect in the free version of Resolve.
(This post is part of the DaVinci Resolve Effects series.)
To make VHS effect in DaVinci Resolve, first change the aspect ratio of your footage to 4:3. Then under the “Color” page, add the splitter-combiner node and change the node sizing value. Add vhs texture overlay, and finally add built-in digital glitch effect.
Video Home System (VHS) effect is an analog recording of your video captured in tape cassettes, unlike the modern digital recording.
Because of its analog nature and recording in tape, the old videos (from the ’80s, 90’s era) produce a distinct look that contains glitches, noise, scan lines, etc.
The analog damage effect exactly does that but it’s not free and is part of the Studio (paid) version.
Today, we’ll see how to mimic the VHS effect in the free version of DaVinci Resolve.
- How to Make VHS Effect in DaVinci Resolve Free Version?
- Step 1: Change the Aspect Ratio to 4:3 (or 1.33)
- Step 2: Add Adjustment Clip
- Step 3: Add Splitter Combiner Node for Actual VHS Effect
- Step 4: Add VHS Texture Overlay
- Step 5: Add VCR Styled Font for Date
- Step 6: Convert the Text to a Compound Clip and Repeat Step no. 3
- Step 7: Add "Digital Glitch" to Your Video
- Analog Damage Effect in DaVinci Resolve
This is the final look. The video starts with the normal version, followed by the VHS look.
How to Make VHS Effect in DaVinci Resolve Free Version?
- First change the aspect ratio of your footage or timeline to 4:3, for an old tv look.
- Then under the “Color” page, implement the splitter-combiner node and change the node sizing value. (Don’t be bothered by the name, actually its a simple setting.)
- Then under the “Edit” page, add vhs texture overlay, and
- Finally add built-in digital glitch effect.
- (Optional) Add VCR styled font text.
- No need to worry, we’ll break this down step by step.
First, create a new project (if not already). Then, import your clips into the “Media Pool“.
Then go to the “Edit” page.
Step 1: Change the Aspect Ratio to 4:3 (or 1.33)
You can either change the aspect ratio of the whole timeline by going to the menu “Timeline” > “Output Blanking” > “1.33” to achieve the vertical boxed look.
Or…
Crop your required footage by selecting the clip in the timeline, then going to the “Inspector” tab > “Video” > “Transform” > “Cropping” > slide the “Crop Left” and “Crop Right” values till you get the boxed look.
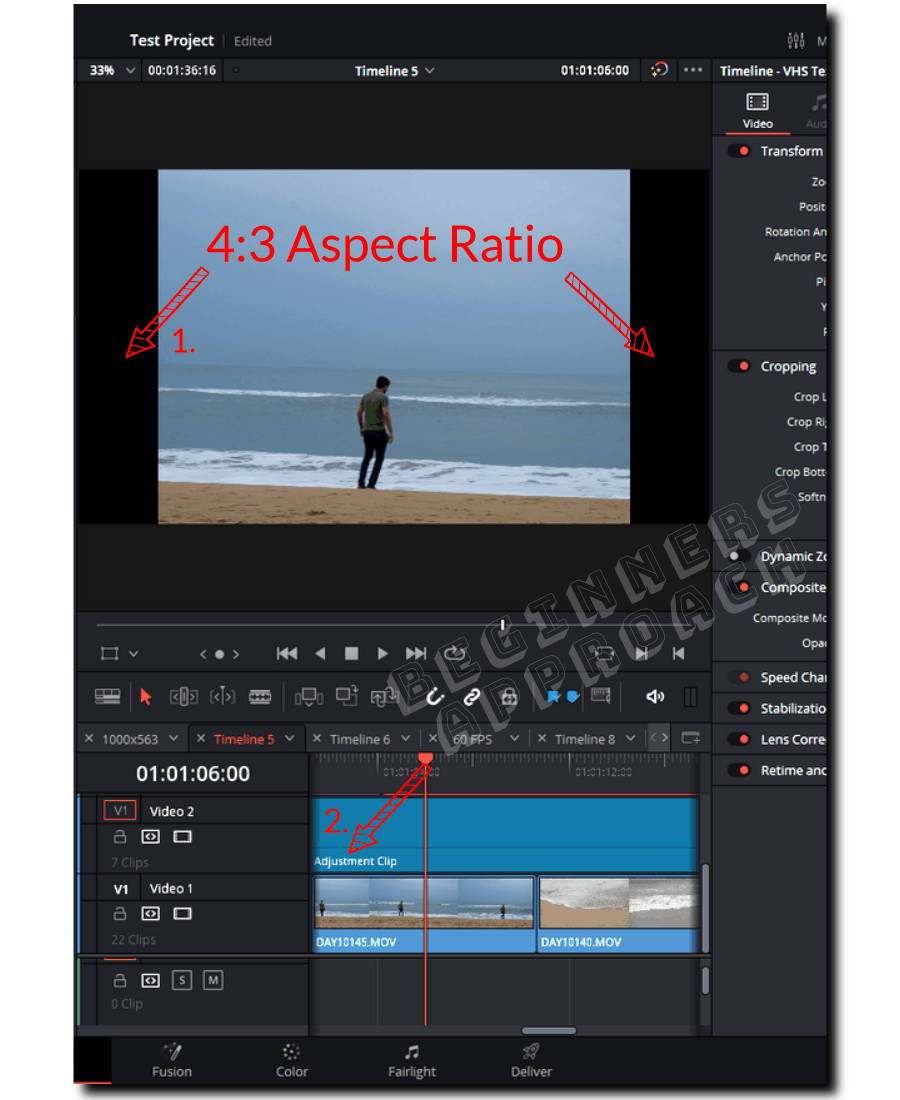
Step 2: Add Adjustment Clip
Under the “Edit” page, go to the “Effects” > “Toolbox” > “Effects” > “Adjustment Clip”. Drag and drop the adjustment clip on video track 2 (the one above the actual video).
Adjustment clip gives you the flexibility to simultaneously target multiple clips without having to do the same process for multiple clips.
It saves you a lot of time. (Use adjustment clip wherever necessary in your workflow.)
Step 3: Add Splitter Combiner Node for Actual VHS Effect
Go to the “Color” page. Then click on the “Clips” from the upper right corner. This reveals all of your clips in the timeline.
Select the “Adjustment Clip” – which we just added in the previous step.
By default, there will be only one node. You can use this node to do a basic color correction, contrast adjustment, etc if needed.
Now go to the menu, click on “Color” > “Nodes” > “Add Splitter Combiner”. (Alternatively, press “Alt + y” – keyboard shortcut for splitter combiner node).
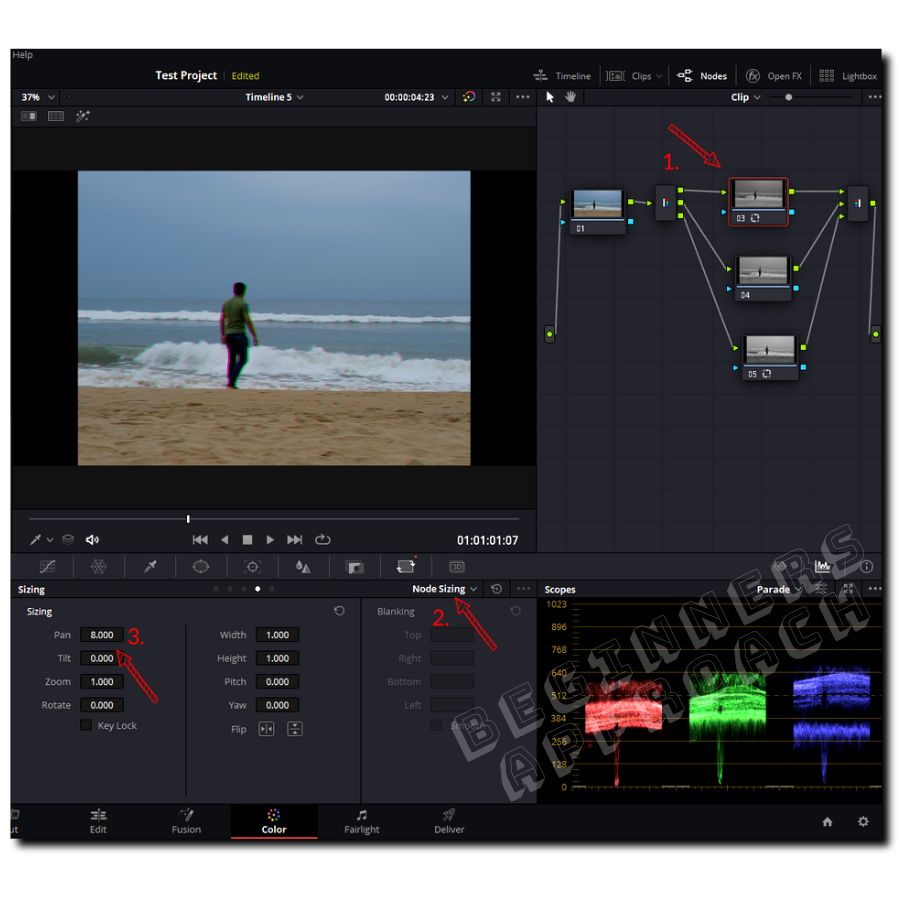
Click on the first node (as shown in the above image). Now go to the “Sizing” section (found below the viewer) and select “Node Sizing” from the dropdown.
Enter a value, say, “8” for “Pan”. You’ll immediately notice a colored boundary in your image that mimics the look of VHS tapes. You can enter different values till you get the look of your taste.
You can do the same for the other 2 nodes (in parallel to the first node), if you would like to.
Step 4: Add VHS Texture Overlay
Google for “free VHS overlay pack” and download the ones you like.
I chose the website colorgradingcentral which gives you a free overlay pack, containing- VHS texture mp4 file, glitch mp4, and VCR font.
Unzip the VHS overlay pack. Then import the VHS texture into the “Media Pool“.
Under the “Edit” page, drag and drop the texture on top of the adjustment clip (in video track 3).
Click on the VHS texture clip, then go to the “Inspector” > “Video” tab.
Under the “Composite” mode, select “Overlay“.
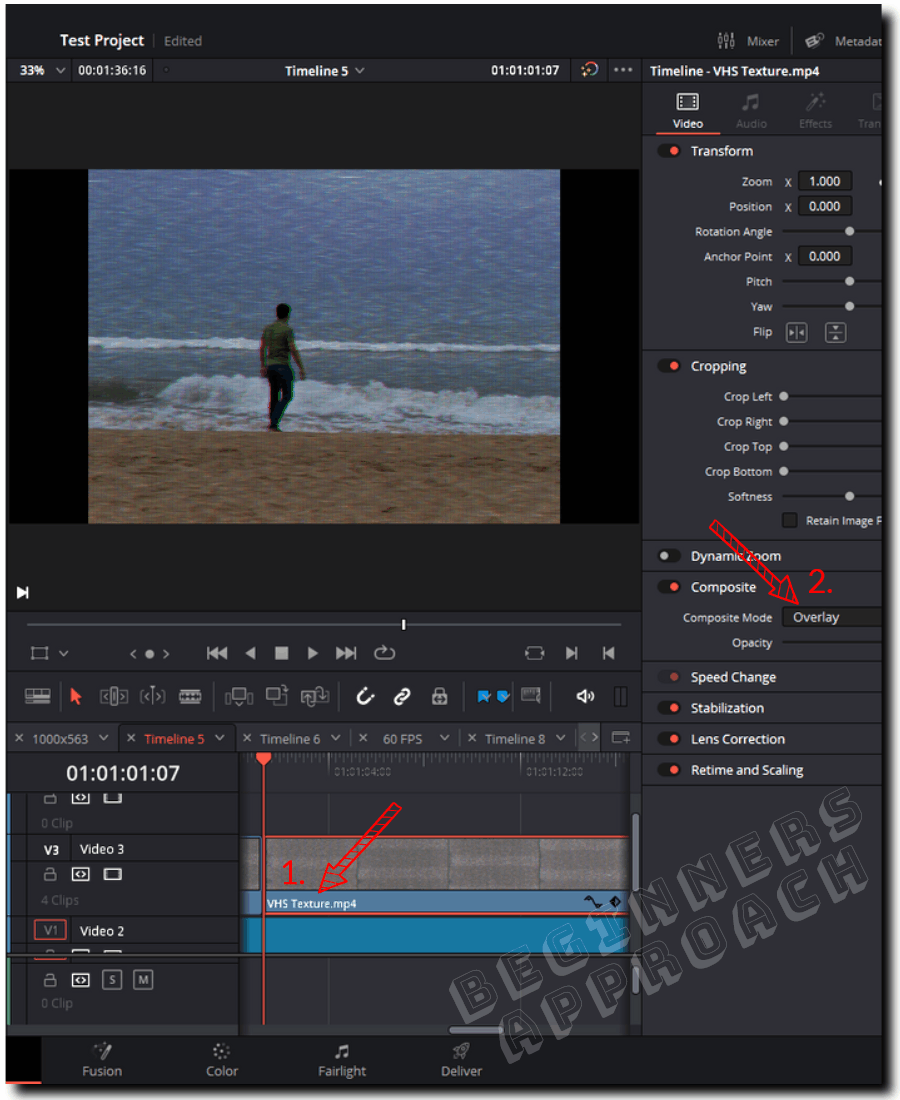
Your VHS look is almost ready.
Step 5: Add VCR Styled Font for Date
In the VHS overlay pack (that was downloaded in the previous section), double click on the “VCR_OCD_MONO.ttf” font file.
Click on the “Install” button from the upper left corner.
This will install the VCR-styled font in your machine.
Restart your DaVinci Resolve. (This will make sure Resolve loads the new font).
Under the “Edit” page, click on the “Effects” > “Toolbox” > “Titles”.
Drag and drop a “Basic Title” text on top of your VHS texture (from the previous step) in a separate video track (track no. 4).

Edit the text to your required date.
Change the font to “VCR OSD Mono” from the “Font Family” dropdown.
Resize the font, adjust the position x and y to place it in the lower-left corner of your footage.
That’s it.
But you will notice that even though the text mimics the 80’s, 90’s VHS look, it still doesn’t blend very well into the scene.
In the next section, we will blend the text so that the overall image looks natural and straight from the 80’s period.
Step 6: Convert the Text to a Compound Clip and Repeat Step no. 3
Right-click on the text, and select “New Compound Clip“, enter a name, and then click on “Ok“.
Your text is now converted to a clip.
Now go to the “Color” page. Next, click on the “Clips” from the upper right corner.
This reveals all of your clips in the timeline. Select the compound clip which we just converted.
By default, there will be only one node.
Now go to the menu, click on “Color” > “Nodes” > “Add Splitter Combiner”. Alternatively, press “Alt + y” – keyboard shortcut for splitter combiner node.
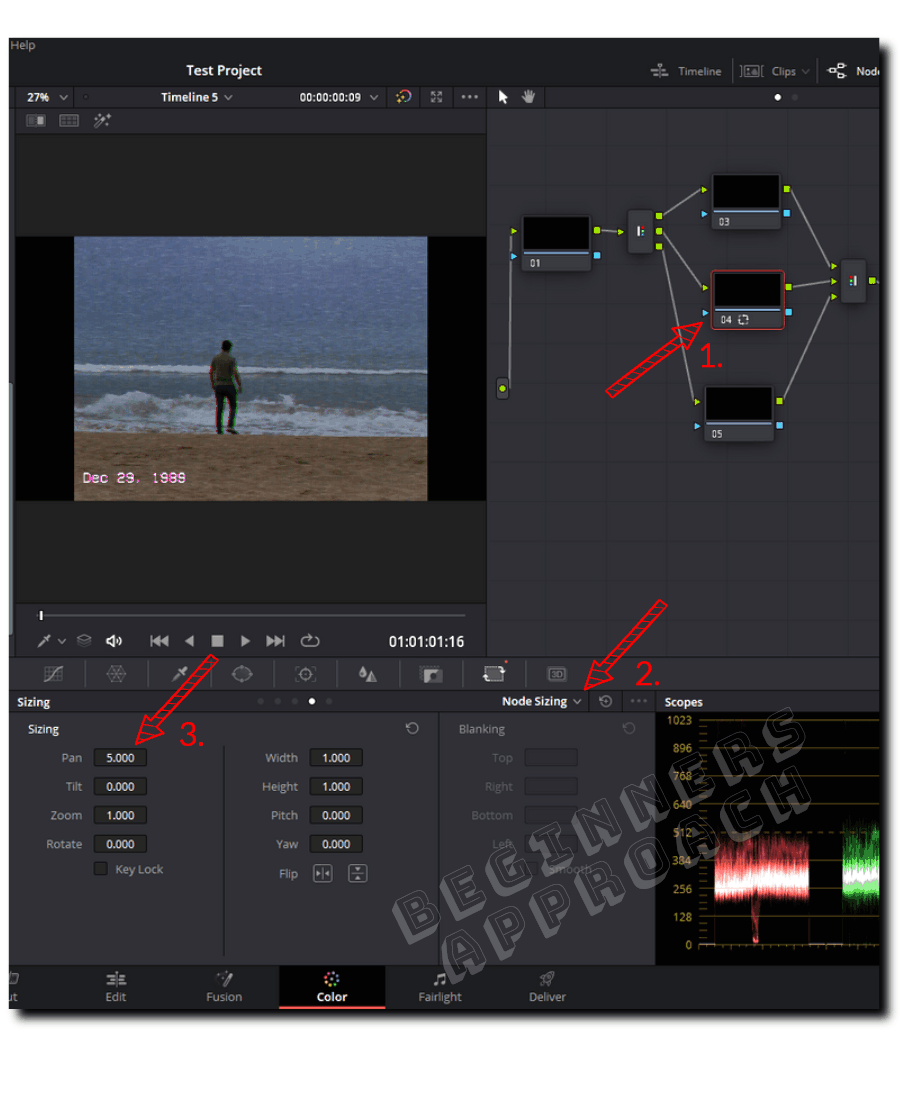
Click on the second node as shown in the image above.
Under “Sizing” > select “Node Sizing”.
Enter a value of, say, 5 against “Pan“. You can play with the value here till you get the desired look.
Now the date seamlessly blends into the scene.
Now onto the final part.
The Glitch!
Step 7: Add “Digital Glitch” to Your Video
Under the “Edit” page, select your video.
Choose a random point where you would like to see the glitch in your clip.
Then select the “Blade” tool (shortcut is “B”). Click on the clip. This will be the starting point.
Using your right key, move forward a few frames, let’s say, 6 frames – which means, you need to press the right key 6 times.
Click on the clip again with the blade tool. This will be the ending point. (Once this step is done, press the keyboard shortcut “A” for normal selection mode)
Now you have a small clip of 6 frames – which will glitch when you add the effect. (Make sure to enlarge your timeline by clicking “+” so that you can adequately see your clip).
(The reason I am choosing a small sub-clip is that when you add the glitch effect, it will apply to the entire duration of the clip which is not desirable. We only want part of the clip to glitch – which looks natural).

Do the same process for your text (which is now a compounded clip).
Now go to the “Effects” > “Toolbox” > “Effects” > select “Digital Glitch” under “Fusion Effects”.
Drag and drop it on the sub-clip (the 6 frames one). Again drop the same effect on the compounded clip which contains the 6 frames.
If you want, you can also create many sub-clips of 5 to 6 frames to have many glitches.
There you have it!.
Analog Damage Effect in DaVinci Resolve
“Analog Damage” is a built-in DaVinci Resolve effect that mimics the look of VHS. It is not free. It has various options like “Clean VHS”, “Old VHS”, “1980s”, “1990s” looks. It also supports features like “Scan Lines”, “TV Construction”, “VHS” settings to get your desired VHS look.
Analog Damage is available only in the Studio version (paid). If you try to drag and drop this effect, you will see a giant watermark in your viewer, if you are using the free version.
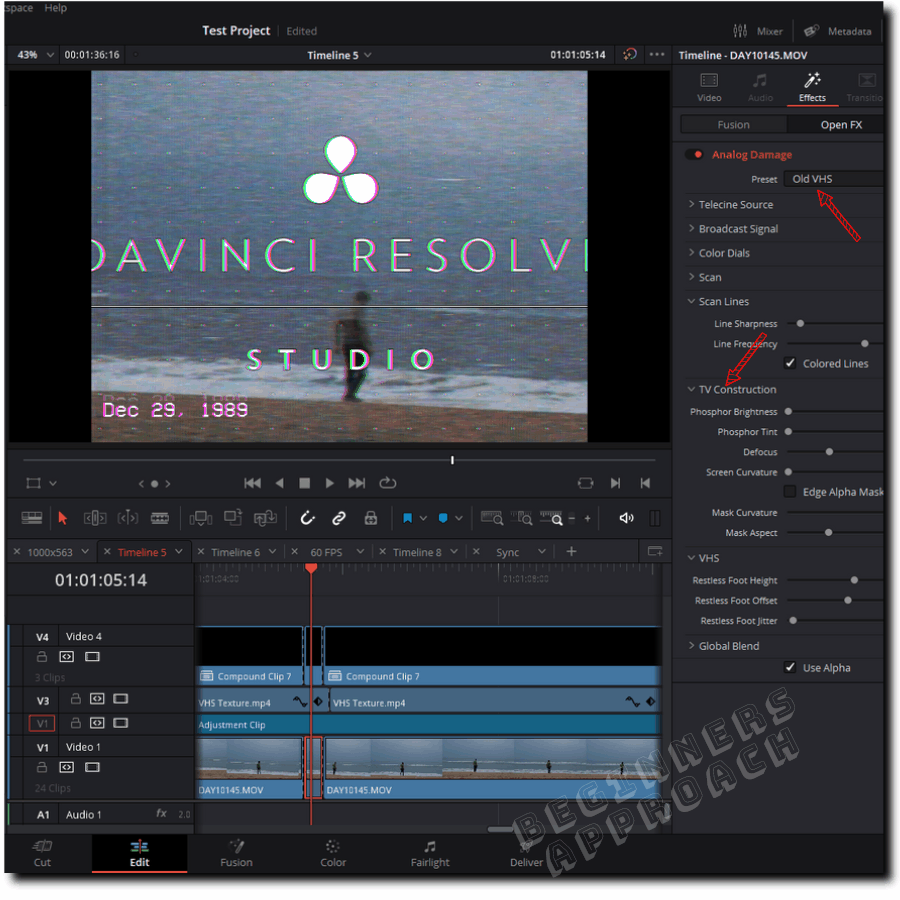
But if you happened to have Studio version, you simply drag and drop this effect from the “Effects” > “Open FX” > “Filters” > scroll down till you see “Resolve FX Texture” > “Analog Damage”.
Go to the “Inspector” tab > “Effects” > “Open FX”. Select your preset, let’s say, “Old VHS”, and play with other settings to get your desired look.
There are also other built-in effects that are free like:
- The “Film Damage” effect which is very handy in re-creating old vintage film effect.
- The “Watercolor” and “Abstraction” effects to mimic cartoon / comic effect in DaVinci Resolve.