If you’re a beginner or newcomer to DaVinci Resolve (versions 18.5, 18, 17, etc.), today’s guide will show you how to achieve camera shake or shake effect in the free version of Resolve (without Fusion!).
(Today’s post is part of the DaVinci Resolve Effects series.)
To add a camera shake effect in DaVinci Resolve, go to the “Edit” page > “Effects” tab. Drag and drop “Camera Shake” under the “Resolve FX Transform” on top of your video. Change the “Motion Method” to “Rectified Sine”. Set the “Border Type” to “Replicate”.
To add bass effects to your video matching your audio – “Zoom Blur” and “Dynamic Zoom” can be used. For a step-by-step tutorial, read on.
The video below displays these effects. (Note that this is a rough edit visually showing the different shake effects.)
Things to Keep in Mind Before Adding Shake Effects in DaVinci Resolve
The first step is to determine if you want the shake effect applied to the entire clip or part of the clip.
The next step is to determine the exact location on your video clip where you want the shake effect (if you want the effect on the entire clip, this is unnecessary).
Another vital thing to keep in mind – if you’re looking to add effects to your music video or match your effect to a unique sound like a high point in your music (typically bass sound), then you need to have the music added to your timeline underneath your video, before adding effects.
Then mark your timeline with markers (by pressing “M”) wherever you would like to see the shake effect (like camera/earthquake shake or bass shake).
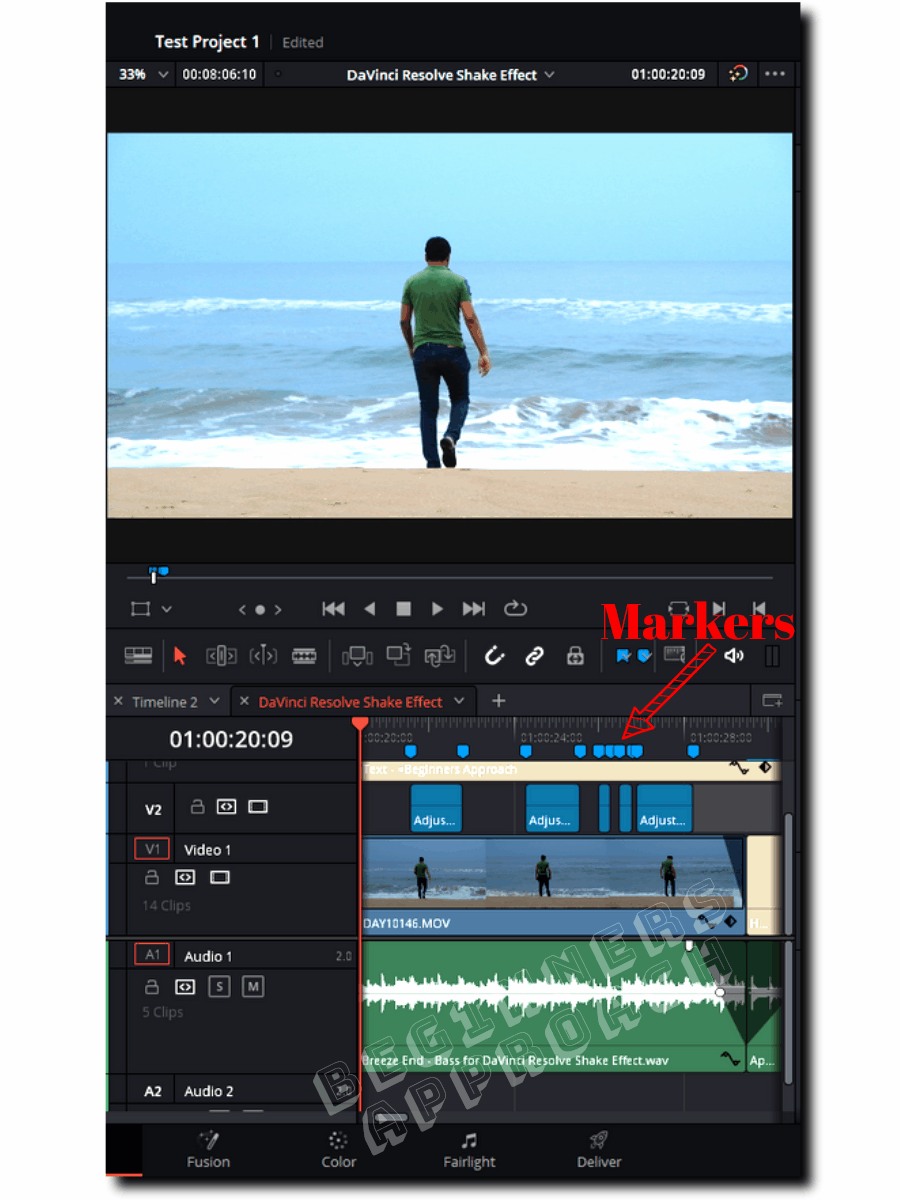
Having markers placed in the timeline makes your job easier – to add effects.
It saves you a ton of time!
(In the video above, you can see the markers I placed, which helps me add effects precisely matching the beats of the music.)
How to Add Camera Shake Effect in DaVinci Resolve Quickly?
- Create a new project (or open an already existing one).
- Under the “Edit” page, click on the “Media Pool” tab from the top left corner.
- Then import your footages by pressing “Ctrl + i” (or “Cmd + i”).
- Create a timeline (if not already) and drop your video clips on it.
- Click your desired video clip in the timeline. (This step is crucial because, while adding effects the right clip needs to be selected, or accidentally you might end up adding effects to the wrong clip)
- Now click on the “Effects” tab (next to the “Media Pool”).
- Click on “Open FX” > “Filters” > scroll down till you see “Resolve FX Transform” > “Camera Shake”.
- (Alternatively, you can also click on the search bar and search for “Camera Shake”. If there are no results displayed, then make sure you click on the “Effects” button to see the effect listed in the search.)
- Now drag and drop this effect onto the video clip.

This should instantly introduce a camera shake into your footage.
For further fine-tuning, click on the clip in the timeline and then click on the “Inspector” tab > “Effects” > “Open FX” > “Camera Shake”.
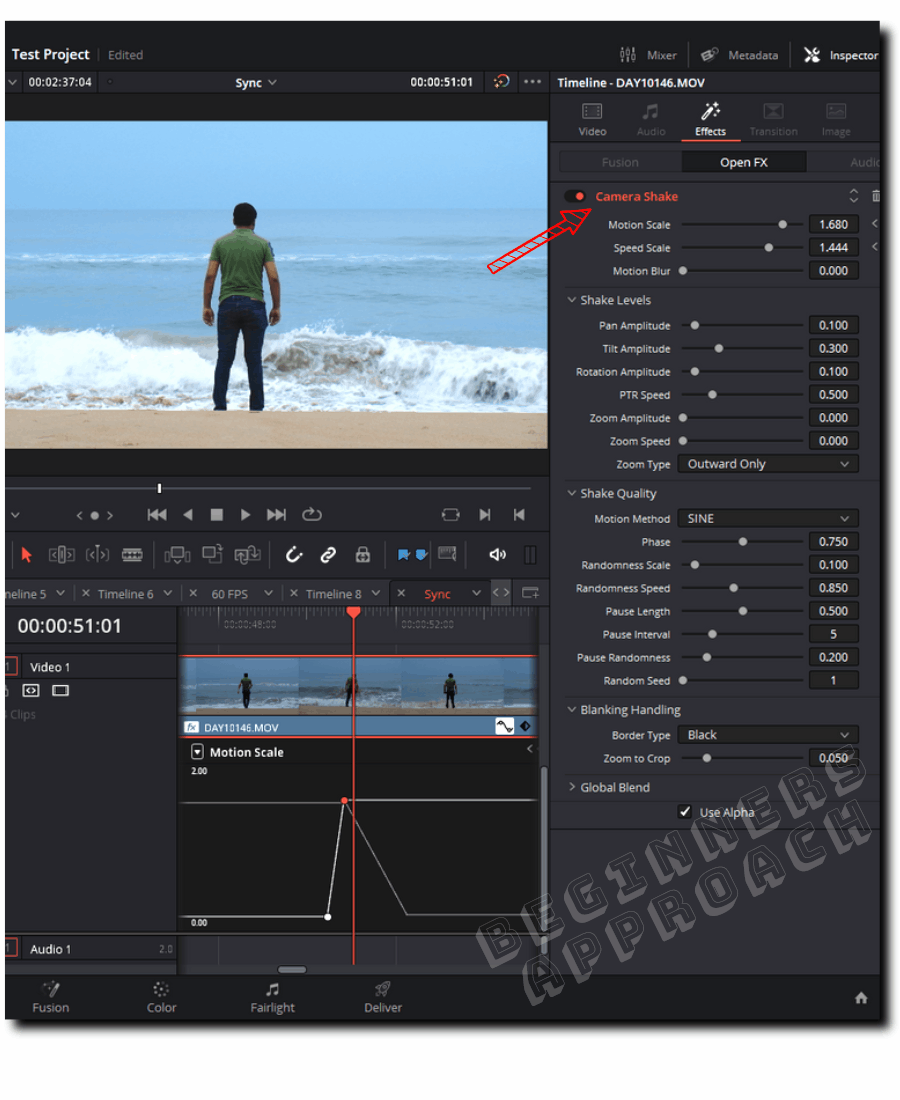
Play with different settings to change the motion, speed, and blur of the camera shake like:
- Motion scale
- Speed scale
- Motion blur
- Pan and Tilt amplitudes under “Shake Levels“
- Zoom amplitude and Speed
Change the “Motion” method to “Sine”, “Rectified Sine”, “Rectified Sine(Invert)“. This changes the type of camera shake. I used “Rectified Sine” in the above video, which was appropriate and to my taste for this particular video.
“Blanking Handling” – This is an important setting. Leaving it to the default value “Black” introduces black bars in the edges of your video whenever the shake is too much. To look natural, select the “Replicate” option, which gets rid of the black edges from your video.
The above was a quick and dirty approach to adding a camera shake effect.
However, you might need a more granular camera shake effect – occurring at a particular point in your video.
This is where the keyframing comes into the picture.
Keyframing Camera Shake Effect in DaVinci Resolve Quickly
- Add the “Camera Shake” effect from the “Effects” tab onto your video clip.
- Click on the video clip to select it in the timeline.
- Determine where you would like to have camera shake in your video.
- Then place the timeline playhead there.
- Go to the “Inspector” > “Effects” > “Open FX” tab > “Camera Shake”.
- Click on the small diamond icon at the end of the “Motion Scale” to place a keyframe. It turns red (which means it’s activated).
- Let the default value be “1” (you change it to whatever value based on your taste).
- Determine the starting point of your camera shake by pressing your left key arrow a few times – the timeline playhead will move a few frames to the left.
- Now enter a value of “0” and press enter. This will place another keyframe automatically.
- Determine the ending point of your camera shake by pressing your right key arrow a few times – the timeline playhead will move a few frames to the right.
- Now enter a value of “0” and press enter. This will place the third keyframe automatically.
- Now you’ve got a camera shake happening at a particular time in your clip!
For a more visual representation and fine adjustments of the keyframes, click on the wave icon on the bottom right corner of the clip.
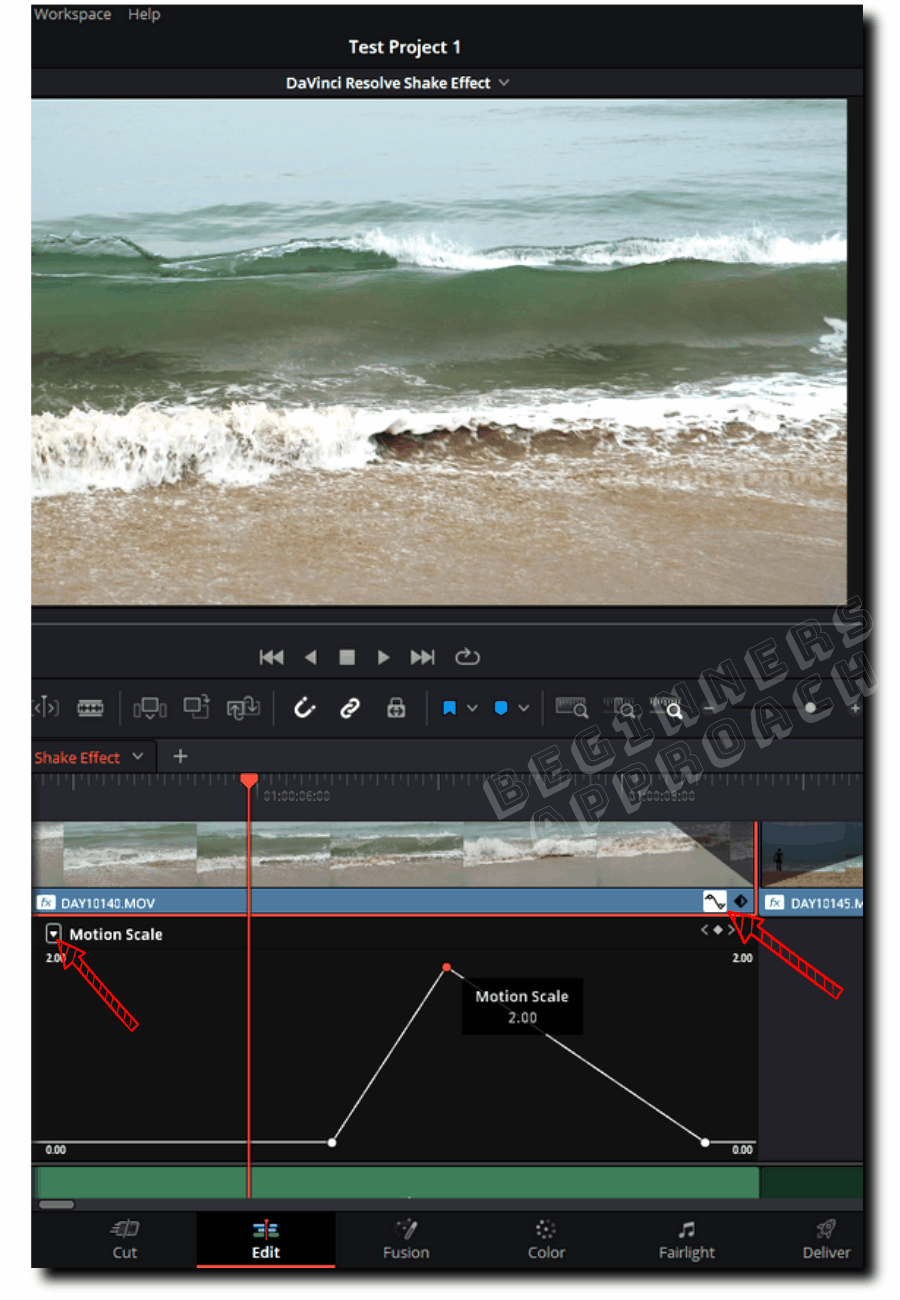
Then click on the dropdown from the upper left corner to select “Motion Scale” under the “Camera Shake” section.
You can see all of your keyframes. You can click and drag any keyframe – to get the desired result.
(Alternatively, in the video at the start of the post, I show you how I keyframe to achieve the desired result. It is visual and very helpful to beginners. Please check it out.)
How to Turn Off the Camera Shake Effect in DaVinci Resolve?
To turn off the camera shake effect in DaVinci Resolve (which was added from the “Effects” tab), go to the “Inspector” > “Effects” > “Open FX” tab > “Camera Shake”, click on the toggle button to disable it or click on the trash icon to delete the camera shake permanently.
How to Do Bass Shake Effect in DaVinci Resolve (Fast)?
- Place your video clip in the timeline. Also add the audio or music (to match your video) in the audio track.
- Listen to the music and add markers (by pressing “M”) wherevere necessary. These are the points in the timeline which will have bass shake effects.
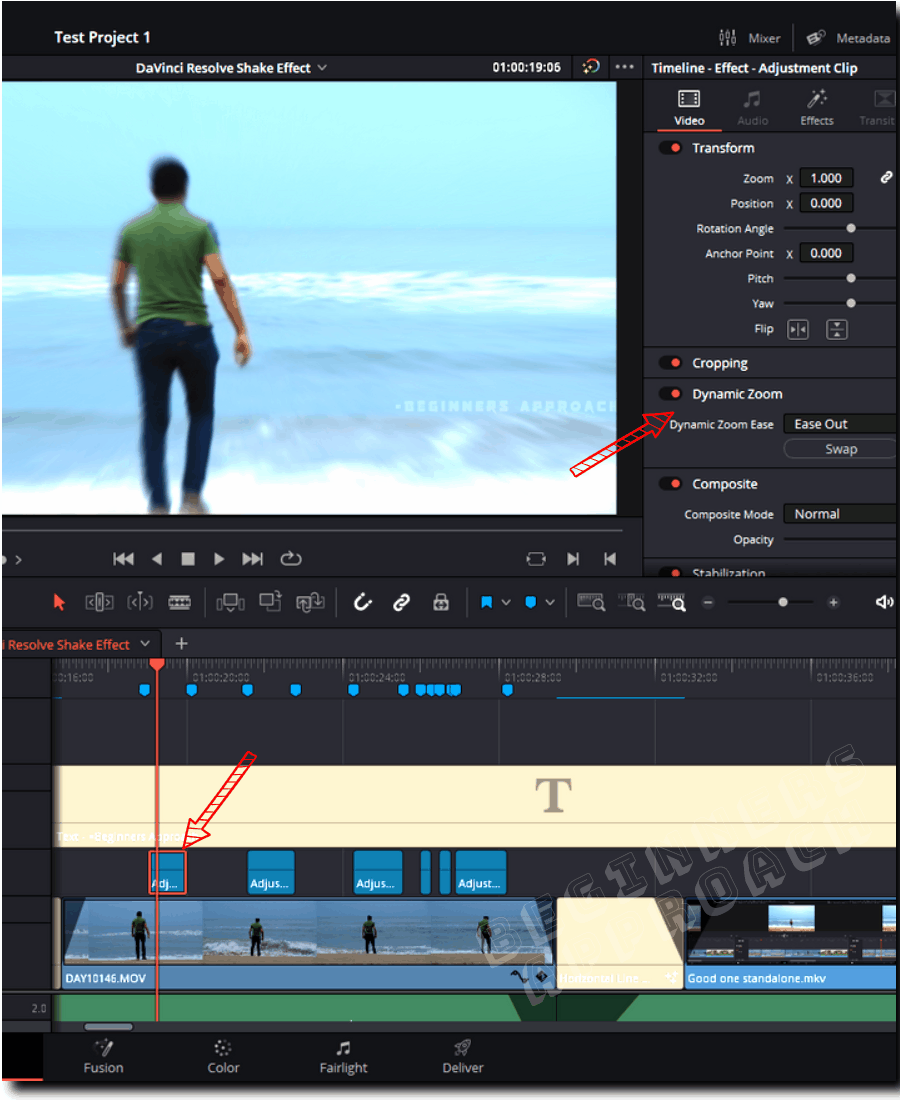
- Now go to the “Effects” > “Toolbox” > “Effects” > “Adjustment Clip“.
- Drag and drop the adjsutment clip on top of your video (in a new video track).
- Resize your adjustment clip according to the markers.
- Now go to the “Effects” > “Open FX” > “Resolve FX Blur” > select “Zoom Blur“.
- Drag and drop the zoom blur onto the adjustment clip. A basic zoom blur or a bass shake kind of effect is introduced in your video.
- (Optional) You can also add “Prism Blur” under “Resolve FX Stylize” from the “Effects Library” onto the adjustment clip.
- To add punch to the zoom blur, click on the adjustment clip, then go to the “Inspector” > “Video” > enable “Dynamic Zoom”.
- Select “Ease Out”. It starts with the video zoomed in and then ends slowly with zoom out.
Finetuning “Dynamic Zoom”
Play with the different values like “Ease In”, “Ease Out”, “Ease in and Ease Out”, “Linear” for different effects.
Finetuning “Zoom Blur”
You can also further tweak your settings in the “Zoom Blur” effect.
Go to the “Inspector” > “Effects” > “Open FX” > click on the “Zoom Blur” to reveal its settings.
Play with the “Zoom Amount” settings to your taste.
Change the value of “Center Exclusion” settings to keep things in focus or blur.
Finetuning “Prism Blur” to Your Taste
Similarly play with the settings of “Prism Blur”, by going to the “Inspector” > “Effects” > “Open FX” > “Prism Blur”.
Click on the “Prism Blur” till you see the settings underneath.
Play with the “Blur Strength”, “Aberration Distance” and “Aberration Strength” till you get your desired result.
After fine-tuning your settings, copy the adjustment clip (or press “Alt“, then drag and drop the adjustment clip to duplicate) and place it on the next marker.
As you precisely match the bass beats of your music to the bass effect through the adjustment clip, you will start to see your video shake accurately to the required beats in the music.
This makes your video look cool!!!
In the video (at the beginning of the post), you can see me placing the effects to match with the musical bass beats.
If you are interested in effects like these, which increase your production value, then you should also check out: