
Your recorded audio could have a lot of background noise coming from wind, ac, fans, power line hums, hisses, etc, to name a few.
To remove background noise in DaVinci Resolve (version 18, 17), use the built-in free “Noise Reduction” effect found in the “Effects” tab under the “Edit”, “Fairlight” and “Cut” pages.
Let’s explore the above in detail.
We’ll also see how to reduce noise from individual clips and track as a whole (which contains all the clips).
Without wasting time, let’s get started!
How to Remove Background Noise in DaVinci Resolve?
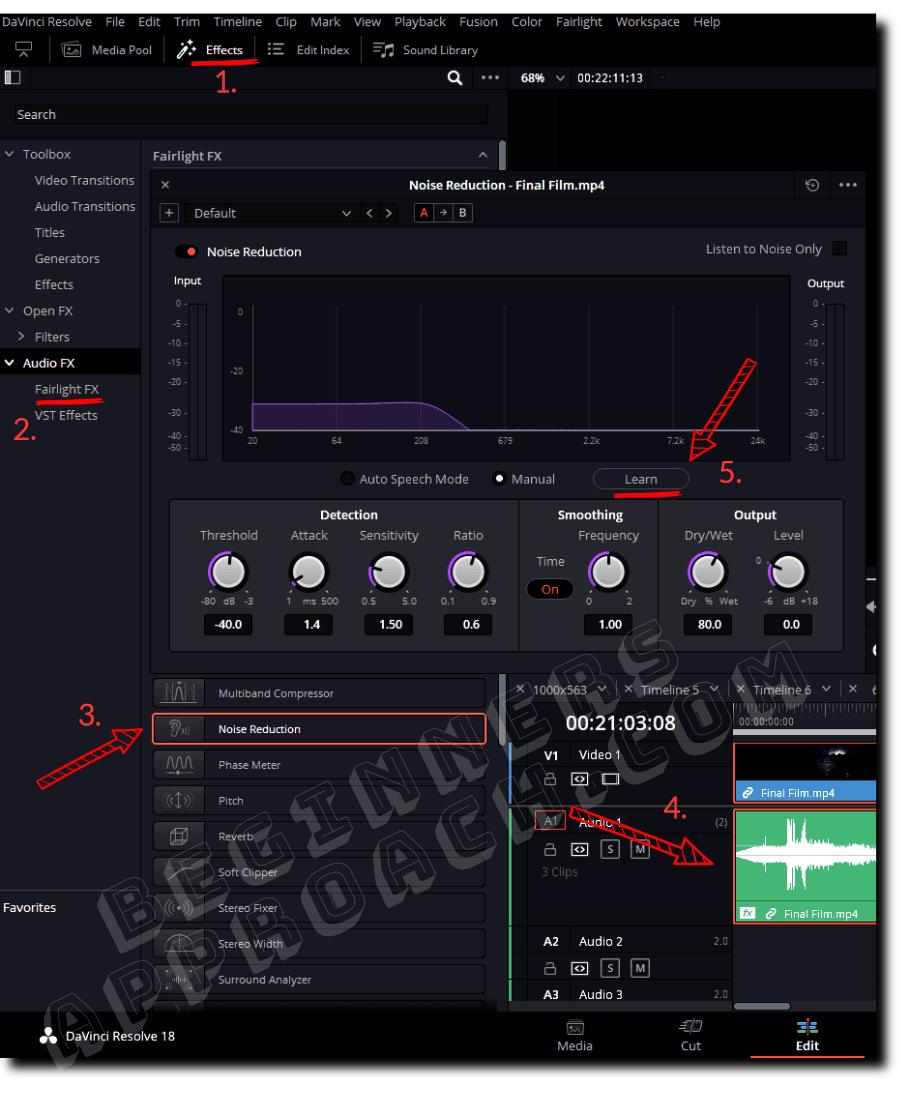
- Under the “Edit” page, click on the “Effects” tab (previously known as “Effects Library”).
- Click on “Audio FX” > “Fairlight FX” from the left-hand side.
- Locate the “Noise Reduction” effect.
- Drag and drop the effect on top of your desired audio clip in the timeline.
- Select “Manual” and click on “Learn”. The button should be highlighted.
- Move your playhead to the unwanted noise part, like wind noise or rumble.
- Play the audio clip, which has the noise-only part, and stop.
- Now Resolve has learned the noise print.
- Click on “Learn” so that it’s not highlighted anymore.
- Now play the audio clip. There should be no noise (like wind).
For effective noise removal, the “Learn” part is very important for Resolve. If the noise is accurately learned, then it can be removed easily.
DaVinci Resolve Noise Reduction Settings
Auto Speech Mode – Try this option when you have a dialogue. Resolve will automatically “learn” the noise and remove it.
But if you’re not satisfied with the noise removal, then play with different settings like “Threshold“, “Attack“, “Sensitivity“, etc.
In the “Output” section, there are two knobs – “Dry/Wet” and “Level”.
Using the “Dry/Wet” knob, you can actually lessen or maximize the output of noise removal done through the above methods.
“Level” – If your audio dB level is reduced because of the noise reduction, you can use the “Level” knob to increase the dB level (output gain).
Toggle the “Noise Reduction” button on and off to see the – before and after – difference. The button can be found in the top left corner.
(You might have to play the audio in a loop when you’re working with this effect so that you can correctly identify the noise and remove it.)
The above is for a single audio clip.
If you want to apply the same noise reduction settings to multiple clips, then you’ll have to create a preset.
How to Create a Preset for Audio Noise Reduction in Resolve
After dragging and dropping the “Noise Reduction” effect on one of the clips and changing the settings to your taste, you can save the settings into a preset.
- Inside the “Noise Reduction” plugin, click on the “+” icon, which is called “Add Preset” – found in the top left corner.
- Enter a name.
- Click on “Ok” to save the preset.

- Clicking on the preset drop-down will display your created preset.
- Next time, when you drag and drop the “Noise Reduction” effect on other clips, you can choose this preset from the drop-down.
- This will save you a lot of time!
If you have a lot of clips with the same background noise in the same track (inside your timeline), then instead of dragging and dropping the “Noise Reduction” effect on a clip, you can drag and drop it onto a track header.
Now the changes that you make in the noise reduction effect will affect the whole track with all the clips in it.
(Please keep in mind that after dragging and dropping, you can also access the noise reduction effect from the “Inspector” tab.)
You can do the same on the “Fairlight” page as well!
How to Add Noise Reduction Effect to a Track in Fairlight Resolve?
- Go to the “Fairlight” page.
- Click on “Mixer” – it should display your audio track.
- Under your track, against “Effect“, click on the “+” plus sign.
- Select “Restoration” > “Noise Reduction“.
- This noise reduction effect will be added to the whole track.

And inside Fairlight, you can also add noise reduction effects to individual clips and save them as presets, as we did on the “Edit” page.
There are also other effects that can remove different noises like a power line hum or low rumbles inside a room.
Some important audio effects are
- De-Hummer,
- Dialogue Processor,
- De-Esser, etc.
On top of that, we can also use third-party VST plugins like iZotope inside Resolve!
How to Remove Hum Noise in DaVinci Resolve
You can remove hum noise by using the “De-Hummer” effect found under the “Effects” tab on the “Edit” page.
- Under the “Edit” page, click on the “Effects” tab from the upper left section.
- Click on “Audio FX” > “Fairlight FX”.
- Locate the “De-Hummer” effect.
- Drag and drop the effect on your desired audio clip.

You can play with the “Frequency” and “Amount” knobs till the hum is removed from your audio.
Powel line hum frequency in the US is 60 Hz and in Europe, it is 50 Hz. So you can select the appropriate radio button under “Frequency” for a much better result.
If not, you can always adjust the knob according to your requirements.
How to Remove Low Rumble Noise in DaVinci Resolve?
The “Equalizer” effect can easily remove low rumble noise, which is generally of low frequencies.
A high-pass filter (band 1) should do the job of cutting out the low-end frequencies without affecting other frequencies.
- Go to the “Fairlight” page.
- Click on “Mixer” – it should display your audio track.
- Under your track, against “EQ“, double-click on the graph.
- The “Equalizer” plugin will be displayed.
- Click on “Band 1“.

- Play the clip. If the noise is removed, then you are good.
- If not, then adjust the frequency knob such that EQ catches hold of the low-frequency noise and removes it.
- If needed, increase the gain (on the right-hand side of the plugin) to make up for any reduction in sound because of EQ processing.
Using Equalizer, you can also remove high-frequency hiss sounds. All you have to do is apply a low-pass filter (Band 6). This low-pass filter will remove the higher frequencies (hiss sound).
You may also be interested in the below posts:
- How to Split Audio Channels / Tracks in DaVinci Resolve (Explained!)
- How to Normalize & Balance Audio Levels in DaVinci Resolve? (Quick Tips)