
When you have a lot of audio clips from different sources, adjusting and balancing audio levels for each clip could be time-consuming in the timeline. To overcome this, Resolve provides a technique called Normalization.
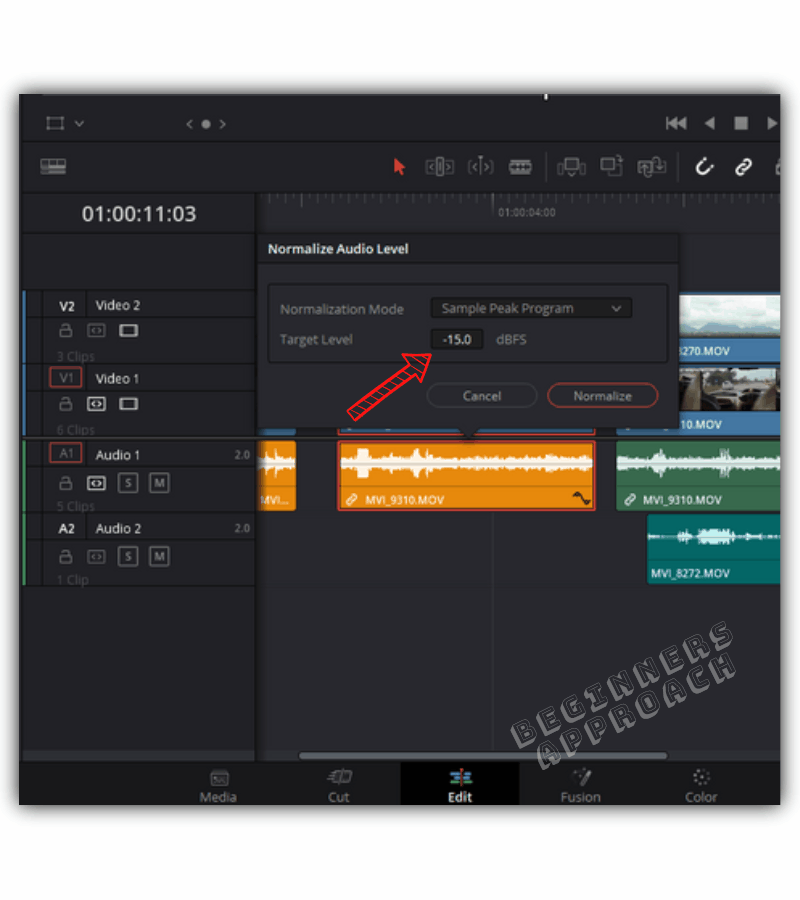
To normalize audio in DaVinci Resolve, go to the “Edit” page, right-click the audio clip on the timeline, and select “Normalize Audio Levels”. Set “Normalization Mode” to “Sample Peak Program”. Set the desired “Target Level” value to “-15”. Click on “Normalize”. Done.
With the help of normalization, we are actually adjusting and balancing the audio levels to the required decibel values. (The recommended levels are given below).
If you need to normalize your audio for YouTube or other social media platforms like Instagram, TikTok, or short films, etc., you’re at the right place.
Let’s explore the audio normalization in DaVinci Resolve in detail – step-by-step with pictures (very helpful for beginners and newcomers to DaVinci Resolve versions 18.5, 18, 17, 16, etc.).
- How to Normalize Audio Levels in DaVinci Resolve?
- Recommended Audio Levels for Dialog
- Recommended Audio Levels for Music / Sound Effects
- How to Reduce Audio Peaks in DaVinci Resolve?
- How to Normalize Multiple Audio Clips in DaVinci Resolve?
- How to Normalize Audio in Fairlight?
- What is Compression?
- How to Compress Audio in DaVinci Resolve?
- Normalization vs Compression
How to Normalize Audio Levels in DaVinci Resolve?
- Go to the “Edit” page (you can also do this on the “Fairlight” page).
- Select your desired audio clip (“ctrl + left click” or “cmd + left click”) from the timeline.
- Right-click and select “Normalize Audio Levels…“.
- Leave the “Normalization Mode” to the default value of “Sample Peak Program“.
- Set your desired “Target Level” value, say, “-15” (refer to the recommended audio levels discussed below).
- Click on “Normalize“.
- The loudest parts will be set to the target value.
If you’re not familiar with the concept of “Normalization“, let me explain the basics.
But before that, you should know some standard recommended audio levels.
Keep in mind, there are no hard and fast rules for the audio levels. Experts recommend the below audio levels:
Recommended Audio Levels for Dialog
- Generally, vocal / dialog level is within -15 db to -10 db.
- Strong booming voice around -10 db.
- Softer-natured voice around -15 db.
- Average voice level at around -12 db.
- Whispering sound around -20 db.
- The yelling sound is around -3 db.
Recommended Audio Levels for Music / Sound Effects
- Background music track audio level around -20 db.
- Shooting/explosion audio around -3 db.
- Musical video around -10 db to -5 db.
Points to Consider
- Obviously, when a scene involves a dialog and background music, you’ll have to lower the background music level so that the dialog is audible.
- Never allow the audio level to hit 0 dB (while recording and in post). Because the details of the audio will be lost at 0 dB and will be clipped and distorted.
How to Reduce Audio Peaks in DaVinci Resolve?
After you record your audio, there might be some clips with high peaks. And when you play them back, the dynamic range of the audio (from sounding quiet to high) will be too high – making high peaks sound louder and lower ones sound quieter.
The first step is to balance the levels so that it is easier to work with the audio post-processing workflow down the pipeline (like applying the Equalizer, Compressor, and other audio sweetening processes).
So how to reduce peaks quickly in Resolve?
To reduce audio peaks, Normalize the clips. Normalization is the process in which you set a target value for the peak to hit. For example, when you set a value of “-5 db”, any peak above -5 db, let’s say, -3db, will be set to -5db, which will also bring down the dB of other parts of the waveform.
Normalization is only a volume adjustment.
Normalization doesn’t compress or expand the dynamic range of audio.
All it does is bring down the peak to the desired target, thereby increasing or decreasing the levels of other parts of the audio. In short, it affects the volume of the entire clip in order to hit the targetted peak.
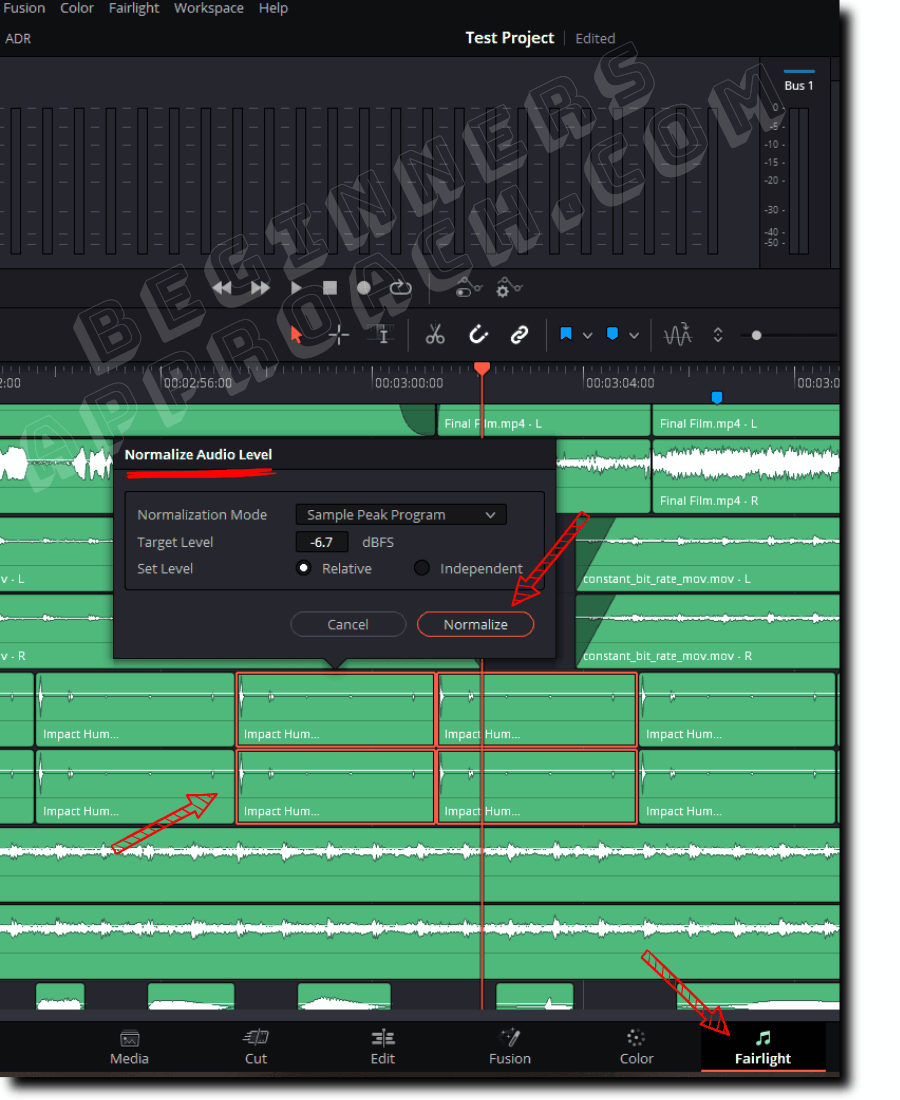
When you select a group of audio clips in the timeline for normalization, you get a new setting called “Set Level”. This is discussed below.
How to Normalize Multiple Audio Clips in DaVinci Resolve?
- Go to the “Edit” page (you can also do this on the “Fairlight” page).
- Select all your desired clips using a ctrl-left click or shift-left click.
- Right-click and select “Normalize Audio Levels…“.
- Leave the “Normalization Mode” to the default value of “Sample Peak Program“.
- Set your desired “Target Level” value.
- “Set Level” = Choose “Relative” if you want Resolve to treat all the selected clips as one clip, or “Independent” so that Resolve will work on each clip individually for volume adjustment.
- Click on “Normalize“.

Things to Note:
- Normalization Mode = A standard for measuring the actual peak of an audio clip. By default, Resolve uses the “Sample Peak Program” to measure the actual peak. Now it has introduced another standard called BS 1770-4 which measures inter-sample peaks.
“Relative” = If you have a track full of dialog from the same person, or if the clips on the track are similar sounding ones, then balance them using the “Relative” set level while doing normalization. The volume of all the clips will be adjusted by the same amount. It will save you a lot of time.
“Independent” = If you have a track with different sounding clips, then choose the “Independent” set level for balancing the levels. Each clip will have its own volume change after the normalization process.
How to Normalize Audio in Fairlight?
- On the “Fairlight” page, select all your desired clips using ctrl + click or shift + click, in the timeline.
- Right-click and select “Normalize Audio Levels…“.
- Leave the “Normalization Mode” to the default value of “Sample Peak Program”.
- Set your desired “Target Level” value.
- “Set Level” > Choose “Relative” for similar-sounding clips or “Independent” for clips having different audio levels. (This will be displayed only when more than one clip is selected.)
- Click on “Normalize“.
- After normalization, the peak levels of each clip match with one another.
Normalization is a shortcut for going to the “Inspector” tab and changing the volume level for each clip individually (which is time-consuming).
It is a starting point for further post-processing, wherein you quickly balance the audio levels for the audio clips.
But as discussed earlier, it doesn’t affect the dynamic range – compress or expand – the audio.
The difference between the loudest peak and the quietest peak will be the same.
Related Article:
What is Compression?
Compression helps you bring the loudest parts of the audio to come closer to the quietest parts – it somewhat evens out the audio.
It is used to tame the peaks and bring them under control.
The loudest peaks can occur when someone is very excited at the beginning of a conversation and then gradually lowers the conversation progresses (maybe even whisper).
Now there will be a vast difference between the loudest peak and the quietest one (because of a whisper).
To even this out, we need to compress the audio.
Compression works by bringing down the amplitude of the audio when it crosses a defined threshold. Anything below the threshold won’t be touched.
How to Compress Audio in DaVinci Resolve?
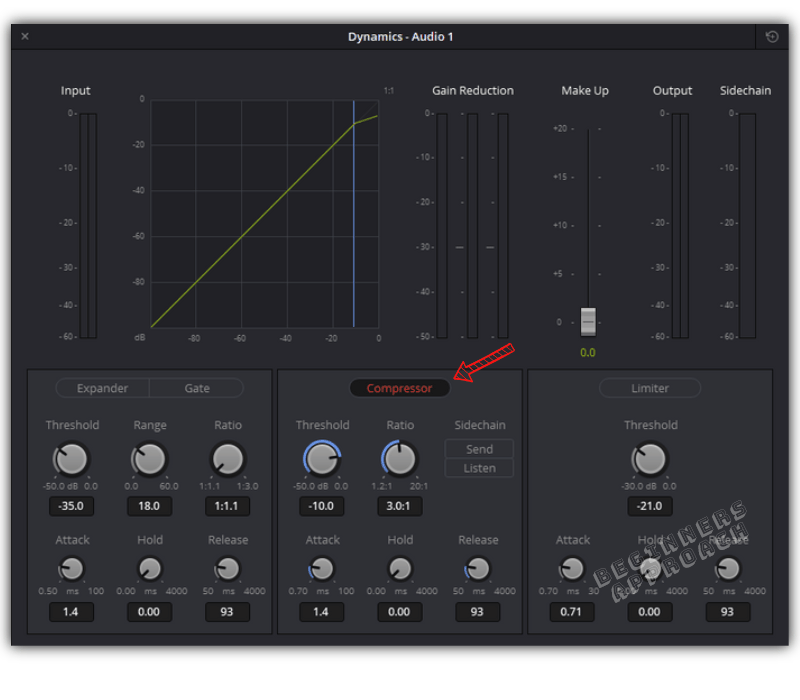
- Go to “Fairlight“.
- Click on the “Mixer” tab to bring up the mixer for each track.
- Double-click on the “Dynamics” graphics down your desired track, say A1, that needs compression.
- Click on “Compressor”.
- Set a “Threshold” value based on your requirement. (for example, it could be around -10 db, anything below -10 db won’t be touched).
- Set the desired “Ratio” (for dialogues, generally it is 3:1, but play with it).
- You can leave other settings to default (or play with them).
- Loop, play the audio, and adjust the dials as needed (to your taste).
Things to note:
Ratio 3.00: 1 means, for every 3db increase in input, only 1db will be permitted as output. For example, if the threshold is set to -10 dB and when the audio amplitude goes above it, say, -7 dB, the compressor will only allow a 1 dB increase from the threshold which is -9 dB.
If the audio peak hits, – 4db, it will allow only a 2db increase, which is, -8db.
In this way, the dynamic range of the audio is narrowed down.
Normalization vs Compression
| Normalization | Compression |
|---|---|
| Volume only adjustment. No dynamics applied. | It is an audio effect. Changes the dynamics. |
| The target value is set for the loudest part. | The threshold and Ratio are set for the loudest part. |
| The whole volume of the audio clip is adjusted to make the peak hit the target value. | Only that part of the audio is brought down, which crosses the defined threshold. Audio below the threshold won’t be touched. |
| The dynamic range remains the same after normalization. | The dynamic range of the audio clip is narrowed down after compression so that there is less difference between the loudest and quietest parts. |
You may also be interested in the below posts:
How to Split Audio Channels / Tracks in DaVinci Resolve (Explained!)