If you’re a beginner or newcomer to DaVinci Resolve (versions 18.5, 18, 17, etc.), then today’s guide on DaVinci Resolve’s built-in free effects – will take your video to the next level!
These are one of the best built-in effects in DaVinci Resolve for free:
- Old Film Effect
- Cartoon Effect
- Outline Effect
- Shake Effect
- Glow Effect
- Light Rays Effect
- DSLR Look Effect
- VHS Effect
Don’t worry about the endless hours needed to make your video look cool. (Because that’s already taken care of.)
First, I will explain the basics quickly and then jump right into the different effects – all free.
- Does DaVinci Resolve have Effects?
- Are the Effects Free in DaVinci Resolve?
- How to Access DaVinci Resolve's Effects Library?
- How to Add Effects to your Video or Image in DaVinci Resolve?
- How to Apply Effects to Multiple Clips in DaVinci Resolve?
- DaVinci Resolve Old Film Effect
- Cartoon / Comic Effect
- Outline Effect for Video/Image
- DaVinci Resolve Shake Effect
- Glow Effect in DaVinci Resolve
- Light Rays Effect in DaVinci Resolve
- DSLR Look in DaVinci Resolve
- VHS Effect in DaVinci Resolve
Does DaVinci Resolve have Effects?
DaVinci Resolve has a lot of built-in video and audio effects, and transitions like film damage, camera shake, watercolor, mirrors, blur, etc. These can be found under the “Effects” tab under different pages like “Edit“, “Cut“, “Fairlight”, etc.
With the help of these effects (as explained below), your video will look incredible and cinematic!
Are the Effects Free in DaVinci Resolve?
Most of the effects are free in DaVinci Resolve (as listed below). Although with the DaVinci Resolve’s free version, you can access all the effects, the ones requiring the paid (or Studio) version will display a huge watermark in your screen.
If you’re not ready to pay for the Studio version, you still have free workarounds – but be prepared to spend some extra effort.
How to Access DaVinci Resolve’s Effects Library?
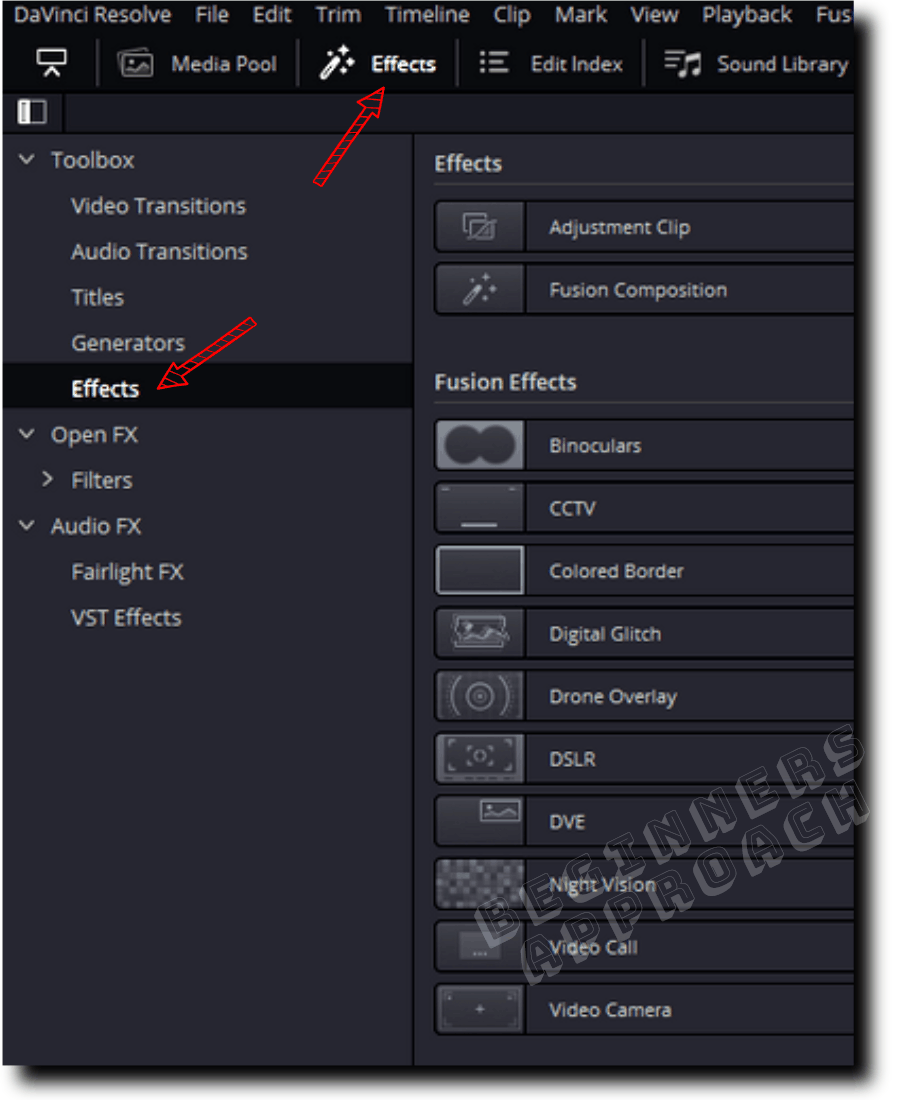
To access Resolve’s effects library, go to the “Edit” page (you can also go to the “Cut” page), click on the “Effects” tab from the top left corner (next to the “Media Pool”). The effects library consists of video/audio transitions, titles, generators, effects, Open FX, etc.
If you pay attention, you will notice “Effects” and “Open FX” are displayed in the “Effects” tab.
Clicking on “Effects” reveals different Fusion effects, which you can drag and drop over a clip in the timeline.
The below list displays you the free effects and the paid (Studio only) ones.
Full List of Built-in Free and Paid Fusion Effects for Use in the “Edit”/”Cut” Page
| Category | Effects | Free / Studio Only |
|---|---|---|
| Effects | Adjustment Clip | Free |
| Fusion Composition | Free | |
| Fusion Effects | Binoculars | Free |
| CCTV | Studio Only | |
| Colored Border | Free | |
| Digital Glitch | Free | |
| Drone Overlay | Studio Only | |
| DSLR | Free | |
| DVE | Free | |
| Night Vision | Free | |
| Video Call | Free | |
| Video Camera | Free |
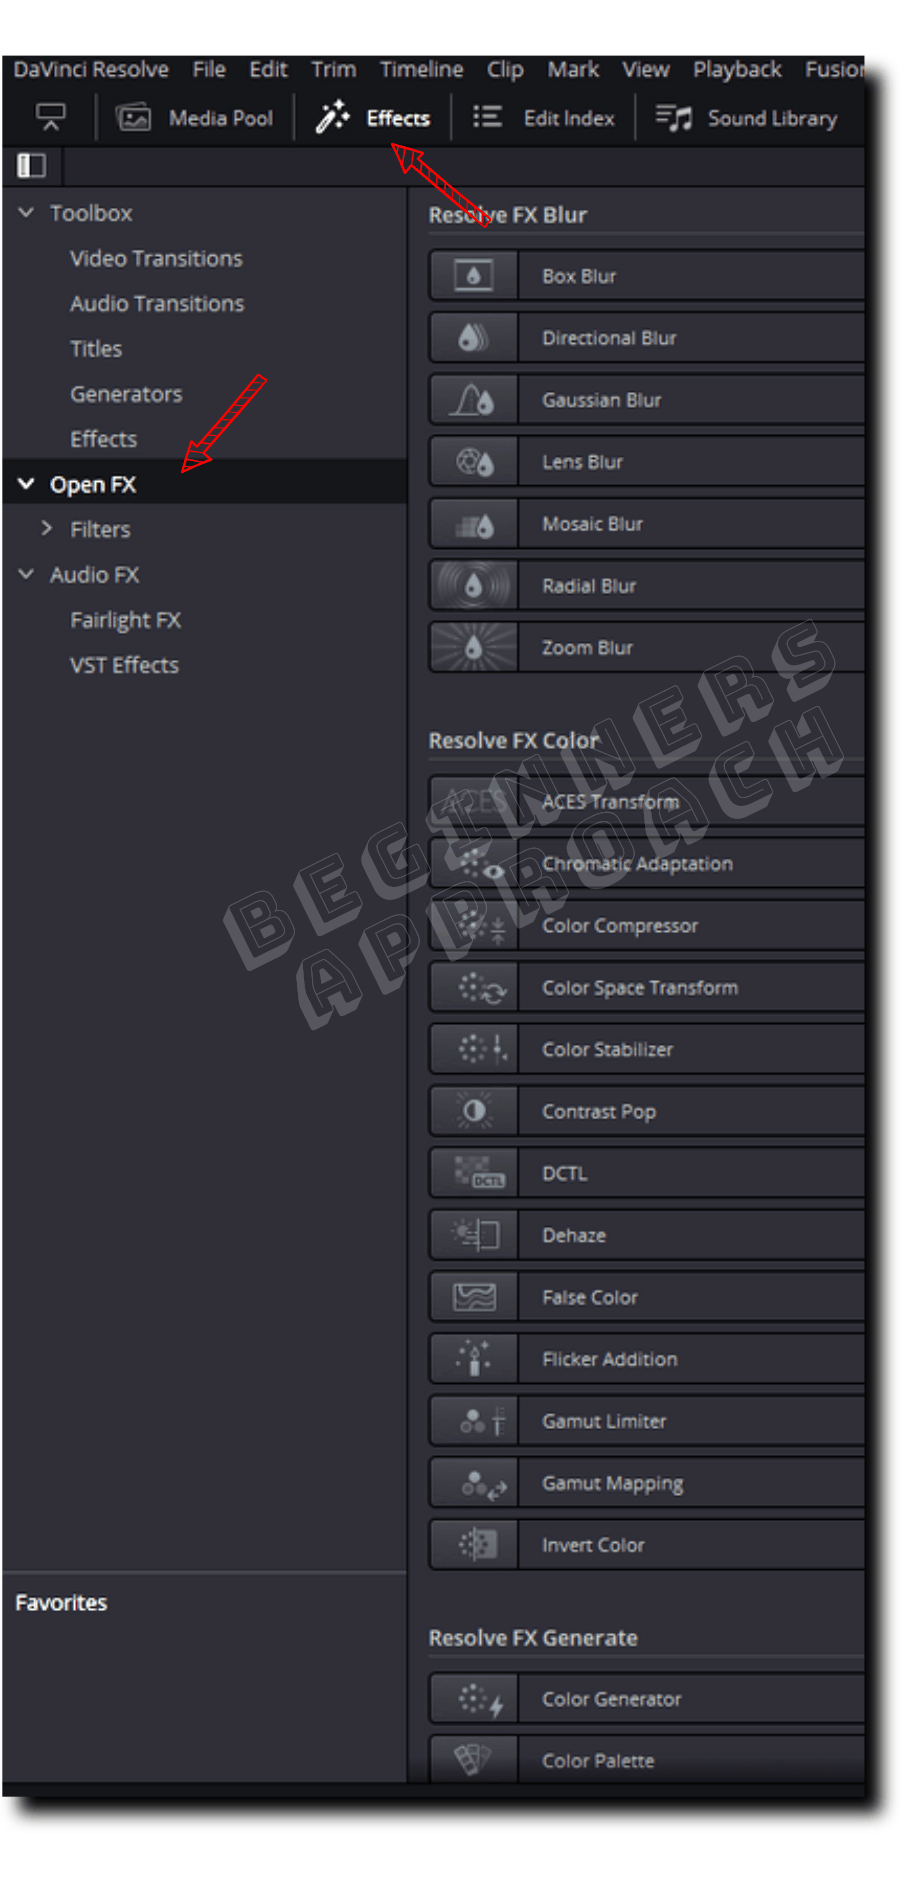
Similarly, clicking on the “Open FX” reveals the built-in Resolve’s Effects and any third-party effects you have installed in your system. Also, note that you can access the “Open FX” from the “Color” page as well.
Full List of Free and Paid Built-in “Open FX” Effects in DaVinci Resolve
There are 45 free built-in Open FX effects out of 76 (at the time of this writing).
The remaining 31 are Studio only (or paid version) effects.
So, with the free version, you get more than half of the effects for free.
| Category | Effects | Free / Studio Only |
|---|---|---|
| Resolve FX Blur | Box Blur | Free |
| Directional Blur | Free | |
| Gaussian Blur | Free | |
| Lens Blur | Studio Only | |
| Mosaic Blur | Free | |
| Radial Blur | Free | |
| Zoom Blur | Free | |
| Resolve FX Color | ACES Transform | Free |
| Chromatic Adaptation | Free | |
| Color Compressor | Free | |
| Color Space Transform | Free | |
| Color Stabilizer | Studio Only | |
| Contrast Pop | Studio Only | |
| DCTL | Studio Only | |
| Dehaze | Studio Only | |
| False Color | Studio Only | |
| Flicker Addition | Free | |
| Gamut Limiter | Free | |
| Gamut Mapping | Free | |
| Invert Color | Free | |
| Resolve FX Generate | Color Generator | Free |
| Color Palette | Free | |
| Grid | Free | |
| Resolve FX Key | 3D Keyer | Free |
| Alpha Matte Shrink and Glow | Free | |
| HSL Keyer | Free | |
| Luma Keyer | Free | |
| Resolve FX Light | Aperture Diffraction | Studio Only |
| Glow | Free | |
| Halation | Studio Only | |
| Lens Flare | Studio Only | |
| Lens Reflections | Studio Only | |
| Light Rays | Free | |
| Resolve FX Refine | Beauty | Studio Only |
| Resolve FX Revival | Automatic Dirt Removal | Studio Only |
| Chromatic Aberration Removal | Studio Only | |
| Dead Pixel Fixer | Free | |
| Deband | Free | |
| Deflicker | Studio Only | |
| Frame Replacer | Studio Only | |
| Noise Reduction | Studio Only | |
| Patch Replacer | Studio Only | |
| Resolve FX Sharpen | Sharpen | Studio Only |
| Sharpen Edges | Studio Only | |
| Soften & Sharpen | Studio Only | |
| Resolve FX Stylize | Abstraction | Free |
| Blanking Fill | Free | |
| Drop Shadow | Free | |
| Edge Detect | Free | |
| Emboss | Free | |
| Mirrors | Free | |
| Pencil Sketch | Studio Only | |
| Prism Blur | Free | |
| Scanlines | Free | |
| Stylize | Studio Only | |
| Tilt-Shift Blur | Studio Only | |
| Vignette | Free | |
| Water Color | Free | |
| Resolve FX Temporal | Motion Blur | Studio Only |
| Motion Trails | Studio Only | |
| Smear | Studio Only | |
| Stop Motion | Free | |
| Resolve FX Texture | Analog Damage | Studio Only |
| Film Damage | Free | |
| Film Grain | Studio Only | |
| Jpeg Damage | Free | |
| Texture Pop | Studio Only | |
| Resolve FX Transform | Camera Shake | Free |
| Transform | Free | |
| Video Collage | Free | |
| Resolve FX Warp | Dent | Free |
| Lens Distortion | Studio Only | |
| Ripples | Free | |
| Vortex | Free | |
| Warper | Studio Only | |
| Waviness | Free |
Difference Between the “Effects” and “Open FX” in DaVinci Resolve
“Effects” mainly contains the adjustment clip and Fusion effects. After dragging and dropping these effects over the clip in the timeline, you can access the settings by going to the “Inspector” tab > “Effects” > “Fusion”.
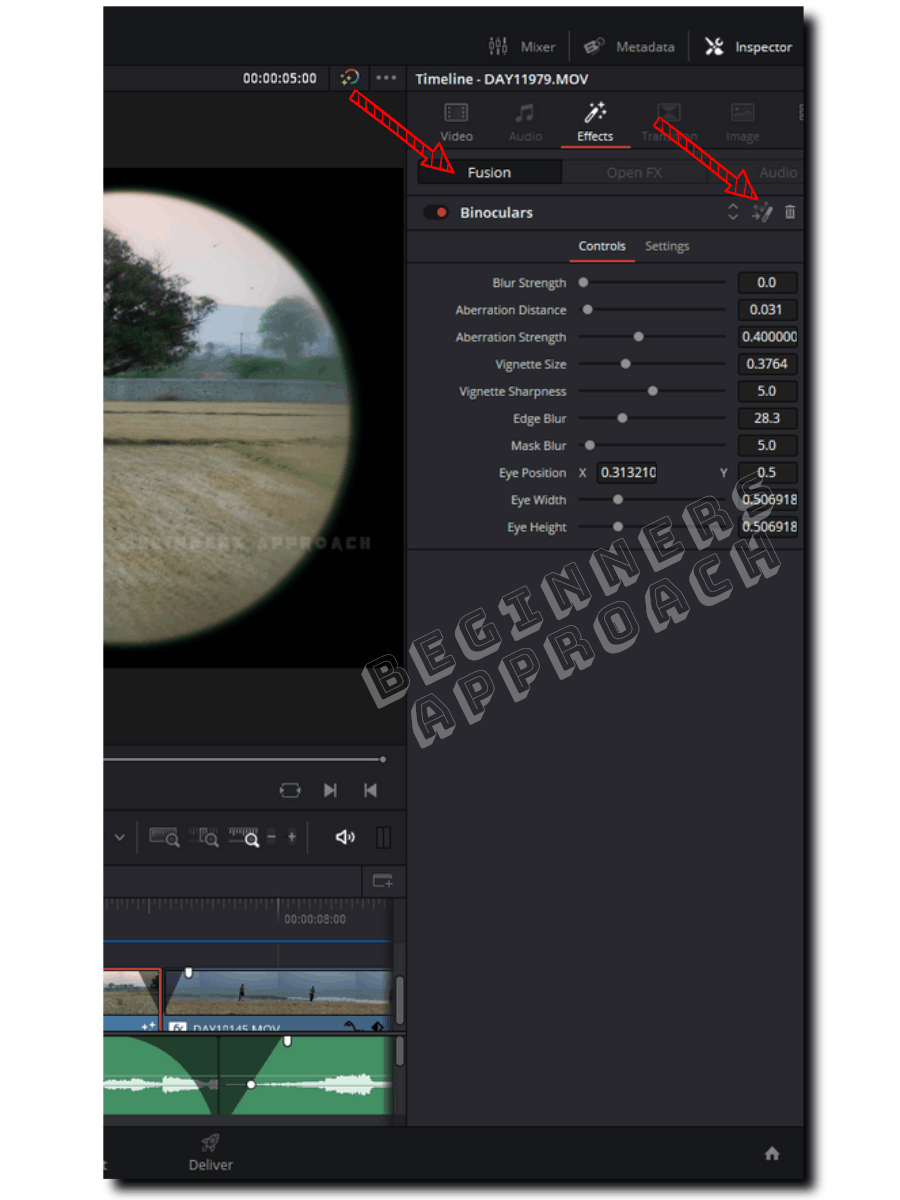
When you click on the fusion icon (as pointed by the second arrow in the image above), it will take you directly to the “Fusion” page for advanced tweaking.
On the other hand, you can access the Open FX settings inside the “Open FX” tab, which is found next to the “Fusion” tab in the “Inspector” window.
Now that you know the different effects (free and paid ones), let’s move on to the next important thing.
How to Add Effects to your Video or Image in DaVinci Resolve?
To add effects to your video (or image), click on the “Effects” tab inside the “Edit” page, locate your required effect, let’s say, “Binocular”, drag and drop it over your video clip in the timeline. That’s it. The effect is instantly applied.
You can further tweak the settings by first clicking on the video clip from the timeline and then going to the “Inspector” tab > “Effects”.
How to Apply Effects to Multiple Clips in DaVinci Resolve?
- Go to the “Edit” page.
- First drag and drop any effect, let’s say, “DSLR” from the “Effects” Library on a single clip in the timeline.
- Tweak the settings to your taste from the “Inspector” tab > “Effects” > “Fusion“.
- Click on the clip in the timeline and copy the settings by pressing “Ctrl + c” (or “Cmd + c”).
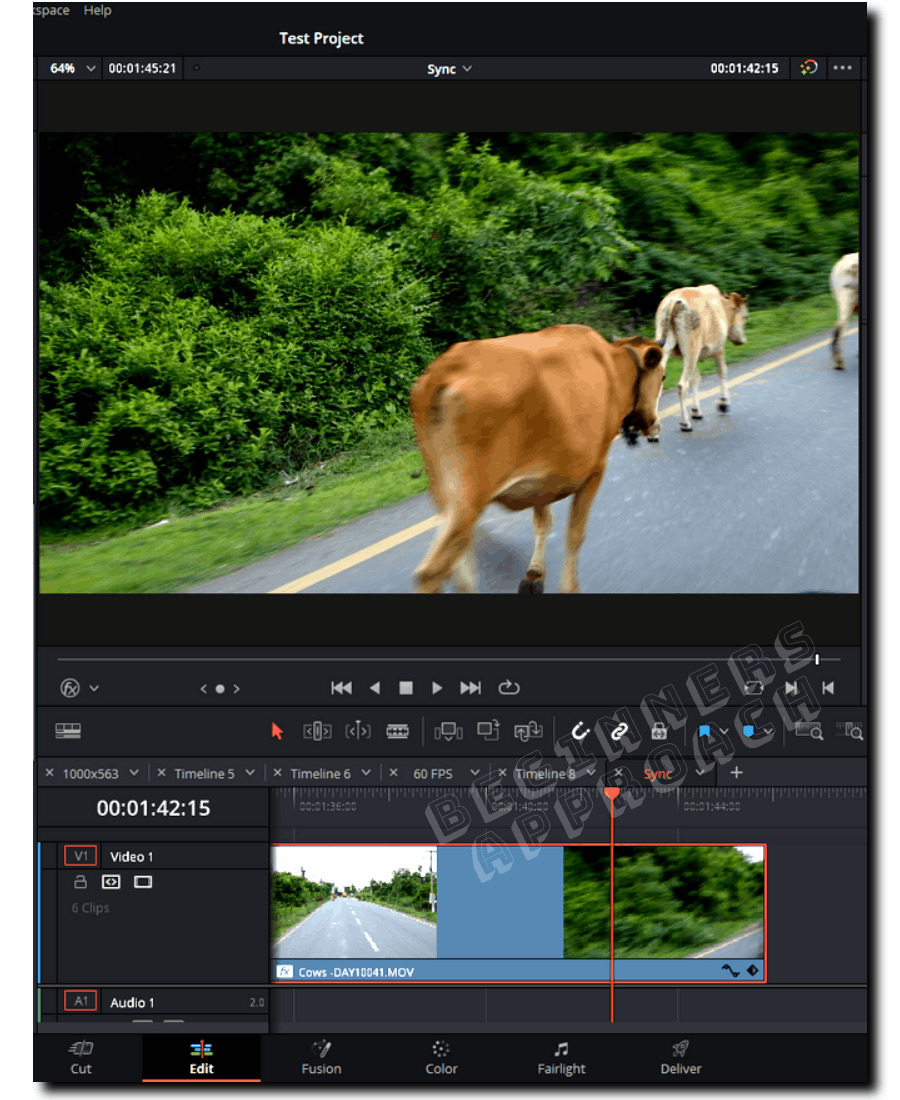
- Then select all the required clips either by ctrl+clicking them or drawing a box around them.
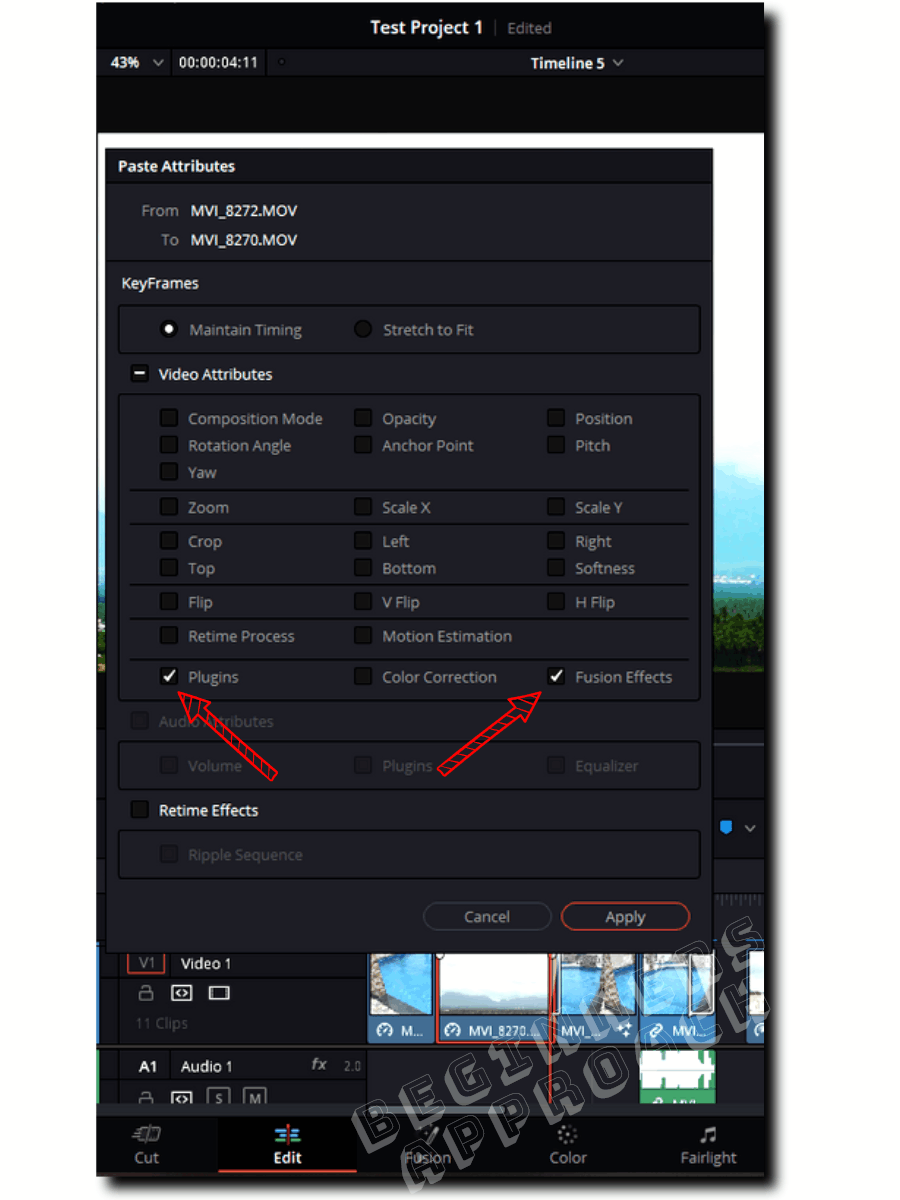
- Press “Alt + v” (or right click and click on “Paste Attributes”).
- Check “Plugins” checkbox for selecting Resolve FX effects and “Fusion Effects” checkbox for selecting, well, fusion effects (self-explanatory).
- Click on “Apply“. The effects are now applied to multiple or all of the selected clips.
- You can still go to the individual clip and tweak it’s “Inspector” settings to achieve your desired look.
The following section will list different effects that you can achieve for free within Resolve.
DaVinci Resolve Old Film Effect
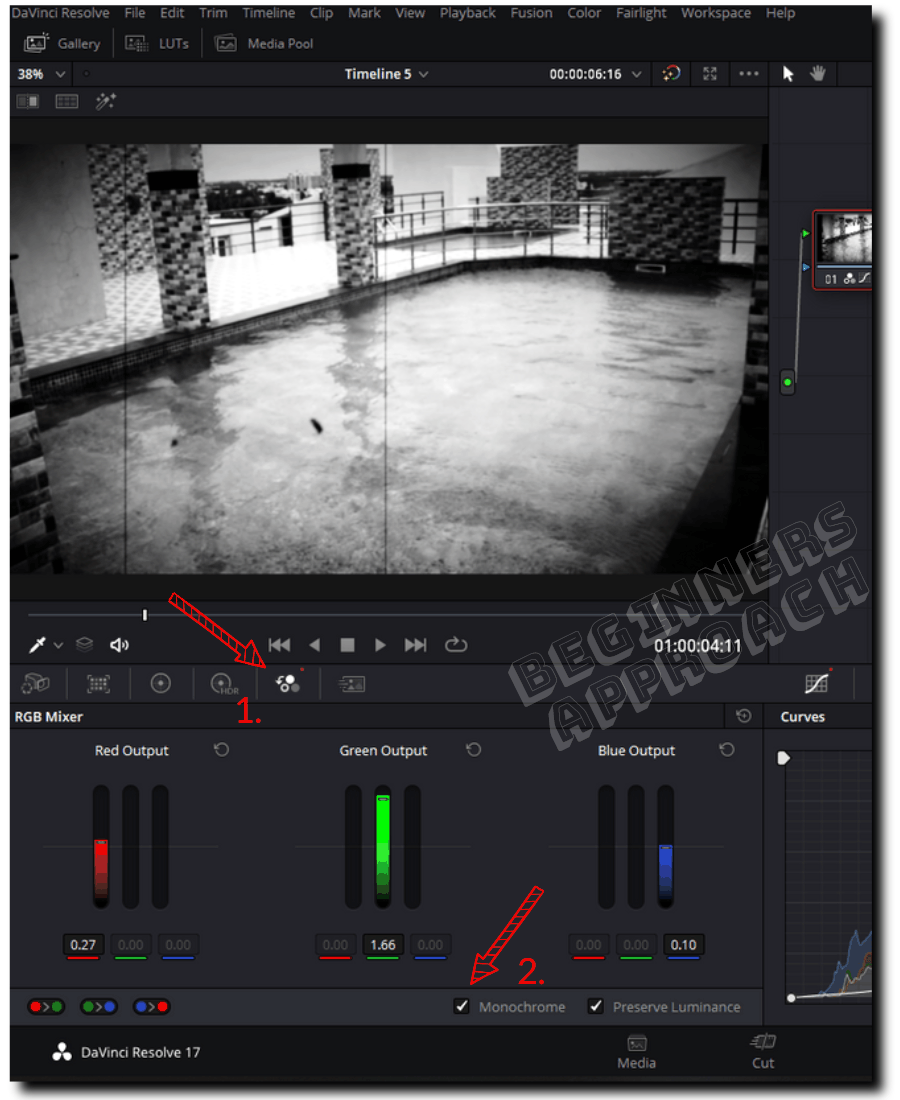
To make your video look old and vintage, on the “Edit” page, add the Resolve’s built-in effect called “Film Damage” found under the “Resolve FX Texture” from the “Effects” Library to your video in the timeline.
To make it look really old, you can make it black and white and skip a few frames.
Read “DaVinci Resolve Old Film Effect (How to Do Under 2 mins!)” for a detailed step-by-step tutorial.
Before:
After:
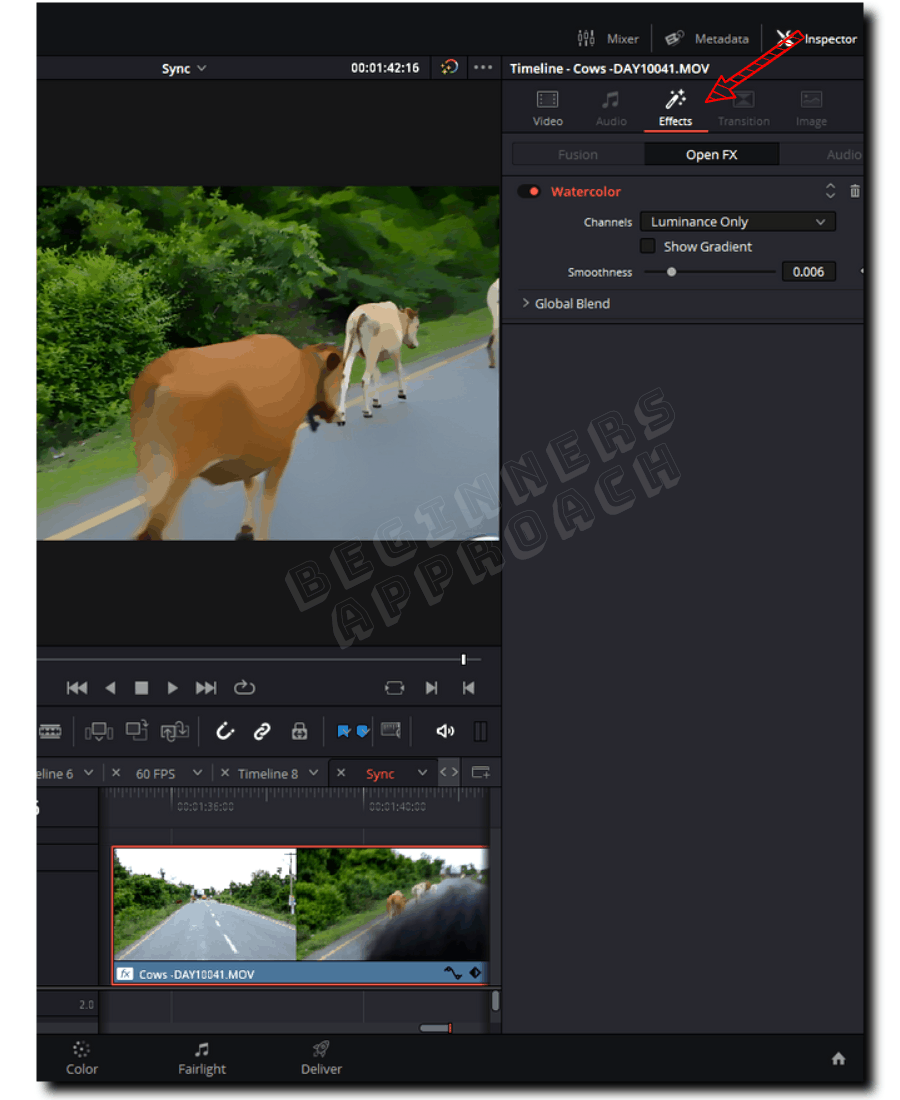
Cartoon / Comic Effect
To make your footage mimic the look of a cartoon, you can make use of “Watercolor” and “Abstraction” effects found under ” Resolve FX Stylize ” in the “Effects” tab.
After adding the effects, go to the “Inspector” tab for further tweaking.
Read “Cartoon / Comic Effect in DaVinci Resolve“, for a detailed step-by-step tutorial.
Before:
After:
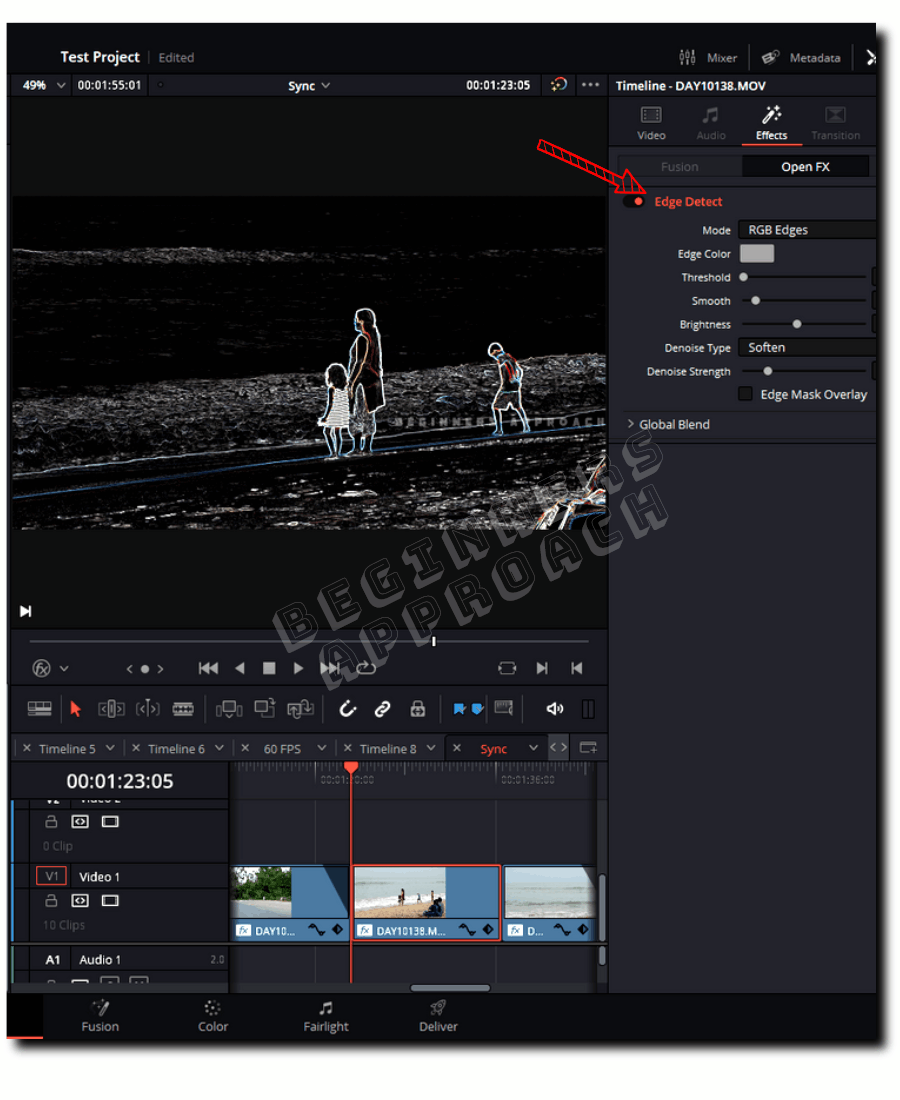
Outline Effect for Video/Image
To create an outline-only effect, you can use “Edge Detect” found under “Open FX” > “Resolve FX Stylize”.
If you want to do the following:
- Outline only, or
- Actual video with an edge or outline, or
- Actual image with an edge or outline
Then read “DaVinci Resolve Outline Effect for Video/Image (Free & Fast)” for a detailed step-by-step video tutorial.
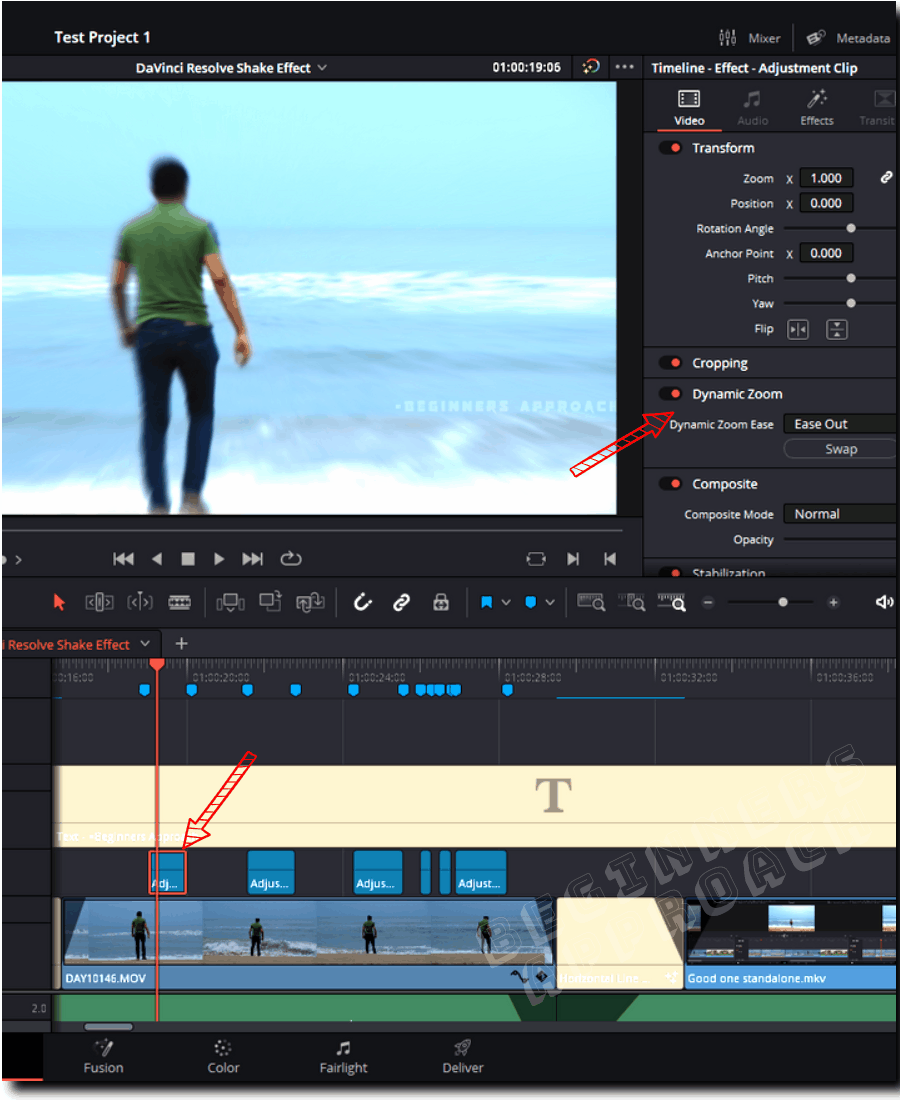
DaVinci Resolve Shake Effect
You can use the built-in “Camera Shake” effect for the desired shake. On top of the Camera Shake effect, you can also use “Zoom Blur” and “Dynamic Zoom” for bass effects.
Read “Shake Effect in DaVinci Resolve Free Version” for video and step-by-step tutorial.
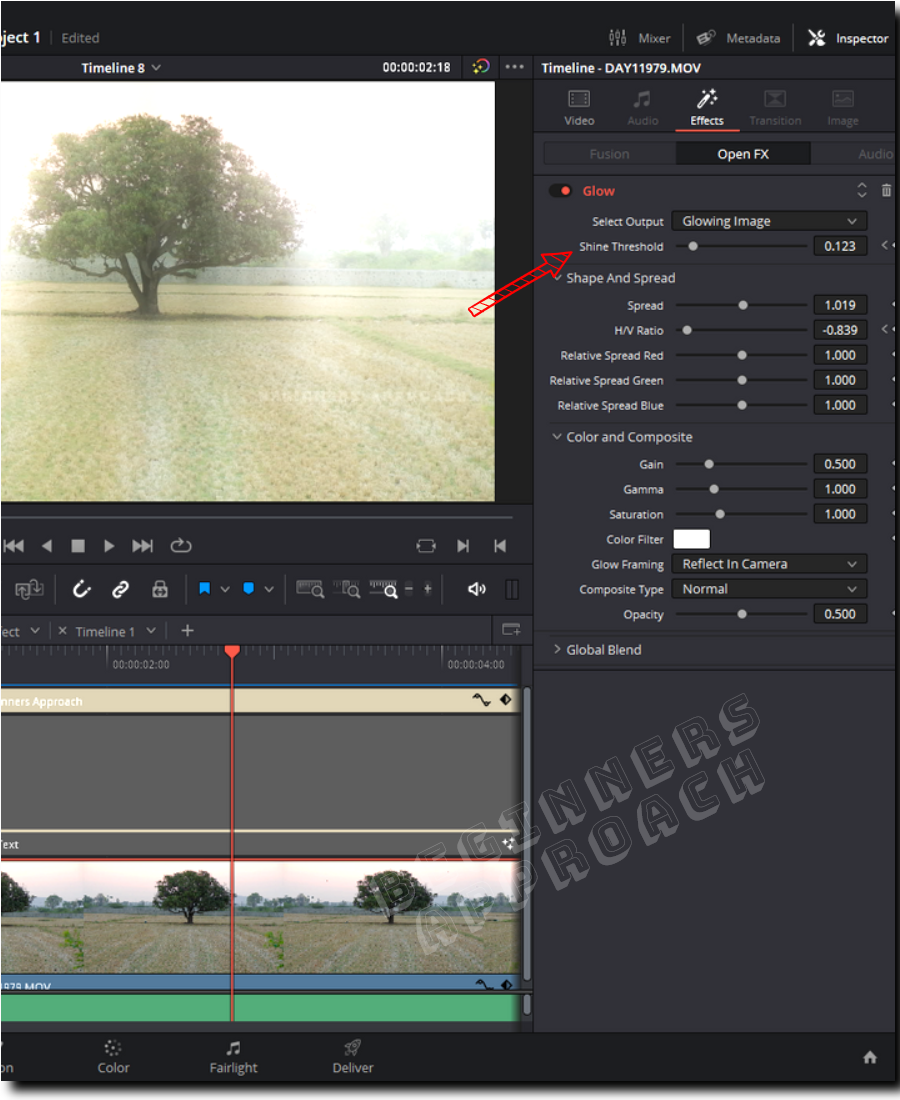
Glow Effect in DaVinci Resolve
You can make your object shine and sparkle with the built-in “Glow” effect, found under “Open FX” > “Resolve FX Light”.
This effect can make your footage look dreamy or give an ethereal look of illusion.
Read “Quick DaVinci Resolve Glow Effect under 1 min (No Fusion!)” for a step-by-step tutorial that also includes a video on how I implement this effect.
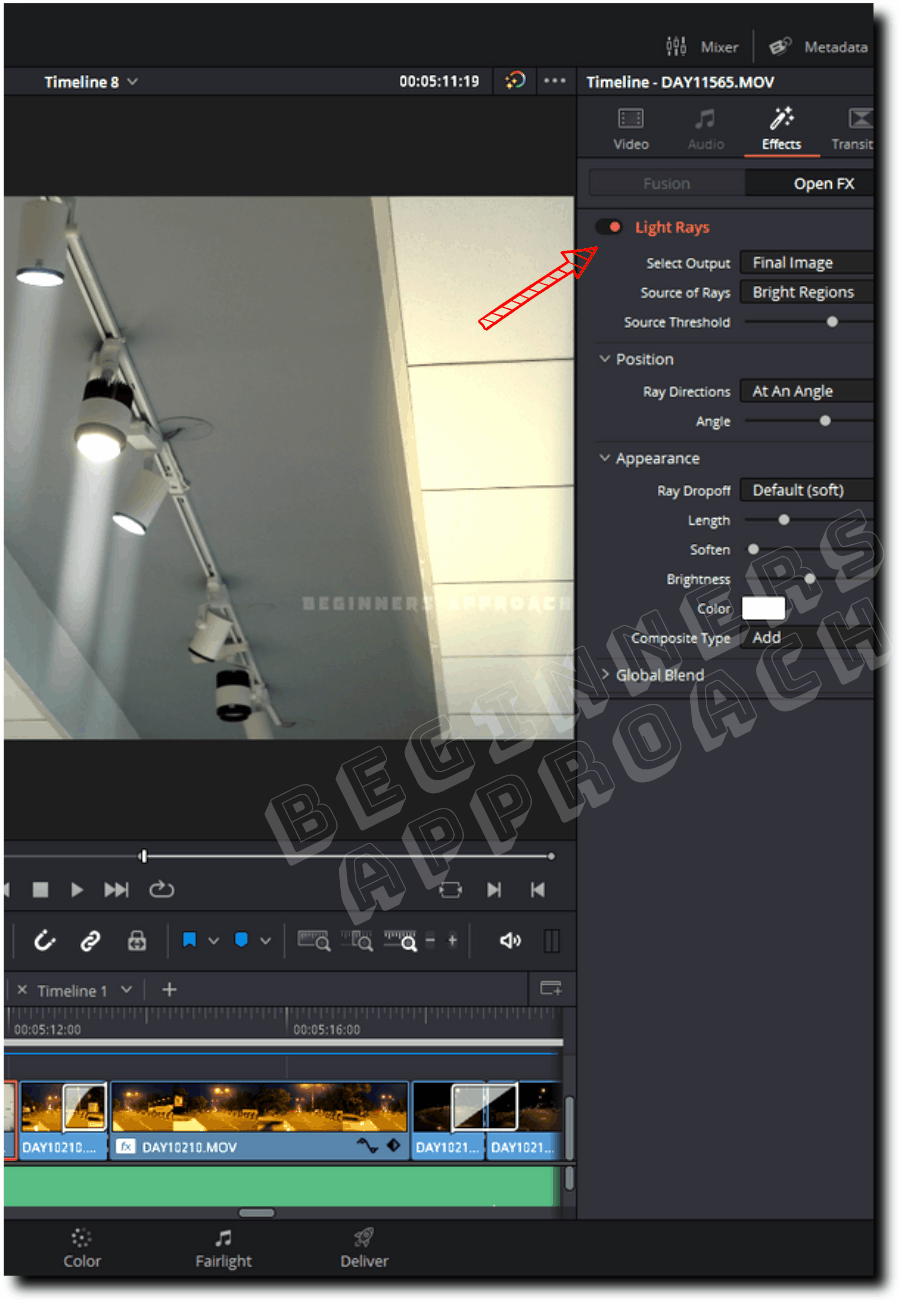
Light Rays Effect in DaVinci Resolve
With the help of the “Light Rays” effect found under “Open FX” > “Resolve FX Light”, you can create beautiful light rays for light sources in your footage – like sun, artificial lights, etc.
You can further tweak it to exclude certain light sources from your footage and affect only the required sources.
On top of that, you can also track your light sources.
Read “Quick Light Rays Effect in Free DaVinci Resolve (+ Video)” for a detailed step-by-step explanation to achieve the look.
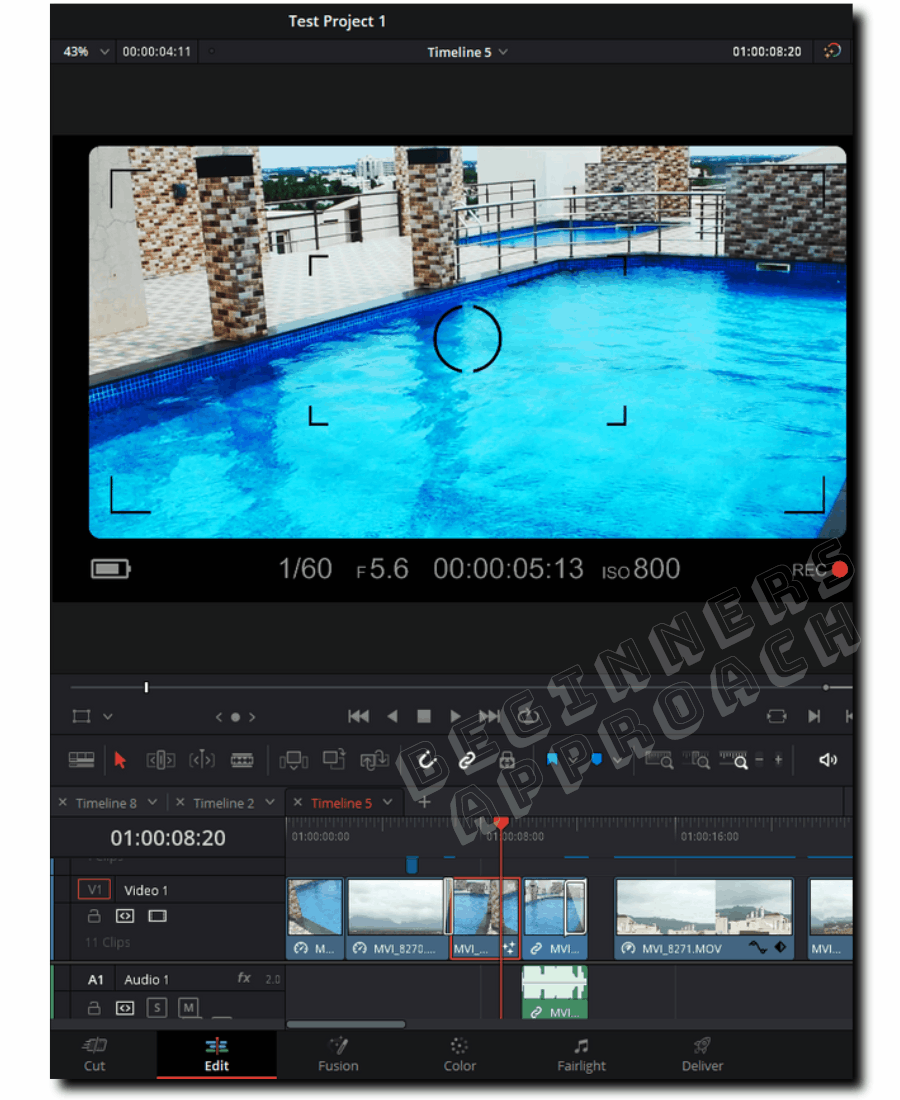
DSLR Look in DaVinci Resolve
To achieve a DSLR or mirrorless camera look with different onscreen settings like ISO, REC, F stop numbers, etc, you can use the “DSLR” effect found under “Effects” > “Fusion Effects” (not Resolve FX).
You can further tweak the settings from the “Inspector” tab > “Effects” > “Fusion” to get your desired look.
VHS Effect in DaVinci Resolve
To achieve a VHS look that contains glitches, noise, scan lines, etc., the Studio only (paid )version has an effect called “Analog Damage”.
But the free version doesn’t have this effect. So you need to perform a few more steps to achieve the same look – all free, though!
Read “VHS Effect in DaVinci Resolve Free Version (Quick Tutorial)” for a detailed step-by-step tutorial with resources containing VHS overlays and other steps.
Before:
After:
