What is Blackmagic Proxy Generator?
The Blackmagic Proxy Generator is a separate free app shipped along with DaVinci Resolve 18. It automatically generates proxy media and runs in the background. This frees up Resolve for your editing work while still generating proxies parallelly.
Generating proxy files is necessary for collaboration and achieving real-time smooth playback in DaVinci Resolve.
Blackmagic proxy generator app doesn’t require a separate download. It is shipped with DaVinci Resolve automatically.
To generate proxies using the proxy generator, launch the app, then click on the “Add” button and choose the location that contains your original source files. Then select the required “Proxy Format”, say, “H.264 8 bit 4:2:0 Half Res”. Hit “Start”. The proxy generation starts.
You should know 3 main important settings in the Proxy Generator app = Proxy format, Proxy Generator Watch Folders, and Extract Proxies. (More on that below).
To link proxies generated by the Blackmagic Proxy Generator app inside DaVinci Resolve, navigate to the “Edit” page > “Media Pool”. Right-click on the required clips. Select “Relink Proxy Media”. Choose the location of the generated proxies. Then enable the “Playback” > “Proxy Handling” > “Prefer Proxies”.
Click here to learn more about the proxy feature in DaVinci Resolve.
How to Download and Install Blackmagic Proxy Generator?
Downloading and installing the DaVinci Resolve 18 application should automatically download and install the Blackmagic proxy generator app. You don’t have to download it separately or go to the Play Store. You can access it in Windows by going to “Start” > “Blackmagic Design” > “Blackmagic Proxy Generator Lite”.

The above image shows the location of the Blackmagic Proxy Generator Lite app in Windows.
How to Generate Proxies Using BlackMagic Proxy Generator App?
- Launch the proxy generator app = “Start” > “Blackmagic Design” > “Blackmagic Proxy Generator Lite”
- Click on the “Add” button and choose the location which contains your original source files.
- Select the “Proxy Format“, let’s say, “H.264 8 bit 4:2:0 Half Res“.
- Click on “Start“. The proxy generation starts.
- After some time, based on the number of files, the status will change to “Completed“.
- Until you click on the “Stop” button, the proxy generator will actively look for source files for generating proxies.
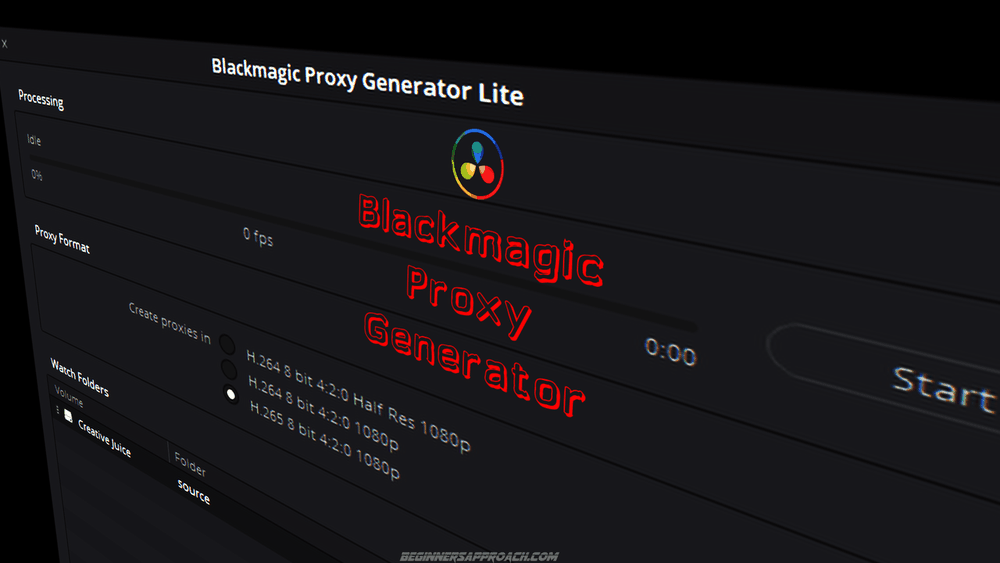
- The below image shows the “Proxy Format” settings in the proxy app.

(You can simultaneously launch both the Resolve and proxy generator app. They both are independent.)
The proxy media is generated and placed in a folder named “Proxy”, along with the original source media file.
The proxy generation inside Resolve will not allow you to work till the proxies are created, whereas the proxy generator app generates proxies in the background. (As already mentioned above, you’ll have to click on the “Start” button for an automatic proxy generation.)
The Proxy Generator app is helpful when you have a large number of files that need proxies.
(Note that at the time of this writing, we don’t have the option of editor-friendly codecs in Windows like DNxHR, although the Mac has ProRes.)
Blackmagic Proxy Generator Free Version – Important Settings
#1) Proxy Format
The below table shows 3 proxy format settings.
| Windows |
|---|
| H.264 8 bit 4:2:0 Half Res 1080p |
| H.264 8 bit 4:2:0 1080p |
| H.265 8 bit 4:2:0 Half Res 1080p |
You can choose any of the above formats for generating proxies (this is for Windows).
However, if you don’t find the required format, then you can generate the required proxy format inside Resolve. Please click on the below post for a detailed guide on the DaVinci Resolve proxy:
Pro Tip
When you click on the different proxy formats, the proxy generator app displays the size of the proxy file.

#2) Proxy Generator Watch Folders
Watch folders are the folders in your computer where you place the source files for generating proxies. The DaVinci Resolve Generator app will automatically look for files inside this watch folder and generate proxies in the background.
Click on “Add” to add multiple watch folders based on your requirements.
Ensure the Watch Folder has enough space to accommodate both the original source files and their proxies.
#3) Proxy Generator Extract Proxies
The “Extract Proxies” feature copies all proxy files from the selected watch folders to a new folder location. This copies only the proxies, which is helpful in sharing over the internet or with other computers.

- Click on the “Extract Proxies” button.
- Select a destination folder.
- Click on “Select”.
- The Proxy Generator app will extract only the proxies to the required destination.
The most important thing is to make sure you’re able to work with the generated proxies inside Resolve.
If your media has a proxy counterpart, then it will display the proxy icon, as discussed below.
How to Link Proxies from the Proxy Generator App in Resolve?
- Launch DaVinci Resolve.
- Go to the “Edit” page > “Media Pool”.
- Right-click on the required clips.
- Select “Relink Proxy Media”.
- Choose the location of the generated proxies by the Blackmagic Proxy Generator lite app.
- Click on “Open”.
- Then go to the menu “Playback” > “Proxy Handling” > “Prefer Proxies”
- This will display a proxy icon on the lower left-hand side of the clip in the media pool or timeline.
- Done!
After you’re done with the editing, you can go ahead and export – DaVinci Resolve will automatically export the original resolution.
Make sure you check the below before exporting:
Go to the “Deliver” page > “Render Settings” > “Advanced Settings”, and ensure the “Use Proxy Media” checkbox is unchecked.
When I press Stop on half way of processing and then Starting again, it will start from beginning?how I can make pause of process?
thank you